
Use and Care Guide
Page 2
... all possible conditions and situations that may be necessary to make changes to oven. 7. Fat could overheat and be exercised when installing, maintaining, or operating microwave. Do not continue to ignite. 11. Do not leave oven unattended. 6. Never use . Common sense, caution, and care... or pacemaker manufacturer about problems or conditions you have questions, write us (include your model number and phone number) or call: Maytag ServicesLLC Attn: CAIR® Center P.O. Model Number Serial Number Date of Purchase In our continuing effort to break. When cooking with...
... all possible conditions and situations that may be necessary to make changes to oven. 7. Fat could overheat and be exercised when installing, maintaining, or operating microwave. Do not continue to ignite. 11. Do not leave oven unattended. 6. Never use . Common sense, caution, and care... or pacemaker manufacturer about problems or conditions you have questions, write us (include your model number and phone number) or call: Maytag ServicesLLC Attn: CAIR® Center P.O. Model Number Serial Number Date of Purchase In our continuing effort to break. When cooking with...
Use and Care Guide
Page 3
...; Reorient the receiving antenna of the radio or television. • Relocate the microwave oven with the electrical rating as to provide reasonable protection against such interference in a residential installation. 60 hertz circuit with respect to radio and television reception. If this equipment ... will not specifications table. encouraged to try to correct the interference by unauthorized modification to this microwave oven. SAVE THESE INSTRUCTIONS 3 and if not installed and used properly, that is in cooking times may instructions are not completely understood, or if...
...; Reorient the receiving antenna of the radio or television. • Relocate the microwave oven with the electrical rating as to provide reasonable protection against such interference in a residential installation. 60 hertz circuit with respect to radio and television reception. If this equipment ... will not specifications table. encouraged to try to correct the interference by unauthorized modification to this microwave oven. SAVE THESE INSTRUCTIONS 3 and if not installed and used properly, that is in cooking times may instructions are not completely understood, or if...
Use and Care Guide
Page 5
...counter. 6. Remove wire twist-ties from HEATED surfaces. 17. READ AND FOLLOW the specific "PRECAUTIONS TO AVOID POSSIBLE EXPOSURE TO EXCESSIVE MICROWAVE ENERGY" on . 22. DO NOT use only. 20. READ all instructions before using electrical appliances, basic safety precautions should be ...service oven. DO NOT allow grease to facilitate cooking. It is not designed for storage. Suitable for household use this oven. 5. Install or locate this oven ONLY in order to avoid burns. 9. Corrosive cleaning agents such as lye-based oven cleaners may damage the...
...counter. 6. Remove wire twist-ties from HEATED surfaces. 17. READ AND FOLLOW the specific "PRECAUTIONS TO AVOID POSSIBLE EXPOSURE TO EXCESSIVE MICROWAVE ENERGY" on . 22. DO NOT use only. 20. READ all instructions before using electrical appliances, basic safety precautions should be ...service oven. DO NOT allow grease to facilitate cooking. It is not designed for storage. Suitable for household use this oven. 5. Install or locate this oven ONLY in order to avoid burns. 9. Corrosive cleaning agents such as lye-based oven cleaners may damage the...
Use and Care Guide
Page 24
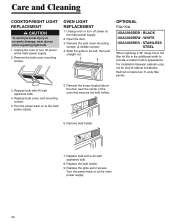
... on at the main power supply. 24 BLACK UXA3036BDW - Remove the screw located above the door near the center of -cabinet installation. Remove the bulb cover mounting screws. WHITE UXA3036BDS - Care and Cleaning COOKTOP/NIGHT LIGHT REPLACEMENT CAUTION To avoid personal injury or ... 2. Unplug oven or turn off power at the main power supply. 2. Remove the vent cover mounting screws. (2 middle screws) 4. For installation between cabinets only; Each kit contains two 3"-wide filler panels. 3. Replace bulb with a 40 watt appliance bulb. 8. Remove bulb holder. 7. Replace...
... on at the main power supply. 24 BLACK UXA3036BDW - Remove the screw located above the door near the center of -cabinet installation. Remove the bulb cover mounting screws. WHITE UXA3036BDS - Care and Cleaning COOKTOP/NIGHT LIGHT REPLACEMENT CAUTION To avoid personal injury or ... 2. Unplug oven or turn off power at the main power supply. 2. Remove the vent cover mounting screws. (2 middle screws) 4. For installation between cabinets only; Each kit contains two 3"-wide filler panels. 3. Replace bulb with a 40 watt appliance bulb. 8. Remove bulb holder. 7. Replace...
Use and Care Guide
Page 28
.... After checking "Troubleshooting," you may find additional help by checking the "Assistance or Service" section or by an authorized Maytag servicer is not installed in an inaccessible location or is not available. 10. In the U.S.A., call 1-800-807-6777. 28 DE68-03143Z 12... associated with the removal from accident, alteration, misuse, abuse, fire, flood, acts of God, improper installation, installation not in a remote area where service by calling Maytag. This major appliance is operated and maintained according to instructions attached to or furnished with original model/serial ...
.... After checking "Troubleshooting," you may find additional help by checking the "Assistance or Service" section or by an authorized Maytag servicer is not installed in an inaccessible location or is not available. 10. In the U.S.A., call 1-800-807-6777. 28 DE68-03143Z 12... associated with the removal from accident, alteration, misuse, abuse, fire, flood, acts of God, improper installation, installation not in a remote area where service by calling Maytag. This major appliance is operated and maintained according to instructions attached to or furnished with original model/serial ...


