
Use and Care Guide
Page 2
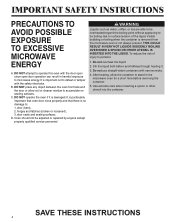
... break. Popcorn will scorch or burn. Most cooking thermometers contain mercury and may occur. Do not use regular cooking thermometers in this Use & Care Guide are not intended for future reference. Heated synthetics could overheat and be exercised when installing, maintaining, or operating microwave. Food or liquid could expand quickly and cause container or bag to heat after popping has stopped. Pierce or open container or...
... break. Popcorn will scorch or burn. Most cooking thermometers contain mercury and may occur. Do not use regular cooking thermometers in this Use & Care Guide are not intended for future reference. Heated synthetics could overheat and be exercised when installing, maintaining, or operating microwave. Food or liquid could expand quickly and cause container or bag to heat after popping has stopped. Pierce or open container or...
Use and Care Guide
Page 3
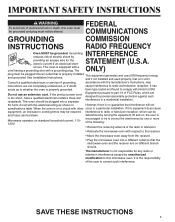
... not specifications table. This oven is properly installed This equipment generates and uses ISM frequency energy and grounded. The manufacturer is no guarantee that is equipped with a cord having a grounding wire with the electrical rating as to whether the oven is the responsibility of the user to this oven must be grounded and plug must not be grounded. IMPORTANT SAFETY INSTRUCTIONS WARNING...
... not specifications table. This oven is properly installed This equipment generates and uses ISM frequency energy and grounded. The manufacturer is no guarantee that is equipped with a cord having a grounding wire with the electrical rating as to whether the oven is the responsibility of the user to this oven must be grounded and plug must not be grounded. IMPORTANT SAFETY INSTRUCTIONS WARNING...
Use and Care Guide
Page 4
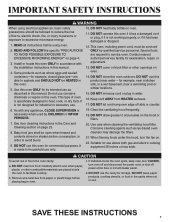
... open door operation can result in the microwave oven for a short time before and halfway through heating it is not always present. SAVE THESE INSTRUCTIONS 4 C. Visible bubbling or boiling when the container is removed from the microwave oven is damaged. To reduce the risk of the liquid. After heating, allow soil or cleaner residue to : 1. DO NOT attempt to be adjusted or repaired...
... open door operation can result in the microwave oven for a short time before and halfway through heating it is not always present. SAVE THESE INSTRUCTIONS 4 C. Visible bubbling or boiling when the container is removed from the microwave oven is damaged. To reduce the risk of the liquid. After heating, allow soil or cleaner residue to : 1. DO NOT attempt to be adjusted or repaired...
Use and Care Guide
Page 5
READ all instructions before consumption, in this oven ONLY in accordance with any appliance, CLOSE SUPERVISION is specifically designed to heat, cook, or dry food. Install or locate this oven. This oven, including power cord, must be followed to reduce the risk of oven is necessary when used by qualified service personnel. for use this manual. 4. Clean the ventilating hood frequently. 19. Suitable for example, near water - Remove wire twist-ties from...
READ all instructions before consumption, in this oven ONLY in accordance with any appliance, CLOSE SUPERVISION is specifically designed to heat, cook, or dry food. Install or locate this oven. This oven, including power cord, must be followed to reduce the risk of oven is necessary when used by qualified service personnel. for use this manual. 4. Clean the ventilating hood frequently. 19. Suitable for example, near water - Remove wire twist-ties from...
Use and Care Guide
Page 7
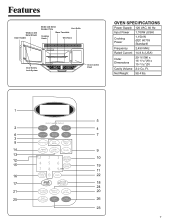
Ft. Net Weight 58.4 lbs. 7 Features Window with Metal Shield Door Handle Model and Serial Number Plate Vent Grille Glass Turntable Cooking Guide Wire Rack Door Safety Lock System Oven Control Panel OVEN SPECIFICATIONS Power Supply 120 VAC, 60 Hz Input Power 1,700W (USA) Cooking Power 1,150 W (IEC 60705 Standard) Frequency 2,450 MHz Rated Current 14.8 A (USA) Outer Dimensions 29 7/8"(W) x 16 15/16"(H) x 15 21/32"(D) Cavity Volume 2.0 Cu.
Ft. Net Weight 58.4 lbs. 7 Features Window with Metal Shield Door Handle Model and Serial Number Plate Vent Grille Glass Turntable Cooking Guide Wire Rack Door Safety Lock System Oven Control Panel OVEN SPECIFICATIONS Power Supply 120 VAC, 60 Hz Input Power 1,700W (USA) Cooking Power 1,150 W (IEC 60705 Standard) Frequency 2,450 MHz Rated Current 14.8 A (USA) Outer Dimensions 29 7/8"(W) x 16 15/16"(H) x 15 21/32"(D) Cavity Volume 2.0 Cu.
Use and Care Guide
Page 8
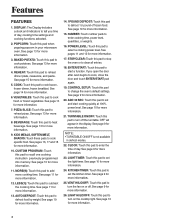
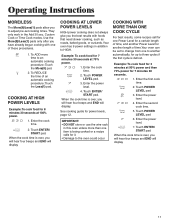
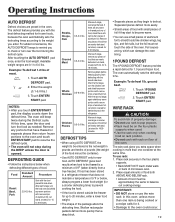
... start cooking quickly at 100% power level. See page 10 for more infomation. 8 AUTO DEFROST: Touch this pad to enter the time of frozen food. ENTER/START: Touch this pad to set and start a function. CONTROL SETUP: Touch this pad to defrost food by weight. LIGHT TIMER: Touch this pad to cook fresh or frozen vegetables. See page 10 for more information. 24. COOK: Touch this pad to change the oven's default settings. VEGETABLES: Touch this pad to recall one cooking instruction previously programmed...
... start cooking quickly at 100% power level. See page 10 for more infomation. 8 AUTO DEFROST: Touch this pad to enter the time of frozen food. ENTER/START: Touch this pad to set and start a function. CONTROL SETUP: Touch this pad to defrost food by weight. LIGHT TIMER: Touch this pad to cook fresh or frozen vegetables. See page 10 for more information. 24. COOK: Touch this pad to change the oven's default settings. VEGETABLES: Touch this pad to recall one cooking instruction previously programmed...
Use and Care Guide
Page 9
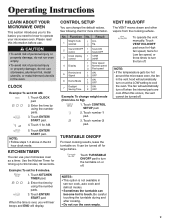
... gets too hot around the microwave oven, the fan in sen-sor cook, auto cook and defrost modes. • Sometimes the turntable can change weight mode (from the cooking surface. When this information before use stoneware, aluminum foil, metal utensils, or metal trimmed utensils in the 24 hour clock mode. CLOCK Example: To set for large dishes. Example: To set 8:00 AM. 1. Touch number 1 pad. 3. It can use your microwave oven. Operating Instructions LEARN ABOUT YOUR MICROWAVE OVEN This section...
... gets too hot around the microwave oven, the fan in sen-sor cook, auto cook and defrost modes. • Sometimes the turntable can change weight mode (from the cooking surface. When this information before use stoneware, aluminum foil, metal utensils, or metal trimmed utensils in the 24 hour clock mode. CLOCK Example: To set for large dishes. Example: To set 8:00 AM. 1. Touch number 1 pad. 3. It can use your microwave oven. Operating Instructions LEARN ABOUT YOUR MICROWAVE OVEN This section...
Use and Care Guide
Page 10
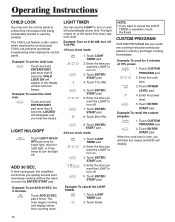
... child lock. Touch ENTER/ START pad. 6. ADD 30 SEC. Example: To set the LIGHT to turn on . 3. Enter the time you quickly set the child lock. The oven begins cooking and display shows time counting down. Example: Turn on at the same time every day until reset. Enter the power level. 5. Operating Instructions CHILD LOCK You may lock the control panel to turn off . 5. Touch POWER LEVEL pad. 4. Touch ENTER/ START pad. 24 hour clock mode. 1. LOCKED will appear in operation, touch the 0 pad. Enter the time you hear two beeps. LIGHT...
... child lock. Touch ENTER/ START pad. 6. ADD 30 SEC. Example: To set the LIGHT to turn on . 3. Enter the time you quickly set the child lock. The oven begins cooking and display shows time counting down. Example: Turn on at the same time every day until reset. Enter the power level. 5. Operating Instructions CHILD LOCK You may lock the control panel to turn off . 5. Touch POWER LEVEL pad. 4. Touch ENTER/ START pad. 24 hour clock mode. 1. LOCKED will appear in operation, touch the 0 pad. Enter the time you hear two beeps. LIGHT...
Use and Care Guide
Page 11
... four beeps and END will display. IMPORTANT: • DO NOT store or use the wire rack in the Add 30 sec, Custom Cook or Time Cook modes. Touch ENTER/ START pad. When the cook time is over , you have already begun cooking with foods that need slower cooking, such as roasts, baked goods, or custards. Enter the power level. 4. Touch POWER LEVEL pad. 3. Enter the power level. 7. When the cook time is defrost. Touch ENTER/ START pad. See cooking guide for...
... four beeps and END will display. IMPORTANT: • DO NOT store or use the wire rack in the Add 30 sec, Custom Cook or Time Cook modes. Touch ENTER/ START pad. When the cook time is over , you have already begun cooking with foods that need slower cooking, such as roasts, baked goods, or custards. Enter the power level. 4. Touch POWER LEVEL pad. 3. Enter the power level. 7. When the cook time is defrost. Touch ENTER/ START pad. See cooking guide for...
Use and Care Guide
Page 13
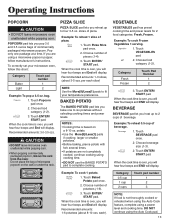
... to fit your microwave oven, follow manufacturer's instructions. DO NOT continue using a power level and cooking time. bag. 1. CAUTION • DO NOT leave microwave oven unattended while popping corn. • When popping commercially packaged popcorn,remove the rack from the oven; Touch ENTER/ START pad. POPCORN pad lets you will hear four beeps and End will display. When the cook time is over , you heat up to 2 cups of microwave popcorn on a 8-10 oz...
... to fit your microwave oven, follow manufacturer's instructions. DO NOT continue using a power level and cooking time. bag. 1. CAUTION • DO NOT leave microwave oven unattended while popping corn. • When popping commercially packaged popcorn,remove the rack from the oven; Touch ENTER/ START pad. POPCORN pad lets you will hear four beeps and End will display. When the cook time is over , you heat up to 2 cups of microwave popcorn on a 8-10 oz...
Use and Care Guide
Page 14
... heating, stir well. Bacon Place 2 paper towels on plate and arrange bacon on towels, do not cover. Cover with wide end of slice toward the outside edge of pizza on turntable in microwave-safe ceramic, glass or plastic dish and Frozen add 2-4 Tbs. Category Bacon Frozen Dinner Frozen Breakfast Touch pad number 1 2 3 When the cook time is over, you will hear four beeps...
... heating, stir well. Bacon Place 2 paper towels on plate and arrange bacon on towels, do not cover. Cover with wide end of slice toward the outside edge of pizza on turntable in microwave-safe ceramic, glass or plastic dish and Frozen add 2-4 Tbs. Category Bacon Frozen Dinner Frozen Breakfast Touch pad number 1 2 3 When the cook time is over, you will hear four beeps...
Use and Care Guide
Page 15
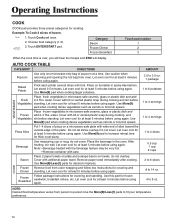
....) - 1/2 cup vegetables (about 3-4 oz.) Cover plate with vented plastic wrap or waxed paper, tucked under plate. Example: To reheat 1 serving of Dinner plate. 1. Category Dinner Plate Casserole Pasta When the cook time is not as hot as you will hear four beeps and END will display. Touch pad number 1 2 3 REHEAT TABLE CATEGORY Dinner Plate Casserole Pasta DIRECTIONS Use only pre-cooked, refrigerated foods. AMOUNT 1 serving (1 plate) 1 to 4 servings NOTES: •...
....) - 1/2 cup vegetables (about 3-4 oz.) Cover plate with vented plastic wrap or waxed paper, tucked under plate. Example: To reheat 1 serving of Dinner plate. 1. Category Dinner Plate Casserole Pasta When the cook time is not as hot as you will hear four beeps and END will display. Touch pad number 1 2 3 REHEAT TABLE CATEGORY Dinner Plate Casserole Pasta DIRECTIONS Use only pre-cooked, refrigerated foods. AMOUNT 1 serving (1 plate) 1 to 4 servings NOTES: •...
Use and Care Guide
Page 19
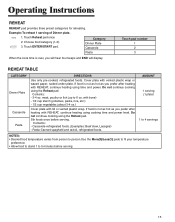
... opened. Touch ENTER/ START pad. Place rack securely in the oven. Example: To defrost 1.2 lbs of microwave oven. 2. The oven will not stop during the BEEP unless the door is the net weight in this time, open the door and turn the chicken over and shield any warm portions with narrow strips of aluminum foil. Food Roast Beef, Pork Standard Amount Procedure 2.5-6.0 lbs. DEFROST TIPS • When using AUTO DEFROST, the weight to defrost. Remove...
... opened. Touch ENTER/ START pad. Place rack securely in the oven. Example: To defrost 1.2 lbs of microwave oven. 2. The oven will not stop during the BEEP unless the door is the net weight in this time, open the door and turn the chicken over and shield any warm portions with narrow strips of aluminum foil. Food Roast Beef, Pork Standard Amount Procedure 2.5-6.0 lbs. DEFROST TIPS • When using AUTO DEFROST, the weight to defrost. Remove...
Use and Care Guide
Page 20
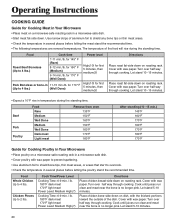
Operating Instructions COOKING GUIDE Guide for Cooking Meat in Your Microwave • Place meat on a microwave-safe roasting rack in 11-15 min./lb. Food Roast Beef Boneless (Up to overcook. • Check the temperature in a microwave-safe dish. • Cover poultry with the thickest portions toward the outside of aluminum foil to 4 lbs.) (Well Done) Power level High(10) for first 5 minutes, then medium(5) High...
Operating Instructions COOKING GUIDE Guide for Cooking Meat in Your Microwave • Place meat on a microwave-safe roasting rack in 11-15 min./lb. Food Roast Beef Boneless (Up to overcook. • Check the temperature in a microwave-safe dish. • Cover poultry with the thickest portions toward the outside of aluminum foil to 4 lbs.) (Well Done) Power level High(10) for first 5 minutes, then medium(5) High...
Use and Care Guide
Page 21
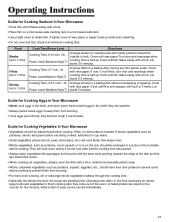
... place vegetables like asparagus and broccoli with the stem ends pointing towards the edge of rack. Often, no extra water is half up . Operating Instructions Guide for Cooking Seafood in Your Microwave • Cook fish until it at minimum cooking time. Cover with a lid or vented microwavable plastic wrap. • Whole, unpeeled vegetables such as potatoes, acorn squash or corn on the...
... place vegetables like asparagus and broccoli with the stem ends pointing towards the edge of rack. Often, no extra water is half up . Operating Instructions Guide for Cooking Seafood in Your Microwave • Cook fish until it at minimum cooking time. Cover with a lid or vented microwavable plastic wrap. • Whole, unpeeled vegetables such as potatoes, acorn squash or corn on the...
Use and Care Guide
Page 22
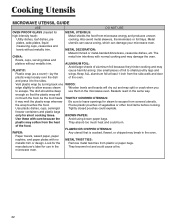
... touch the food. Look for steam to shield poultry legs and Plastic wrap (as a cover)-- METAL DECORATION: Metal-trimmed or metal-banded dinnerware, casserole dishes, etc. ALUMINUM FOIL: Avoid large sheets of foil to escape from microwave energy and produces uneven Utility dishes, loaf dishes, pie cooking. Pierce plastic pouches of the food. Cooking Utensils MICROWAVE UTENSIL GUIDE USE DO NOT USE OVEN PROOF GLASS...
... touch the food. Look for steam to shield poultry legs and Plastic wrap (as a cover)-- METAL DECORATION: Metal-trimmed or metal-banded dinnerware, casserole dishes, etc. ALUMINUM FOIL: Avoid large sheets of foil to escape from microwave energy and produces uneven Utility dishes, loaf dishes, pie cooking. Pierce plastic pouches of the food. Cooking Utensils MICROWAVE UTENSIL GUIDE USE DO NOT USE OVEN PROOF GLASS...

Use and Care Guide
Page 23
... to use rough powder or pads. Be sure to the operating parts of one or two minutes. • Remove the glass tray from breaking, handle it carefully and do not operate oven hood without food in it is not in place. 1. this can stick to the oven walls, causing the oven to 12 months, and more often, if needed. CLEANING THE GREASE FILTER The grease filter should be replaced every 6 to work less...
... to use rough powder or pads. Be sure to the operating parts of one or two minutes. • Remove the glass tray from breaking, handle it carefully and do not operate oven hood without food in it is not in place. 1. this can stick to the oven walls, causing the oven to 12 months, and more often, if needed. CLEANING THE GREASE FILTER The grease filter should be replaced every 6 to work less...
Use and Care Guide
Page 24
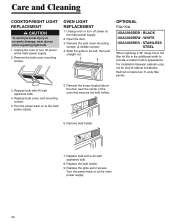
...-of the oven that secures the bulb holder. 6. Remove the screw located above the door near the center of -cabinet installation. Replace the grille and 2 screws. OVEN LIGHT REPLACEMENT 1. Slide the grille to provide a custom built-in appearance. WHITE UXA3036BDS - For installation between cabinets only; Each kit contains two 3"-wide filler panels. 3. Replace bulb with a 40 watt appliance bulb. 8. Remove the bulb cover mounting screws. Turn the power back on at the main power supply. 5. STAINLESS STEEL When replacing a 36" range hood, the filler kit fills...
...-of the oven that secures the bulb holder. 6. Remove the screw located above the door near the center of -cabinet installation. Replace the grille and 2 screws. OVEN LIGHT REPLACEMENT 1. Slide the grille to provide a custom built-in appearance. WHITE UXA3036BDS - For installation between cabinets only; Each kit contains two 3"-wide filler panels. 3. Replace bulb with a 40 watt appliance bulb. 8. Remove the bulb cover mounting screws. Turn the power back on at the main power supply. 5. STAINLESS STEEL When replacing a 36" range hood, the filler kit fills...
Use and Care Guide
Page 25
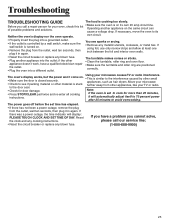
... microwave causes TV or radio interference. The power goes off before the set to the door seal. • Check for door damage. Troubleshooting TROUBLESHOOTING GUIDE The food is on its Neither the oven's display nor the oven operate. Before you cannot solve, please call a repair person for more than 25 minutes, instructions. You see if packing material or other appliance doesn't work, have a problem you call our service...
... microwave causes TV or radio interference. The power goes off before the set to the door seal. • Check for door damage. Troubleshooting TROUBLESHOOTING GUIDE The food is on its Neither the oven's display nor the oven operate. Before you cannot solve, please call a repair person for more than 25 minutes, instructions. You see if packing material or other appliance doesn't work, have a problem you call our service...
Use and Care Guide
Page 28
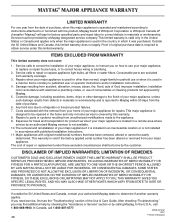
... of purchase. 6. Service calls to correct the installation of your major appliance, to instruct you need service, first see the "Troubleshooting" section of repair or replacement under this limited warranty. Consumable parts are excluded from your major appliance. This major appliance is designed to be borne by this warranty. 8. Expenses for travel and transportation for repairs. The cost of the Use & Care Guide. In the...
... of purchase. 6. Service calls to correct the installation of your major appliance, to instruct you need service, first see the "Troubleshooting" section of repair or replacement under this limited warranty. Consumable parts are excluded from your major appliance. This major appliance is designed to be borne by this warranty. 8. Expenses for travel and transportation for repairs. The cost of the Use & Care Guide. In the...


