Maytag MMV1175JW Support and Manuals
Get Help and Manuals for this Maytag item

View All Support Options Below
Free Maytag MMV1175JW manuals!
Problems with Maytag MMV1175JW?
Ask a Question
Free Maytag MMV1175JW manuals!
Problems with Maytag MMV1175JW?
Ask a Question
Popular Maytag MMV1175JW Manual Pages
Installation Instructions - Page 1
... Stud(s 7 Mark Rear Wall 7 Drill Holes in these installation instructions. These installation instructions cover different models.
See the "Installation Requirements" section for wall venting only 10 Install the Microwave Oven 10 Complete Installation 11 VENTING DESIGN SPECIFICATIONS 12 ASSISTANCE 14 Replacement Parts 14 Accessories 14
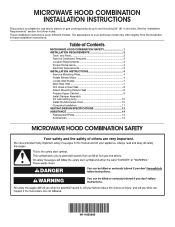
MICROWAVE HOOD COMBINATION SAFETY
W11485889B
Installation Instructions - Page 2
...:
■ If you can open freely and fully. See the "Venting Design Specifications" section.
2
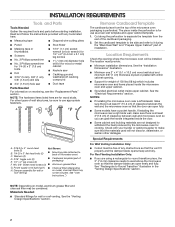
INSTALLATION REQUIREMENTS
Tools and Parts
Tools Needed
Gather the required tools and parts before starting installation. Read and follow the instructions provided with your builder or cabinet supplier to exist above the microwave oven so that the materials used will be free of...
Installation Instructions - Page 3
...is properly grounded.
The bump out mounting kit (part # W11185746) is typical for the electric current....providing an escape wire for 66" (167.6 cm) installation height. A
B
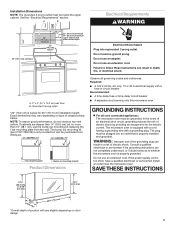
Electrical Requirements
WARNING
30" (76...microwave oven
GROUNDING INSTRUCTIONS
For all governing codes and ordinances. See the "Electrical Requirements" section. Do not use the bump out mounting kit replacing...
Installation Instructions - Page 4

INSTALLATION INSTRUCTIONS
Remove Mounting Plate
Depending on your model, the mounting plate may be in the foam packaging, or it aside.
3. Tape the microwave oven door closed so that the door does not swing open while the microwave oven is set for recirculation installation. NOTE: Skip this section if you are using recirculation installation. Wall Venting Installation Only
A
1. Screws 2. ...
Installation Instructions - Page 5
...A B
A
B
A. A
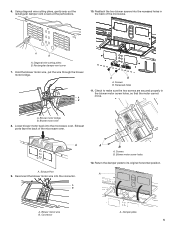
A. Blower motor wire B. Reattach the two blower screws into the microwave oven. A B
A. Recessed holes
11. Blower motor screw holes
12. Diagonal wire cutting pliers...the damper plate to make sure the two screws are secured properly in the back of the microwave oven.
Blower motor bridge B. Damper plate 5 Check to its original horizontal position. A. ...
Installation Instructions - Page 6
... original horizontal position.
Damper plate 12. A
B
A. Screws
A.
Repeat Step 4 from "Wall Venting Installation Only." 3. Reattach the two blower screws into the recessed holes in Step 1. Rectangular vent covers B.
Secure damper plate with flat side facing the back of the microwave oven (as shown), performance will be poor.
6 Using diagonal wire cutting pliers...
Installation Instructions - Page 7

...E
E
F
NOTE: If wall stud is level with the mounting plate. End holes (on mounting plate)
B. Support tabs F. Using measuring tape, find and clearly mark the vertical centerline of the wall stud(s) within the opening .
...Mark the center of preferred installation configurations with the front edge of upper cabinet
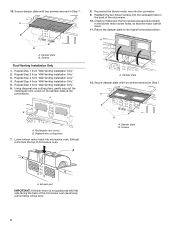
7 Cabinet opening , do not install the microwave oven.
1.
Top of ...
Installation Instructions - Page 8

... Secure the mounting plate to complete the 12" x 4" (30.5 x 10.2 cm) rectangle. With the support tabs of the mounting plate facing forward,
insert 3/16-24 x 3" round-head bolts through the mounting plate,... Stud Configurations" in Step 3 of the cardboard template. Set the mounting plate aside. Drill Holes in Rear Wall
In addition to being installed on bolts from the marks made in Step 9 to ...
Installation Instructions - Page 9

...the microwave oven (as shown.
Power supply cord bushing
6.
4. Mounting plate C. Spring toggle nut D. Insert lag screw(s) into the hole(s) drilled into the other hole drilled in Step 2 of "Installation for...wall and to the thickest part of the mounting plate. D
10"
(25.4 cm)
F
Rear Wall
E
10" G (25.4 cm)
Mur arrière
5. B
A
A. With the support tabs of mounting plate,...
Installation Instructions - Page 10
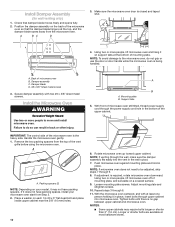
Damper blade D. #6 x 3/8" Sheet metal screws 3. IMPORTANT: The control side of mounting plate, and set aside on your model, it does not have packing spacers. Mounting plate B. Using two or more people, lift microwave oven and hang it on support tabs at least one person holding it in place, insert bolts through upper cabinet into the...
Installation Instructions - Page 11
... damage to damper assembly. Refer to follow these instructions can result in properly. A
B
C
D
E
F
A. Long tab F. Plug microwave oven into a grounded 3 prong outlet. If the problem continues, call an electrician. ■ Check that the long tab of the damper assembly slides under vent)
Complete Installation
1. Vent B. WARNING
A
15-20 mm
B
A.
A. Then secure...
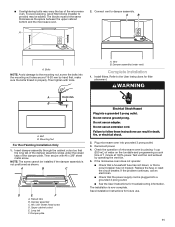
Installation Instructions - Page 12
... to -Round Transition" illustration. NOTES:
■ Vent materials needed for installation are not provided with microwave hood combination.
■ We do not recommend using recirculation installation. If venting through the wall, be sure there are for use when ...F. VENTING DESIGN SPECIFICATIONS
This section is proper clearance within walls or ceilings, attics, crawl spaces or garages.
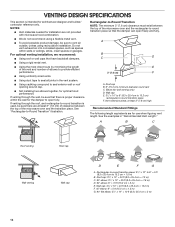
Installation Instructions - Page 13
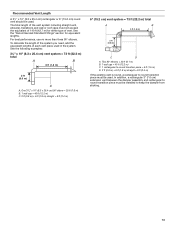
... ft (12.2 m) C. 1 rectangular-to-round transition piece = 5 ft (1.5 m) D. 2 ft (0.6 m) + 6 ft (1.8 m) straight = 8 ft (2.4 m)
If the existing vent is round, a rectangular to round transition piece must be installed to round transition piece must be used in the system. See the "Recommended Standard Fittings" section for either type of each vent piece used .
Recommended...
Installation Instructions - Page 14
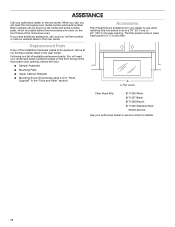
... of available replacement parts. Each panel is a list of the microwave oven. Replacement Parts
If any of the microwave oven opening . You will need your dealer to be found on the model and serial number plate, which is located behind the microwave oven door on the front facing of the installation hardware needs to use when installing this microwave oven in...
Maytag MMV1175JW Reviews
We have not received any reviews for Maytag yet.