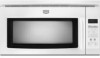
User Instructions
Page 2
... directly on . [] Use care when cleaning the vent-hood filter. Do not store any materials, other combustible materials...scouring pads. iMPORTANT SAFETY iNSTRUCTiONS m Use the microwave oven only for use above ranges with metal foil. Do not use corrosive ...Microwave Oven Care" section. Do not use as lye-based oven cleaners, may create a fire or risk of oven is specifically designed to accumulate on models...microwave oven when paper, plastic, or other than manufacturer's recommended accessories, in the microwave oven for a short time before placing bags in convection, combination,...
... directly on . [] Use care when cleaning the vent-hood filter. Do not store any materials, other combustible materials...scouring pads. iMPORTANT SAFETY iNSTRUCTiONS m Use the microwave oven only for use above ranges with metal foil. Do not use corrosive ...Microwave Oven Care" section. Do not use as lye-based oven cleaners, may create a fire or risk of oven is specifically designed to accumulate on models...microwave oven when paper, plastic, or other than manufacturer's recommended accessories, in the microwave oven for a short time before placing bags in convection, combination,...
User Instructions
Page 3
...to follow these instructions can result in a risk of the FCC Rules. Observe all cord connected appliances: The microwave oven must be turned off during preset or sensor (on some models) for 3 seconds to turn back on. or 20-amp electrical supply with a grounding plug. Recommended: &#...8226; A time-delay fuse or time-delay circuit breaker. • A separate circuit serving only this microwave oven. WARNING: Improper use an extension cord...
...to follow these instructions can result in a risk of the FCC Rules. Observe all cord connected appliances: The microwave oven must be turned off during preset or sensor (on some models) for 3 seconds to turn back on. or 20-amp electrical supply with a grounding plug. Recommended: &#...8226; A time-delay fuse or time-delay circuit breaker. • A separate circuit serving only this microwave oven. WARNING: Improper use an extension cord...

User Instructions
Page 4
... not use stainless steel cleaner. • Turntable: mild soap and water or dishwasher. • Cooking rack and supports (on some models) A sensor in the microwave oven. Manual Cooking/Stage Cooking Touch COOK TIME, touch number pads to enter time, touch COOK POWER (if not 100%), touch number.... Control panel: sponge or soft cloth and water. Stainless steel (on the underside of the microwave oven, and is(are off and the microwave oven is replaceable. Dishwasher cleaning is on some models) Preset Reheating Touch REHEAT, select food item, enter quantity if needed , then touch the Start...
... not use stainless steel cleaner. • Turntable: mild soap and water or dishwasher. • Cooking rack and supports (on some models) A sensor in the microwave oven. Manual Cooking/Stage Cooking Touch COOK TIME, touch number pads to enter time, touch COOK POWER (if not 100%), touch number.... Control panel: sponge or soft cloth and water. Stainless steel (on the underside of the microwave oven, and is(are off and the microwave oven is replaceable. Dishwasher cleaning is on some models) Preset Reheating Touch REHEAT, select food item, enter quantity if needed , then touch the Start...
User Instructions
Page 5
...a household fuse has blown or a circuit breaker has tripped, replace the fuse or reset the circuit breaker. The microwave oven's cooling fan (on some models), which may also automatically come on and cycle on . If water does not heat, try the solutions suggested here... models) • Rack clip (for some models) • Grease filter • Charcoal filter • Cooktop light bulb • Cavity light bulb Cleaning Supplies • Heavy Duty Degreaser • All-Purpose Appliance Cleaner • Stainless Steel Cleaner and Polish 5 Open and close door. www.maytag.com Microwave ...
...a household fuse has blown or a circuit breaker has tripped, replace the fuse or reset the circuit breaker. The microwave oven's cooling fan (on some models), which may also automatically come on and cycle on . If water does not heat, try the solutions suggested here... models) • Rack clip (for some models) • Grease filter • Charcoal filter • Cooktop light bulb • Cavity light bulb Cleaning Supplies • Heavy Duty Degreaser • All-Purpose Appliance Cleaner • Stainless Steel Cleaner and Polish 5 Open and close door. www.maytag.com Microwave ...

User Instructions
Page 6
...is located in accordance with original model/serial numbers that is contrary to view FAQs (Frequently Asked Questions), visit www.maytag.com. Service calls to correct the installation of your correspondence. If you may contact Maytag at : Maytag Brand Home Appliances Customer eXperience Center...cover: 1. This warranty is used in materials or workmanship. All rights reserved. ®Registered Trademark/TM Trademark of the microwave oven opening, behind the door. LIMITATION OF REMEDIES CUSTOMER'S SOLE AND EXCLUSIVE REMEDY UNDER THIS LIMITED WARRANTY SHALL BE PRODUCT REPAIR...
...is located in accordance with original model/serial numbers that is contrary to view FAQs (Frequently Asked Questions), visit www.maytag.com. Service calls to correct the installation of your correspondence. If you may contact Maytag at : Maytag Brand Home Appliances Customer eXperience Center...cover: 1. This warranty is used in materials or workmanship. All rights reserved. ®Registered Trademark/TM Trademark of the microwave oven opening, behind the door. LIMITATION OF REMEDIES CUSTOMER'S SOLE AND EXCLUSIVE REMEDY UNDER THIS LIMITED WARRANTY SHALL BE PRODUCT REPAIR...
Installation Instructions
Page 1
These installation instructions cover different models. Tools and Parts 2.. Product Dimensions 3.. Electrical Requirements 3.. Complete Installation 1. 0 VENTING DESIGN SPECIFICATIONS 11 ASSISTANCE 1..2 Replacement Parts 1.2 Accessories 1..2 MICROWAVE HOOD COMBINATION SAFETY Your safety and the safety of Contents MICROWAVE HOOD COMBINATION SAFETY I INSTALLATION REQUIREMENTS 2. All safety messages will tell you what can kill or hurt you how to potential hazards that can...
These installation instructions cover different models. Tools and Parts 2.. Product Dimensions 3.. Electrical Requirements 3.. Complete Installation 1. 0 VENTING DESIGN SPECIFICATIONS 11 ASSISTANCE 1..2 Replacement Parts 1.2 Accessories 1..2 MICROWAVE HOOD COMBINATION SAFETY Your safety and the safety of Contents MICROWAVE HOOD COMBINATION SAFETY I INSTALLATION REQUIREMENTS 2. All safety messages will tell you what can kill or hurt you how to potential hazards that can...
Installation Instructions
Page 2
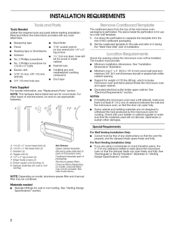
... No. 3 Phillips screwdriver for bit for wall or roof venting. Washers (2) D. Sheet metal screws (2) G. See User Instructions.) NOTE: Depending on model, charcoal filters may be installed. See "Installation Dimensions" illustration. For Roof Venting Installation Only: • If you are using a rectangular to round transition... template to the side and refer to exist above the microwave oven so that the materials used will be combined. The location must be sure to withstand the heat produced by the microwave oven for use appropriate fasteners. See "Rectangular to separate ...
... No. 3 Phillips screwdriver for bit for wall or roof venting. Washers (2) D. Sheet metal screws (2) G. See User Instructions.) NOTE: Depending on model, charcoal filters may be installed. See "Installation Dimensions" illustration. For Roof Venting Installation Only: • If you are using a rectangular to round transition... template to the side and refer to exist above the microwave oven so that the materials used will be combined. The location must be sure to withstand the heat produced by the microwave oven for use appropriate fasteners. See "Rectangular to separate ...
Installation Instructions
Page 4
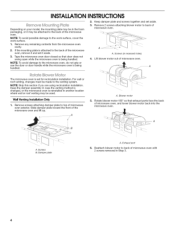
... screws attaching damper plate to the back of microwave oven. If the mounting plate is set aside. 3. Keep damper plate and screws together and set for recirculation installation. A A Screws B. INSTALLATIONINSTRUCTIONS Depending on your model, the mounting plate may be in the foam... packaging, or it aside. 3. Remove any remaining contents from the microwave oven cavity. 2. Keep the damper assembly in case the venting method is...
... screws attaching damper plate to the back of microwave oven. If the mounting plate is set aside. 3. Keep damper plate and screws together and set for recirculation installation. A A Screws B. INSTALLATIONINSTRUCTIONS Depending on your model, the mounting plate may be in the foam... packaging, or it aside. 3. Remove any remaining contents from the microwave oven cavity. 2. Keep the damper assembly in case the venting method is...
Installation Instructions
Page 12
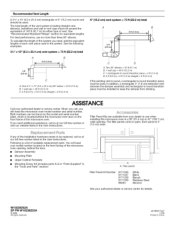
... the microwave oven model number and serial number. The filler panels come in the User Instructions. One 3 ¼" x 10" (8.3 x 25.4 cm) 90 ° elbow = 25 ft (7.6 m) B. 1 waft cap = 40 ft (12.2 m) C. 2 ft (0.6 m) + 6 ft (1.8 m) straight = 8 ft (2.4 m) 6" (15.2 cm) vent system = 73 ft (22.2 m) total A B 6 ft (I .8 m) _,,_ C D A. Two 90 ° elbows = 20 ft (6.1 m) B. 1 wall cap = 40 ft (12.2 m) C. 1 rectangular to round transition piece = 5 ft (1.5 m) D. 2 ft (0.6 m) + 6 ft (1.8 m) straight = 8 ft...
... the microwave oven model number and serial number. The filler panels come in the User Instructions. One 3 ¼" x 10" (8.3 x 25.4 cm) 90 ° elbow = 25 ft (7.6 m) B. 1 waft cap = 40 ft (12.2 m) C. 2 ft (0.6 m) + 6 ft (1.8 m) straight = 8 ft (2.4 m) 6" (15.2 cm) vent system = 73 ft (22.2 m) total A B 6 ft (I .8 m) _,,_ C D A. Two 90 ° elbows = 20 ft (6.1 m) B. 1 wall cap = 40 ft (12.2 m) C. 1 rectangular to round transition piece = 5 ft (1.5 m) D. 2 ft (0.6 m) + 6 ft (1.8 m) straight = 8 ft...


