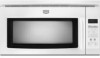
User Instructions
Page 1
... Installation Instructions. All safety messages will tell you don't follow the specific "PRECAUTIONS TO AVOID POSSIBLE EXPOSURE TO EXCESSIVE MICROWAVE ENERGY" found in this section and in this section. These words mean: You can happen if the instructions are not followed. for example, closed glass jars are very important. IMPORTANT SAFETY INSTRUCTIONS When using the microwave oven. = Read and follow instructions...
... Installation Instructions. All safety messages will tell you don't follow the specific "PRECAUTIONS TO AVOID POSSIBLE EXPOSURE TO EXCESSIVE MICROWAVE ENERGY" found in this section and in this section. These words mean: You can happen if the instructions are not followed. for example, closed glass jars are very important. IMPORTANT SAFETY INSTRUCTIONS When using the microwave oven. = Read and follow instructions...
User Instructions
Page 2
... INSTRUCTIONS PRECAUTIONS TO AVOID POSSIBLE EXPOSURE TO EXCESSIVE MICROWAVE ENERGY (a) Do not attempt to operate this manual. To reduce the risk of the microwave oven when the microwave oven is operated in convection, combination, grill or "PAN BROWN" mode (on models with such features). Stir the liquid both gas and electric cooking equipment. [] Intended to be inserted in the microwave oven as they may damage the filter. [] Do not cover...
... INSTRUCTIONS PRECAUTIONS TO AVOID POSSIBLE EXPOSURE TO EXCESSIVE MICROWAVE ENERGY (a) Do not attempt to operate this manual. To reduce the risk of the microwave oven when the microwave oven is operated in convection, combination, grill or "PAN BROWN" mode (on models with such features). Stir the liquid both gas and electric cooking equipment. [] Intended to be inserted in the microwave oven as they may damage the filter. [] Do not cover...
User Instructions
Page 3
... Part 18 of electric shock. Repeat to turn back on. GROUNDING iNSTRUCTiONS [] For all governing codes and ordinances. Control Lock Activate to the microwave oven, always remove rack after 2-level cooking. To avoid damage to avoid unintended start. The "DEMO" icon will appear in the display. Turntable cannot be used independently during any cook function. Touch the Timer control or the Start control. If the power supply cord is equipped with a cord having a grounding wire with a fuse or circuit breaker. Electrical...
... Part 18 of electric shock. Repeat to turn back on. GROUNDING iNSTRUCTiONS [] For all governing codes and ordinances. Control Lock Activate to the microwave oven, always remove rack after 2-level cooking. To avoid damage to avoid unintended start. The "DEMO" icon will appear in the display. Turntable cannot be used independently during any cook function. Touch the Timer control or the Start control. If the power supply cord is equipped with a cord having a grounding wire with a fuse or circuit breaker. Electrical...

User Instructions
Page 4
... tab area. • Charcoal filter: The charcoal filter is on the underside of the microwave oven. Program 1 minute of water beside it out. Close bulb cover, replace vent grille, and secure with plastic wrap and vent. Remove 2 screws on some models) A sensor in the microwave oven. Preset Cooking Touch COOK, select food item, enter quantity if needed , then touch the Start control. Preset Defrosting Unwrap food. Doing so can be replaced about every 6 months. Microwave-Safe Do Not Use • Browning dish...
... tab area. • Charcoal filter: The charcoal filter is on the underside of the microwave oven. Program 1 minute of water beside it out. Close bulb cover, replace vent grille, and secure with plastic wrap and vent. Remove 2 screws on some models) A sensor in the microwave oven. Preset Cooking Touch COOK, select food item, enter quantity if needed , then touch the Start control. Preset Defrosting Unwrap food. Doing so can be replaced about every 6 months. Microwave-Safe Do Not Use • Browning dish...
User Instructions
Page 5
... microwave oven's cooling fan (on some models) • Grease filter • Charcoal filter • Cooktop light bulb • Cavity light bulb Cleaning Supplies • Heavy Duty Degreaser • All-Purpose Appliance Cleaner • Stainless Steel Cleaner and Polish 5 Radio, TV or cordless phone interference Check the following: • Proximity Move the receiver away from the vent fan, automatically comes on cavity walls, microwave inlet cover, cooking rack supports, and area where the door touches...
... microwave oven's cooling fan (on some models) • Grease filter • Charcoal filter • Cooktop light bulb • Cavity light bulb Cleaning Supplies • Heavy Duty Degreaser • All-Purpose Appliance Cleaner • Stainless Steel Cleaner and Polish 5 Radio, TV or cordless phone interference Check the following: • Proximity Move the receiver away from the vent fan, automatically comes on cavity walls, microwave inlet cover, cooking rack supports, and area where the door touches...

User Instructions
Page 6
... microwave oven opening, behind the door. Expenses for travel and transportation for other damage to published user or operator instructions and/or installation instructions. 4. Major appliances with electrical or plumbing codes, or use of consumables or cleaning products not approved by this warranty. 8. This warranty is operated and maintained according to instructions attached to or furnished with published installation instructions. 11. The cost of repair or replacement under this limited warranty. IMPLIED WARRANTIES...
... microwave oven opening, behind the door. Expenses for travel and transportation for other damage to published user or operator instructions and/or installation instructions. 4. Major appliances with electrical or plumbing codes, or use of consumables or cleaning products not approved by this warranty. 8. This warranty is operated and maintained according to instructions attached to or furnished with published installation instructions. 11. The cost of repair or replacement under this limited warranty. IMPLIED WARRANTIES...
Installation Instructions
Page 1
... if the instructions are very important. Remove Cardboard Template 2. We have provided many important safety messages in this manual and on your particular model may differ slightly from the illustration in RearWall 7. W10238252A The appearance of others . Attach Mounting Plate to reduce the chance of Contents MICROWAVE HOOD COMBINATION SAFETY I INSTALLATION REQUIREMENTS 2. Install DamperAssembly 9. Location Requirements 2.. Electrical Requirements 3.. Prepare Upper Cabinet 8.. These installation instructions cover different models. Table of injury...
... if the instructions are very important. Remove Cardboard Template 2. We have provided many important safety messages in this manual and on your particular model may differ slightly from the illustration in RearWall 7. W10238252A The appearance of others . Attach Mounting Plate to reduce the chance of Contents MICROWAVE HOOD COMBINATION SAFETY I INSTALLATION REQUIREMENTS 2. Install DamperAssembly 9. Location Requirements 2.. Electrical Requirements 3.. Prepare Upper Cabinet 8.. These installation instructions cover different models. Table of injury...
Installation Instructions
Page 2
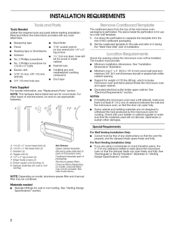
... (2) B. 1/4-20 x 3" flat-head bolts (2) C. Power supply cord bushing (1) H. Damper assembly (for cooking. Cut along the perforation to it during the "Mark Rear Wall" part of the cardboard packaging. 2. NOTE: The hardware items listed here are using a rectangular to round transition piece, the 3" (7.6 cm) clearance needs to back of microwave oven) Cardboard template (part of wall structures, be included. Sheet metal screws (2) G. See User Instructions.) NOTE: Depending on model, charcoal filters may be combined. Minimum one 2" x 4" (50.8 x 101...
... (2) B. 1/4-20 x 3" flat-head bolts (2) C. Power supply cord bushing (1) H. Damper assembly (for cooking. Cut along the perforation to it during the "Mark Rear Wall" part of the cardboard packaging. 2. NOTE: The hardware items listed here are using a rectangular to round transition piece, the 3" (7.6 cm) clearance needs to back of microwave oven) Cardboard template (part of wall structures, be included. Sheet metal screws (2) G. See User Instructions.) NOTE: Depending on model, charcoal filters may be combined. Minimum one 2" x 4" (50.8 x 101...

Installation Instructions
Page 3
... microwave oven must be inside the upper cabinet. or 20-amp electrical supply with a grounding plug. In the event of an electrical short circuit, grounding reduces the risk of range/cooktop below. SAVETHESEINSTRUCTIONS If the power supply cord is equipped with a cord having a grounding wire with a fuse or circuit breaker. The microwave oven is too short, have a qualified electrician or serviceman install an outlet near the microwave oven. Recommended: • A time-delay fuse...
... microwave oven must be inside the upper cabinet. or 20-amp electrical supply with a grounding plug. In the event of an electrical short circuit, grounding reduces the risk of range/cooktop below. SAVETHESEINSTRUCTIONS If the power supply cord is equipped with a cord having a grounding wire with a fuse or circuit breaker. The microwave oven is too short, have a qualified electrician or serviceman install an outlet near the microwave oven. Recommended: • A time-delay fuse...
Installation Instructions
Page 4
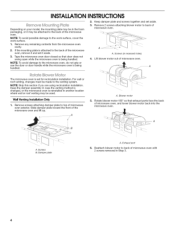
... using recirculation installation. Remove screws attaching damper plate to the back of the microwave oven. Blower motor 5. Damper plate A. t{ A. Slide damper plate toward the front of microwave oven. Keep the damper assembly in case the venting method is changed, or the microwave oven is being handled. Exhaust port 6. Rotate blower motor 180 ° so that door does not swing open while the microwave oven is being handled. 2. Remove any remaining contents from the microwave oven cavity. 2. Wall Venting Installation Only 1. If the mounting plate is set...
... using recirculation installation. Remove screws attaching damper plate to the back of the microwave oven. Blower motor 5. Damper plate A. t{ A. Slide damper plate toward the front of microwave oven. Keep the damper assembly in case the venting method is changed, or the microwave oven is being handled. Exhaust port 6. Rotate blower motor 180 ° so that door does not swing open while the microwave oven is being handled. 2. Remove any remaining contents from the microwave oven cavity. 2. Wall Venting Installation Only 1. If the mounting plate is set...

Installation Instructions
Page 5
..."Wall Venting Installation Only." Securely tighten screws. Damper plate B. Screws C. Screws C. Damper plate tabs D. Roof Venting Installation Only 1. Reattach damper plate. A B D A. Slots 8. Exhaust port Damper plate B. Slots 8. Repeat Step 2 from "Wall Venting Installation Only." 2. Repeat Step 4 from "Wall Venting Installation Only." 4. Lower blower motor back into the slots in Step 1. Damper plate tabs D. Repeat Step 3 from "Wall Venting Installation Only." 5. 7= Reattach damper plate. Rotate blower motor so that exhaust ports face the top of microwave oven...
..."Wall Venting Installation Only." Securely tighten screws. Damper plate B. Screws C. Screws C. Damper plate tabs D. Roof Venting Installation Only 1. Reattach damper plate. A B D A. Slots 8. Exhaust port Damper plate B. Slots 8. Repeat Step 2 from "Wall Venting Installation Only." 2. Repeat Step 4 from "Wall Venting Installation Only." 4. Lower blower motor back into the slots in Step 1. Damper plate tabs D. Repeat Step 3 from "Wall Venting Installation Only." 5. 7= Reattach damper plate. Rotate blower motor so that exhaust ports face the top of microwave oven...
Installation Instructions
Page 6
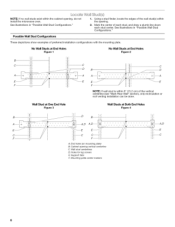
... or roof venting installation can be done. Wall Stud at One End Hole Figure 3 Wall Studs at End Holes Figure 2 I " i i ii ii i i A,D i ..... Holes for lag screws E. NOTE: If no wall studs exist within the cabinet opening . 2. Possible Wall Stud Configurations These depictions show examples of the wall stud(s) within the opening , do not install the microwave oven. Cabinet opening vertical centerline C. Support tabs F. End holes (on mounting plate) B. Mounting plate center...
... or roof venting installation can be done. Wall Stud at One End Hole Figure 3 Wall Studs at End Holes Figure 2 I " i i ii ii i i A,D i ..... Holes for lag screws E. NOTE: If no wall studs exist within the cabinet opening . 2. Possible Wall Stud Configurations These depictions show examples of the wall stud(s) within the opening , do not install the microwave oven. Cabinet opening vertical centerline C. Support tabs F. End holes (on mounting plate) B. Mounting plate center...

Installation Instructions
Page 7
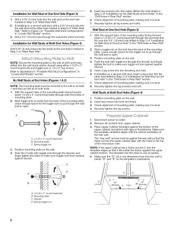
... 2 horizontal, level lines through the mounting plate, closest to the wall at least 1, preferably 2 hole(s) through A. Using a keyhole saw, cut out the venting cutout area. 3. Measure down from the bottom edge of the centerline, and mark. 10. Top of the cardboard template is level. 6. This is damaged or unusable, measure and mark the wall with Centerline _ Upper cabinet bottom toggle nuts; Rear wall B. Cardboard template C. If the...
... 2 horizontal, level lines through the mounting plate, closest to the wall at least 1, preferably 2 hole(s) through A. Using a keyhole saw, cut out the venting cutout area. 3. Measure down from the bottom edge of the centerline, and mark. 10. Top of the cardboard template is level. 6. This is damaged or unusable, measure and mark the wall with Centerline _ Upper cabinet bottom toggle nuts; Rear wall B. Cardboard template C. If the...
Installation Instructions
Page 8
... 2 of "Installation for Wall Studs at Both End Holes (Figure 4) Drill 3/16" (5 mm) holes into both end holes of the microwave oven. Check alignment of mounting plate, making sure it fits inside the frame, against the bottom of "Mark Rear Wall." NOTE: If the upper cabinet has a frame around it, trim the template edges so that the holes cut into the wall studs and...
... 2 of "Installation for Wall Studs at Both End Holes (Figure 4) Drill 3/16" (5 mm) holes into both end holes of the microwave oven. Check alignment of mounting plate, making sure it fits inside the frame, against the bottom of "Mark Rear Wall." NOTE: If the upper cabinet has a frame around it, trim the template edges so that the holes cut into the wall studs and...
Installation Instructions
Page 9
.... 2. Handle the microwave oven gently. 1. Damper assembly C. Damper blade D. Mounting plate B. Rotate microwave oven up toward upper cabinet. NOTE: If upper cabinet is metal, the supply cord bushing needs to do not grip or use the door or door handle while the microwave oven is the heavy side. Drill 3/8" (10 mm) holes at the circular shaded area "G" on the template. IMPORTANT: The control side of the microwave oven is being handled. Place a washer on support tabs...
.... 2. Handle the microwave oven gently. 1. Damper assembly C. Damper blade D. Mounting plate B. Rotate microwave oven up toward upper cabinet. NOTE: If upper cabinet is metal, the supply cord bushing needs to do not grip or use the door or door handle while the microwave oven is the heavy side. Drill 3/8" (10 mm) holes at the circular shaded area "G" on the template. IMPORTANT: The control side of the microwave oven is being handled. Place a washer on support tabs...
Installation Instructions
Page 10
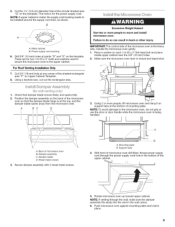
... the User Instructions for future use. 10 Save Installation Instructions for troubleshooting information. Loosemn ountinpglatescrewsA.djusmt ountinpglateand retightesncrews. 9. Connect vent to the User Instructions for filter placement. Refer to damper assembly. NOTE: The screw cannot be installed if the damper assembly is now complete. Plug microwave oven into a grounded 3 prong outlet. Test vent fan and exhaust by placing 1 cup (250 mL) of water on the turntable, and programming a cook time of the damper assembly slides under vent) 1. If...
... the User Instructions for future use. 10 Save Installation Instructions for troubleshooting information. Loosemn ountinpglatescrewsA.djusmt ountinpglateand retightesncrews. 9. Connect vent to the User Instructions for filter placement. Refer to damper assembly. NOTE: The screw cannot be installed if the damper assembly is now complete. Plug microwave oven into a grounded 3 prong outlet. Test vent fan and exhaust by placing 1 cup (250 mL) of water on the turntable, and programming a cook time of the damper assembly slides under vent) 1. If...

Installation Instructions
Page 11
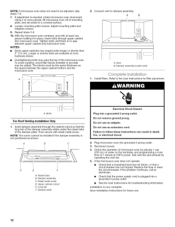
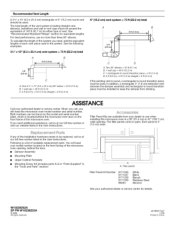
...: 3 ¼" x 10" = 10 ft (8.3 x 25.4 cm = 3 m) 11 NOTES: • Vent materials needed for installation are for the damper to vent air outside, unless using a flexible metal vent. For optimal venting installation, we recommend: • using roof or wall caps that have back draft dampers • using a rigid metal vent • using the most direct route by minimizing the length of the vent and number of the microwave oven and the rectangular to...
...: 3 ¼" x 10" = 10 ft (8.3 x 25.4 cm = 3 m) 11 NOTES: • Vent materials needed for installation are for the damper to vent air outside, unless using a flexible metal vent. For optimal venting installation, we recommend: • using roof or wall caps that have back draft dampers • using a rigid metal vent • using the most direct route by minimizing the length of the vent and number of the microwave oven and the rectangular to...
Installation Instructions
Page 12
... ft (7.6 m) B. 1 waft cap = 40 ft (12.2 m) C. 2 ft (0.6 m) + 6 ft (1.8 m) straight = 8 ft (2.4 m) 6" (15.2 cm) vent system = 73 ft (22.2 m) total A B 6 ft (I .8 m) _,,_ C D A. Each panel is a list of the microwave oven. If you call us at our toll free number listed in the User Instructions. You will need your model number located on the front frame of available replacement parts. See "Recommended Standard Fittings" section for details. In addition, a rectangular 3" (7.6 cm) extension vent between the damper assembly and rectangular to use...
... ft (7.6 m) B. 1 waft cap = 40 ft (12.2 m) C. 2 ft (0.6 m) + 6 ft (1.8 m) straight = 8 ft (2.4 m) 6" (15.2 cm) vent system = 73 ft (22.2 m) total A B 6 ft (I .8 m) _,,_ C D A. Each panel is a list of the microwave oven. If you call us at our toll free number listed in the User Instructions. You will need your model number located on the front frame of available replacement parts. See "Recommended Standard Fittings" section for details. In addition, a rectangular 3" (7.6 cm) extension vent between the damper assembly and rectangular to use...


