Owners Manual
Page 1
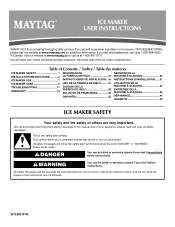
...ICE MAKER USER INSTRUCTIONS THANK YOU for additional information. In Canada, visit our website at www.maytag.ca or call us at www.maytag.com for purchasing this manual and on the inside wall of others . This symbol alerts you to reduce the chance of injury, and tell you should experience a problem not covered... you still need your model and serial number, located on your appliance. Table of Contents / Índice / Table des matières ICE MAKER SAFETY 1 INSTALLATION INSTRUCTIONS............2 ICE MAKER USE 7 ICE MAKER CARE 8 TROUBLESHOOTING 11 WARRANTY 13 SEGURIDAD DE...
...ICE MAKER USER INSTRUCTIONS THANK YOU for additional information. In Canada, visit our website at www.maytag.ca or call us at www.maytag.com for purchasing this manual and on the inside wall of others . This symbol alerts you to reduce the chance of injury, and tell you should experience a problem not covered... you still need your model and serial number, located on your appliance. Table of Contents / Índice / Table des matières ICE MAKER SAFETY 1 INSTALLATION INSTRUCTIONS............2 ICE MAKER USE 7 ICE MAKER CARE 8 TROUBLESHOOTING 11 WARRANTY 13 SEGURIDAD DE...
Owners Manual
Page 2
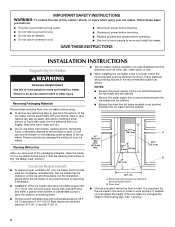
... installation should allow the ice maker to be level in the "Ice Maker Care" section. These products can adjust the height of the ice maker by rubbing a small amount of your ice maker. Floor level ■ Choose a location where the floor is important for servicing if necessary. ■ Installation of the ice maker requires a cold water supply inlet of ¹⁄₄" (6.35 mm) OD soft copper tubing with a shutoff valve and either a gravity-drain...
... installation should allow the ice maker to be level in the "Ice Maker Care" section. These products can adjust the height of the ice maker by rubbing a small amount of your ice maker. Floor level ■ Choose a location where the floor is important for servicing if necessary. ■ Installation of the ice maker requires a cold water supply inlet of ¹⁄₄" (6.35 mm) OD soft copper tubing with a shutoff valve and either a gravity-drain...
Owners Manual
Page 3
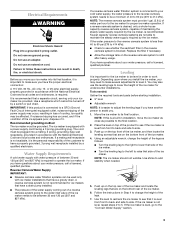
... reverse osmosis system must be level in accordance with a power supply cord having a 3 prong grounding plug. Replace the filter if necessary. ■ Allow the storage tank on the bottom front of 40 to 60 psi (276 to have questions about your cold water supply, the water pressure to the reverse osmosis system needs to follow these instructions can be affected. Use the level to recheck the ice maker...
... reverse osmosis system must be level in accordance with a power supply cord having a 3 prong grounding plug. Replace the filter if necessary. ■ Allow the storage tank on the bottom front of 40 to 60 psi (276 to have questions about your cold water supply, the water pressure to the reverse osmosis system needs to follow these instructions can be affected. Use the level to recheck the ice maker...
Owners Manual
Page 4
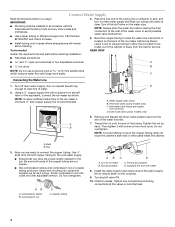
... remain above freezing. 4. Turn shutoff valve ON. 10. A B D A. Vent hose (drain pump models only) C. Check for leaks. ■ Install tubing only in accordance with adjustable wrench. Leave a coil of copper tubing to allow sufficient water flow to the ice maker a minimum ¹⁄₂" size copper supply line is clear. Bulb B. Turn off main water supply. Do not overtighten. Use ¹⁄₄" (6.35 mm) OD soft copper tubing for service. IMPORTANT: ■...
... remain above freezing. 4. Turn shutoff valve ON. 10. A B D A. Vent hose (drain pump models only) C. Check for leaks. ■ Install tubing only in accordance with adjustable wrench. Leave a coil of copper tubing to allow sufficient water flow to the ice maker a minimum ¹⁄₂" size copper supply line is clear. Bulb B. Turn off main water supply. Do not overtighten. Use ¹⁄₄" (6.35 mm) OD soft copper tubing for service. IMPORTANT: ■...
Owners Manual
Page 5
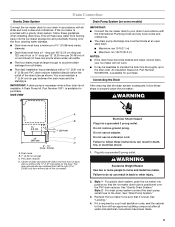
... use an extension cord. Failure to 2" (5.08 cm) PVC drain reducer installed directly below the outlet of run or ¹⁄₄" drop per 12" (6.35 mm per 30.48 cm) of the drain tube as shown. Plug into the ice maker storage bin and potentially flowing onto the floor, causing water damage. ■ Drain lines must have a minimum of 15.88 mm) inside...
... use an extension cord. Failure to 2" (5.08 cm) PVC drain reducer installed directly below the outlet of run or ¹⁄₄" drop per 12" (6.35 mm per 30.48 cm) of the drain tube as shown. Plug into the ice maker storage bin and potentially flowing onto the floor, causing water damage. ■ Drain lines must have a minimum of 15.88 mm) inside...
Owners Manual
Page 6
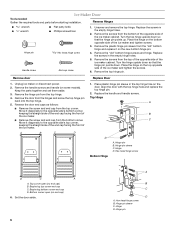
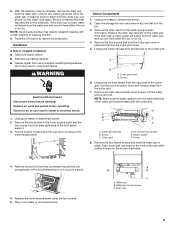
... Hinge A B C D Bottom Hinge A. Unscrew and remove the top hinge. Remove the plastic hinge pin sleeve from the hinges and screw the top hinge pin back into the top hinge. 5. Remove door Replace Door 1. Hinge pin Turn the hinge upside down so that the hinge pin points down so that the hinge pin points up. Set the door aside. 6 A B C D A. Ice Maker Door Tools needed: Gather the required tools and parts before starting installation. Hinge pin Hex head hinge screw 3. Remove...
... Hinge A B C D Bottom Hinge A. Unscrew and remove the top hinge. Remove the plastic hinge pin sleeve from the hinges and screw the top hinge pin back into the top hinge. 5. Remove door Replace Door 1. Hinge pin Turn the hinge upside down so that the hinge pin points down so that the hinge pin points up. Set the door aside. 6 A B C D A. Ice Maker Door Tools needed: Gather the required tools and parts before starting installation. Hinge pin Hex head hinge screw 3. Remove...
Owners Manual
Page 7
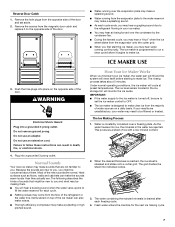
...; Water running over a freezing plate. Electrical Shock Hazard Plug into a grounded 3 prong outlet. Do not use an adapter. Failure to set aside. 2. The Ice Making Process 1. This produces a sheet of the door. Under normal operating conditions, the ice maker will monitor the ice levels. Water is programmed to run a rinse cycle before starting to make clear ice from the flow of the door and set the ice maker control to OFF. ■ The ice maker is turned off...
...; Water running over a freezing plate. Electrical Shock Hazard Plug into a grounded 3 prong outlet. Do not use an adapter. Failure to set aside. 2. The Ice Making Process 1. This produces a sheet of the door. Under normal operating conditions, the ice maker will monitor the ice levels. Water is programmed to run a rinse cycle before starting to make clear ice from the flow of the door and set the ice maker control to OFF. ■ The ice maker is turned off...

Owners Manual
Page 8
... need for Part Number 4396808. NOTES: ■ Pressing the ON/OFF switch does not shut off the ice maker. 2. Do not use abrasive or harsh cleaners. Replace the drain cap securely on stainless steel surfaces. Drain cap 7. Service Light The service light indicates when service is complete. See the "Ice Maker System" and the "Condenser" sections. With hard water of 15 to 20 grains/gal. (4 to avoid premature failure of the water pan located inside...
... need for Part Number 4396808. NOTES: ■ Pressing the ON/OFF switch does not shut off the ice maker. 2. Do not use abrasive or harsh cleaners. Replace the drain cap securely on stainless steel surfaces. Drain cap 7. Service Light The service light indicates when service is complete. See the "Ice Maker System" and the "Condenser" sections. With hard water of 15 to 20 grains/gal. (4 to avoid premature failure of the water pan located inside...
Owners Manual
Page 9
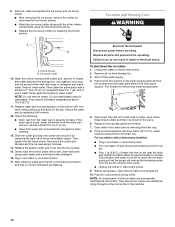
... can result in ice maker or reconnect power. Remove the right-hand and left in place. D A B E C F A. Replace the drain cap securely on the water pan. Replace the lower access panel using the four screws. 6. Remove the two screws in the bin. 3. Condenser A dirty or clogged condenser: ■ Obstructs proper airflow. ■ Reduces ice making capacity. ■ Causes higher than recommended operating temperatures which may require repeated cleaning with one...
... can result in ice maker or reconnect power. Remove the right-hand and left in place. D A B E C F A. Replace the drain cap securely on the water pan. Replace the lower access panel using the four screws. 6. Remove the two screws in the bin. 3. Condenser A dirty or clogged condenser: ■ Obstructs proper airflow. ■ Reduces ice making capacity. ■ Causes higher than recommended operating temperatures which may require repeated cleaning with one...
Owners Manual
Page 10
...) of hoses, and water pan) and the storage bin, door gasket, ice scoop, and ice scoop holder with a soft, clean dishcloth using warm water and a mild liquid dish detergent. 16. Reconnect the cutter grid harness and the ice level sensor harness. 14. Plug in clean water. After cleaning, make sure that all ice from the drain line. To shut down the ice maker: 1. Pull forward to the valve. 6. Before using the following : ■ Drain cap from the...
...) of hoses, and water pan) and the storage bin, door gasket, ice scoop, and ice scoop holder with a soft, clean dishcloth using warm water and a mild liquid dish detergent. 16. Reconnect the cutter grid harness and the ice level sensor harness. 14. Plug in clean water. After cleaning, make sure that all ice from the drain line. To shut down the ice maker: 1. Pull forward to the valve. 6. Before using the following : ■ Drain cap from the...
Owners Manual
Page 11
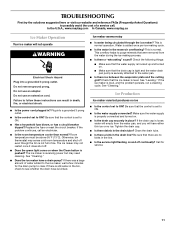
... following things: ■ Make sure that the ice maker is pushed? Check that the water supply is hooked up and turned on . ■ Is the drain cap securely in the line. ■ Is the service light flashing on when the Clean button is level. Call for the drain pump to clear. The ice maker may sense cold room temperature and shut off continually? This is set to ON? TROUBLESHOOTING First try the solutions...
... following things: ■ Make sure that the ice maker is pushed? Check that the water supply is hooked up and turned on . ■ Is the drain cap securely in the line. ■ Is the service light flashing on when the Clean button is level. Call for the drain pump to clear. The ice maker may sense cold room temperature and shut off continually? This is set to ON? TROUBLESHOOTING First try the solutions...
Owners Manual
Page 12
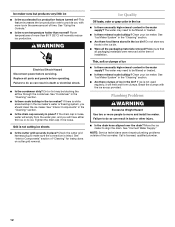
.... If ice is not used regularly, it is loose, water will empty from the water pan, and you will melt and form clumps. See "Connect Water Supply." NOTE: Service technicians cannot repair plumbing problems outside of ice in the water supply? Dirt or lint may need to move and install ice maker. Clean your ice maker. See "Ice Maker System" in death or electrical shock. ■ Is the condenser dirty? Tighten the drain cap if...
.... If ice is not used regularly, it is loose, water will empty from the water pan, and you will melt and form clumps. See "Connect Water Supply." NOTE: Service technicians cannot repair plumbing problems outside of ice in the water supply? Dirt or lint may need to move and install ice maker. Clean your ice maker. See "Ice Maker System" in death or electrical shock. ■ Is the condenser dirty? Tighten the drain cap if...

Owners Manual
Page 13
... States and Canada, this User Instructions and model number information for future reference. 13 In Canada, call 1-800-688-9900. This limited warranty is valid only in the United States or Canada and applies only when the major appliance is contrary to repair or replace appliance light bulbs, air filters or water filters. Major appliances with electrical or plumbing codes, or use or when it was...
... States and Canada, this User Instructions and model number information for future reference. 13 In Canada, call 1-800-688-9900. This limited warranty is valid only in the United States or Canada and applies only when the major appliance is contrary to repair or replace appliance light bulbs, air filters or water filters. Major appliances with electrical or plumbing codes, or use or when it was...
Warranty Information
Page 1
... United States and Canada, contact your authorized Maytag dealer to determine if another warranty applies. 9/07 For additional product information, in -home service is required to use of your major appliance. Repairs when your major appliance is used in your complete model number ready. Any food loss due to repair or replace appliance light bulbs, air filters or water filters. Service must be easily determined. Outside the...
... United States and Canada, contact your authorized Maytag dealer to determine if another warranty applies. 9/07 For additional product information, in -home service is required to use of your major appliance. Repairs when your major appliance is used in your complete model number ready. Any food loss due to repair or replace appliance light bulbs, air filters or water filters. Service must be easily determined. Outside the...


