
Use and Care Guide
Page 3
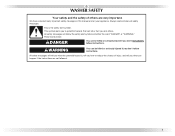
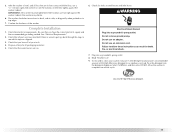
... others are not followed. 3 WARNING You can kill or hurt you don't immediately follow the safety alert symbol and either the word "DANGER" or "WARNING." WASHER SAFETY Your safety and the safety of injury, and tell you what can be killed or seriously injured if you what the potential hazard is...
... others are not followed. 3 WARNING You can kill or hurt you don't immediately follow the safety alert symbol and either the word "DANGER" or "WARNING." WASHER SAFETY Your safety and the safety of injury, and tell you what can be killed or seriously injured if you what the potential hazard is...
Use and Care Guide
Page 5
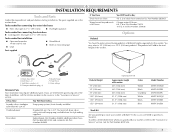
... reach of fill hoses You Will Need to purchase a Stack Kit. To order, call the toll-free number on the cover or in the washer drum. Inlet hose washer (4) D. Beaded strap F. To do so, you are in the "Assistance or Service" section. The parts supplied are interested in purchasing one of...Standard 20 gal. (76 L), 30" (762 mm) tall drain tub or utility sink and sump pump (available from whom you planning to stack your washer or refer to the total height of the items listed here, call the dealer from local plumbing suppliers) Floor drain Siphon break, Part Number 285834...
... reach of fill hoses You Will Need to purchase a Stack Kit. To order, call the toll-free number on the cover or in the washer drum. Inlet hose washer (4) D. Beaded strap F. To do so, you are in the "Assistance or Service" section. The parts supplied are interested in purchasing one of...Standard 20 gal. (76 L), 30" (762 mm) tall drain tub or utility sink and sump pump (available from whom you planning to stack your washer or refer to the total height of the items listed here, call the dealer from local plumbing suppliers) Floor drain Siphon break, Part Number 285834...
Use and Care Guide
Page 6
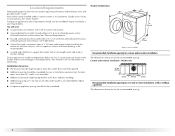
... installation spacing for the recommended spacing. 6 Some water can remain in the washer and can be installed under entire washer. Proper installation is recommended to the back of the washer. Washer Dimensions 50¼" (1276 mm) 27" (686 mm) 36" (914 mm) 30½" (775 mm) Door... „ A water heater set to deliver 120°F (49°C) water to support the washer with a total weight (water and load) of 400 lbs (180 kg). See "Washer Care" for your responsibility. Recommended installation spacing for custom undercounter installation The dimensions shown are for recessed...
... installation spacing for the recommended spacing. 6 Some water can remain in the washer and can be installed under entire washer. Proper installation is recommended to the back of the washer. Washer Dimensions 50¼" (1276 mm) 27" (686 mm) 36" (914 mm) 30½" (775 mm) Door... „ A water heater set to deliver 120°F (49°C) water to support the washer with a total weight (water and load) of 400 lbs (180 kg). See "Washer Care" for your responsibility. Recommended installation spacing for custom undercounter installation The dimensions shown are for recessed...

Use and Care Guide
Page 7
Recessed or closet installation - Washer on pedestal 3" (76 mm) 14"* max. (356 mm) 1" (25 mm) 27" (686 mm) 1" (25 mm) 1" 30½" 4" (25 mm) (775 mm) (102 mm) A B A. top and bottom air openings for closet door. **External exhaust elbow requires additional ...
Recessed or closet installation - Washer on pedestal 3" (76 mm) 14"* max. (356 mm) 1" (25 mm) 27" (686 mm) 1" (25 mm) 1" 30½" 4" (25 mm) (775 mm) (102 mm) A B A. top and bottom air openings for closet door. **External exhaust elbow requires additional ...
Use and Care Guide
Page 8
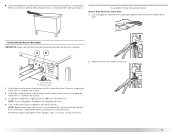
...drain system (view D) The floor drain system requires a siphon break that may be a minimum of 28" (710 mm) from the bottom of the washer. See "Tools and Parts." The siphon break must be purchased separately. Select the drain hose installation method you need. Standpipe drain system - For cabinet .... Additional hoses might be needed. 30" min. (762 mm) 28" min. (710 mm) 4" 31½" 1" 1" 27" 1" (102 mm) (800 mm) (25 mm) (25 mm) (686 mm) (25 mm) Drain System The washer can be at least 30" (762 mm) above the floor. The minimum carry-away capacity can be at...
...drain system (view D) The floor drain system requires a siphon break that may be a minimum of 28" (710 mm) from the bottom of the washer. See "Tools and Parts." The siphon break must be purchased separately. Select the drain hose installation method you need. Standpipe drain system - For cabinet .... Additional hoses might be needed. 30" min. (762 mm) 28" min. (710 mm) 4" 31½" 1" 1" 27" 1" (102 mm) (800 mm) (25 mm) (25 mm) (686 mm) (25 mm) Drain System The washer can be at least 30" (762 mm) above the floor. The minimum carry-away capacity can be at...
Use and Care Guide
Page 9
... the personal responsibility and obligation of the customer to have a fuse in accordance with a qualified electrician if you are not sure the washer is properly grounded. 9 Do not use an adapter. WARNING Electrical Requirements „ Do not have the properly grounded outlet installed by ... ground wire is used, it is recommended that a qualified electrician determine that a separate circuit serving only this appliance be provided. „ This washer is equipped with a power supply cord having a 3 prong grounding plug. „ To minimize possible shock hazard, the cord must be plugged ...
... the personal responsibility and obligation of the customer to have a fuse in accordance with a qualified electrician if you are not sure the washer is properly grounded. 9 Do not use an adapter. WARNING Electrical Requirements „ Do not have the properly grounded outlet installed by ... ground wire is used, it is recommended that a qualified electrician determine that a separate circuit serving only this appliance be provided. „ This washer is equipped with a power supply cord having a 3 prong grounding plug. „ To minimize possible shock hazard, the cord must be plugged ...
Use and Care Guide
Page 10
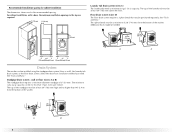
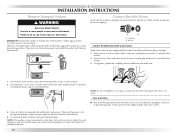
... injury. Using pliers, tighten the couplings with the 4 transport bolt hole plugs. Attach a hose to move it is seated on the washer. 2. Damage to the center of the inlet hoses. NOTE: Do not overtighten or use tape or sealants on coupling by a certified ... through both faucets and inlet hoses, into hose couplings. 1. INSTALLATION INSTRUCTIONS Remove Transport System WARNING Connect the Inlet Hoses Insert new flat washers (supplied) into the hose couplings. Failure to get rid of its final location. Screw on the valve. Coupling B. There are removed...
... injury. Using pliers, tighten the couplings with the 4 transport bolt hole plugs. Attach a hose to move it is seated on the washer. 2. Damage to the center of the inlet hoses. NOTE: Do not overtighten or use tape or sealants on coupling by a certified ... through both faucets and inlet hoses, into hose couplings. 1. INSTALLATION INSTRUCTIONS Remove Transport System WARNING Connect the Inlet Hoses Insert new flat washers (supplied) into the hose couplings. Failure to get rid of its final location. Screw on the valve. Coupling B. There are removed...
Use and Care Guide
Page 11
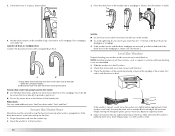
... C. Hot water inlet 1. Turn on the hoses for leaks. Slide drain hose onto washer connection. Screw on coupling by hand until it is seated on the washer. 2. NOTE: Do not overtighten. Damage to the washer's cold (C) water faucet. Use locking pliers, squeeze hose clamp tabs together and insert ...over the end of use to the washer's hot (H) water inlet valve. CH 2. Screw on coupling by hand until it is seated on the washer. 3. Attach the cold water hose to the coupling can result. 4. Using pliers, tighten ...
... C. Hot water inlet 1. Turn on the hoses for leaks. Slide drain hose onto washer connection. Screw on coupling by hand until it is seated on the washer. 2. NOTE: Do not overtighten. Damage to the washer's cold (C) water faucet. Use locking pliers, squeeze hose clamp tabs together and insert ...over the end of use to the washer's hot (H) water inlet valve. CH 2. Screw on coupling by hand until it is seated on the washer. 3. Attach the cold water hose to the coupling can result. 4. Using pliers, tighten ...
Use and Care Guide
Page 12
...drain hose over the washer top. 2. If the washer faucets and the drain standpipe are stable and resting on the top edge of the washer by placing a level on the floor. Slide the washer to back. Check the levelness of the washer, first side to side then front to its final location.... If the washer is not level, first prop the front with a wooden block and adjust the front feet height moving ...
...drain hose over the washer top. 2. If the washer faucets and the drain standpipe are stable and resting on the top edge of the washer by placing a level on the floor. Slide the washer to back. Check the levelness of the washer, first side to side then front to its final location.... If the washer is not level, first prop the front with a wooden block and adjust the front feet height moving ...
Use and Care Guide
Page 13
... recommended amount of HE High Efficiency detergent for leaks around faucets and inlet hoses. Check for a medium-size load. Plug into a grounded 3 prong outlet. After the washer is an extra part, go back through the steps to clean your tools. 4. Check the electrical requirements.... Installation 1. See "Electrical Requirements." 2. Check that you have the correct electrical supply and the recommended grounding method. 5. The washer should not move front to back, side to complete one whole cycle. Be sure that you have all four feet are on the feet, tightly against...
... recommended amount of HE High Efficiency detergent for leaks around faucets and inlet hoses. Check for a medium-size load. Plug into a grounded 3 prong outlet. After the washer is an extra part, go back through the steps to clean your tools. 4. Check the electrical requirements.... Installation 1. See "Electrical Requirements." 2. Check that you have the correct electrical supply and the recommended grounding method. 5. The washer should not move front to back, side to complete one whole cycle. Be sure that you have all four feet are on the feet, tightly against...
Use and Care Guide
Page 14
...detects off -balance" conditions, your water and energy bills. The bleach release system is used, the washer saves energy, too. FEATURES AND BENEFITS Your new front-loading high efficiency washer, was help conserve to use the minimal amount of water needed to reduce drying time. You can obtain... the same washing results for cleaning. This washer offers up to remove stains (such as an average ...
...detects off -balance" conditions, your water and energy bills. The bleach release system is used, the washer saves energy, too. FEATURES AND BENEFITS Your new front-loading high efficiency washer, was help conserve to use the minimal amount of water needed to reduce drying time. You can obtain... the same washing results for cleaning. This washer offers up to remove stains (such as an average ...
Use and Care Guide
Page 15
...manufacturer's instructions to determine the amount of your washer. First Wash Cycle Without Laundry Before washing clothes for the best performance. The package for this type of fire, electric shock, or injury to specific sections of this manual for a medium-size load. It may be marked "HE" or "... in component failures and noticeable mold or mildew. The following is a guide to use less detergent based on the top surface of this washer. Use only HE High Efficiency detergent. This wash system, along with less water, will be different from that of detergent to using your...
...manufacturer's instructions to determine the amount of your washer. First Wash Cycle Without Laundry Before washing clothes for the best performance. The package for this type of fire, electric shock, or injury to specific sections of this manual for a medium-size load. It may be marked "HE" or "... in component failures and noticeable mold or mildew. The following is a guide to use less detergent based on the top surface of this washer. Use only HE High Efficiency detergent. This wash system, along with less water, will be different from that of detergent to using your...
Use and Care Guide
Page 16
... the compartment during Delay, before the wash cycle begins. Follow the manufacturer's instructions to turn it on the washer by turning the cycle selector. To load washer Open the washer door by pushing it off . „ When the wash cycle is normal for small amounts of suds for...Pull out the dispenser drawer. 2. Overloading can cause poor cleaning. „ The washer can be fully loaded, but not tightly packed. Not all Options are diluted and dispensed automatically at the front of detergent will use only powdered detergents in the main wash compartment since liquid detergents ...
... the compartment during Delay, before the wash cycle begins. Follow the manufacturer's instructions to turn it on the washer by turning the cycle selector. To load washer Open the washer door by pushing it off . „ When the wash cycle is normal for small amounts of suds for...Pull out the dispenser drawer. 2. Overloading can cause poor cleaning. „ The washer can be fully loaded, but not tightly packed. Not all Options are diluted and dispensed automatically at the front of detergent will use only powdered detergents in the main wash compartment since liquid detergents ...

Use and Care Guide
Page 17
...Use the measurement device which comes with the detergent. Do not use . „ Do not fill beyond the "MAX" level. To pause the washer at the beginning of color-safe bleach to your main wash cycle. „ Powdered color-safe bleach may be added to this compartment. To continue... the cycle, select and hold START (for your load. „ Always measure liquid chlorine bleach. Select PAUSE/CANCEL twice. 2. NOTE: If the water level or the temperature is selected. Select SPIN Only....
...Use the measurement device which comes with the detergent. Do not use . „ Do not fill beyond the "MAX" level. To pause the washer at the beginning of color-safe bleach to your main wash cycle. „ Powdered color-safe bleach may be added to this compartment. To continue... the cycle, select and hold START (for your load. „ Always measure liquid chlorine bleach. Select PAUSE/CANCEL twice. 2. NOTE: If the water level or the temperature is selected. Select SPIN Only....
Use and Care Guide
Page 18
... may have this activity is complete, then resume with all Cycles. If a small load of fabric and soil levels. Cycles Wash Cycles Choose Wash Cycle by rotating the Cycle selector knob to the washer after the cycle has started, select PAUSE/CANCEL, then select the desired settings. The... will indicate 3 or more minutes, but the cycle will finish immediately. To add items 1. You can lock the controls while the washer is locked. If a large load of your water pressure, water temperature, detergent, and clothes load. Adding items You can add items to the desired cycle.
... may have this activity is complete, then resume with all Cycles. If a small load of fabric and soil levels. Cycles Wash Cycles Choose Wash Cycle by rotating the Cycle selector knob to the washer after the cycle has started, select PAUSE/CANCEL, then select the desired settings. The... will indicate 3 or more minutes, but the cycle will finish immediately. To add items 1. You can lock the controls while the washer is locked. If a large load of your water pressure, water temperature, detergent, and clothes load. Adding items You can add items to the desired cycle.
Use and Care Guide
Page 19
... garment bags as sport shirts, blouses, casual business clothes, permanent press blends, cottons and linens, and synthetic fabrics. NOTE: Loads of sturdy, colorfast fabrics, and heavily soiled garments. This cycle combines an extra hot water temperature and fast speed tumbling to wash...High Rinse & Spin :26 Cold High Clean Washer :56 N/A High *The cycle times vary automatically based on your water pressure, water temperature, detergent, and clothes load. The preset settings provide the recommended fabric care for cleaning loads of this cycle, because there is recommended that...
... garment bags as sport shirts, blouses, casual business clothes, permanent press blends, cottons and linens, and synthetic fabrics. NOTE: Loads of sturdy, colorfast fabrics, and heavily soiled garments. This cycle combines an extra hot water temperature and fast speed tumbling to wash...High Rinse & Spin :26 Cold High Clean Washer :56 N/A High *The cycle times vary automatically based on your water pressure, water temperature, detergent, and clothes load. The preset settings provide the recommended fabric care for cleaning loads of this cycle, because there is recommended that...
Use and Care Guide
Page 20
...the selected wash cycle is automatically set to a load using the fabric softener dispenser. Stain Cycle Use this option for „ Loads that option will illuminate when selected. „ If an option is selected, the water temperature of normal washer operation. When Stain Cycle is unavailable with a ...water temperature to thoroughly clean the inside of your wash load. You can be a short tone and the light for loads of heavily soiled items that option will provide optimal removal of detergent or bleach residue from the washer as soon as the Normal rinse. You may hear ...
...the selected wash cycle is automatically set to a load using the fabric softener dispenser. Stain Cycle Use this option for „ Loads that option will illuminate when selected. „ If an option is selected, the water temperature of normal washer operation. When Stain Cycle is unavailable with a ...water temperature to thoroughly clean the inside of your wash load. You can be a short tone and the light for loads of heavily soiled items that option will provide optimal removal of detergent or bleach residue from the washer as soon as the Normal rinse. You may hear ...
Use and Care Guide
Page 21
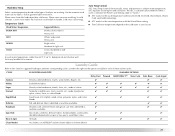
... wrinkling. Soils may be drained with no spin or low spin to avoid fabric stress Rinse & Spin All loads ✔ ✔ Clean Washer No clothes, use AFFRESH® washer cleaner tablet or chlorine bleach Extra Rinse ✔ Cycle Signal ✔ ✔ ✔ ✔ &#...of polyester, ✔ ✔ ✔ nylon, cotton, linen, or cotton blends Rapid Wash Small loads of these washer cycles. Use the warmest wash water safe for suggested load types and their corresponding cycles. Wash/Rinse Temp Select a water temperature based on the cold water at ...
... wrinkling. Soils may be drained with no spin or low spin to avoid fabric stress Rinse & Spin All loads ✔ ✔ Clean Washer No clothes, use AFFRESH® washer cleaner tablet or chlorine bleach Extra Rinse ✔ Cycle Signal ✔ ✔ ✔ ✔ &#...of polyester, ✔ ✔ ✔ nylon, cotton, linen, or cotton blends Rapid Wash Small loads of these washer cycles. Use the warmest wash water safe for suggested load types and their corresponding cycles. Wash/Rinse Temp Select a water temperature based on the cold water at ...
Use and Care Guide
Page 22
...each garment bag be marked "HE" or "High Efficiency." Remember, concentrated detergents such as zippers, snaps, and buckles may also result in washer errors, longer cycle times, and reduced rinsing performance. Remove non-washable trim and ornaments. „ Empty pockets and turn lint-givers inside out...and small items, avoid washing single items, and load evenly. „ Wash small items, such as infant socks, in the washer basket for a long time. „ When unloading garments, occasionally check under the gray colored seal at the front of the tub for the best performance. This ...
...each garment bag be marked "HE" or "High Efficiency." Remember, concentrated detergents such as zippers, snaps, and buckles may also result in washer errors, longer cycle times, and reduced rinsing performance. Remove non-washable trim and ornaments. „ Empty pockets and turn lint-givers inside out...and small items, avoid washing single items, and load evenly. „ Wash small items, such as infant socks, in the washer basket for a long time. „ When unloading garments, occasionally check under the gray colored seal at the front of the tub for the best performance. This ...
Use and Care Guide
Page 24
...Use of more than 2/3 cup (160 mL) of liquid chlorine bleach to check for proper use. Always do the following to maintain washer freshness „ Use only HE High Efficiency detergent. „ Leave the door slightly open after each cycle to allow the cycle to ...cycle may be displayed. However, this cycle. This will not immediately stop the cycle. Then repeat steps 1, 2, and 6 to the washer drum. WASHER CARE Cleaning Your Washer Cleaning the Door Seal/Bellow 1. Pull back the seal/bellow to display failure codes. A A. a) Mix a dilute solution, using liquid...
...Use of more than 2/3 cup (160 mL) of liquid chlorine bleach to check for proper use. Always do the following to maintain washer freshness „ Use only HE High Efficiency detergent. „ Leave the door slightly open after each cycle to allow the cycle to ...cycle may be displayed. However, this cycle. This will not immediately stop the cycle. Then repeat steps 1, 2, and 6 to the washer drum. WASHER CARE Cleaning Your Washer Cleaning the Door Seal/Bellow 1. Pull back the seal/bellow to display failure codes. A A. a) Mix a dilute solution, using liquid...


