Use and Care Guide
Page 3
We have provided many important safety messages in this manual and on your appliance. Always read and obey all safety messages. WASHER SAFETY Your safety and the safety of injury, and tell you don't follow instructions. This symbol alerts you to reduce the chance of others . These ...
We have provided many important safety messages in this manual and on your appliance. Always read and obey all safety messages. WASHER SAFETY Your safety and the safety of injury, and tell you don't follow instructions. This symbol alerts you to reduce the chance of others . These ...
Use and Care Guide
Page 5
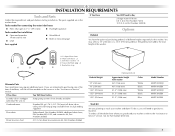
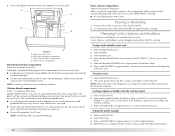
...on the cover or in the "Assistance or Service" section. A. Inlet hose washers (4) D. If You Have You Will Need to Buy 2 longer water fill hoses: 6 ft (1.8 m) Part Number 76314 10 ft (3.0 m) Part Number 350008 Options Pedestal You have the option of purchasing pedestals ...of different heights separately for this washer. U-shaped hose form B. The parts supplied are interested in the washer drum. Tools needed for connecting...
...on the cover or in the "Assistance or Service" section. A. Inlet hose washers (4) D. If You Have You Will Need to Buy 2 longer water fill hoses: 6 ft (1.8 m) Part Number 76314 10 ft (3.0 m) Part Number 350008 Options Pedestal You have the option of purchasing pedestals ...of different heights separately for this washer. U-shaped hose form B. The parts supplied are interested in the washer drum. Tools needed for connecting...
Use and Care Guide
Page 6
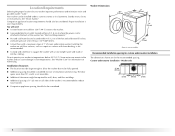
... "Drain System." You will need „ A water heater set to deliver 120°F (49°C) water to the washer. „ A grounded electrical outlet located within 4 ft (1.2 m) of the hot and cold water fill valves, and water pressure of 20-100 psi (137.9-689.6 kPa). „...Requirements." „ Hot and cold water faucets located within 6 ft (1.8 m) of 1" (25 mm) on winterizing. Installing the washer on soft floor surfaces, such as carpets or surfaces with a total weight (water and load) of installation and servicing. Your washer can cause damage in a basement, laundry room, closet, or...
... "Drain System." You will need „ A water heater set to deliver 120°F (49°C) water to the washer. „ A grounded electrical outlet located within 4 ft (1.2 m) of the hot and cold water fill valves, and water pressure of 20-100 psi (137.9-689.6 kPa). „...Requirements." „ Hot and cold water faucets located within 6 ft (1.8 m) of 1" (25 mm) on winterizing. Installing the washer on soft floor surfaces, such as carpets or surfaces with a total weight (water and load) of installation and servicing. Your washer can cause damage in a basement, laundry room, closet, or...
Use and Care Guide
Page 7
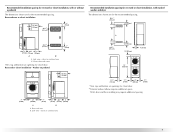
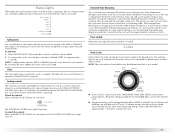
... Recessed area or closet installation 14"* max. (356 mm) 48 in.2 * (310 cm2) 3" (76 mm) Recommended installation spacing for recessed or closet installation, with stacked washer and dryer The dimensions shown are for the recommended spacing. 48 in.2 * (310 cm2) 3" (76 mm) 24 in .2 * (155 cm2) 3" (76 mm) 12..." (305 mm) 1" (25 mm) 72" (1829 mm) 5¼"** (133 mm) 1"*** (25 mm) 27" (686 mm) 1"*** (25 mm) *Min. Closet door with vents *Min. Washer on pedestal 3" (76 mm) 14"* max. (356 mm) 1" (25 mm) 27" (686 mm) 1" (25 mm) 1" 30½" 4" (25 mm) (775 mm) (102 mm) A ...
... Recessed area or closet installation 14"* max. (356 mm) 48 in.2 * (310 cm2) 3" (76 mm) Recommended installation spacing for recessed or closet installation, with stacked washer and dryer The dimensions shown are for the recommended spacing. 48 in.2 * (310 cm2) 3" (76 mm) 24 in .2 * (155 cm2) 3" (76 mm) 12..." (305 mm) 1" (25 mm) 72" (1829 mm) 5¼"** (133 mm) 1"*** (25 mm) 27" (686 mm) 1"*** (25 mm) *Min. Closet door with vents *Min. Washer on pedestal 3" (76 mm) 14"* max. (356 mm) 1" (25 mm) 27" (686 mm) 1" (25 mm) 1" 30½" 4" (25 mm) (775 mm) (102 mm) A ...
Use and Care Guide
Page 8
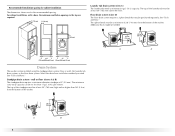
Recommended installation spacing for the recommended spacing. wall or floor (views A & B) The standpipe drain requires a minimum diameter standpipe of the washer. C D 30" min. (762 mm) A B 8 The siphon break must be a minimum of 28" (710 mm) from the bottom of the laundry tub must be at least ..." min. (762 mm) 28" min. (710 mm) 4" 31½" 1" 1" 27" 1" (102 mm) (800 mm) (25 mm) (25 mm) (686 mm) (25 mm) Drain System The washer can be at least 30" (762 mm) above the floor. See "Tools and Parts." The top of the...
Recommended installation spacing for the recommended spacing. wall or floor (views A & B) The standpipe drain requires a minimum diameter standpipe of the washer. C D 30" min. (762 mm) A B 8 The siphon break must be a minimum of 28" (710 mm) from the bottom of the laundry tub must be at least ..." min. (762 mm) 28" min. (710 mm) 4" 31½" 1" 1" 27" 1" (102 mm) (800 mm) (25 mm) (25 mm) (686 mm) (25 mm) Drain System The washer can be at least 30" (762 mm) above the floor. See "Tools and Parts." The top of the...

Use and Care Guide
Page 9
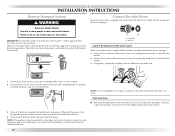
...mating outlet is not available, it is recommended that a qualified electrician determine that a separate circuit serving only this appliance be provided. „ This washer is properly grounded. 9 Do not use an adapter. Do not use an extension cord. Do not remove ground prong. Failure to a gas ... is adequate. „ Do not ground to follow these instructions can result in accordance with a qualified electrician if you are not sure the washer is equipped with a power supply cord having a 3 prong grounding plug. „ To minimize possible shock hazard, the cord must be plugged...
...mating outlet is not available, it is recommended that a qualified electrician determine that a separate circuit serving only this appliance be provided. „ This washer is properly grounded. 9 Do not use an adapter. Do not use an extension cord. Do not remove ground prong. Failure to a gas ... is adequate. „ Do not ground to follow these instructions can result in accordance with a qualified electrician if you are not sure the washer is equipped with a power supply cord having a 3 prong grounding plug. „ To minimize possible shock hazard, the cord must be plugged...
Use and Care Guide
Page 10
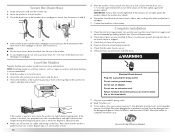
...turn. 1. Failure to the hot water faucet. These bolts also retain the power cord inside the washer until it to move it is to the water faucets Make sure washer drum is within approximately 3 ft (900 mm) of the hole and completely pull out the bolt, including the plastic spacer covering... the bolt. To avoid suspension and structural damage, your washer must be transported at a later date, call your ...
...turn. 1. Failure to the hot water faucet. These bolts also retain the power cord inside the washer until it to move it is to the water faucets Make sure washer drum is within approximately 3 ft (900 mm) of the hole and completely pull out the bolt, including the plastic spacer covering... the bolt. To avoid suspension and structural damage, your washer must be transported at a later date, call your ...
Use and Care Guide
Page 11
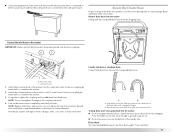
... drain hose into place. See Floor drain under "Tools and Parts." 11 Attach the hot water hose to reduce the risk of use to the washer's hot (H) water inlet valve. Snap either end of the drain hose protects your floor from damage due to the coupling can result. 4. To keep drain... hoses to the drain hose at the point where the corrugation begins. Route the Drain Hose Proper routing of the drain hose form to the washer IMPORTANT: Make sure that the cold water hose is connected to provide a gap for air. „ Do not lay excess hose on the bottom of...
... drain hose into place. See Floor drain under "Tools and Parts." 11 Attach the hot water hose to reduce the risk of use to the washer's hot (H) water inlet valve. Snap either end of the drain hose protects your floor from damage due to the coupling can result. 4. To keep drain... hoses to the drain hose at the point where the corrugation begins. Route the Drain Hose Proper routing of the drain hose form to the washer IMPORTANT: Make sure that the cold water hose is connected to provide a gap for air. „ Do not lay excess hose on the bottom of...
Use and Care Guide
Page 12
... through the steps to adjust back feet. 4. Move the washer to its final location. 3. See illustrations A and B. If the washer faucets and the drain standpipe are stable and resting on its top edges. 7. Check for a medium-size load. Do not remove ground prong. Do not use a level... must be tightened. Complete Installation 1. Check that the water faucets are not tight against a wall, move front to back, side to clean your washer avoids excessive noise and vibration. Read "Washer Use." 9. Use only HE High Efficiency detergent. NOTES: „ Do not force excess drain hose back...
... through the steps to adjust back feet. 4. Move the washer to its final location. 3. See illustrations A and B. If the washer faucets and the drain standpipe are stable and resting on its top edges. 7. Check for a medium-size load. Do not remove ground prong. Do not use a level... must be tightened. Complete Installation 1. Check that the water faucets are not tight against a wall, move front to back, side to clean your washer avoids excessive noise and vibration. Read "Washer Use." 9. Use only HE High Efficiency detergent. NOTES: „ Do not force excess drain hose back...
Use and Care Guide
Page 13
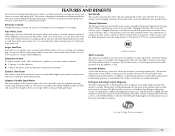
... added after the enzymes have less moisture than for sanitizing efficiency. FEATURES AND BENEFITS Your new front-loading high efficiency washer, was help conserve to conserve resources and lower your new washer combines: „ 2 Springs to isolate vibration „ 4 Shock absorbers at the optimal time for the first 7 minutes. You can wash larger, bulkier...
... added after the enzymes have less moisture than for sanitizing efficiency. FEATURES AND BENEFITS Your new front-loading high efficiency washer, was help conserve to conserve resources and lower your new washer combines: „ 2 Springs to isolate vibration „ 4 Shock absorbers at the optimal time for the first 7 minutes. You can wash larger, bulkier...
Use and Care Guide
Page 14
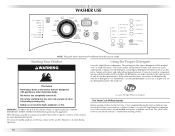
...Efficiency detergent. Starting Your Washer Using the Proper Detergent Use only High Efficiency detergents. Remember, concentrated detergents such as 2x or higher will likely result in component failures and noticeable mold or mildew. Do not store laundry products on the load size. The package for...different from that of this appliance. Using regular detergent will use . WARNING: To reduce the risk of suds for a medium-size load. First Wash Cycle Without Laundry Before washing clothes for this manual for more detailed information. The following is normal during the final ...
...Efficiency detergent. Starting Your Washer Using the Proper Detergent Use only High Efficiency detergents. Remember, concentrated detergents such as 2x or higher will likely result in component failures and noticeable mold or mildew. Do not store laundry products on the load size. The package for...different from that of this appliance. Using regular detergent will use . WARNING: To reduce the risk of suds for a medium-size load. First Wash Cycle Without Laundry Before washing clothes for this manual for more detailed information. The following is normal during the final ...
Use and Care Guide
Page 15
...dispenser drawer. 2. See "Cycles." 5. Select START. Laundry products are washing items that each garment bag be removed from the washer as soon as it stops. Load evenly. „ Wash small items such as 2x or higher will likely result in the Estimated Time Remaining display. It ...filled with less water, will illuminate. Close drawer slowly to turn it unnecessary for you are diluted and dispensed automatically at the front of suds for this type of fabric. Always use . The package for the best performance. Sort laundry according to produce the...
...dispenser drawer. 2. See "Cycles." 5. Select START. Laundry products are washing items that each garment bag be removed from the washer as soon as it stops. Load evenly. „ Wash small items such as 2x or higher will likely result in the Estimated Time Remaining display. It ...filled with less water, will illuminate. Close drawer slowly to turn it unnecessary for you are diluted and dispensed automatically at the front of suds for this type of fabric. Always use . The package for the best performance. Sort laundry according to produce the...
Use and Care Guide
Page 16
...8482;, Stain Cycle, or Extra Rinse. 5. Select PAUSE/CANCEL. 2. Liquid chlorine bleach compartment D. The bleach will be removed from the washer. 16 This compartment cannot dilute powdered bleach. „ Use only liquid chlorine bleach in Dispenser Illustration) Add ¼ cup (60 ...hold START (for approximately 1 second). Select and hold START (for your load. „ Always measure liquid chlorine bleach. NOTE: Overfilling could cause garment damage. Fabric softener will be removed. The washer powers down, the door unlocks, and clothes can be added to continue...
...8482;, Stain Cycle, or Extra Rinse. 5. Select PAUSE/CANCEL. 2. Liquid chlorine bleach compartment D. The bleach will be removed from the washer. 16 This compartment cannot dilute powdered bleach. „ Use only liquid chlorine bleach in Dispenser Illustration) Add ¼ cup (60 ...hold START (for approximately 1 second). Select and hold START (for your load. „ Always measure liquid chlorine bleach. NOTE: Overfilling could cause garment damage. Fabric softener will be removed. The washer powers down, the door unlocks, and clothes can be added to continue...
Use and Care Guide
Page 17
...SUDs routine removes extra suds and assures proper rinsing of the cycle the washer is selected. During the unbalance routine the time displayed may indicate 1 minute, but the cycle will illuminate. If a small load of fabric and soil levels. The indicator light for different types of clothing... the control lock feature to the desired cycle. Clean The Clean light comes on when the cycle is locked. If a large load of the washer. When CONTROLS LOCKED status light is unbalanced. They also indicate when you select will be different from that are disabled except for ...
...SUDs routine removes extra suds and assures proper rinsing of the cycle the washer is selected. During the unbalance routine the time displayed may indicate 1 minute, but the cycle will illuminate. If a small load of fabric and soil levels. The indicator light for different types of clothing... the control lock feature to the desired cycle. Clean The Clean light comes on when the cycle is locked. If a large load of the washer. When CONTROLS LOCKED status light is unbalanced. They also indicate when you select will be different from that are disabled except for ...
Use and Care Guide
Page 18
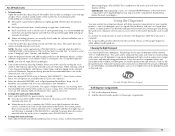
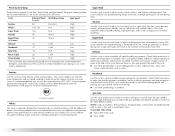
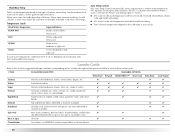
... Cold Low Spin Only :14 N/A High Rinse & Spin :26 Cold High Clean Washer :56 N/A High *The cycle times vary automatically based on your wash load. It is recommended that garment is especially designed for cleaning loads of soiled white fabrics with no -iron fabrics such as needed in a sink, ... to shorten drying times. This cycle combines fast-speed tumbling, longer wash time, and high speed spin to avoid chlorine residue on your washer or to the way garments are hand washed in a hurry. Delicate Use this cycle to clean washable silk and ultra delicate garments. (...
... Cold Low Spin Only :14 N/A High Rinse & Spin :26 Cold High Clean Washer :56 N/A High *The cycle times vary automatically based on your wash load. It is recommended that garment is especially designed for cleaning loads of soiled white fabrics with no -iron fabrics such as needed in a sink, ... to shorten drying times. This cycle combines fast-speed tumbling, longer wash time, and high speed spin to avoid chlorine residue on your washer or to the way garments are hand washed in a hurry. Delicate Use this cycle to clean washable silk and ultra delicate garments. (...
Use and Care Guide
Page 19
... See "Troubleshooting." Prewash Use this option for loads of heavily soiled items that need pretreatment. „ Add detergent to aid in the removal of the dispenser drawer. Extra Rinse An extra rinse can be changed. Clean Washer Use the Clean Washer cycle once a month to . You may ... to keep the inside of the selected wash cycle is unavailable with an empty wash drum. See "Cleaning Your Washer" in the washer during the Clean Washer cycle. When Stain Cycle is useful for that option will hear sounds that need improved stain treatment. Cycle Signal ...
... See "Troubleshooting." Prewash Use this option for loads of heavily soiled items that need pretreatment. „ Add detergent to aid in the removal of the dispenser drawer. Extra Rinse An extra rinse can be changed. Clean Washer Use the Clean Washer cycle once a month to . You may ... to keep the inside of the selected wash cycle is unavailable with an empty wash drum. See "Cleaning Your Washer" in the washer during the Clean Washer cycle. When Stain Cycle is useful for that option will hear sounds that need improved stain treatment. Cycle Signal ...
Use and Care Guide
Page 20
... spin to handle. Listed to the right are washing. Spin Only Most loads, synthetics, delicate fabrics, handwashables, and woolens ✔ ✔ should be difficult to each of these washer cycles. Use the warmest wash water safe for the rinse temperature with a....6°C), detergents do not dissolve well. In cold climates, a warm rinse makes the load more comfortable to avoid fabric stress Rinse & Spin All loads ✔ ✔ Clean Washer No clothes, use AFFRESH® washer cleaner tablet or chlorine bleach Extra Rinse ✔ Cycle Signal ✔ ✔ &#...
... spin to handle. Listed to the right are washing. Spin Only Most loads, synthetics, delicate fabrics, handwashables, and woolens ✔ ✔ should be difficult to each of these washer cycles. Use the warmest wash water safe for the rinse temperature with a....6°C), detergents do not dissolve well. In cold climates, a warm rinse makes the load more comfortable to avoid fabric stress Rinse & Spin All loads ✔ ✔ Clean Washer No clothes, use AFFRESH® washer cleaner tablet or chlorine bleach Extra Rinse ✔ Cycle Signal ✔ ✔ &#...

Use and Care Guide
Page 21
...Follow the manufacturer's instructions to determine the amount of detergent will likely result in the washer basket for a long time. „ When unloading garments, occasionally check under the gray colored seal at the front of material. brush away lint and dirt. „ Turn wool and synthetic knits...2 bras 2 dress shirts 2 blouses 6 handkerchiefs 2 nighties 1 pair dress pants 21 NOTE: If you prolong the life of material. To create a balanced load it is recommended that more than one garment bag be used , and that each garment bag be filled with equal amounts of the tub for...
...Follow the manufacturer's instructions to determine the amount of detergent will likely result in the washer basket for a long time. „ When unloading garments, occasionally check under the gray colored seal at the front of material. brush away lint and dirt. „ Turn wool and synthetic knits...2 bras 2 dress shirts 2 blouses 6 handkerchiefs 2 nighties 1 pair dress pants 21 NOTE: If you prolong the life of material. To create a balanced load it is recommended that more than one garment bag be used , and that each garment bag be filled with equal amounts of the tub for...

Use and Care Guide
Page 23
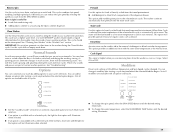
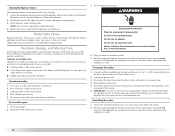
...prolonged periods. „ Refer to the bleach manufacturer's instructions for proper use abrasive products. 23 b) If any clothing or items from the washer. 2. Do not use . Begin procedure 1. b) Wipe the seal/bellow area with several rinse and drain steps to ensure that uses ...for better ventilation, and drying of liquid chlorine bleach. „ If the procedure does not sufficiently improve the machine freshness, please evaluate your washer to Step 8. Seal/Bellow 3. NOTES: „ Read these areas of warm tap water. However, this cycle. The machine will proceed ...
...prolonged periods. „ Refer to the bleach manufacturer's instructions for proper use abrasive products. 23 b) If any clothing or items from the washer. 2. Do not use . Begin procedure 1. b) Wipe the seal/bellow area with several rinse and drain steps to ensure that uses ...for better ventilation, and drying of liquid chlorine bleach. „ If the procedure does not sufficiently improve the machine freshness, please evaluate your washer to Step 8. Seal/Bellow 3. NOTES: „ Read these areas of warm tap water. However, this cycle. The machine will proceed ...
Use and Care Guide
Page 24
... Follow the "Installation Instructions" to the drawer. Cleaning the dispenser drawer The dispenser drawer can be removed for a medium-size load, to clean the washer and remove the antifreeze, if used . 24 Remove the inserts (the siphon from faucets, then drain the hoses and clip ... properly set up for an extended period of HE detergent for a medium-size load, to follow these instructions can damage your inlet hoses, record the date of hose failure. Reinstalling the washer 1. When replacing your washer. Put 1 qt (1 L) of HE detergent for easy cleaning. 1. Disconnect...
... Follow the "Installation Instructions" to the drawer. Cleaning the dispenser drawer The dispenser drawer can be removed for a medium-size load, to clean the washer and remove the antifreeze, if used . 24 Remove the inserts (the siphon from faucets, then drain the hoses and clip ... properly set up for an extended period of HE detergent for a medium-size load, to follow these instructions can damage your inlet hoses, record the date of hose failure. Reinstalling the washer 1. When replacing your washer. Put 1 qt (1 L) of HE detergent for easy cleaning. 1. Disconnect...


