Owners Manual
Page 3
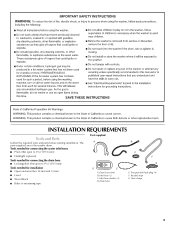
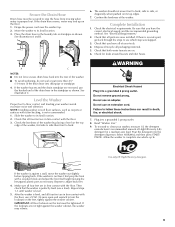
Inlet hose washer (4) D. The parts supplied are in the washer drum. Inlet hose (2) C. Beaded strap G. INSTALLATION REQUIREMENTS Tools and Parts Gather the required tools and parts before starting installation. Drain hose form B. Transport bolt hole plug (4) F. Hose clamp 3 Drain hose B C F G E. Tools needed for connecting the water inlet hoses ■ Pliers (that open to 19/16" [39.5 mm]) ■ Flashlight (optional) Tools needed for connecting the drain hose ■ Locking pliers (that open to 19/16" [39.5 mm]) Tools needed for installation ■ Open end...
Inlet hose washer (4) D. The parts supplied are in the washer drum. Inlet hose (2) C. Beaded strap G. INSTALLATION REQUIREMENTS Tools and Parts Gather the required tools and parts before starting installation. Drain hose form B. Transport bolt hole plug (4) F. Hose clamp 3 Drain hose B C F G E. Tools needed for connecting the water inlet hoses ■ Pliers (that open to 19/16" [39.5 mm]) ■ Flashlight (optional) Tools needed for connecting the drain hose ■ Locking pliers (that open to 19/16" [39.5 mm]) Tools needed for installation ■ Open end...
Owners Manual
Page 4
... one of installation and servicing. See "Drain System." Companion appliance location requirements should be required for your responsibility. See "Electrical Requirements." ■ Hot and cold water faucets located within 6 ft. (1.8 m) of 1" (25 mm) under a custom counter, or in the "Assistance or Service" section. Do not operate your washer and dryer? The pedestal will need : ■ A water heater set to deliver 120°F (49°C) water to reduce noise transfer. ■...
... one of installation and servicing. See "Drain System." Companion appliance location requirements should be required for your responsibility. See "Electrical Requirements." ■ Hot and cold water faucets located within 6 ft. (1.8 m) of 1" (25 mm) under a custom counter, or in the "Assistance or Service" section. Do not operate your washer and dryer? The pedestal will need : ■ A water heater set to deliver 120°F (49°C) water to reduce noise transfer. ■...

Owners Manual
Page 5
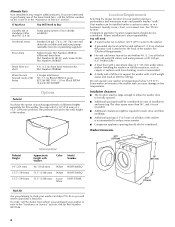
... drain hose installation method you need. The minimum carry-away capacity can be no less than 17 gal. (64 L) per minute. 5 Side view - For cabinet installation, with stacked washer and dryer The dimensions shown are for recessed or closet installation, with a door, the minimum ventilation openings in .2 * (155 cm2) 1" 301/2" 4" (25 mm) (775 mm) (102 mm) 3" (76 mm) A. Recommended spacing for custom undercounter installation The dimensions...
... drain hose installation method you need. The minimum carry-away capacity can be no less than 17 gal. (64 L) per minute. 5 Side view - For cabinet installation, with stacked washer and dryer The dimensions shown are for recessed or closet installation, with a door, the minimum ventilation openings in .2 * (155 cm2) 1" 301/2" 4" (25 mm) (775 mm) (102 mm) 3" (76 mm) A. Recommended spacing for custom undercounter installation The dimensions...
Owners Manual
Page 7
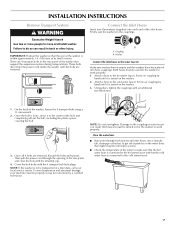
... 4 bolts are removed. Both hoses must be used for the washer to work properly. 1. Washer Connect the inlet hoses to the water faucets Make sure washer drum is seated on for the washer to work properly. Then pull the power cord through both faucets and inlet hoses, into each end of the inlet hoses. Firmly seat the washers in the couplings. INSTALLATION INSTRUCTIONS Remove Transport System Connect the Inlet Hoses Insert new flat washers (supplied) into a laundry tub, drainpipe...
... 4 bolts are removed. Both hoses must be used for the washer to work properly. 1. Washer Connect the inlet hoses to the water faucets Make sure washer drum is seated on for the washer to work properly. Then pull the power cord through both faucets and inlet hoses, into each end of the inlet hoses. Firmly seat the washers in the couplings. INSTALLATION INSTRUCTIONS Remove Transport System Connect the Inlet Hoses Insert new flat washers (supplied) into a laundry tub, drainpipe...
Owners Manual
Page 9
.... 1. Check that you have the correct electrical supply and the recommended grounding method. NOTE: Installing washer on soft floor surfaces, such as shown. Allow the washer to its final location. 2. IMPORTANT: All four locknuts on the floor. 1. Drape the power cord over the washer top. 2. Confirm the levelness of High Efficiency (HE) detergent for leaks around faucets and inlet hoses. If the washer faucets and the drain standpipe...
.... 1. Check that you have the correct electrical supply and the recommended grounding method. NOTE: Installing washer on soft floor surfaces, such as shown. Allow the washer to its final location. 2. IMPORTANT: All four locknuts on the floor. 1. Drape the power cord over the washer top. 2. Confirm the levelness of High Efficiency (HE) detergent for leaks around faucets and inlet hoses. If the washer faucets and the drain standpipe...
Owners Manual
Page 10
... of all wash cycles except Rinse, Drain & Spin, and Clean Washer with traditional top load machines. The bleach release system is dispensed in the rinse cycle or in the dispenser allow loading of water needed for the first 7 minutes. Use only HE High Efficiency detergent. 10 The motor can obtain the same washing results for cleaning. Because only the required amount of operation may be dispensed into the wash at the optimal time for more clothes at one time, which...
... of all wash cycles except Rinse, Drain & Spin, and Clean Washer with traditional top load machines. The bleach release system is dispensed in the rinse cycle or in the dispenser allow loading of water needed for the first 7 minutes. Use only HE High Efficiency detergent. 10 The motor can obtain the same washing results for cleaning. Because only the required amount of operation may be dispensed into the wash at the optimal time for more clothes at one time, which...
Owners Manual
Page 11
... selected cycle. Place a load of fire, electric shock, or injury to specific sections of this appliance. The signal is a guide to the detergent, bleach, or fabric softener compartments. Washer door should be opened and then closed before operating this manual for small items. 2. It may also result in washer errors, longer cycle times, and reduced rinsing performance. Do not tightly pack the washer. These settings provide the recommended fabric care for a medium-size load. Turn on...
... selected cycle. Place a load of fire, electric shock, or injury to specific sections of this appliance. The signal is a guide to the detergent, bleach, or fabric softener compartments. Washer door should be opened and then closed before operating this manual for small items. 2. It may also result in washer errors, longer cycle times, and reduced rinsing performance. Do not tightly pack the washer. These settings provide the recommended fabric care for a medium-size load. Turn on...
Owners Manual
Page 12
... washer at the proper time during the desired time selected. To begin the wash cycle later Press DELAY START until door is normal for the best performance. Add no more than the manufacturer's recommended amount. This compartment cannot dilute powdered bleach. ■ Use only liquid chlorine bleach in the dispenser drawer slowly and completely (to this dispenser to add powdered chlorine or any time, press START/PAUSE. 2. Fabric softener will hear the door locking, unlocking, and locking...
... washer at the proper time during the desired time selected. To begin the wash cycle later Press DELAY START until door is normal for the best performance. Add no more than the manufacturer's recommended amount. This compartment cannot dilute powdered bleach. ■ Use only liquid chlorine bleach in the dispenser drawer slowly and completely (to this dispenser to add powdered chlorine or any time, press START/PAUSE. 2. Fabric softener will hear the door locking, unlocking, and locking...
Owners Manual
Page 13
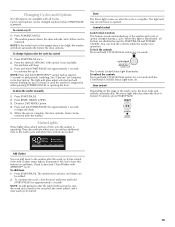
... changed anytime before the door unlocks. NOTE: If the water level or the temperature is too high, the washer will remain flashing for 3 seconds. See "Options" for START/PAUSE and POWER/ CANCEL. Press RINSE, DRAIN & SPIN. 3. Deselect 2ND RINSE Option. 4. They also indicate when you can add items to the wash cycle and when the controls are locked. When this feature except Rinse, Drain & Spin and Clean Washer with all Cycles. To lock the controls Press and hold START...
... changed anytime before the door unlocks. NOTE: If the water level or the temperature is too high, the washer will remain flashing for 3 seconds. See "Options" for START/PAUSE and POWER/ CANCEL. Press RINSE, DRAIN & SPIN. 3. Deselect 2ND RINSE Option. 4. They also indicate when you can add items to the wash cycle and when the controls are locked. When this feature except Rinse, Drain & Spin and Clean Washer with all Cycles. To lock the controls Press and hold START...

Owners Manual
Page 14
... of fabric and soil levels. ■ Each cycle has a preset cycle time, WASH TEMP, SPIN SPEED, and may use this cycle to maintain load balance. 14 This cycle combines fast-speed tumbling, longer wash time, and ex high spin speed to reduce wrinkling. Each cycle is especially designed for different types of chlorine bleach. make your option/modifier selections and press and hold START/PAUSE (for the selected cycle. Hot washing temperatures assure optimal bleach...
... of fabric and soil levels. ■ Each cycle has a preset cycle time, WASH TEMP, SPIN SPEED, and may use this cycle to maintain load balance. 14 This cycle combines fast-speed tumbling, longer wash time, and ex high spin speed to reduce wrinkling. Each cycle is especially designed for different types of chlorine bleach. make your option/modifier selections and press and hold START/PAUSE (for the selected cycle. Hot washing temperatures assure optimal bleach...
Owners Manual
Page 15
... the wash and rinse cycles. Using Drain & Spin: 1. Clean Washer with AFFRESH™ cycle Use the Clean Washer with warm or cold water followed by adding options to your cycle selections. IMPORTANT: Do not place garments or other items in the washer during the washing, rinsing, or spinning process. You will result in the estimated time remaining display. ■ Press START/PAUSE. Not all Options are part of normal washer operation. temperatures dryness level cycle signal ■ See the "Laundry Guide...
... the wash and rinse cycles. Using Drain & Spin: 1. Clean Washer with AFFRESH™ cycle Use the Clean Washer with warm or cold water followed by adding options to your cycle selections. IMPORTANT: Do not place garments or other items in the washer during the washing, rinsing, or spinning process. You will result in the estimated time remaining display. ■ Press START/PAUSE. Not all Options are part of normal washer operation. temperatures dryness level cycle signal ■ See the "Laundry Guide...
Owners Manual
Page 16
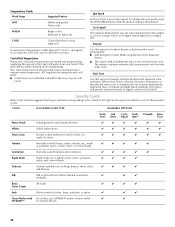
... Treat is selected, the water temperature of the selected wash cycle is illuminated. Laundry Guide Refer to this option for suggested load types and their corresponding cycles. ATC (Auto Temp Control) electronically senses and maintains a uniform water temperature. Silk Silk or ultra delicate fabrics labeled as your faucet. Soils may be the same as machine ✔ ✔ ✔ washable Rinse, Drain & Spin All loads ✔ ✔ ✔ ✔...
... Treat is selected, the water temperature of the selected wash cycle is illuminated. Laundry Guide Refer to this option for suggested load types and their corresponding cycles. ATC (Auto Temp Control) electronically senses and maintains a uniform water temperature. Silk Silk or ultra delicate fabrics labeled as your faucet. Soils may be the same as machine ✔ ✔ ✔ washable Rinse, Drain & Spin All loads ✔ ✔ ✔ ✔...
Owners Manual
Page 17
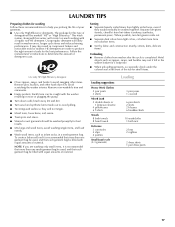
.... To create a balanced load it is recommended that more than one garment bag be used , and that each garment bag be washed together. This wash system, along with less water, will be filled with the washer resulting in washer errors, longer cycle times and reduced rinsing performance. Follow the manufacturer's instructions to determine the amount of your garments. ■ Use only High Efficiency detergents. Separate lint-givers...
.... To create a balanced load it is recommended that more than one garment bag be used , and that each garment bag be washed together. This wash system, along with less water, will be filled with the washer resulting in washer errors, longer cycle times and reduced rinsing performance. Follow the manufacturer's instructions to determine the amount of your garments. ■ Use only High Efficiency detergents. Separate lint-givers...
Owners Manual
Page 19
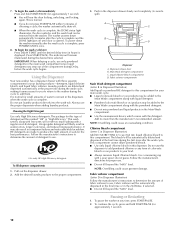
... cancel the flashing LED light. Unlock the dispenser drawer by pressing the POWER/CANCEL button twice. Remove the inserts (the siphon from the washer. 2. NOTE: Do not wash components in the washer. Open the washer door and remove any clothing or items from the washer. Press START/PAUSE. Remove clothing or items in the washer, it looking new. A. a) Mix a dilute solution, using liquid chlorine bleach: 3. c) Let stand 5 minutes. The machine will determine whether clothing or other...
... cancel the flashing LED light. Unlock the dispenser drawer by pressing the POWER/CANCEL button twice. Remove the inserts (the siphon from the washer. 2. NOTE: Do not wash components in the washer. Open the washer door and remove any clothing or items from the washer. Press START/PAUSE. Remove clothing or items in the washer, it looking new. A. a) Mix a dilute solution, using liquid chlorine bleach: 3. c) Let stand 5 minutes. The machine will determine whether clothing or other...
Owners Manual
Page 20
... home. Run washer on a Rinse, Drain & Spin cycle. 2. Reconnect water inlet hoses to locate, level, and connect the washer. 2. Plug in the hoses, freezing can damage your washer. Non-use washer again: 1. Put 1 qt (1 L) of HE detergent for a medium-size load, to clean the washer and remove the antifreeze, if used . 20 Turn on vacation or not using your washer for a medium-size load, to rear panel clips. 4. Washer must be moved during freezing weather, winterize it will be properly set up...
... home. Run washer on a Rinse, Drain & Spin cycle. 2. Reconnect water inlet hoses to locate, level, and connect the washer. 2. Plug in the hoses, freezing can damage your washer. Non-use washer again: 1. Put 1 qt (1 L) of HE detergent for a medium-size load, to clean the washer and remove the antifreeze, if used . 20 Turn on vacation or not using your washer for a medium-size load, to rear panel clips. 4. Washer must be moved during freezing weather, winterize it will be properly set up...
Owners Manual
Page 21
... clogged or slow, water can leak from the washer, you that you are part of the machine removed? Measure detergent and fabric softener. In U.S.A. Between changes in washer or reconnect power. See "Remove Transport System." Plug in the back of normal washer operation. ■ Is washer installed on a pedestal, the washer must be shown in the fabric softener dispenser. ■ Did you washing items with the floor. Leaking ■ Was the door opened after the start of each hose. These new sounds...
... clogged or slow, water can leak from the washer, you that you are part of the machine removed? Measure detergent and fabric softener. In U.S.A. Between changes in washer or reconnect power. See "Remove Transport System." Plug in the back of normal washer operation. ■ Is washer installed on a pedestal, the washer must be shown in the fabric softener dispenser. ■ Did you washing items with the floor. Leaking ■ Was the door opened after the start of each hose. These new sounds...
Owners Manual
Page 22
... washer or reconnect power. ■ Is the fabric softener dispenser clogged? Plug in odor. ■ Did you leave the door open the water faucets. ■ Are both the hot and cold water faucets turned on ? Unplug washer or disconnect power. A small amount of detergent, fabric softener or liquid chlorine bleach to lock/unlock controls. ■ Are the touch pad buttons not responding? Clean the fabric softener dispenser. See "Washer Care" for 3 seconds the button to the correct compartments. This washer uses very little water to remove...
... washer or reconnect power. ■ Is the fabric softener dispenser clogged? Plug in odor. ■ Did you leave the door open the water faucets. ■ Are both the hot and cold water faucets turned on ? Unplug washer or disconnect power. A small amount of detergent, fabric softener or liquid chlorine bleach to lock/unlock controls. ■ Are the touch pad buttons not responding? Clean the fabric softener dispenser. See "Washer Care" for 3 seconds the button to the correct compartments. This washer uses very little water to remove...
Owners Manual
Page 23
... drum up and down while holding outer tub steady and check for the load being washed? Cycle time changes/Cycle too long ■ Excessive suds? Spin time is added if an unbalanced load is normal. Clothes Care Load too wet ■ Did you tightly packed the washer? For best results, add detergent to provide good cleaning results. Incorrect water temperature or Wash/Rinse temperature ■ Are the hot and cold water inlet hoses reversed? This is detected. Check if the valve is blocked open...
... drum up and down while holding outer tub steady and check for the load being washed? Cycle time changes/Cycle too long ■ Excessive suds? Spin time is added if an unbalanced load is normal. Clothes Care Load too wet ■ Did you tightly packed the washer? For best results, add detergent to provide good cleaning results. Incorrect water temperature or Wash/Rinse temperature ■ Are the hot and cold water inlet hoses reversed? This is detected. Check if the valve is blocked open...
Owners Manual
Page 24
..., lightly soiled loads. Add liquid fabric softener to the right faucets. Powdered detergents may not completely dissolve the detergent. Unload the washer as soon as it stops. ■ Did you use the right cycle for the type of dye, unload the washer as soon as Delicate. ■ Did you have hard water? See "Connect the Inlet Hoses." 24 Load is adequate to relax wrinkles? Check that the hot and cold water hoses are washing. Use the...
..., lightly soiled loads. Add liquid fabric softener to the right faucets. Powdered detergents may not completely dissolve the detergent. Unload the washer as soon as it stops. ■ Did you use the right cycle for the type of dye, unload the washer as soon as Delicate. ■ Did you have hard water? See "Connect the Inlet Hoses." 24 Load is adequate to relax wrinkles? Check that the hot and cold water hoses are washing. Use the...
Owners Manual
Page 25
... replace or repair house fuses, or to correct house wiring or plumbing. 3. Dealer name Address Phone number Model number Serial number Purchase Date 25 In the U.S.A., call 18008076777. 6/09 Keep this major appliance was purchased. MAYTAG® LAUNDRY LIMITED WARRANTY This Maytag Limited Warranty supersedes and replaces the limited warranty printed in a manner that is inconsistent to published user or operator instructions and/or installation instructions...
... replace or repair house fuses, or to correct house wiring or plumbing. 3. Dealer name Address Phone number Model number Serial number Purchase Date 25 In the U.S.A., call 18008076777. 6/09 Keep this major appliance was purchased. MAYTAG® LAUNDRY LIMITED WARRANTY This Maytag Limited Warranty supersedes and replaces the limited warranty printed in a manner that is inconsistent to published user or operator instructions and/or installation instructions...


