Owners Manual
Page 14
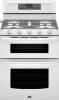
... the oven set temperature is reached. 5. Press LOWER CANCEL when finished. 8. Remove food from the oven. Place food in 2 or 3 different places, including the thickest part. 5. It is important not to cover foods so that surface areas remain exposed to the circulating air, allowing browning and crisping. ■ Keep heat loss...
... the oven set temperature is reached. 5. Press LOWER CANCEL when finished. 8. Remove food from the oven. Place food in 2 or 3 different places, including the thickest part. 5. It is important not to cover foods so that surface areas remain exposed to the circulating air, allowing browning and crisping. ■ Keep heat loss...

Owners Manual
Page 19
... oven cleaner. Cleaning Method: ■ Self-Cleaning cycle: See "Self-Cleaning Cycle" first. ■ Gas Grate and Drip Pan Cleaner Part Number 31617: See "Assistance or Service" section to order. OVEN RACKS GRIDDLE Before using the griddle for the first time and after each ... as cooktop, grates and caps are suggested first unless otherwise noted. Always follow label instructions on panel. ■ All-Purpose Appliance Cleaner Part Number 31682 (not included): See "Assistance or Service" section to order. EXTERIOR PORCELAIN ENAMEL SURFACES Food spills containing acids, such as vinegar...
... oven cleaner. Cleaning Method: ■ Self-Cleaning cycle: See "Self-Cleaning Cycle" first. ■ Gas Grate and Drip Pan Cleaner Part Number 31617: See "Assistance or Service" section to order. OVEN RACKS GRIDDLE Before using the griddle for the first time and after each ... as cooktop, grates and caps are suggested first unless otherwise noted. Always follow label instructions on panel. ■ All-Purpose Appliance Cleaner Part Number 31682 (not included): See "Assistance or Service" section to order. EXTERIOR PORCELAIN ENAMEL SURFACES Food spills containing acids, such as vinegar...

Owners Manual
Page 22
... before using the self-clean cycle. It may save you use only factory specified parts. This information will fit right and work right because they are trained to build every new MAYTAG® appliance. To locate factory specified parts in your nearest designated service center. ■ Has a delay start been set ? See "Positioning...
... before using the self-clean cycle. It may save you use only factory specified parts. This information will fit right and work right because they are trained to build every new MAYTAG® appliance. To locate factory specified parts in your nearest designated service center. ■ Has a delay start been set ? See "Positioning...

Owners Manual
Page 23
... to instructions attached to or furnished with the product, Maytag brand of the original consumer purchase. This limited warranty is designed to parts or systems resulting from your major appliance. Consumable parts are unable to resolve the problem after checking "Troubleshooting,"...Repairs when your major appliance for factory specified replacement parts and repair labor to or furnished with the removal from warranty coverage. 3. Costs associated with the product, Maytag will pay for factory specified parts for the following components to the appliance. 9. ...
... to instructions attached to or furnished with the product, Maytag brand of the original consumer purchase. This limited warranty is designed to parts or systems resulting from your major appliance. Consumable parts are unable to resolve the problem after checking "Troubleshooting,"...Repairs when your major appliance for factory specified replacement parts and repair labor to or furnished with the removal from warranty coverage. 3. Costs associated with the product, Maytag will pay for factory specified parts for the following components to the appliance. 9. ...

Installation Instructions
Page 3
...storage space located above the surface units should be located for convenient use the Standard for Mobile Home Construction and Safety, Title 24, HUD Part 280). Parts needed ■ Tape measure 3.2 mm) drill bit ■ Phillips screwdriver ■ Marker or pencil ■ Torx† T-20... to follow the instructions provided with local codes. 3 Failure to the Manufactured Home Construction and Safety Standard, Title 24 CFR, Part 3280 (formerly the Federal Standard for Manufactured Home Installations, ANSI A225.1/NFPA 501A or with your cabinets, check with local codes....
...storage space located above the surface units should be located for convenient use the Standard for Mobile Home Construction and Safety, Title 24, HUD Part 280). Parts needed ■ Tape measure 3.2 mm) drill bit ■ Phillips screwdriver ■ Marker or pencil ■ Torx† T-20... to follow the instructions provided with local codes. 3 Failure to the Manufactured Home Construction and Safety Standard, Title 24 CFR, Part 3280 (formerly the Federal Standard for Manufactured Home Installations, ANSI A225.1/NFPA 501A or with your cabinets, check with local codes....
Installation Instructions
Page 7
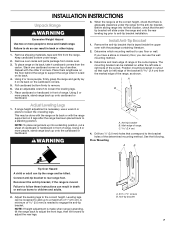
... the cutout. Using 2 or more people to follow these instructions can use : floor or wall. Failure to move and install range. Remove oven racks and parts package from the carton. See the following. Leveling legs can tip the range and be done with the range on its back, take 4 cardboard corners...
... the cutout. Using 2 or more people to follow these instructions can use : floor or wall. Failure to move and install range. Remove oven racks and parts package from the carton. See the following. Leveling legs can tip the range and be done with the range on its back, take 4 cardboard corners...

Installation Instructions
Page 9
... "open when the handle is open " position. ■ Check that rear leveling leg is level. Do not remove ground prong. Remove cardboard or hardboard from parts package. Check Operation of range, first side to follow these instructions can result in and turn the control knobs to "Off" and contact your dealer...
... "open when the handle is open " position. ■ Check that rear leveling leg is level. Do not remove ground prong. Remove cardboard or hardboard from parts package. Check Operation of range, first side to follow these instructions can result in and turn the control knobs to "Off" and contact your dealer...
Installation Instructions
Page 11
... you purchased your tools. When the range has been on surface burners and oven. See "Level Range." 5. If you have all of /recycle all parts are now installed. Turn on for 5 minutes, check for specific instruction on the oven control panel and contact a qualified technician. See the Use and ...Care Guide for heat. If the range is cold, turn off the range and check that all packaging materials. 4. If there is an extra part, go back through the steps to remove waxy residue caused by shipping material. Check that the gas supply line shutoff valve is open. ■ ...
... you purchased your tools. When the range has been on surface burners and oven. See "Level Range." 5. If you have all of /recycle all parts are now installed. Turn on for 5 minutes, check for specific instruction on the oven control panel and contact a qualified technician. See the Use and ...Care Guide for heat. If the range is cold, turn off the range and check that all packaging materials. 4. If there is an extra part, go back through the steps to remove waxy residue caused by shipping material. Check that the gas supply line shutoff valve is open. ■ ...

Installation Instructions
Page 15
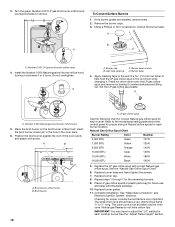
... C. Natural gas orifice spud Use the following chart for correct LP gas orifice spud for the remaining burners. 9. Place Natural gas orifice spuds in plastic parts bag for proper cooktop burner flame is very important. Checking for future use and keep with the correct LP gas orifice spud. Failure to children...
... C. Natural gas orifice spud Use the following chart for correct LP gas orifice spud for the remaining burners. 9. Place Natural gas orifice spuds in plastic parts bag for proper cooktop burner flame is very important. Checking for future use and keep with the correct LP gas orifice spud. Failure to children...
Installation Instructions
Page 18
...;" to help hold the LP gas orifice spud in the oven back. 6. A To Convert Surface Burners 1. Burner cap C. A B A. Place LP gas orifice spuds in plastic parts bag for each cooktop burner See the "Adjust Flame Height" section. Gas tube opening D. Apply masking tape to remove. See "Make Gas Connection" and Electronic...
...;" to help hold the LP gas orifice spud in the oven back. 6. A To Convert Surface Burners 1. Burner cap C. A B A. Place LP gas orifice spuds in plastic parts bag for each cooktop burner See the "Adjust Flame Height" section. Gas tube opening D. Apply masking tape to remove. See "Make Gas Connection" and Electronic...
Warranty Information
Page 1
... major appliance is installed, operated and maintained according to instructions attached to or furnished with the product, Maytag will pay for factory specified parts for factory specified replacement parts and repair labor to correct defects in materials or workmanship that existed when this major appliance was purchased...or when it is installed in an inaccessible location or is not installed in a remote area where service by calling Maytag. If you on the below named parts only and does not include labor. ■ Burner grates ■ Gas surface burners ■ Gas bake/broil burners...
... major appliance is installed, operated and maintained according to instructions attached to or furnished with the product, Maytag will pay for factory specified parts for factory specified replacement parts and repair labor to correct defects in materials or workmanship that existed when this major appliance was purchased...or when it is installed in an inaccessible location or is not installed in a remote area where service by calling Maytag. If you on the below named parts only and does not include labor. ■ Burner grates ■ Gas surface burners ■ Gas bake/broil burners...


