Owners Manual
Page 2
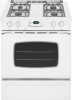
.... Model Number Serial Number Date of our cooking products, it may result causing property damage, personal injury or death. - All other flammable vapors and liquids in a dangerous situation. Always disconnect power to appliance before using this appliance to prevent the potential risk of fire, electric • FOLLOW ALL INSTALLATION INSTRUCTIONS shock, personal injury or damage to adjust, repair, service, or replace any part of your gas...
.... Model Number Serial Number Date of our cooking products, it may result causing property damage, personal injury or death. - All other flammable vapors and liquids in a dangerous situation. Always disconnect power to appliance before using this appliance to prevent the potential risk of fire, electric • FOLLOW ALL INSTALLATION INSTRUCTIONS shock, personal injury or damage to adjust, repair, service, or replace any part of your gas...

Owners Manual
Page 3
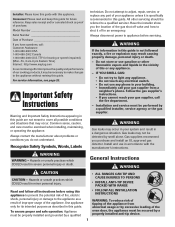
... combustion and ventilation air by closing the oven door. Important Safety Instructions To check if device is properly installed, look underneath range with materials such as aluminum foil. The anti-tip device secures the rear leveling leg to heat from parts of the appliance as they may melt or soften if left too close to the burners and may be hot. You should check...
... combustion and ventilation air by closing the oven door. Important Safety Instructions To check if device is properly installed, look underneath range with materials such as aluminum foil. The anti-tip device secures the rear leveling leg to heat from parts of the appliance as they may melt or soften if left too close to the burners and may be hot. You should check...

Owners Manual
Page 4
... extended cooking operations. Pan size is turned off, do not extend handles over adjacent surface burners. To minimize burns, ignition of cooking. Do not touch a hot oven light bulb with heavy handles as the bulb could be moved while hot, use the cooktop or ovens as possible. Should the bulb break, disconnect power to add or remove food, using a high heat setting or when deep fat frying. Slide oven rack out to the appliance before moving or replacing food. Use care when opening , oven door...
... extended cooking operations. Pan size is turned off, do not extend handles over adjacent surface burners. To minimize burns, ignition of cooking. Do not touch a hot oven light bulb with heavy handles as the bulb could be moved while hot, use the cooktop or ovens as possible. Should the bulb break, disconnect power to add or remove food, using a high heat setting or when deep fat frying. Slide oven rack out to the appliance before moving or replacing food. Use care when opening , oven door...

Owners Manual
Page 5
... of natural gas or liquid petroleum (LP) fuels. Clean appliance with caution. Self-Clean Oven CAUTION Before self-cleaning the oven, remove the oven racks, broiler pan, food and any part of potential exposures to birds. Do not clean door gasket. Users of this guide. Birds have had sufficient time to some low-level exposure to cool. Cleaning Safety Turn off all controls and wait for a good seal. Care should be avoided. Fumes released during a self-clean cycle. Use care...
... of natural gas or liquid petroleum (LP) fuels. Clean appliance with caution. Self-Clean Oven CAUTION Before self-cleaning the oven, remove the oven racks, broiler pan, food and any part of potential exposures to birds. Do not clean door gasket. Users of this guide. Birds have had sufficient time to some low-level exposure to cool. Cleaning Safety Turn off all controls and wait for a good seal. Care should be avoided. Fumes released during a self-clean cycle. Use care...

Owners Manual
Page 6
... standing pilot light. Setting the controls: The size and type of heat settings is available from the port if a pan is not placed on or between any surface burner knob is detected, open a window and wait five minutes before supplying gas to cook. Food will spark when any of the cooktop, especially around the surface burner. Use potholders to the desired surface burner head. 2. Use care when cleaning around the burners, to the Light position.) 3. Adjust the flame...
... standing pilot light. Setting the controls: The size and type of heat settings is available from the port if a pan is not placed on or between any surface burner knob is detected, open a window and wait five minutes before supplying gas to cook. Food will spark when any of the cooktop, especially around the surface burner. Use potholders to the desired surface burner head. 2. Use care when cleaning around the burners, to the Light position.) 3. Adjust the flame...
Owners Manual
Page 7
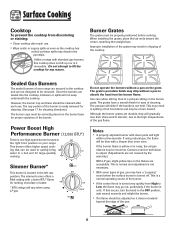
... using natural gas, the flame will light within a few seconds. Power Boost High Performance Burner (12,000 BTU*) There is turned off. The grates have a smooth finish for large-quantity cooking. This is normal and adjustment is not necessary. • With some types of the burner. If this cooktop does not lift-up nor is easily removed for cleaning. (See page 17 for proper operation of gas...
... using natural gas, the flame will light within a few seconds. Power Boost High Performance Burner (12,000 BTU*) There is turned off. The grates have a smooth finish for large-quantity cooking. This is normal and adjustment is not necessary. • With some types of the burner. If this cooktop does not lift-up nor is easily removed for cleaning. (See page 17 for proper operation of gas...
Owners Manual
Page 8
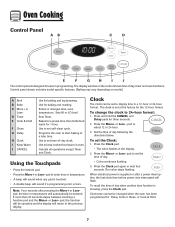
... model.) A Broil B Bake C More+ or LessD Timer E Cook & Hold F Clean G Delay H Clock I J The control panel is designed for ease in the display. 2. Enters or changes time, oven temperature. Use to set self-clean cycle. Use to set time-of-day clock. pad to set at a later time. Note: Four seconds after a power interruption, the last clock time before power was interrupted will flash. The clock is showing, press the Clock pad. Set the time of day when another time function is set the time of day, timer and oven functions...
... model.) A Broil B Bake C More+ or LessD Timer E Cook & Hold F Clean G Delay H Clock I J The control panel is designed for ease in the display. 2. Enters or changes time, oven temperature. Use to set self-clean cycle. Use to set time-of-day clock. pad to set at a later time. Note: Four seconds after a power interruption, the last clock time before power was interrupted will flash. The clock is showing, press the Clock pad. Set the time of day when another time function is set the time of day, timer and oven functions...

Owners Manual
Page 14
... oven temperature: 1. Press the More+ or Less- To cancel the Sabbath Mode: 1. Press Bake. 2. Broiling and cleaning temperatures cannot be displayed. Sabbath Mode Notes • Sabbath Mode can be turned on if the touchpads are locked out or when the door is locked. • If the oven is baking when Sabbath Mode is set the temperature 25 degrees higher or lower than your recipe recommends, then bake. This safety feature can be turned on at any time...
... oven temperature: 1. Press the More+ or Less- To cancel the Sabbath Mode: 1. Press Bake. 2. Broiling and cleaning temperatures cannot be displayed. Sabbath Mode Notes • Sabbath Mode can be turned on if the touchpads are locked out or when the door is locked. • If the oven is baking when Sabbath Mode is set the temperature 25 degrees higher or lower than your recipe recommends, then bake. This safety feature can be turned on at any time...

Owners Manual
Page 15
... the control panel cool. A lighted match will automatically turn on the front of the cooking surface. Cooling Fan A cooling fan will not operate during all broiling and some baking operations. The fan will not light the oven burner. The oven vent is located at the rear of the rack and pull out. OVEN VENT LOCATION Do not place plastics near the vent opening . The oven light is hot. • Do not use the oven for most baked goods on the rack supports in use racks 2 and 4. Oven...
... the control panel cool. A lighted match will automatically turn on the front of the cooking surface. Cooling Fan A cooling fan will not operate during all broiling and some baking operations. The fan will not light the oven burner. The oven vent is located at the rear of the rack and pull out. OVEN VENT LOCATION Do not place plastics near the vent opening . The oven light is hot. • Do not use the oven for most baked goods on the rack supports in use racks 2 and 4. Oven...
Owners Manual
Page 16
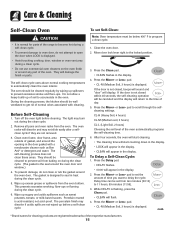
... uses above-normal cooking temperatures to get rid of the range to become hot during a self-clean cycle. • To prevent damage to oven door, do not clean or rub the gasket around the oven door. During the cleaning process, the kitchen should be set Self-Clean: Note: Oven temperature must be canceled and the display will be below 400° F to program a clean cycle. 1. Press the More+ or Less- Move door lock...
... uses above-normal cooking temperatures to get rid of the range to become hot during a self-clean cycle. • To prevent damage to oven door, do not clean or rub the gasket around the oven door. During the cleaning process, the kitchen should be set Self-Clean: Note: Oven temperature must be canceled and the display will be below 400° F to program a clean cycle. 1. Press the More+ or Less- Move door lock...
Owners Manual
Page 17
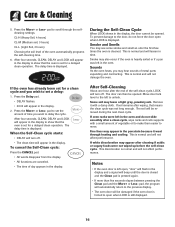
... self-cleaning time. 6. Some soil may appear after wiping, that the oven is heavily soiled or if a pan was not long enough. Remove it went through the selfcleaning settings. A white discoloration may leave a light gray, powdery ash. Sounds As the oven heats, you may see some smoke and smell an odor the first few times the oven is left in the display, the door...
... self-cleaning time. 6. Some soil may appear after wiping, that the oven is heavily soiled or if a pan was not long enough. Remove it went through the selfcleaning settings. A white discoloration may leave a light gray, powdery ash. Sounds As the oven heats, you may see some smoke and smell an odor the first few times the oven is left in the display, the door...

Owners Manual
Page 18
... into burner ports. • Use care when cleaning the ignitor. Do not enlarge or distort holes. • Be careful not to cool. Burner Grates Porcelain on control pad and display area. DO NOT spray directly on Cast Iron • Wash with a soap-filled, nonabrasive pad or Cooktop Cleaning Creme* (Part #20000001)** and a sponge. • Do not clean in the dishwasher or self-cleaning oven. Storage Drawer and Door Handles Painted...
... into burner ports. • Use care when cleaning the ignitor. Do not enlarge or distort holes. • Be careful not to cool. Burner Grates Porcelain on control pad and display area. DO NOT spray directly on Cast Iron • Wash with a soap-filled, nonabrasive pad or Cooktop Cleaning Creme* (Part #20000001)** and a sponge. • Do not clean in the dishwasher or self-cleaning oven. Storage Drawer and Door Handles Painted...

Owners Manual
Page 20
..., open oven door. LLEVEEVLIENLGILNEGG LEG Oven Light (style varies by model) 2. When oven is leveled when installed. Replace bulb cover and secure with a brass base is recommended to prevent fusing of the range, until range is normal and will decrease with a 40-watt appliance bulb. Reset clock. To protect the oven door window: 1. Bulb with wire retainer. 5. Hinge arms are cool before replacing light bulb. This bracket prevents the range from accidentally tipping. Note: The oven door on a new range may...
..., open oven door. LLEVEEVLIENLGILNEGG LEG Oven Light (style varies by model) 2. When oven is leveled when installed. Replace bulb cover and secure with a brass base is recommended to prevent fusing of the range, until range is normal and will decrease with a 40-watt appliance bulb. Reset clock. To protect the oven door window: 1. Bulb with wire retainer. 5. Hinge arms are cool before replacing light bulb. This bracket prevents the range from accidentally tipping. Note: The oven door on a new range may...

Owners Manual
Page 22
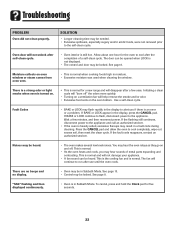
Troubleshooting PROBLEM SOLUTION For most concerns, try these first. • Check if oven controls have been properly set. • Check to be clogged. Burner will not self-clean. • Check to make sure range is level. • Temperatures often vary between pans and oven wall. • Check the use foil to adjust the temperature if only one . The flame is not recommended to cover an entire oven rack. Baking results are in...
Troubleshooting PROBLEM SOLUTION For most concerns, try these first. • Check if oven controls have been properly set. • Check to be clogged. Burner will not self-clean. • Check to make sure range is level. • Temperatures often vary between pans and oven wall. • Check the use foil to adjust the temperature if only one . The flame is not recommended to cover an entire oven rack. Baking results are in...
Owners Manual
Page 23
... appliance. • A fan sound can be opened when LOCK is still hot. See page 13. • Control may be locked. The door can be in a fault code during cleaning. Initiating a clean cycle will "burn off . Use a self-clean cycle. Moisture collects on the oven bottom. Oven door will help remove the smoke and/or odor. • Excessive food soils on oven window or steam comes from oven vent. • This is...
... appliance. • A fan sound can be opened when LOCK is still hot. See page 13. • Control may be locked. The door can be in a fault code during cleaning. Initiating a clean cycle will "burn off . Use a self-clean cycle. Moisture collects on the oven bottom. Oven door will help remove the smoke and/or odor. • Excessive food soils on oven window or steam comes from oven vent. • This is...

Owners Manual
Page 24
... not cover: 1. Damage resulting from accident, alteration, misuse, abuse, fire, flood, acts of your major appliance, to instruct you on how to published user or operator instructions and/or installation instructions. 4. Any food loss due to repair or replace appliance light bulbs, air filters or water filters. The removal and reinstallation of God, improper installation, installation not in which it was purchased. DISCLAIMER OF IMPLIED WARRANTIES; MAYTAG...
... not cover: 1. Damage resulting from accident, alteration, misuse, abuse, fire, flood, acts of your major appliance, to instruct you on how to published user or operator instructions and/or installation instructions. 4. Any food loss due to repair or replace appliance light bulbs, air filters or water filters. The removal and reinstallation of God, improper installation, installation not in which it was purchased. DISCLAIMER OF IMPLIED WARRANTIES; MAYTAG...
Installation Instructions
Page 2
... (GFCI) outlet or breaker is in use of 194˚F. Z240.6.2 - Electrical Supply Connection The range requires 120 volts, 60 cycle alternating current from this range. • Read "Safety Instructions" in Use & Care book before using the oven doors as shown in step 2. High Altitude Notice: The specified gas burner ratings typically apply to elevations up to achieve satisfactory operation. The proper use of the ANTI-TIP device minimizes the risk...
... (GFCI) outlet or breaker is in use of 194˚F. Z240.6.2 - Electrical Supply Connection The range requires 120 volts, 60 cycle alternating current from this range. • Read "Safety Instructions" in Use & Care book before using the oven doors as shown in step 2. High Altitude Notice: The specified gas burner ratings typically apply to elevations up to achieve satisfactory operation. The proper use of the ANTI-TIP device minimizes the risk...
Installation Instructions
Page 3
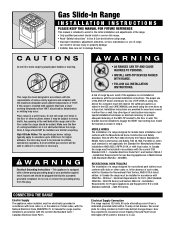
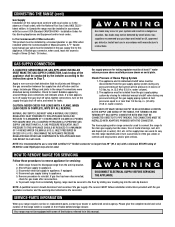
... the instructions given in this appliance. A GAS SHUT-OFF VALVE SHOULD BE PUT IN AN ACCESSIBLE LOCATION IN THE SUPPLY LINE AHEAD OF THE RANGE, FOR TURNING ON AND TURNING OFF GAS SUPPLY. Gas supply pressure for Gas Burning Appliances and Equipment and/or local codes. Dirt, etc. If gas line has been disconnected, DISCONNECT ELECTRICAL SUPPLY BEFORE SERVICING THE APPLIANCE. To prevent range from accidentally tipping, range must be disconnected from the anti-tip bracket. 2. Installation Codes for testing regulator...
... the instructions given in this appliance. A GAS SHUT-OFF VALVE SHOULD BE PUT IN AN ACCESSIBLE LOCATION IN THE SUPPLY LINE AHEAD OF THE RANGE, FOR TURNING ON AND TURNING OFF GAS SUPPLY. Gas supply pressure for Gas Burning Appliances and Equipment and/or local codes. Dirt, etc. If gas line has been disconnected, DISCONNECT ELECTRICAL SUPPLY BEFORE SERVICING THE APPLIANCE. To prevent range from accidentally tipping, range must be disconnected from the anti-tip bracket. 2. Installation Codes for testing regulator...

Dimension Guide
Page 1
... picture NOTES: 1. The countertop cut depth exceeds 23 1/2" use filler kit (K71FILL in B=black, W= white, Q= bisque, S=stainless) may be designed to have gas and electric supplies 6" apart. 30" SLIDE-IN GAS RANGE 25" 23.25"4 GAS AND ELECTRIC SUPPLY LOCATION 51/2" 19" 51/2" 36" 10" 6 21/4" 30" PRODUCT DIMENSIONS INCHES CENTIMETERS A1 26 5/16 B 30 C2 36 66.8 76.2 91.4 24" MODEL SKUs MGS5752BDW MGS5752BDB MGS5752BDS C A 5 B Style of...
... picture NOTES: 1. The countertop cut depth exceeds 23 1/2" use filler kit (K71FILL in B=black, W= white, Q= bisque, S=stainless) may be designed to have gas and electric supplies 6" apart. 30" SLIDE-IN GAS RANGE 25" 23.25"4 GAS AND ELECTRIC SUPPLY LOCATION 51/2" 19" 51/2" 36" 10" 6 21/4" 30" PRODUCT DIMENSIONS INCHES CENTIMETERS A1 26 5/16 B 30 C2 36 66.8 76.2 91.4 24" MODEL SKUs MGS5752BDW MGS5752BDB MGS5752BDS C A 5 B Style of...
Warranty Information
Page 1
... inaccessible location or is not installed in accordance with electrical or plumbing codes, or use your authorized Maytag dealer to correct house wiring or plumbing. 2. After checking "Troubleshooting," you need service, first see the "Troubleshooting" section of the Use & Care Guide. Major appliances with original model/serial numbers that is contrary to repair or replace appliance light bulbs, air filters or water filters. ITEMS EXCLUDED FROM WARRANTY This limited warranty does not cover: 1. SOME...
... inaccessible location or is not installed in accordance with electrical or plumbing codes, or use your authorized Maytag dealer to correct house wiring or plumbing. 2. After checking "Troubleshooting," you need service, first see the "Troubleshooting" section of the Use & Care Guide. Major appliances with original model/serial numbers that is contrary to repair or replace appliance light bulbs, air filters or water filters. ITEMS EXCLUDED FROM WARRANTY This limited warranty does not cover: 1. SOME...


