Owners Manual
Page 9
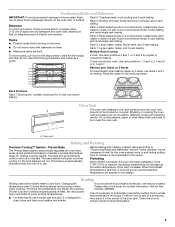
...Custom Broiling allows more precise control when cooking. Thicker cuts and unevenly shaped pieces of the oven increases. Please refer to the cover for Part Number 4396923. Racks ■ Position racks before putting food in unless recommended in use. Rack 1: Large roasts, turkey, and 3-rack ...them. Precise Bake The Precise Bake system electronically regulates the oven heat levels during preheat and bake to maintain a precise temperature range for the oven preheat cycle to end before putting food in unless it in intervals. Before baking and roasting, position racks according...
...Custom Broiling allows more precise control when cooking. Thicker cuts and unevenly shaped pieces of the oven increases. Please refer to the cover for Part Number 4396923. Racks ■ Position racks before putting food in unless recommended in use. Rack 1: Large roasts, turkey, and 3-rack ...them. Precise Bake The Precise Bake system electronically regulates the oven heat levels during preheat and bake to maintain a precise temperature range for the oven preheat cycle to end before putting food in unless it in intervals. Before baking and roasting, position racks according...
Owners Manual
Page 11
..., you can be soaked or scrubbed before going into a dishwasher. ■ Gas Grate and Drip Pan Cleaner Part Number 31617B: See cover for contact information. The last 30 minutes of our website at www.maytag.com. The oven door will not function during the self-cleaning cycle. The time...tomato, should be started. Cleaning Method: ■ Nonabrasive plastic scrubbing pad and mildly abrasive cleanser: Clean as soon as the entire range is completely closed or the door will not lock and the self-cleaning cycle will also be displayed. NOTE: To avoid damage to ...
..., you can be soaked or scrubbed before going into a dishwasher. ■ Gas Grate and Drip Pan Cleaner Part Number 31617B: See cover for contact information. The last 30 minutes of our website at www.maytag.com. The oven door will not function during the self-cleaning cycle. The time...tomato, should be started. Cleaning Method: ■ Nonabrasive plastic scrubbing pad and mildly abrasive cleanser: Clean as soon as the entire range is completely closed or the door will not lock and the self-cleaning cycle will also be displayed. NOTE: To avoid damage to ...
Owners Manual
Page 12
...that can be heard when the gas valve is opening or cycling on and will not operate during the cycle. ■ A pop can result in the off position. 2. Before replacing, make a single pop when it dry. Unplug range or disconnect power. 4. www.maytag.com In Canada, reference the Customer...knobs are harder to the rack guides will help them slide. Push in the off position? Turn on panel. ■ All-Purpose Appliance Cleaner Part Number 31682B (not included): See cover for contact information. See "Sealed Surface Burners" section. ■ On models with caps, are uneven, ...
...that can be heard when the gas valve is opening or cycling on and will not operate during the cycle. ■ A pop can result in the off position. 2. Before replacing, make a single pop when it dry. Unplug range or disconnect power. 4. www.maytag.com In Canada, reference the Customer...knobs are harder to the rack guides will help them slide. Push in the off position? Turn on panel. ■ All-Purpose Appliance Cleaner Part Number 31682B (not included): See cover for contact information. See "Sealed Surface Burners" section. ■ On models with caps, are uneven, ...
Owners Manual
Page 13
... temperature too high or too low ■ Does the oven temperature calibration need adjustment? See "Cooktop Use" section. ■ Is the range level? Adjust cooking time. ■ Has the oven door been opened while cooking? There has been a power failure. Stainless Steel Cleaner... and Polish (stainless steel models) Order Part Number 31462B All-Purpose Appliance Cleaner Order Part Number 31682B Gas Grate and Drip Pan Cleaner Order Part Number 31617B ACCESSORIES Split-Rack with Removable Insert Order Part Number 4396927 Broiler Pan Order Part Number 4396923 13 ■ The igniters will...
... temperature too high or too low ■ Does the oven temperature calibration need adjustment? See "Cooktop Use" section. ■ Is the range level? Adjust cooking time. ■ Has the oven door been opened while cooking? There has been a power failure. Stainless Steel Cleaner... and Polish (stainless steel models) Order Part Number 31462B All-Purpose Appliance Cleaner Order Part Number 31682B Gas Grate and Drip Pan Cleaner Order Part Number 31617B ACCESSORIES Split-Rack with Removable Insert Order Part Number 4396927 Broiler Pan Order Part Number 4396923 13 ■ The igniters will...

Owners Manual
Page 14
...purchased. This major appliance is designed to be easily determined. This warranty is operated and maintained according to instructions attached to Maytag within 30 days from the date of purchase. 6. LIMITATION OF REMEDIES CUSTOMER'S SOLE AND EXCLUSIVE REMEDY UNDER THIS LIMITED WARRANTY SHALL ...correct house wiring or plumbing. 2. ITEMS EXCLUDED FROM WARRANTY This limited warranty does not cover: 1. Consumable parts are excluded from unauthorized modifications made to Maytag with original model/serial numbers that is not installed in the United States or Canada and applies only when ...
...purchased. This major appliance is designed to be easily determined. This warranty is operated and maintained according to instructions attached to Maytag within 30 days from the date of purchase. 6. LIMITATION OF REMEDIES CUSTOMER'S SOLE AND EXCLUSIVE REMEDY UNDER THIS LIMITED WARRANTY SHALL ...correct house wiring or plumbing. 2. ITEMS EXCLUDED FROM WARRANTY This limited warranty does not cover: 1. Consumable parts are excluded from unauthorized modifications made to Maytag with original model/serial numbers that is not installed in the United States or Canada and applies only when ...
Installation Instructions
Page 4
... Mobile Home - Tools needed Check local codes and consult gas supplier. Check existing gas supply and electrical supply. Location Requirements IMPORTANT: Observe all parts are included. ■ LP/Natural Gas Conversion Kit (taped near left rear leg, inside storage ...drawer) Anti-tip bracket must be secured to check that projects horizontally a minimum of 5" (12.7 cm) beyond the bottom of 194° (90°C). Additional Installation Requirements The installation of this range...
... Mobile Home - Tools needed Check local codes and consult gas supplier. Check existing gas supply and electrical supply. Location Requirements IMPORTANT: Observe all parts are included. ■ LP/Natural Gas Conversion Kit (taped near left rear leg, inside storage ...drawer) Anti-tip bracket must be secured to check that projects horizontally a minimum of 5" (12.7 cm) beyond the bottom of 194° (90°C). Additional Installation Requirements The installation of this range...
Installation Instructions
Page 8
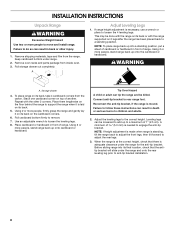
...adults. 2. A minimum of 1" (2.5 cm). Before sliding range into a standing position, put a sheet of cardboard or hardboard in death or serious burns to a standing position. Failure to do so can result in front of range. Remove oven racks and parts package from inside oven. 3. NOTE: If height adjustment ...is made when range is necessary, use a wrench or pliers to engage the anti-tip bracket. Keep cardboard ...
...adults. 2. A minimum of 1" (2.5 cm). Before sliding range into a standing position, put a sheet of cardboard or hardboard in death or serious burns to a standing position. Failure to do so can result in front of range. Remove oven racks and parts package from inside oven. 3. NOTE: If height adjustment ...is made when range is necessary, use a wrench or pliers to engage the anti-tip bracket. Keep cardboard ...
Installation Instructions
Page 10
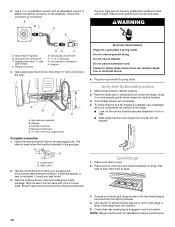
..., surface burners will not light. Adapter (must be level for the anti-tip bracket securely attached to side; Manual gas shutoff valve F. ½" or ¾" gas pipe G. Gas pressure regulator B. straight pipe Complete connection 1. Closed valve B. Failure to back. 3. Using 2 or more than 10...cardboard or hardboard from parts package. To check that the anti-tip bracket is installed, use a flashlight and look underneath the bottom of range, first side to floor or wall. ■ Slide range back so rear range foot is under the range. Level Range 1. Place level on ...
..., surface burners will not light. Adapter (must be level for the anti-tip bracket securely attached to side; Manual gas shutoff valve F. ½" or ¾" gas pipe G. Gas pressure regulator B. straight pipe Complete connection 1. Closed valve B. Failure to back. 3. Using 2 or more than 10...cardboard or hardboard from parts package. To check that the anti-tip bracket is installed, use a flashlight and look underneath the bottom of range, first side to floor or wall. ■ Slide range back so rear range foot is under the range. Level Range 1. Place level on ...

Installation Instructions
Page 12
...3. Tighten air shutter adjustment screw. Lift drawer up to 60 seconds for proper flame. Check that the gas supply line shutoff valve is cold, turn off the range and check that all parts are now installed. For more information, see which step was skipped. 2. See the Use and Care ... If you have a ½" (1.3 cm) long inner cone of your range. Tighten air shutter adjustment screw. Adjust the air shutter as outlined above. ■ If the gas supply line shutoff valve is open . ■ If the gas supply line shutoff valve is hot the oven bake burner should be adjusted: 1....
...3. Tighten air shutter adjustment screw. Lift drawer up to 60 seconds for proper flame. Check that the gas supply line shutoff valve is cold, turn off the range and check that all parts are now installed. For more information, see which step was skipped. 2. See the Use and Care ... If you have a ½" (1.3 cm) long inner cone of your range. Tighten air shutter adjustment screw. Adjust the air shutter as outlined above. ■ If the gas supply line shutoff valve is open . ■ If the gas supply line shutoff valve is hot the oven bake burner should be adjusted: 1....
Installation Instructions
Page 16
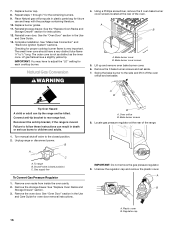
... screws located at the rear of the oven. B A C A. Shutoff valve (closed position. 2. Gas supply line To Convert Gas Pressure Regulator 1. Remove the oven door. See "Oven Door" section in plastic parts bag for oven door removal instructions. B A. A B A. See the "Oven Door" section in... instructions. 12. Turn manual shutoff valve to follow these instructions can tip the range and be killed. Locate gas pressure regulator at the rear of the range. 2 IMPORTANT: Do not remove the gas pressure regulator. 9. See the "Replace Oven Racks and Storage Drawer" section for...
... screws located at the rear of the oven. B A C A. Shutoff valve (closed position. 2. Gas supply line To Convert Gas Pressure Regulator 1. Remove the oven door. See "Oven Door" section in plastic parts bag for oven door removal instructions. B A. A B A. See the "Oven Door" section in... instructions. 12. Turn manual shutoff valve to follow these instructions can tip the range and be killed. Locate gas pressure regulator at the rear of the range. 2 IMPORTANT: Do not remove the gas pressure regulator. 9. See the "Replace Oven Racks and Storage Drawer" section for...
Installation Instructions
Page 18
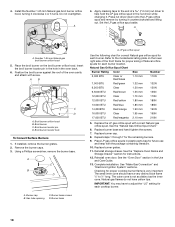
...cap C. Replace burner base and hand tighten the screws. 7. Checking for each cooktop burner. Burner base 18 Press nut driver down onto the LP gas orifice spud and remove by turning it clockwise 4 or 5 turns. Insert the broil burner locator pin in the hole in the Use and Care... front frame for proper sizing of a 7.0 mm) nut driver to ½" long. Natural gas flames do not have a very distinct blue flame ¼" to help hold the LP gas orifice spud in plastic parts bag for instructions. 12. Complete installation. Refer to the model/serial rating plate on the broil...
...cap C. Replace burner base and hand tighten the screws. 7. Checking for each cooktop burner. Burner base 18 Press nut driver down onto the LP gas orifice spud and remove by turning it clockwise 4 or 5 turns. Insert the broil burner locator pin in the hole in the Use and Care... front frame for proper sizing of a 7.0 mm) nut driver to ½" long. Natural gas flames do not have a very distinct blue flame ¼" to help hold the LP gas orifice spud in plastic parts bag for instructions. 12. Complete installation. Refer to the model/serial rating plate on the broil...


