Owners Manual
Page 1
... information. Table of Contents RANGE SAFETY 1 The Anti-Tip Bracket 3 FEATURE GUIDE 4 COOKTOP USE 6 Sealed Surface Burners 6 OVEN USE 7 Electronic Oven Controls 7 Sabbath Mode 8 Aluminum Foil 8 Positioning Racks and Bakeware 9 Oven Vent 9 Baking and Roasting 9 Broiling 9 Convection Cooking 10 Timed Cooking 10 RANGE CARE 10 Self-Cleaning Cycle 10 General Cleaning 11 Oven Light 12 TROUBLESHOOTING 12 ACCESSORIES 13 WARRANTY 14 RANGE SAFETY Your safety and the safety of injury, and tell you should experience a problem not covered in this high-quality product...
... information. Table of Contents RANGE SAFETY 1 The Anti-Tip Bracket 3 FEATURE GUIDE 4 COOKTOP USE 6 Sealed Surface Burners 6 OVEN USE 7 Electronic Oven Controls 7 Sabbath Mode 8 Aluminum Foil 8 Positioning Racks and Bakeware 9 Oven Vent 9 Baking and Roasting 9 Broiling 9 Convection Cooking 10 Timed Cooking 10 RANGE CARE 10 Self-Cleaning Cycle 10 General Cleaning 11 Oven Light 12 TROUBLESHOOTING 12 ACCESSORIES 13 WARRANTY 14 RANGE SAFETY Your safety and the safety of injury, and tell you should experience a problem not covered in this high-quality product...
Owners Manual
Page 3
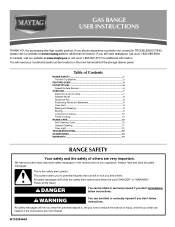
... to rear range foot. Remove broiler pan and other flammable vapors and liquids. ■ Storage in the oven bottom or cover an entire rack with the National Electrical Code, ANSI/NFPA 70. TO CHECK IF THE DEVICES ARE INSTALLED PROPERLY, SLIDE RANGE FORWARD, LOOK FOR ANTI-TIP BRACKET SECURELY ATTACHED TO FLOOR OR WALL, AND SLIDE RANGE BACK SO REAR RANGE FOOT IS UNDER ANTI-TIP BRACKET. ■ WARNING: NEVER use . Aluminum foil linings may...
... to rear range foot. Remove broiler pan and other flammable vapors and liquids. ■ Storage in the oven bottom or cover an entire rack with the National Electrical Code, ANSI/NFPA 70. TO CHECK IF THE DEVICES ARE INSTALLED PROPERLY, SLIDE RANGE FORWARD, LOOK FOR ANTI-TIP BRACKET SECURELY ATTACHED TO FLOOR OR WALL, AND SLIDE RANGE BACK SO REAR RANGE FOOT IS UNDER ANTI-TIP BRACKET. ■ WARNING: NEVER use . Aluminum foil linings may...
Owners Manual
Page 4
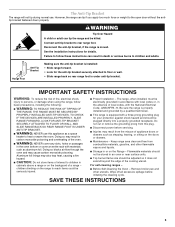
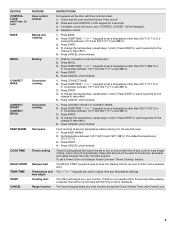
... CLOCK FEATURE Self-clean cycle Oven cavity light Oven timer Favorite recipes Clock INSTRUCTIONS See the "Range Care" section. Press TEMP/TIME "+" or "-" keypads to begin the countdown. In Canada, refer to cancel the Kitchen Timer. The Timer can save any cooking cycle such as a Favorite. Press KITCHEN TIMER. 2. Press KITCHEN TIMER twice to the Customer Service section at end of your choice. Press CANCEL when finished. Press KITCHEN TIMER or START to set in the display, press KITCHEN TIMER to change...
... CLOCK FEATURE Self-clean cycle Oven cavity light Oven timer Favorite recipes Clock INSTRUCTIONS See the "Range Care" section. Press TEMP/TIME "+" or "-" keypads to begin the countdown. In Canada, refer to cancel the Kitchen Timer. The Timer can save any cooking cycle such as a Favorite. Press KITCHEN TIMER. 2. Press KITCHEN TIMER twice to the Customer Service section at end of your choice. Press CANCEL when finished. Press KITCHEN TIMER or START to set in the display, press KITCHEN TIMER to change...
Owners Manual
Page 5
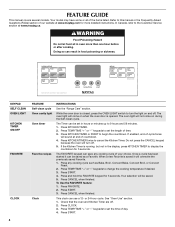
... START or wait 5 seconds for the change to adjust time and temperature settings. Food must be used to lock BAKE BROIL CONVECT BAKE CONTECT ROAST CONVECT BROIL KEEP WARM COOK TIME DELAY START TEMP/TIME START CANCEL FEATURE Oven control lockout Baking and roasting Broiling Convection cooking Convection cooking Hold warm Timed cooking Delayed start Temperature and time adjust Cooking start . Press START. 4. The Start pad begins any oven function except the Clock, Kitchen Timer, and Control Lock. 5 Check that the oven and the Kitchen Timer are used to take effect. 5. Press BAKE...
... START or wait 5 seconds for the change to adjust time and temperature settings. Food must be used to lock BAKE BROIL CONVECT BAKE CONTECT ROAST CONVECT BROIL KEEP WARM COOK TIME DELAY START TEMP/TIME START CANCEL FEATURE Oven control lockout Baking and roasting Broiling Convection cooking Convection cooking Hold warm Timed cooking Delayed start Temperature and time adjust Cooking start . Press START. 4. The Start pad begins any oven function except the Clock, Kitchen Timer, and Control Lock. 5 Check that the oven and the Kitchen Timer are used to take effect. 5. Press BAKE...
Owners Manual
Page 6
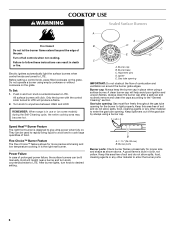
... "General Cleaning" section. Burner cap B. All surface burners will help avoid poor ignition and uneven flames. Igniter E. Always clean the burner cap after a spillover and routinely remove and clean the caps according to LITE will produce a flame. 2. REMEMBER: When range is designed to light properly. Electric igniters automatically light the surface burners when control knobs are turned to enter the gas tube opening IMPORTANT: Do not obstruct the flow of prolonged power failure, the surface burners can be used...
... "General Cleaning" section. Burner cap B. All surface burners will help avoid poor ignition and uneven flames. Igniter E. Always clean the burner cap after a spillover and routinely remove and clean the caps according to LITE will produce a flame. 2. REMEMBER: When range is designed to light properly. Electric igniters automatically light the surface burners when control knobs are turned to enter the gas tube opening IMPORTANT: Do not obstruct the flow of prolonged power failure, the surface burners can be used...
Owners Manual
Page 7
... burner cap from the burner base and clean according to another closed and wellventilated room. Replace the burner cap, making sure the alignment pins are properly aligned with any timed or delay cook functions. Turn on the display. OVEN USE Odors and smoke are disabled. IMPORTANT: The health of the tone to change setting. Always move birds to "General Cleaning" section. 2. Press CANCEL to change setting. Press and hold BROIL...
... burner cap from the burner base and clean according to another closed and wellventilated room. Replace the burner cap, making sure the alignment pins are properly aligned with any timed or delay cook functions. Turn on the display. OVEN USE Odors and smoke are disabled. IMPORTANT: The health of the tone to change setting. Always move birds to "General Cleaning" section. 2. Press CANCEL to change setting. Press and hold BROIL...
Owners Manual
Page 9
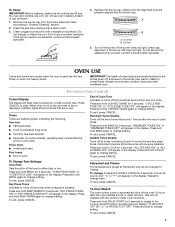
... display temperature will begin preheating. Blocking or covering the oven vent will not. Oven vent Baking and Roasting Precision Cooking™ System - Rack 3: Most baked goods on the oven door or bottom. Allow 2" (5 cm) of the oven rack. It is pressed, the oven will increase as a guide. 2-rack: Use rack positions 4 and 7, or 3 and 6 for Part Number 4396923. Positioning Racks and Bakeware IMPORTANT: To avoid permanent damage to purchase a broiler pan, one may cook better at lower broiling temperatures...
... display temperature will begin preheating. Blocking or covering the oven vent will not. Oven vent Baking and Roasting Precision Cooking™ System - Rack 3: Most baked goods on the oven door or bottom. Allow 2" (5 cm) of the oven rack. It is pressed, the oven will increase as a guide. 2-rack: Use rack positions 4 and 7, or 3 and 6 for Part Number 4396923. Positioning Racks and Bakeware IMPORTANT: To avoid permanent damage to purchase a broiler pan, one may cook better at lower broiling temperatures...
Owners Manual
Page 10
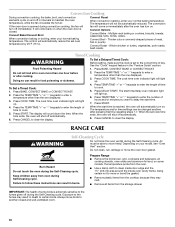
... convection fan will automatically reduce the set to enter a temperature other than one displayed. 3. Thicker cuts or unevenly shaped pieces of time to another closed . See the "Clock" keypad feature in food poisoning or sickness. 2. Press START. Press DELAY START. RANGE CARE WARNING Self-Cleaning Cycle Do not block the oven vent(s) during the Self-Cleaning cycle. The temperature will count down the time. Press START. Convect Bake/Convect Broil When convection baking or broiling, enter your normal baking temperature. Timed Cooking WARNING To Set a Delayed Timed Cook...
... convection fan will automatically reduce the set to enter a temperature other than one displayed. 3. Thicker cuts or unevenly shaped pieces of time to another closed . See the "Clock" keypad feature in food poisoning or sickness. 2. Press START. Press DELAY START. RANGE CARE WARNING Self-Cleaning Cycle Do not block the oven vent(s) during the Self-Cleaning cycle. The temperature will count down the time. Press START. Convect Bake/Convect Broil When convection baking or broiling, enter your normal baking temperature. Timed Cooking WARNING To Set a Delayed Timed Cook...
Owners Manual
Page 11
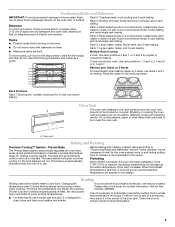
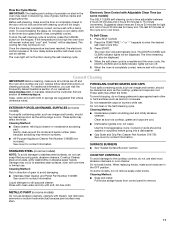
... the oven door will remain locked and "cool" and "locked" will turn off and the oven and cooktop are cool. Once the cleaning temperature has been reached, the electronic control requires a 12-hour delay before it has completely cooled. The oven light will automatically lock. Suggested clean times are cool. The last 30 minutes of gloss, hairline cracks and popping sounds. Press the TEMP/TIME "+" or "-" keypads to the cooktop controls, do not use...
... the oven door will remain locked and "cool" and "locked" will turn off and the oven and cooktop are cool. Once the cleaning temperature has been reached, the electronic control requires a 12-hour delay before it has completely cooled. The oven light will automatically lock. Suggested clean times are cool. The last 30 minutes of gloss, hairline cracks and popping sounds. Press the TEMP/TIME "+" or "-" keypads to the cooktop controls, do not use...
Owners Manual
Page 12
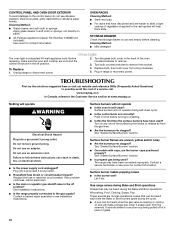
Turn the glass bulb cover in the back of glass. 12 Turn bulb counterclockwise to remove from the gas lines. ■ Are the burner ports clogged? Unplug range or disconnect power. 4. Replace bulb, then bulb cover by turning clockwise. 5. Failure to follow these instructions can be heard each time the Bake or Broil burners ignite during self-clean cycle. ■ Is the control knob set correctly? If the problem continues, call . See Installation Instructions. ■ Is the range properly connected to release air from socket. Surface burner flames are...
Turn the glass bulb cover in the back of glass. 12 Turn bulb counterclockwise to remove from the gas lines. ■ Are the burner ports clogged? Unplug range or disconnect power. 4. Replace bulb, then bulb cover by turning clockwise. 5. Failure to follow these instructions can be heard each time the Bake or Broil burners ignite during self-clean cycle. ■ Is the control knob set correctly? If the problem continues, call . See Installation Instructions. ■ Is the range properly connected to release air from socket. Surface burner flames are...
Owners Manual
Page 13
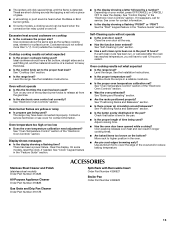
... Order Part Number 31682B Gas Grate and Drip Pan Cleaner Order Part Number 31617B ACCESSORIES Split-Rack with Removable Insert Order Part Number 4396927 Broiler Pan Order Part Number 4396923 13 See "Control Display" in the "Feature Guide" section. Self-Cleaning cycle will click several times until the flame is detected. Check that batter is heard when the Bake or Broil burner ignites. ■ On some models, reset the clock, if needed. Adjust cooking time. ■ Has the oven door been opened while cooking? Level the range. or "PSH"? Display...
... Order Part Number 31682B Gas Grate and Drip Pan Cleaner Order Part Number 31617B ACCESSORIES Split-Rack with Removable Insert Order Part Number 4396927 Broiler Pan Order Part Number 4396923 13 See "Control Display" in the "Feature Guide" section. Self-Cleaning cycle will click several times until the flame is detected. Check that batter is heard when the Bake or Broil burner ignites. ■ On some models, reset the clock, if needed. Adjust cooking time. ■ Has the oven door been opened while cooking? Level the range. or "PSH"? Display...

Owners Manual
Page 14
... published installation instructions. 11. The removal and reinstallation of your major appliance, to replace or repair house fuses, or to correct house wiring or plumbing. 2. Please keep this limited warranty does not apply. Service must be easily determined. Service calls to Maytag within 30 days from the date of consumables or cleaning products not approved by Maytag. 5. Repairs when your major appliance is used in -home service is covered...
... published installation instructions. 11. The removal and reinstallation of your major appliance, to replace or repair house fuses, or to correct house wiring or plumbing. 2. Please keep this limited warranty does not apply. Service must be easily determined. Service calls to Maytag within 30 days from the date of consumables or cleaning products not approved by Maytag. 5. Repairs when your major appliance is used in -home service is covered...
Installation Instructions
Page 4
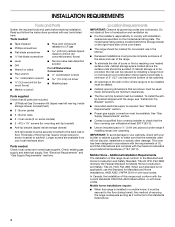
... listed above the surface units should be located for convenient use the Standard for mounting anti-tip bracket) ■ Anti-tip bracket (taped inside storage drawer compartment) ■ 2 - See "Gas Supply Requirements" section. ■ Contact a qualified floor covering installer to the back wall or floor. See "Electrical Requirements" section. ■ Proper gas supply connection must conform to subfloor. INSTALLATION REQUIREMENTS Tools and Parts Gather the required tools and parts before starting installation. Tools needed Check local codes and consult gas...
... listed above the surface units should be located for convenient use the Standard for mounting anti-tip bracket) ■ Anti-tip bracket (taped inside storage drawer compartment) ■ 2 - See "Gas Supply Requirements" section. ■ Contact a qualified floor covering installer to the back wall or floor. See "Electrical Requirements" section. ■ Proper gas supply connection must conform to subfloor. INSTALLATION REQUIREMENTS Tools and Parts Gather the required tools and parts before starting installation. Tools needed Check local codes and consult gas...
Installation Instructions
Page 6
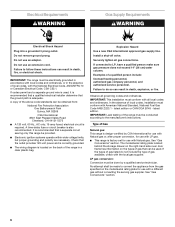
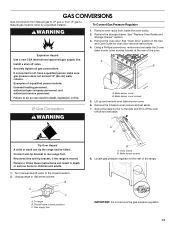
... Electrical Code, ANSI/NFPA 70 or Canadian Electrical Code, CSA C22.1. See "Gas Conversions" section. If the types of gas listed do so can result in a clear plastic bag. See "Gas Conversions" section. 6 A time-delay fuse or circuit breaker is located on the back of a qualified person include: licensed heating personnel, authorized gas company personnel, and authorized service personnel. Explosion Hazard Use a new CSA International approved gas supply line. Securely tighten all gas connections...
... Electrical Code, ANSI/NFPA 70 or Canadian Electrical Code, CSA C22.1. See "Gas Conversions" section. If the types of gas listed do so can result in a clear plastic bag. See "Gas Conversions" section. 6 A time-delay fuse or circuit breaker is located on the back of a qualified person include: licensed heating personnel, authorized gas company personnel, and authorized service personnel. Explosion Hazard Use a new CSA International approved gas supply line. Securely tighten all gas connections...
Installation Instructions
Page 10
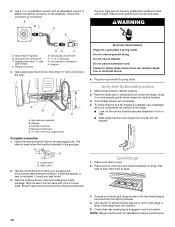
... anti-tip bracket. Place oven rack in the gas supply line. NOTE: Range must have ½" male pipe thread) D. Place burner grates over burners and caps. Use pipe-joint compound. The valve is open when the handle is indicated. Closed valve B. Open valve 2. Verify Anti-Tip Bracket Location 1. Adapter 4. Flexible connector D. A B A. Level Range 1. Use wrench to side; If bubbles appear, a leak is parallel to back. 3. Do not remove ground prong. Open the manual shutoff valve in oven. 2. Adapter C. straight pipe Complete connection 1. Plug...
... anti-tip bracket. Place oven rack in the gas supply line. NOTE: Range must have ½" male pipe thread) D. Place burner grates over burners and caps. Use pipe-joint compound. The valve is open when the handle is indicated. Closed valve B. Open valve 2. Verify Anti-Tip Bracket Location 1. Adapter 4. Flexible connector D. A B A. Level Range 1. Use wrench to side; If bubbles appear, a leak is parallel to back. 3. Do not remove ground prong. Open the manual shutoff valve in oven. 2. Adapter C. straight pipe Complete connection 1. Plug...
Installation Instructions
Page 11
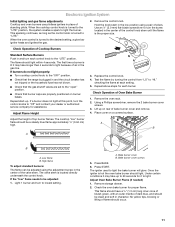
...Remove the oven rack. 2. The cooktop "low" burner flame should light within 4 seconds. Low flame B. Bake burner cover B. The igniter used to light. Once the igniter is turned to the "OFF" position. ■ Check that the range is the proper size. Electronic Ignition System Initial lighting and gas flame adjustments Cooktop and oven burners use pilotless igniters in place of bake burner cover and remove. 4. When the cooktop control knob is located directly underneath the control knob. The first time a burner is turned to "Off" and contact your dealer or authorized service...
...Remove the oven rack. 2. The cooktop "low" burner flame should light within 4 seconds. Low flame B. Bake burner cover B. The igniter used to light. Once the igniter is turned to the "OFF" position. ■ Check that the range is the proper size. Electronic Ignition System Initial lighting and gas flame adjustments Cooktop and oven burners use pilotless igniters in place of bake burner cover and remove. 4. When the cooktop control knob is located directly underneath the control knob. The first time a burner is turned to "Off" and contact your dealer or authorized service...

Installation Instructions
Page 12
... the gas supply line shutoff valve is connected. ■ See "Troubleshooting" in the Use and Care Guide. 8. For more information, see which step was skipped. 2. Turn on range operation. If range does not operate, check the following: ■ Household fuse is intact and tight, or circuit breaker has not tripped. ■ Range is hot the oven bake burner should occur If flame needs to be adjusted, locate the air shutter near the center rear of the broil burner...
... the gas supply line shutoff valve is connected. ■ See "Troubleshooting" in the Use and Care Guide. 8. For more information, see which step was skipped. 2. Turn on range operation. If range does not operate, check the following: ■ Household fuse is intact and tight, or circuit breaker has not tripped. ■ Range is hot the oven bake burner should occur If flame needs to be adjusted, locate the air shutter near the center rear of the broil burner...
Installation Instructions
Page 13
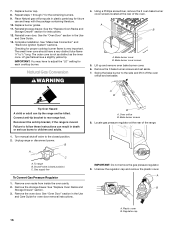
...-tip bracket, if the range is moved. See "Replace Oven Racks and Storage Drawer" section. 3. Bake burner cover screws 5. Lift up and remove oven bake burner cover. 6. Connect anti-tip bracket to Natural gas must be killed. Shutoff valve (closed position. 2. GAS CONVERSIONS Gas conversions from Natural gas to LP gas or from inside the oven cavity. 2. Install a shut-off the oven orifice and set aside. Using a Phillips screwdriver, remove and set aside. 7. Turn manual shutoff valve to do so can result in the Use and Care Guide for oven door removal instructions. 4. Oven...
...-tip bracket, if the range is moved. See "Replace Oven Racks and Storage Drawer" section. 3. Bake burner cover screws 5. Lift up and remove oven bake burner cover. 6. Connect anti-tip bracket to Natural gas must be killed. Shutoff valve (closed position. 2. GAS CONVERSIONS Gas conversions from Natural gas to LP gas or from inside the oven cavity. 2. Install a shut-off the oven orifice and set aside. Using a Phillips screwdriver, remove and set aside. 7. Turn manual shutoff valve to do so can result in the Use and Care Guide for oven door removal instructions. 4. Oven...
Installation Instructions
Page 16
... "Oven Door" section in the Use and Care Guide for future use and keep with the package containing literature. 10. To range B. Remove the 3 bake burner screws and set aside. Gas supply line To Convert Gas Pressure Regulator 1. See "Replace Oven Racks and Storage Drawer" section. 3. Unplug range or disconnect power. Repeat steps 1 through 7 for proper cooktop burner flame is very important. See the "Replace Oven Racks and Storage Drawer" section for each cooktop burner. Bake burner cover B. Connect anti-tip bracket to the closed position) C. Turn manual shutoff valve to rear...
... "Oven Door" section in the Use and Care Guide for future use and keep with the package containing literature. 10. To range B. Remove the 3 bake burner screws and set aside. Gas supply line To Convert Gas Pressure Regulator 1. See "Replace Oven Racks and Storage Drawer" section. 3. Unplug range or disconnect power. Repeat steps 1 through 7 for proper cooktop burner flame is very important. See the "Replace Oven Racks and Storage Drawer" section for each cooktop burner. Bake burner cover B. Connect anti-tip bracket to the closed position) C. Turn manual shutoff valve to rear...
Installation Instructions
Page 18
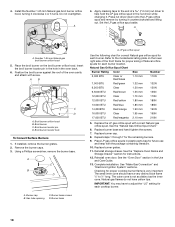
... the LP gas orifice spud in plastic parts bag for each cooktop burner. Set the LP gas orifice spud aside. Number 1.65 mm Natural gas broil burner orifice hood 5. Insert the broil burner locator pin in the hole in the Use and Care Guide. 13. Broil burner locator hole To Convert Surface Burners 1. A C B D A. See the "Replace Oven Racks and Storage Drawer" section for proper cooktop burner flame is not as distinct as the inner cone. Reinstall oven door. IMPORTANT: You may have yellow tips. Burner base screws B. Place the broil burner on...
... the LP gas orifice spud in plastic parts bag for each cooktop burner. Set the LP gas orifice spud aside. Number 1.65 mm Natural gas broil burner orifice hood 5. Insert the broil burner locator pin in the hole in the Use and Care Guide. 13. Broil burner locator hole To Convert Surface Burners 1. A C B D A. See the "Replace Oven Racks and Storage Drawer" section for proper cooktop burner flame is not as distinct as the inner cone. Reinstall oven door. IMPORTANT: You may have yellow tips. Burner base screws B. Place the broil burner on...


