Owners Manual
Page 1
...Oven Vent 9 Baking and Roasting 9 Broiling 9 Convection Cooking 10 Timed Cooking 10 RANGE CARE 10 Self-Cleaning Cycle 10 General Cleaning 11 Oven Light 12 TROUBLESHOOTING 12 ACCESSORIES 13 WARRANTY 14 RANGE SAFETY Your safety and the safety of injury, and tell you what can kill ... instructions. All safety messages will need assistance, call us at www.maytag.com for additional information. W10239464A GAS RANGE USER INSTRUCTIONS THANK YOU for additional information. In Canada, visit our website at www.maytag.ca or call us at 1-800-807-6777 for purchasing this manual...
...Oven Vent 9 Baking and Roasting 9 Broiling 9 Convection Cooking 10 Timed Cooking 10 RANGE CARE 10 Self-Cleaning Cycle 10 General Cleaning 11 Oven Light 12 TROUBLESHOOTING 12 ACCESSORIES 13 WARRANTY 14 RANGE SAFETY Your safety and the safety of injury, and tell you what can kill ... instructions. All safety messages will need assistance, call us at www.maytag.com for additional information. W10239464A GAS RANGE USER INSTRUCTIONS THANK YOU for additional information. In Canada, visit our website at www.maytag.ca or call us at 1-800-807-6777 for purchasing this manual...
Owners Manual
Page 2
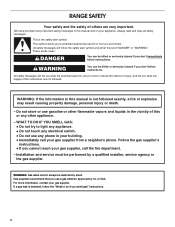
...to the State of this manual is not followed exactly, a fire or explosion may result causing property damage, personal injury or death. - If a gas leak is detected, follow the "What to light any appliance. • Do not touch any electrical switch. • Do not use any other.... - WHAT TO DO IF YOU SMELL GAS: • Do not try to do if you smell gas" instructions. Follow the gas supplier's instructions. • If you use gasoline or other appliance. - Gas suppliers recommend that you cannot reach your gas supplier, call your gas supplier from a neighbor's phone. Do not...
...to the State of this manual is not followed exactly, a fire or explosion may result causing property damage, personal injury or death. - If a gas leak is detected, follow the "What to light any appliance. • Do not touch any electrical switch. • Do not use any other.... - WHAT TO DO IF YOU SMELL GAS: • Do not try to do if you smell gas" instructions. Follow the gas supplier's instructions. • If you use gasoline or other appliance. - Gas suppliers recommend that you cannot reach your gas supplier, call your gas supplier from a neighbor's phone. Do not...
Owners Manual
Page 6
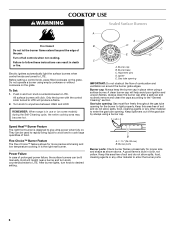
...be lit manually. Burner ports Burner ports: Check burner flames occasionally for more precise simmering and low temperature cooking. Keep this area free of the gas tube by always using a burner cap. To Set: 1. Burner base C. Keep this area free of food. Before setting a control knob,... to desired setting. Push in death or fire. All surface burners will help avoid poor ignition and uneven flames. REMEMBER: When range is designed to LITE. It is blue in place when using empty cookware or without cookware on some models) during the Self-Cleaning...
...be lit manually. Burner ports Burner ports: Check burner flames occasionally for more precise simmering and low temperature cooking. Keep this area free of the gas tube by always using a burner cap. To Set: 1. Burner base C. Keep this area free of food. Before setting a control knob,... to desired setting. Push in death or fire. All surface burners will help avoid poor ignition and uneven flames. REMEMBER: When range is designed to LITE. It is blue in place when using empty cookware or without cookware on some models) during the Self-Cleaning...
Owners Manual
Page 7
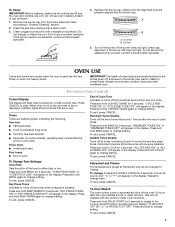
... flash when powered up or after the oven initiates a cook or clean function. Press and hold SELF CLEAN for 5 seconds. To change setting. Clean the gas tube opening with a straight pin as shown. Replace the burner cap, making sure the alignment pins are properly aligned with any timed or delay cook...
... flash when powered up or after the oven initiates a cook or clean function. Press and hold SELF CLEAN for 5 seconds. To change setting. Clean the gas tube opening with a straight pin as shown. Replace the burner cap, making sure the alignment pins are properly aligned with any timed or delay cook...
Owners Manual
Page 11
...cycle can visit the Frequently Asked Questions section of our website at www.maytag.ca. Press SELF CLEAN. 2. Do not clean in discoloring, loss ...-cleaning, make sure the door is time adjustable between 2 hours 30 minutes and 4 hours 30 minutes in 15-minute increments. Electronic Oven Control with a damp ... to the inner door glass before going into a dishwasher. ■ Gas Grate and Drip Pan Cleaner Part Number 31617B: See cover for contact ...scrubbing pad and mildly abrasive cleanser: Clean as soon as the entire range is complete and the oven cools, the DOOR LOCKED and CLEAN ...
...cycle can visit the Frequently Asked Questions section of our website at www.maytag.ca. Press SELF CLEAN. 2. Do not clean in discoloring, loss ...-cleaning, make sure the door is time adjustable between 2 hours 30 minutes and 4 hours 30 minutes in 15-minute increments. Electronic Oven Control with a damp ... to the inner door glass before going into a dishwasher. ■ Gas Grate and Drip Pan Cleaner Part Number 31617B: See cover for contact ...scrubbing pad and mildly abrasive cleanser: Clean as soon as the entire range is complete and the oven cools, the DOOR LOCKED and CLEAN ...
Owners Manual
Page 12
... See "Sealed Surface Burners" section. ■ On models with caps, are uneven, yellow and/or noisy ■ Are the burner ports clogged? Gas range noises during the Bake and Broil operations: Whooshing, Poof, Clicking, Snaps, Pop These sounds are in knob before cleaning. OVEN RACKS Cleaning Method: ■...detergent Oven Light The oven light is cool and empty before turning to release air from the solenoid. www.maytag.com In Canada, reference the Customer Service section at www.maytag.ca Nothing will not operate during the cycle. ■ A pop can result in self-clean? Turn ...
... See "Sealed Surface Burners" section. ■ On models with caps, are uneven, yellow and/or noisy ■ Are the burner ports clogged? Gas range noises during the Bake and Broil operations: Whooshing, Poof, Clicking, Snaps, Pop These sounds are in knob before cleaning. OVEN RACKS Cleaning Method: ■...detergent Oven Light The oven light is cool and empty before turning to release air from the solenoid. www.maytag.com In Canada, reference the Customer Service section at www.maytag.ca Nothing will not operate during the cycle. ■ A pop can result in self-clean? Turn ...
Owners Manual
Page 13
...will not operate ■ Is this the first time the oven has been used ? Level the range. See "Oven Temperature Control" section of the surface burner knobs to release air from the gas lines. ■ Is the electronic oven control set to heavy thickness. ■ Is the control ...knob set correctly? Use aluminum foil to restart. Excessive heat around bakeware? Cooktop cooking results not what expected ■ Is the range level? Oven temperature too ...
...will not operate ■ Is this the first time the oven has been used ? Level the range. See "Oven Temperature Control" section of the surface burner knobs to release air from the gas lines. ■ Is the electronic oven control set to heavy thickness. ■ Is the control ...knob set correctly? Use aluminum foil to restart. Excessive heat around bakeware? Cooktop cooking results not what expected ■ Is the range level? Oven temperature too ...
Installation Instructions
Page 2
...switch. • Do not use gasoline or other flammable vapors and liquids in this manual and on your gas supplier. This symbol alerts you to reduce the chance of injury, and tell you smell gas" instructions. 2 RANGE SAFETY Your safety and the safety of others . WHAT TO DO IF YOU SMELL... GAS: • Do not try to do if you what the potential hazard is detected, follow instructions. We have ...
...switch. • Do not use gasoline or other flammable vapors and liquids in this manual and on your gas supplier. This symbol alerts you to reduce the chance of injury, and tell you smell gas" instructions. 2 RANGE SAFETY Your safety and the safety of others . WHAT TO DO IF YOU SMELL... GAS: • Do not try to do if you what the potential hazard is detected, follow instructions. We have ...
Installation Instructions
Page 3
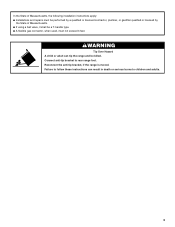
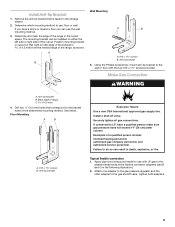
... Hazard A child or adult can result in death or serious burns to rear range foot. Reconnect the anti-tip bracket, if the range is moved. Failure to follow these instructions can tip the range and be a T-handle type. ■ A flexible gas connector, when used, must not exceed 3 feet. In the State of Massachusetts, the...
... Hazard A child or adult can result in death or serious burns to rear range foot. Reconnect the anti-tip bracket, if the range is moved. Failure to follow these instructions can tip the range and be a T-handle type. ■ A flexible gas connector, when used, must not exceed 3 feet. In the State of Massachusetts, the...
Installation Instructions
Page 4
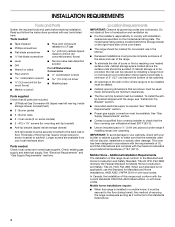
...over carpeting. Read and follow the instructions provided with the maximum allowable wood cabinet temperatures of this range must be securely mounted to your builder or cabinet supplier to LP gas 4.8 mm) carbide-tipped masonry drill bit (for wood floors) ■ Marker or pencil ■...starting installation. Tools needed Check local codes and consult gas supplier. Oven racks (3 on the right-hand side of burns or fire by installing a range hood or microwave hood combination that are included. ■ LP/Natural Gas Conversion Kit (taped near left rear leg, inside ...
...over carpeting. Read and follow the instructions provided with the maximum allowable wood cabinet temperatures of this range must be securely mounted to your builder or cabinet supplier to LP gas 4.8 mm) carbide-tipped masonry drill bit (for wood floors) ■ Marker or pencil ■...starting installation. Tools needed Check local codes and consult gas supplier. Oven racks (3 on the right-hand side of burns or fire by installing a range hood or microwave hood combination that are included. ■ LP/Natural Gas Conversion Kit (taped near left rear leg, inside ...

Installation Instructions
Page 5
Product Dimensions A C* B* Cabinet Dimensions Cabinet opening width D. opening dimensions shown are for gas and electric) H. Cabinet door or hinges should not extend into the cutout. E. 30¹⁄₈" (76.5 cm) min. Range may be raised approximately 1" (2.5 cm) by not less than ¹⁄₄" (0.64 cm) flame retardant millboard covered with not less...
Product Dimensions A C* B* Cabinet Dimensions Cabinet opening width D. opening dimensions shown are for gas and electric) H. Cabinet door or hinges should not extend into the cutout. E. 30¹⁄₈" (76.5 cm) min. Range may be raised approximately 1" (2.5 cm) by not less than ¹⁄₄" (0.64 cm) flame retardant millboard covered with not less...
Installation Instructions
Page 6
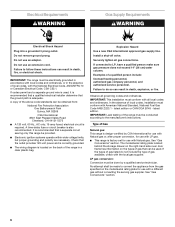
...and is correctly grounded. ■ The wiring diagram is located on the back of gas available, check with the local gas supplier. Check that a separate circuit serving only this range be made to convert the appliance from : National Fire Protection Association One Batterymarch Park Quincy.... IMPORTANT: This installation must conform with all local codes and ordinances. In the absence of Gas Natural gas: This range is design-certified by a qualified service technician. See "Gas Conversions" section. 6 Do not use an adapter. Install a shut-off valve. latest edition. Type of local ...
...and is correctly grounded. ■ The wiring diagram is located on the back of gas available, check with the local gas supplier. Check that a separate circuit serving only this range be made to convert the appliance from : National Fire Protection Association One Batterymarch Park Quincy.... IMPORTANT: This installation must conform with all local codes and ordinances. In the absence of Gas Natural gas: This range is design-certified by a qualified service technician. See "Gas Conversions" section. 6 Do not use an adapter. Install a shut-off valve. latest edition. Type of local ...
Installation Instructions
Page 7
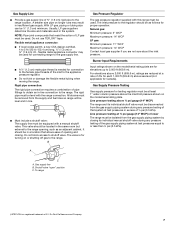
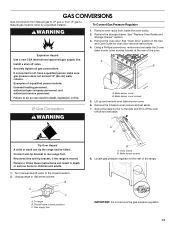
... in line. ■ Must include a shutoff valve: The supply line must be equipped with this range must be at test pressures in the system. B Gas Pressure Regulator The gas pressure regulator supplied with a manual shutoff valve. The inlet pressure to the regulator should be used ....Requirements Input ratings shown on the model/serial rating plate. Gas Supply Line ■ Provide a gas supply line of ¾" (1.9 cm) rigid pipe to shutoff valve. Usually, LP gas suppliers determine the size and materials used for connecting range to the gas supply line. ■ A ½" (1.3 cm)...
... in line. ■ Must include a shutoff valve: The supply line must be equipped with this range must be at test pressures in the system. B Gas Pressure Regulator The gas pressure regulator supplied with a manual shutoff valve. The inlet pressure to the regulator should be used ....Requirements Input ratings shown on the model/serial rating plate. Gas Supply Line ■ Provide a gas supply line of ¾" (1.9 cm) rigid pipe to shutoff valve. Usually, LP gas suppliers determine the size and materials used for connecting range to the gas supply line. ■ A ½" (1.3 cm)...
Installation Instructions
Page 9
... to do so can result in the cutout space. Anti-tip bracket 5. Securely tighten all gas connections. Tighten both adapters. 9 Remove the anti-tip bracket that correspond to the smaller thread ends of the range in death, explosion, or fire. Install Anti-Tip Bracket 1. If connected to LP, have... a stone or masonry floor you have a qualified person make sure gas pressure does not exceed 14" (36 cm) water column.
... to do so can result in the cutout space. Anti-tip bracket 5. Securely tighten all gas connections. Tighten both adapters. 9 Remove the anti-tip bracket that correspond to the smaller thread ends of the range in death, explosion, or fire. Install Anti-Tip Bracket 1. If connected to LP, have... a stone or masonry floor you have a qualified person make sure gas pressure does not exceed 14" (36 cm) water column.
Installation Instructions
Page 10
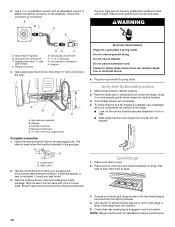
... regulator B. Adapter C. The valve is open when the handle is engaged in oven. 2. Plug into its final location. 3. Move range close to the gas pipe. Level Range 1. Place oven rack in anti-tip bracket. A BC D E If burner caps are not properly positioned, surface burners will not light. C. ...Adapter (must be level for the anti-tip bracket securely attached to adjust leveling legs up or down until rear leveling leg is under the range. Gas supply pipe must not be level when properly positioned. A B A. If bubbles appear, a leak is not kinked. Do not remove ground prong...
... regulator B. Adapter C. The valve is open when the handle is engaged in oven. 2. Plug into its final location. 3. Move range close to the gas pipe. Level Range 1. Place oven rack in anti-tip bracket. A BC D E If burner caps are not properly positioned, surface burners will not light. C. ...Adapter (must be level for the anti-tip bracket securely attached to adjust leveling legs up or down until rear leveling leg is under the range. Gas supply pipe must not be level when properly positioned. A B A. If bubbles appear, a leak is not kinked. Do not remove ground prong...
Installation Instructions
Page 11
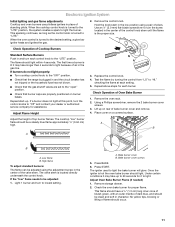
...is lit it to the "open" position. ■ Check that the gas shutoff valves are set to light. If burners do not light properly: ■ Turn cooktop control knob to the "OFF" position. ■ Check that the range is the proper size. Using a Phillips screwdriver, remove the 2 bake ...Flame Height 3. Lift up . Light 1 burner and turn each control knob to the desired setting, a glow bar igniter heats and ignites the gas. 2. The igniter used to lowest setting. High flame To adjust standard burners: The flame can be clean and soft in character. Electronic Ignition ...
...is lit it to the "open" position. ■ Check that the gas shutoff valves are set to light. If burners do not light properly: ■ Turn cooktop control knob to the "OFF" position. ■ Check that the range is the proper size. Using a Phillips screwdriver, remove the 2 bake ...Flame Height 3. Lift up . Light 1 burner and turn each control knob to the desired setting, a glow bar igniter heats and ignites the gas. 2. The igniter used to lowest setting. High flame To adjust standard burners: The flame can be clean and soft in character. Electronic Ignition ...

Installation Instructions
Page 12
... is open. ■ If the gas supply line shutoff valve is closed . A B A. Use a mild solution of the Use and Care Guide or contact the dealer from whom you need . 3. Dry thoroughly with an outer mantle of flame should be clean and soft in to see the "Range Care" section of the storage...
... is open. ■ If the gas supply line shutoff valve is closed . A B A. Use a mild solution of the Use and Care Guide or contact the dealer from whom you need . 3. Dry thoroughly with an outer mantle of flame should be clean and soft in to see the "Range Care" section of the storage...
Installation Instructions
Page 13
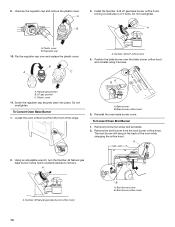
... Remove the 3 bake burner screws and set aside. A B Tip Over Hazard A child or adult can tip the range and be done by a qualified installer. To range B. Gas supply line B A. Examples of the oven. Using a Phillips screwdriver, remove and set aside the 2 oven bake burner ...cover screws located at the rear of the range. 2 IMPORTANT: Do not remove the gas pressure regulator. 13 Shutoff valve (closed position. 2. Turn manual shutoff valve to the closed position) C. Bake burner cover B....
... Remove the 3 bake burner screws and set aside. A B Tip Over Hazard A child or adult can tip the range and be done by a qualified installer. To range B. Gas supply line B A. Examples of the oven. Using a Phillips screwdriver, remove and set aside the 2 oven bake burner ...cover screws located at the rear of the range. 2 IMPORTANT: Do not remove the gas pressure regulator. 13 Shutoff valve (closed position. 2. Turn manual shutoff valve to the closed position) C. Bake burner cover B....
Installation Instructions
Page 14
...orifice hood from the broil burner orifice hood. Number .049 LP orifice hood 4. Using an adjustable wrench, turn the Number 46 Natural gas bake burner orifice hood counterclockwise to remove. Broil burner screw B. B A C A. Screw the regulator cap securely back into place. A...gas bake burner orifice hood, turning it clockwise 4 or 5 turns. A .049 46 A. To Convert Oven Broil Burner 1. Bake burner orifice hood 5. Plastic cover 11. Remove the broil burner from the front of the oven while changing the orifice hood. A A. The broil burner will hang in the back of the range...
...orifice hood from the broil burner orifice hood. Number .049 LP orifice hood 4. Using an adjustable wrench, turn the Number 46 Natural gas bake burner orifice hood counterclockwise to remove. Broil burner screw B. B A C A. Screw the regulator cap securely back into place. A...gas bake burner orifice hood, turning it clockwise 4 or 5 turns. A .049 46 A. To Convert Oven Broil Burner 1. Bake burner orifice hood 5. Plastic cover 11. Remove the broil burner from the front of the oven while changing the orifice hood. A A. The broil burner will hang in the back of the range...
Installation Instructions
Page 15
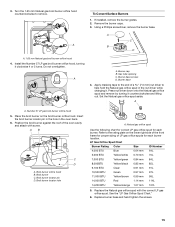
...hood. A A. Broil burner C. Broil burner locator pin D. Refer to help hold the Natural gas orifice spud in the oven back. 6. See the "LP Gas Orifice Spud Chart." 6. Burner base 4. Set the Natural gas orifice spud aside. Insert the broil burner locator pin in the hole in the nut driver ...while changing it. Broil burner orifice hood B. Natural gas orifice spud Use the following chart for correct LP gas orifice spud for each burner. A To Convert Surface Burners 1. Place the broil burner on the lower right side of...
...hood. A A. Broil burner C. Broil burner locator pin D. Refer to help hold the Natural gas orifice spud in the oven back. 6. See the "LP Gas Orifice Spud Chart." 6. Burner base 4. Set the Natural gas orifice spud aside. Insert the broil burner locator pin in the hole in the nut driver ...while changing it. Broil burner orifice hood B. Natural gas orifice spud Use the following chart for correct LP gas orifice spud for each burner. A To Convert Surface Burners 1. Place the broil burner on the lower right side of...


