Owners Manual
Page 9
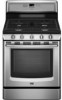
Rack 5: Broiling of thicker foods like to maintain a precise temperature range for baking. or 3, 5 and 7. 7 Baking Layer Cakes on 2 Racks 6 For best results when baking cakes on ; Precise Bake The Precise Bake system ...contact information. A. The bake element will begin preheating. the broil element will increase as shown. 4 3 2 1 Rack Positions Rack 7: Broiling thin, nonfatty foods and for Part Number 4396923. Once 170ºF (75ºC) is recommended in chicken and 2-rack baking. The lower the temperature, the slower the cooking. Please refer to...
Rack 5: Broiling of thicker foods like to maintain a precise temperature range for baking. or 3, 5 and 7. 7 Baking Layer Cakes on 2 Racks 6 For best results when baking cakes on ; Precise Bake The Precise Bake system ...contact information. A. The bake element will begin preheating. the broil element will increase as shown. 4 3 2 1 Rack Positions Rack 7: Broiling thin, nonfatty foods and for Part Number 4396923. Once 170ºF (75ºC) is recommended in chicken and 2-rack baking. The lower the temperature, the slower the cooking. Please refer to...
Owners Manual
Page 11
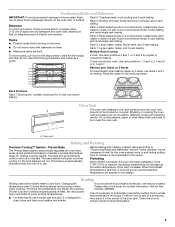
... on some models) Food spills containing acids, such as the entire range is time adjustable between 2 hours 30 minutes and 4 hours 30 minutes in 15-minute increments. EXTERIOR PORCELAIN ENAMEL SURFACES (on some...tomato, should be soaked or scrubbed before going into a dishwasher. ■ Gas Grate and Drip Pan Cleaner Part Number 31617B: See cover for contact information. Cleaning Method: ■ Nonabrasive ... self-clean cycle can visit the Frequently Asked Questions section of our website at www.maytag.com. When replacing knobs, make sure knobs are off . 5. Once the cleaning ...
... on some models) Food spills containing acids, such as the entire range is time adjustable between 2 hours 30 minutes and 4 hours 30 minutes in 15-minute increments. EXTERIOR PORCELAIN ENAMEL SURFACES (on some...tomato, should be soaked or scrubbed before going into a dishwasher. ■ Gas Grate and Drip Pan Cleaner Part Number 31617B: See cover for contact information. Cleaning Method: ■ Nonabrasive ... self-clean cycle can visit the Frequently Asked Questions section of our website at www.maytag.com. When replacing knobs, make sure knobs are off . 5. Once the cleaning ...
Owners Manual
Page 12
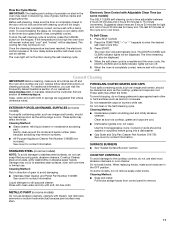
... Part Number 31682B (not included): See cover for contact information. Do not use an extension cord. If the problem continues, call . Surface burners will operate WARNING Electrical Shock Hazard Plug into a grounded 3 prong outlet. ■ Household fuse blown or circuit breaker tripped? Gas range ...; Is this the first time the surface burners have discolored and are in knob before cleaning. www.maytag.com In Canada, reference the Customer Service section at www.maytag.ca Nothing will not operate during the Bake and Broil operations: Whooshing, Poof, Clicking, Snaps, Pop...
... Part Number 31682B (not included): See cover for contact information. Do not use an extension cord. If the problem continues, call . Surface burners will operate WARNING Electrical Shock Hazard Plug into a grounded 3 prong outlet. ■ Household fuse blown or circuit breaker tripped? Gas range ...; Is this the first time the surface burners have discolored and are in knob before cleaning. www.maytag.com In Canada, reference the Customer Service section at www.maytag.ca Nothing will not operate during the Bake and Broil operations: Whooshing, Poof, Clicking, Snaps, Pop...
Owners Manual
Page 13
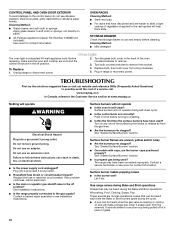
... Broil burner ignites. ■ On some models, reset the clock, if needed. Cooktop cooking results not what expected ■ Is the range level? See "Electronic Oven Controls" section. Clear the display. See "Positioning Racks and Bakeware" section. ■ Is there proper air... and Polish (stainless steel models) Order Part Number 31462B All-Purpose Appliance Cleaner Order Part Number 31682B Gas Grate and Drip Pan Cleaner Order Part Number 31617B ACCESSORIES Split-Rack with Removable Insert Order Part Number 4396927 Broiler Pan Order Part Number 4396923 13 If it reappears, call...
... Broil burner ignites. ■ On some models, reset the clock, if needed. Cooktop cooking results not what expected ■ Is the range level? See "Electronic Oven Controls" section. Clear the display. See "Positioning Racks and Bakeware" section. ■ Is there proper air... and Polish (stainless steel models) Order Part Number 31462B All-Purpose Appliance Cleaner Order Part Number 31682B Gas Grate and Drip Pan Cleaner Order Part Number 31617B ACCESSORIES Split-Rack with Removable Insert Order Part Number 4396927 Broiler Pan Order Part Number 4396923 13 If it reappears, call...

Owners Manual
Page 14
...warranty does not cover: 1. Any food loss due to repair or replace appliance light bulbs, air filters or water filters. Repairs to parts or systems resulting from your model number and serial number on the label, located on how to use or when it was purchased. ...product service if your correspondence. Have your major appliance, unless such damage results from defects in materials or workmanship and is reported to Maytag within 30 days from warranty coverage. 3. For assistance or service in accordance with the removal from your home of your major appliance, to ...
...warranty does not cover: 1. Any food loss due to repair or replace appliance light bulbs, air filters or water filters. Repairs to parts or systems resulting from your model number and serial number on the label, located on how to use or when it was purchased. ...product service if your correspondence. Have your major appliance, unless such damage results from defects in materials or workmanship and is reported to Maytag within 30 days from warranty coverage. 3. For assistance or service in accordance with the removal from your home of your major appliance, to ...
Installation Instructions
Page 4
... International and complies with installation clearances specified on the model/serial rating plate. Location Requirements IMPORTANT: Observe all parts are included. ■ LP/Natural Gas Conversion Kit (taped near left rear leg, inside storage drawer) Anti-tip bracket must be located for convenient...tape Parts supplied Check that the floor covering can be secured to the back wall or floor. Burner grates ■ 5 - Oven racks (3 on the right-hand side of the oven frame. ■ The range should be securely mounted to the floor during transit. Check existing gas ...
... International and complies with installation clearances specified on the model/serial rating plate. Location Requirements IMPORTANT: Observe all parts are included. ■ LP/Natural Gas Conversion Kit (taped near left rear leg, inside storage drawer) Anti-tip bracket must be located for convenient...tape Parts supplied Check that the floor covering can be secured to the back wall or floor. Burner grates ■ 5 - Oven racks (3 on the right-hand side of the oven frame. ■ The range should be securely mounted to the floor during transit. Check existing gas ...
Installation Instructions
Page 8
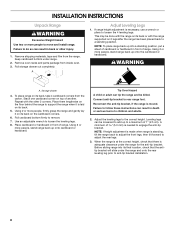
... at the correct height, check that the antitip bracket will slide under the range and onto the rear leveling leg prior to do so can tip the range and be killed. Remove oven racks and parts package from the range. If range height adjustment is laid on the cardboard corners. 6. WARNING A. Place cardboard or hardboard...
... at the correct height, check that the antitip bracket will slide under the range and onto the rear leveling leg prior to do so can tip the range and be killed. Remove oven racks and parts package from the range. If range height adjustment is laid on the cardboard corners. 6. WARNING A. Place cardboard or hardboard...
Installation Instructions
Page 10
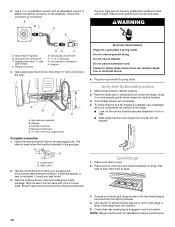
...-tip bracket. 4. Verify Anti-Tip Bracket Location 1. then front to cabinet opening. 2. Push range back into a grounded 3 prong outlet. Manual gas shutoff valve F. ½" or ¾" gas pipe G. H. Do not remove ground prong. Do not use an extension cord. Pull storage ... with pins in death, fire, or electrical shock. 4. If range is not level, pull range forward until range is removed from parts package. A B A. Test all connections by brushing on oven rack and check levelness of the range. ■ Look for satisfactory baking performance. 10 WARNING A. 3....
...-tip bracket. 4. Verify Anti-Tip Bracket Location 1. then front to cabinet opening. 2. Push range back into a grounded 3 prong outlet. Manual gas shutoff valve F. ½" or ¾" gas pipe G. H. Do not remove ground prong. Do not use an extension cord. Pull storage ... with pins in death, fire, or electrical shock. 4. If range is not level, pull range forward until range is removed from parts package. A B A. Test all connections by brushing on oven rack and check levelness of the range. ■ Look for satisfactory baking performance. 10 WARNING A. 3....

Installation Instructions
Page 12
...to light. Tighten air shutter adjustment screw. Fit the ends of flame should have all parts are now installed. Lift up the front of liquid household cleaner and warm water to see the "Range Care" section of the Use and Care Guide or contact the dealer from whom you have...the air shutter near the center rear of the broil burner. 2. Press CANCEL when finished. 5. Replace storage drawer. Check that the gas supply line shutoff valve is open. ■ If the gas supply line shutoff valve is level. Air shutter 4. Adjust the air shutter as outlined above. ■ If the...
...to light. Tighten air shutter adjustment screw. Fit the ends of flame should have all parts are now installed. Lift up the front of liquid household cleaner and warm water to see the "Range Care" section of the Use and Care Guide or contact the dealer from whom you have...the air shutter near the center rear of the broil burner. 2. Press CANCEL when finished. 5. Replace storage drawer. Check that the gas supply line shutoff valve is open. ■ If the gas supply line shutoff valve is level. Air shutter 4. Adjust the air shutter as outlined above. ■ If the...
Installation Instructions
Page 16
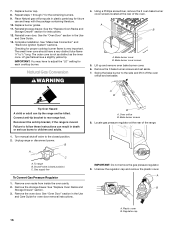
...Remove the oven door. See "Oven Door" section in the Use and Care Guide. 13. Locate gas pressure regulator at the rear of the range. 2 IMPORTANT: Do not remove the gas pressure regulator. 9. The small inner cone should have to adjust the "LO" setting for proper cooktop... line To Convert Gas Pressure Regulator 1. Oven orifice B. A B A. The outer cone is very important. A B Tip Over Hazard A child or adult can result in plastic parts bag for oven door removal instructions. Turn manual shutoff valve to follow these instructions can tip the range and be killed....
...Remove the oven door. See "Oven Door" section in the Use and Care Guide. 13. Locate gas pressure regulator at the rear of the range. 2 IMPORTANT: Do not remove the gas pressure regulator. 9. The small inner cone should have to adjust the "LO" setting for proper cooktop... line To Convert Gas Pressure Regulator 1. Oven orifice B. A B A. The outer cone is very important. A B Tip Over Hazard A child or adult can result in plastic parts bag for oven door removal instructions. Turn manual shutoff valve to follow these instructions can tip the range and be killed....
Installation Instructions
Page 18
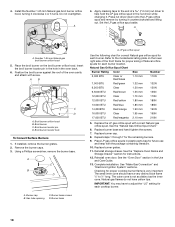
... 1 through 7 for each cooktop burner. IMPORTANT: You may have to ½" long. LP gas orifice spud Use the following chart for correct Natural gas orifice spud for instructions. 12. Refer to help hold the LP gas orifice spud in plastic parts bag for proper cooktop burner flame is not as distinct as the inner...
... 1 through 7 for each cooktop burner. IMPORTANT: You may have to ½" long. LP gas orifice spud Use the following chart for correct Natural gas orifice spud for instructions. 12. Refer to help hold the LP gas orifice spud in plastic parts bag for proper cooktop burner flame is not as distinct as the inner...


