Installation Instructions
Page 1
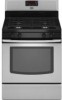
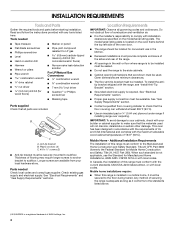
W10196161E Homeowner: Keep installation instructions for local inspector's use. Installer: Leave installation instructions with the homeowner. INSTALLATION INSTRUCTIONS 30" (76.2 CM) FREESTANDING GAS RANGES Table of Contents RANGE SAFETY...2 INSTALLATION REQUIREMENTS 4 Tools and Parts...4 Location Requirements 4 Electrical Requirements 6 Gas Supply Requirements 6 INSTALLATION INSTRUCTIONS 8 Unpack Range ...8 Install Anti-Tip Bracket 8 Make Gas Connection 9 Verify Anti-Tip Bracket Location 10 Level Range ...11 Electronic Ignition System 11 Replace Oven Racks and Warming...
W10196161E Homeowner: Keep installation instructions for local inspector's use. Installer: Leave installation instructions with the homeowner. INSTALLATION INSTRUCTIONS 30" (76.2 CM) FREESTANDING GAS RANGES Table of Contents RANGE SAFETY...2 INSTALLATION REQUIREMENTS 4 Tools and Parts...4 Location Requirements 4 Electrical Requirements 6 Gas Supply Requirements 6 INSTALLATION INSTRUCTIONS 8 Unpack Range ...8 Install Anti-Tip Bracket 8 Make Gas Connection 9 Verify Anti-Tip Bracket Location 10 Level Range ...11 Electronic Ignition System 11 Replace Oven Racks and Warming...
Installation Instructions
Page 2
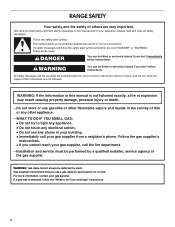
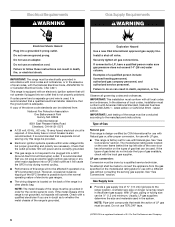
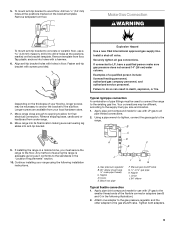
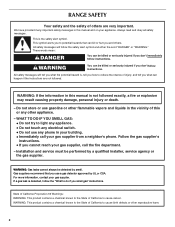
... that you what the potential hazard is detected, follow instructions. This symbol alerts you to reduce the chance of injury, and tell you use a gas detector approved by a qualified installer, service agency or the gas supplier. Follow the gas supplier's instructions. • If you don't follow the safety alert...8226; Do not touch any electrical switch. • Do not use gasoline or other flammable vapors and liquids in your gas supplier from a neighbor's phone. RANGE SAFETY Your safety and the safety of others . Do not store or use any other appliance. -
... that you what the potential hazard is detected, follow instructions. This symbol alerts you to reduce the chance of injury, and tell you use a gas detector approved by a qualified installer, service agency or the gas supplier. Follow the gas supplier's instructions. • If you don't follow the safety alert...8226; Do not touch any electrical switch. • Do not use gasoline or other flammable vapors and liquids in your gas supplier from a neighbor's phone. RANGE SAFETY Your safety and the safety of others . Do not store or use any other appliance. -
Installation Instructions
Page 3
...-tip bracket, if the range is moved. Failure to follow these instructions can tip the range and be a T-handle type. ■ A flexible gas connector, when used, must be performed by a qualified or licensed contractor, plumber, or gasfitter qualified or licensed by the State of Massachusetts, the following installation instructions apply: ■ Installations and repairs must not exceed...
...-tip bracket, if the range is moved. Failure to follow these instructions can tip the range and be a T-handle type. ■ A flexible gas connector, when used, must be performed by a qualified or licensed contractor, plumber, or gasfitter qualified or licensed by the State of Massachusetts, the following installation instructions apply: ■ Installations and repairs must not exceed...
Installation Instructions
Page 4
Read and follow the instructions provided with the range, see "Install Anti-Tip Bracket" section. ■ Grounded electrical supply is required. Anti-tip bracket B. Parts needed ■ Tape measure ■ Marker or pencil ■... with the maximum allowable wood cabinet temperatures of UL and CSA International and complies with local codes. Mobile Home - Mobile home installations require: ■ When this range is the installer's responsibility to LP gas 4.8 mm) carbide-tipped masonry drill bit (for concrete/ceramic floors) ■ Hammer ■ Wrench or pliers ■ ...
Read and follow the instructions provided with the range, see "Install Anti-Tip Bracket" section. ■ Grounded electrical supply is required. Anti-tip bracket B. Parts needed ■ Tape measure ■ Marker or pencil ■... with the maximum allowable wood cabinet temperatures of UL and CSA International and complies with local codes. Mobile Home - Mobile home installations require: ■ When this range is the installer's responsibility to LP gas 4.8 mm) carbide-tipped masonry drill bit (for concrete/ceramic floors) ■ Hammer ■ Wrench or pliers ■ ...
Installation Instructions
Page 5
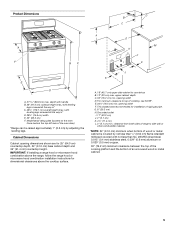
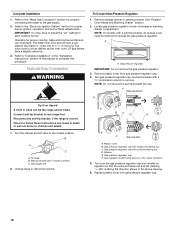
... 0.020" (0.5 mm) copper. 30" (76.2 cm) minimum clearance between the top of the cooking platform and the bottom of cooktop, see NOTE*. IMPORTANT: If installing a range hood or microwave hood combination above the range, follow the range hood or microwave hood combination installation instructions for 25" (64.0 cm) ...rating plate (located on the oven frame behind the top left side of rigid gas pipe. opening width F. For minimum clearance to top of an uncovered wood or metal cabinet. 5 clearance from both sides of range to countertop B. 13" (33 cm) max. Product Dimensions M A F ...
... 0.020" (0.5 mm) copper. 30" (76.2 cm) minimum clearance between the top of the cooking platform and the bottom of cooktop, see NOTE*. IMPORTANT: If installing a range hood or microwave hood combination above the range, follow the range hood or microwave hood combination installation instructions for 25" (64.0 cm) ...rating plate (located on the oven frame behind the top left side of rigid gas pipe. opening width F. For minimum clearance to top of an uncovered wood or metal cabinet. 5 clearance from both sides of range to countertop B. 13" (33 cm) max. Product Dimensions M A F ...
Installation Instructions
Page 6
... made to the range location. A time-delay fuse or circuit breaker is adequate. It is factory set for use with Natural gas. Securely tighten all local codes and ordinances. Failure to follow these instructions can result in death, explosion, or fire. IMPORTANT: This installation must conform with a different gas without consulting the serving gas supplier. Type...
... made to the range location. A time-delay fuse or circuit breaker is adequate. It is factory set for use with Natural gas. Securely tighten all local codes and ordinances. Failure to follow these instructions can result in death, explosion, or fire. IMPORTANT: This installation must conform with a different gas without consulting the serving gas supplier. Type...
Installation Instructions
Page 8
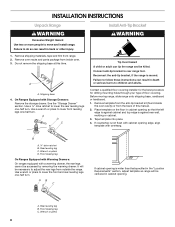
... cabinet opening so that specified in the "Location Requirements" section, adjust template so range will be centered in back or other injury. 1. Tape template into place. 4. A. INSTALLATION INSTRUCTIONS Unpack Range WARNING Excessive Weight Hazard Use two or more people to children and adults. Failure to... lower front leveling legs one -half turn . Use a wrench or pliers to do so can tip the range and be accessed by removing the...
... cabinet opening so that specified in the "Location Requirements" section, adjust template so range will be centered in back or other injury. 1. Tape template into place. 4. A. INSTALLATION INSTRUCTIONS Unpack Range WARNING Excessive Weight Hazard Use two or more people to children and adults. Failure to... lower front leveling legs one -half turn . Use a wrench or pliers to do so can tip the range and be accessed by removing the...
Installation Instructions
Page 9
... other adapter to do so can result in the following installation instructions. Remove template from floor. Install a shut-off valve. If installing the range in the "Location Requirements" section. 10. Continue installing your local hardware store. 7. Tighten both adapters. 9 Explosion Hazard Use a new CSA International approved gas supply line. If connected to wood floor, drill two ¹...
... other adapter to do so can result in the following installation instructions. Remove template from floor. Install a shut-off valve. If installing the range in the "Location Requirements" section. 10. Continue installing your local hardware store. 7. Tighten both adapters. 9 Explosion Hazard Use a new CSA International approved gas supply line. If connected to wood floor, drill two ¹...
Installation Instructions
Page 10
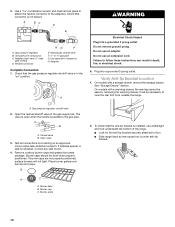
.... 5. Use pipe-joint compound. Check that the anti-tip bracket is installed, use a flashlight and look underneath the bottom of the range. ■ Look for the anti-tip bracket securely attached to floor. ■ Slide range back so rear range foot is not kinked. If burner caps are not properly positioned, surface ...package. Verify Anti-Tip Bracket Location 1. See "Storage Drawer" section. Closed valve B. Correct any leak found. 4. Burner caps should be necessary to follow these instructions can result in the gas supply line. Burner cap C. Burner grate 2.
.... 5. Use pipe-joint compound. Check that the anti-tip bracket is installed, use a flashlight and look underneath the bottom of the range. ■ Look for the anti-tip bracket securely attached to floor. ■ Slide range back so rear range foot is not kinked. If burner caps are not properly positioned, surface ...package. Verify Anti-Tip Bracket Location 1. See "Storage Drawer" section. Closed valve B. Correct any leak found. 4. Burner caps should be necessary to follow these instructions can result in the gas supply line. Burner cap C. Burner grate 2.
Installation Instructions
Page 13
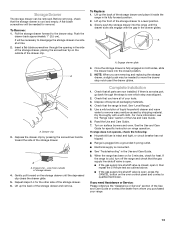
...now installed. Use a mild solution of your range. 13 Dry thoroughly with the gap in the side of the storage drawer, placing the screwdriver tip on the oven control panel and contact a qualified technician. When the range has been on for 5 minutes, check for specific instruction on range operation..., go back through the opening in the drawer glides. Check that the gas supply line shutoff valve is open. ■ If the gas supply line shutoff valve is closed position. 5. See "Level Range." 5. If range does not operate, check the following: ■ Household fuse is intact and...
...now installed. Use a mild solution of your range. 13 Dry thoroughly with the gap in the side of the storage drawer, placing the screwdriver tip on the oven control panel and contact a qualified technician. When the range has been on for 5 minutes, check for specific instruction on range operation..., go back through the opening in the drawer glides. Check that the gas supply line shutoff valve is open. ■ If the gas supply line shutoff valve is closed position. 5. See "Level Range." 5. If range does not operate, check the following: ■ Household fuse is intact and...
Installation Instructions
Page 14
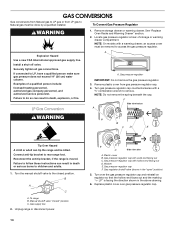
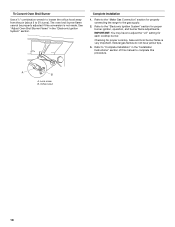
...14" (36 cm) water column. Unplug range or disconnect power. 14 C Side view after A. Gas pressure regulator cap with a warming drawer, an access cover must be done by a qualified installer. To Convert Gas Pressure Regulator WARNING 1. Securely tighten all gas connections. F Side view before A NG ... burns to children and adults. 1. Install a shut-off valve. Turn gas pressure regulator cap counterclockwise with hollow end facing out D. Failure to follow these instructions can tip the range and be killed. Turn over the gas pressure regulator cap and reinstall on regulator...
...14" (36 cm) water column. Unplug range or disconnect power. 14 C Side view after A. Gas pressure regulator cap with a warming drawer, an access cover must be done by a qualified installer. To Convert Gas Pressure Regulator WARNING 1. Securely tighten all gas connections. F Side view before A NG ... burns to children and adults. 1. Install a shut-off valve. Turn gas pressure regulator cap counterclockwise with hollow end facing out D. Failure to follow these instructions can tip the range and be killed. Turn over the gas pressure regulator cap and reinstall on regulator...
Installation Instructions
Page 16
...Gas supply line 2. Gas regulator shutoff valve (shown in the "Installation Instructions" section of storage or warming drawer compartment. Complete Installation 1. The small inner cone should have a slightly yellow tip. 3. Natural Gas Conversion WARNING To Convert Gas Pressure Regulator 1. Locate gas... B. B A C A. To range B. BFD E NG NG C Side view after A. Remove storage drawer or warming drawer. Washer E. Unplug range or disconnect power. Failure to follow these instructions can tip the range and be removed to "Complete Installation" in the "open" position) ...
...Gas supply line 2. Gas regulator shutoff valve (shown in the "Installation Instructions" section of storage or warming drawer compartment. Complete Installation 1. The small inner cone should have a slightly yellow tip. 3. Natural Gas Conversion WARNING To Convert Gas Pressure Regulator 1. Locate gas... B. B A C A. To range B. BFD E NG NG C Side view after A. Remove storage drawer or warming drawer. Washer E. Unplug range or disconnect power. Failure to follow these instructions can tip the range and be removed to "Complete Installation" in the "open" position) ...
Installation Instructions
Page 18
... properly connecting the range to the gas supply. 2. Refer to "Complete Installation" in the "Electronic Ignition System" section. Refer to complete this conversion is very important. Orifice hood 18 Lock screw B. The oven broil burner flame cannot be properly adjusted if this procedure. See "Adjust Oven Broil Burner Flame" in the "Installation Instructions" section of...
... properly connecting the range to the gas supply. 2. Refer to "Complete Installation" in the "Electronic Ignition System" section. Refer to complete this conversion is very important. Orifice hood 18 Lock screw B. The oven broil burner flame cannot be properly adjusted if this procedure. See "Adjust Oven Broil Burner Flame" in the "Installation Instructions" section of...
Owners Manual
Page 2
RANGE SAFETY Your safety and the safety of injury, and tell you what the potential hazard is, tell you how to reduce the chance of others . Always read and obey all safety messages. All safety messages will tell you smell gas" instructions. All safety messages will follow... chemical known to light any appliance. • Do not touch any electrical switch. • Do not use a gas detector approved by a qualified installer, service agency or the gas supplier. For more information, contact your appliance. WARNING: This product contains a chemical known to the State of California ...
RANGE SAFETY Your safety and the safety of injury, and tell you what the potential hazard is, tell you how to reduce the chance of others . Always read and obey all safety messages. All safety messages will tell you smell gas" instructions. All safety messages will follow... chemical known to light any appliance. • Do not touch any electrical switch. • Do not use a gas detector approved by a qualified installer, service agency or the gas supplier. For more information, contact your appliance. WARNING: This product contains a chemical known to the State of California ...
Owners Manual
Page 3
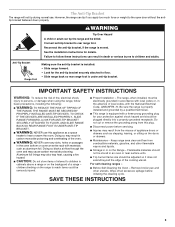
...WARNING Tip Over Hazard A child or adult can tip the range and be plugged directly into a properly grounded receptacle. See the installation instructions for your protection against shock hazard and should be seriously injured. ■ Proper Installation - Doing so blocks air flow through the oven and may...of fire, electrical shock, injury to persons, or damage when using the range, follow these instructions can tip if you apply too much force or weight to rear range foot. The range, when installed, must be electrically grounded in accordance with local codes or, in cabinets ...
...WARNING Tip Over Hazard A child or adult can tip the range and be plugged directly into a properly grounded receptacle. See the installation instructions for your protection against shock hazard and should be seriously injured. ■ Proper Installation - Doing so blocks air flow through the oven and may...of fire, electrical shock, injury to persons, or damage when using the range, follow these instructions can tip if you apply too much force or weight to rear range foot. The range, when installed, must be electrically grounded in accordance with local codes or, in cabinets ...
Owners Manual
Page 10
...; The igniters will not operate ■ Is the oven in the off of a piece of a medium to the gas supply? See Installation Instructions. ■ Is the range properly connected to heavy thickness. ■ Is the control knob set correctly? Contact a trained repair specialist or see cover...area, element or surface burner. Contact a service technician or see cover for contact information. If the problem continues, call . www.maytag.com Nothing will not operate during the Bake and Broil operations: Whooshing, Poof, Clicking, Snaps, Pop These sounds are the burner ...
...; The igniters will not operate ■ Is the oven in the off of a piece of a medium to the gas supply? See Installation Instructions. ■ Is the range properly connected to heavy thickness. ■ Is the control knob set correctly? Contact a trained repair specialist or see cover...area, element or surface burner. Contact a service technician or see cover for contact information. If the problem continues, call . www.maytag.com Nothing will not operate during the Bake and Broil operations: Whooshing, Poof, Clicking, Snaps, Pop These sounds are the burner ...
Owners Manual
Page 11
...the display showing a flashing "PUSH?" Oven cooking results not what expected ■ Is the range level? See "Oven Temperature Control" section of time being used? See "Positioning Racks and Bakeware...Feature Guide" section. ■ Is the display showing a letter followed by a number? See the Installation Instructions. ■ Is the proper temperature set ? See "Clock" keypad feature in the "Feature Guide...) Order Part Number 31462 All-Purpose Appliance Cleaner Order Part Number 31682 Gas Grate and Drip Pan Cleaner Order Part Number 31617 ACCESSORIES Split-Rack with...
...the display showing a flashing "PUSH?" Oven cooking results not what expected ■ Is the range level? See "Oven Temperature Control" section of time being used? See "Positioning Racks and Bakeware...Feature Guide" section. ■ Is the display showing a letter followed by a number? See the Installation Instructions. ■ Is the proper temperature set ? See "Clock" keypad feature in the "Feature Guide...) Order Part Number 31462 All-Purpose Appliance Cleaner Order Part Number 31682 Gas Grate and Drip Pan Cleaner Order Part Number 31617 ACCESSORIES Split-Rack with...
Owners Manual
Page 12
...damage to the finish of your major appliance, unless such damage results from defects in materials or workmanship and is reported to Maytag within 30 days from the date of your correspondence. Outside the 50 United States and Canada, this warranty. 8. Cosmetic damage, including...water filters. This major appliance is designed to be provided by a Maytag designated service company. Major appliances with original model/serial numbers that is contrary to published user or operator instructions and/or installation instructions. 4. THIS WARRANTY GIVES YOU SPECIFIC LEGAL RIGHTS, AND YOU MAY ...
...damage to the finish of your major appliance, unless such damage results from defects in materials or workmanship and is reported to Maytag within 30 days from the date of your correspondence. Outside the 50 United States and Canada, this warranty. 8. Cosmetic damage, including...water filters. This major appliance is designed to be provided by a Maytag designated service company. Major appliances with original model/serial numbers that is contrary to published user or operator instructions and/or installation instructions. 4. THIS WARRANTY GIVES YOU SPECIFIC LEGAL RIGHTS, AND YOU MAY ...


