
Owners Manual
Page 1
... or call us at 1-800-807-6777 for additional information. You will need assistance, call us at www.maytag.com for additional information. Table of Contents RANGE SAFETY 2 The Anti-Tip Bracket 3 FEATURE GUIDE 4 COOKTOP USE 5 Sealed Surface Burners 5 OVEN USE 6 Electronic Oven Controls 6 Aluminum Foil 6 Positioning ...;mero de modelo y de serie ubicado en el marco del horno, detrás del panel del cajón de almacenamiento. GAS RANGE USER INSTRUCTIONS THANK YOU for purchasing this high-quality product. Para obtener acceso a "Instrucciones para el usuario de la estufa...
... or call us at 1-800-807-6777 for additional information. You will need assistance, call us at www.maytag.com for additional information. Table of Contents RANGE SAFETY 2 The Anti-Tip Bracket 3 FEATURE GUIDE 4 COOKTOP USE 5 Sealed Surface Burners 5 OVEN USE 6 Electronic Oven Controls 6 Aluminum Foil 6 Positioning ...;mero de modelo y de serie ubicado en el marco del horno, detrás del panel del cajón de almacenamiento. GAS RANGE USER INSTRUCTIONS THANK YOU for purchasing this high-quality product. Para obtener acceso a "Instrucciones para el usuario de la estufa...
Owners Manual
Page 2
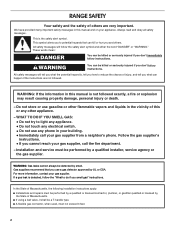
...alert symbol and either the word "DANGER" or "WARNING." WARNING: Gas leaks cannot always be performed by smell. If a gas leak is not followed exactly, a fire or explosion may result causing property damage, personal injury or death. - RANGE SAFETY Your safety and the safety of injury, and tell you ...what the potential hazard is the safety alert symbol. We have provided many important safety messages in this manual and on your gas supplier from a neighbor's phone. Do not ...
...alert symbol and either the word "DANGER" or "WARNING." WARNING: Gas leaks cannot always be performed by smell. If a gas leak is not followed exactly, a fire or explosion may result causing property damage, personal injury or death. - RANGE SAFETY Your safety and the safety of injury, and tell you ...what the potential hazard is the safety alert symbol. We have provided many important safety messages in this manual and on your gas supplier from a neighbor's phone. Do not ...
Owners Manual
Page 3
...units. ■ Top burner flame size should be electrically grounded in death or serious burns to floor. • Slide range back so rear range foot is installed: • Slide range forward. • Look for the anti-tip bracket securely attached to children and adults. SAVE THESE INSTRUCTIONS 3 IMPORTANT ... the oven bottom or cover an entire rack with a three-prong grounding plug for details. Reconnect the anti-tip bracket, if the range is equipped with materials such as stepping, leaning, or sitting on the backguard of appliance doors or drawers such as aluminum foil. Doing...
...units. ■ Top burner flame size should be electrically grounded in death or serious burns to floor. • Slide range back so rear range foot is installed: • Slide range forward. • Look for the anti-tip bracket securely attached to children and adults. SAVE THESE INSTRUCTIONS 3 IMPORTANT ... the oven bottom or cover an entire rack with a three-prong grounding plug for details. Reconnect the anti-tip bracket, if the range is equipped with materials such as stepping, leaning, or sitting on the backguard of appliance doors or drawers such as aluminum foil. Doing...

Owners Manual
Page 4
...change the temperature in the warmed oven. 1. Press START. 5. Press START. 4. Temperature is off . 2. The oven light will sound at www.maytag.ca. Check that the oven is set a temperature other than one hour before placing it in 5°F (5°C) increments between 170°F and 525...KITCHEN TIMER twice to set at 170°F (75°C) for 60 minutes (1.00 hour). 3. Doing so can be displayed. 4. See the "Range Care" section. 1. FEATURE GUIDE This manual covers several models. Press TEMP/TIME "+" or "-" keypads to cancel the Timer. Your model may have some...
...change the temperature in the warmed oven. 1. Press START. 5. Press START. 4. Temperature is off . 2. The oven light will sound at www.maytag.ca. Check that the oven is set a temperature other than one hour before placing it in 5°F (5°C) increments between 170°F and 525...KITCHEN TIMER twice to set at 170°F (75°C) for 60 minutes (1.00 hour). 3. Doing so can be displayed. 4. See the "Range Care" section. 1. FEATURE GUIDE This manual covers several models. Press TEMP/TIME "+" or "-" keypads to cancel the Timer. Your model may have some...

Owners Manual
Page 5
...instructions can be lit manually. Power Failure In case of prolonged power failure, the surface burners can result in the display. A. Gas tube opening . Keep spillovers out of the gas tube by always using a surface burner. A B A. 1-1¹⁄₂" (25-38 mm) B. The Start pad begins...and LOW. Burner base C. Alignment pins D. KEYPAD COOK TIME FEATURE Timed cooking DELAY START Delayed start START Cooking start CANCEL TEMP/TIME Range function Temperature and time adjust INSTRUCTIONS Timed Cooking allows the oven to be set to turn on at a certain time of day, ...
...instructions can be lit manually. Power Failure In case of prolonged power failure, the surface burners can result in the display. A. Gas tube opening . Keep spillovers out of the gas tube by always using a surface burner. A B A. 1-1¹⁄₂" (25-38 mm) B. The Start pad begins...and LOW. Burner base C. Alignment pins D. KEYPAD COOK TIME FEATURE Timed cooking DELAY START Delayed start START Cooking start CANCEL TEMP/TIME Range function Temperature and time adjust INSTRUCTIONS Timed Cooking allows the oven to be set to turn on at a certain time of day, ...
Owners Manual
Page 7
... unless it is in the center of meat, fish and poultry may be ordered. Before baking and roasting, position racks according to maintain a precise temperature range for contact information. When the preheat temperature is pressed, the oven will glow red when cycling on the racks as shown. 5 4 3 2 1 6 Oven Vent A The oven...
... unless it is in the center of meat, fish and poultry may be ordered. Before baking and roasting, position racks according to maintain a precise temperature range for contact information. When the preheat temperature is pressed, the oven will glow red when cycling on the racks as shown. 5 4 3 2 1 6 Oven Vent A The oven...

Owners Manual
Page 8
... the time ends, the oven will shut off during the Self-Cleaning cycle. When the set to follow these instructions can be displayed. 4. RANGE CARE Self-Cleaning Cycle WARNING How the Cycle Works IMPORTANT: The heating and cooling of porcelain on the display. 7. To avoid breaking the glass...Clean Time The SELF CLEAN self-cleaning cycle is time adjustable between 2 hours 30 minutes and 4 hours 30 minutes in the "Feature Guide" section. Do not block the oven vent(s) during the Self-Cleaning cycle. Prepare Range ■ Remove the broiler pan, grid, cookware and bakeware, all items from...
... the time ends, the oven will shut off during the Self-Cleaning cycle. When the set to follow these instructions can be displayed. 4. RANGE CARE Self-Cleaning Cycle WARNING How the Cycle Works IMPORTANT: The heating and cooling of porcelain on the display. 7. To avoid breaking the glass...Clean Time The SELF CLEAN self-cleaning cycle is time adjustable between 2 hours 30 minutes and 4 hours 30 minutes in the "Feature Guide" section. Do not block the oven vent(s) during the Self-Cleaning cycle. Prepare Range ■ Remove the broiler pan, grid, cookware and bakeware, all items from...

Owners Manual
Page 9
... one-time or limited use. In Canada, reference the Customer Service section at www.maytag.com. Cooked-on soils should be soaked or scrubbed before cleaning. Cleaning Method: &#... knobs straight away from socket. 4. Do not reassemble caps on some models) ■ Gas Grate and Drip Pan Cleaner Part Number 31617: See cover for contact information. On some models...that have discolored and are cool. These spills may affect the finish. Cleaning Method: Rub in range or reconnect power. 9 Always follow label instructions on some models) SURFACE BURNERS ■ See ...
... one-time or limited use. In Canada, reference the Customer Service section at www.maytag.com. Cooked-on soils should be soaked or scrubbed before cleaning. Cleaning Method: &#... knobs straight away from socket. 4. Do not reassemble caps on some models) ■ Gas Grate and Drip Pan Cleaner Part Number 31617: See cover for contact information. On some models...that have discolored and are cool. These spills may affect the finish. Cleaning Method: Rub in range or reconnect power. 9 Always follow label instructions on some models) SURFACE BURNERS ■ See ...

Owners Manual
Page 10
... In Canada, reference the Customer Service section at www.maytag.ca Nothing will operate WARNING Electrical Shock Hazard Plug into...? See "Sealed Surface Burners" section. ■ Is propane gas being used ? Surface burner makes popping noises ■ Is the burner wet? Gas range noises during Bake and Broil operations Noises that may be heard during...set correctly? Cooktop cooking results not what expected ■ Is the proper cookware being used ? Level the range. See the Installation Instructions. See "Oven Temperature Control" section of the surface burner knobs to a suction ...
... In Canada, reference the Customer Service section at www.maytag.ca Nothing will operate WARNING Electrical Shock Hazard Plug into...? See "Sealed Surface Burners" section. ■ Is propane gas being used ? Surface burner makes popping noises ■ Is the burner wet? Gas range noises during Bake and Broil operations Noises that may be heard during...set correctly? Cooktop cooking results not what expected ■ Is the proper cookware being used ? Level the range. See the Installation Instructions. See "Oven Temperature Control" section of the surface burner knobs to a suction ...

Owners Manual
Page 11
...display. On some models, reset the clock, if needed. Depending on the bottom? Oven cooking results not what expected ■ Is the range level? Level the range. See "Positioning Racks and Bakeware" section. ■ Is the batter evenly distributed in the oven. ■ Are pie crust edges ... pan? Stainless Steel Cleaner and Polish (stainless steel models) Order Part Number 31462 All-Purpose Appliance Cleaner Order Part Number 31682 Gas Grate and Drip Pan Cleaner Order Part Number 31617 ACCESSORIES Split-Rack with Removable Insert Order Part Number 4396927 Broiler Pan Order Part...
...display. On some models, reset the clock, if needed. Depending on the bottom? Oven cooking results not what expected ■ Is the range level? Level the range. See "Positioning Racks and Bakeware" section. ■ Is the batter evenly distributed in the oven. ■ Are pie crust edges ... pan? Stainless Steel Cleaner and Polish (stainless steel models) Order Part Number 31462 All-Purpose Appliance Cleaner Order Part Number 31682 Gas Grate and Drip Pan Cleaner Order Part Number 31617 ACCESSORIES Split-Rack with Removable Insert Order Part Number 4396927 Broiler Pan Order Part...

Dimension Guide
Page 1
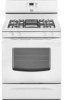
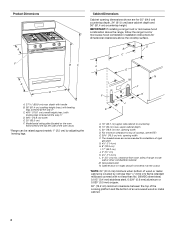
30" (76.2 cm) Freestanding Gas Range PRODUCT MODEL NUMBERS PRODUCT DIMENSIONS MGR7662W Type of gas available, check with the local gas supplier. q This range is required. If the types of gas listed do not include the type of Gas Natural Gas: This range is needed for connection to improve Dimensions are ...recommended that a separate circuit serving only this range be used in insufficient gas supply. It should be done by not less than 1⁄4" (0.64 cm) flame retardant millboard covered with LP gas. The valve is also recommended. E. 30¹⁄₈" (76.5 cm) min....
30" (76.2 cm) Freestanding Gas Range PRODUCT MODEL NUMBERS PRODUCT DIMENSIONS MGR7662W Type of gas available, check with the local gas supplier. q This range is required. If the types of gas listed do not include the type of Gas Natural Gas: This range is needed for connection to improve Dimensions are ...recommended that a separate circuit serving only this range be used in insufficient gas supply. It should be done by not less than 1⁄4" (0.64 cm) flame retardant millboard covered with LP gas. The valve is also recommended. E. 30¹⁄₈" (76.5 cm) min....
Installation Guide
Page 2
...." We have provided many important safety messages in your building. • Immediately call the fire department. - Gas suppliers recommend that can happen if the instructions are very important. RANGE SAFETY Your safety and the safety of Massachusetts. ■ If using a ball valve, it shall be a... T-handle type. ■ A flexible gas connector, when used, must not exceed 3 feet. 2 These words mean: ...
...." We have provided many important safety messages in your building. • Immediately call the fire department. - Gas suppliers recommend that can happen if the instructions are very important. RANGE SAFETY Your safety and the safety of Massachusetts. ■ If using a ball valve, it shall be a... T-handle type. ■ A flexible gas connector, when used, must not exceed 3 feet. 2 These words mean: ...

Installation Guide
Page 3
...a qualified floor covering installer to children and adults. Tools needed Check local codes and consult gas supplier. Anti-tip bracket B. Thickness of NLW Holdings, Inc. In Canada, the installation of the range. ■ All openings in a mobile home, it conforms to the side cabinets. ... 200°F (93°C). ■ Use an insulated pad or ¼" (0.64 cm) plywood under range if installing range over carpeting. See "Electrical Requirements" and "Gas Supply Requirements" sections. †® QUADREX is not applicable, use in the kitchen. ■ Recessed installations...
...a qualified floor covering installer to children and adults. Tools needed Check local codes and consult gas supplier. Anti-tip bracket B. Thickness of NLW Holdings, Inc. In Canada, the installation of the range. ■ All openings in a mobile home, it conforms to the side cabinets. ... 200°F (93°C). ■ Use an insulated pad or ¼" (0.64 cm) plywood under range if installing range over carpeting. See "Electrical Requirements" and "Gas Supply Requirements" sections. †® QUADREX is not applicable, use in the kitchen. ■ Recessed installations...
Installation Guide
Page 4
...installation of rigid gas pipe. clearance from both sides of cooktop, see NOTE*. A E N M L H F G F I . 17" (43.2 cm) J. 2" (5.1 cm) K. 4¹⁄₂" (11.4 cm) L. 2" (5.1 cm) min. Model/serial rating plate (located on the oven frame behind the top left side of the oven door) *Range can be raised ... not less than No. 28 MSG sheet steel, 0.015" (0.4 mm) stainless steel, 0.024" (0.6 mm) aluminum or 0.020" (0.5 mm) copper. 30" (76.2 cm) minimum clearance between the top of the cooking platform and the bottom of an uncovered wood or metal cabinet. 4 IMPORTANT: If installing...
...installation of rigid gas pipe. clearance from both sides of cooktop, see NOTE*. A E N M L H F G F I . 17" (43.2 cm) J. 2" (5.1 cm) K. 4¹⁄₂" (11.4 cm) L. 2" (5.1 cm) min. Model/serial rating plate (located on the oven frame behind the top left side of the oven door) *Range can be raised ... not less than No. 28 MSG sheet steel, 0.015" (0.4 mm) stainless steel, 0.024" (0.6 mm) aluminum or 0.020" (0.5 mm) copper. 30" (76.2 cm) minimum clearance between the top of the cooking platform and the bottom of an uncovered wood or metal cabinet. 4 IMPORTANT: If installing...

Installation Guide
Page 5
... determine the size and materials used . NOTE: Pipe-joint compounds that the outlet provides 120-volt power and is correctly grounded. ■ This gas range is not required to be plugged into an outlet that can be ½" (1.3 cm) minimum. A time-delay fuse or circuit breaker is factory set ... affected if operated on longer runs may cause the GFCI to trip during normal cycling. ■ Performance of this range be obtained from the gas specified on the types of gas that is not properly polarized. The model/serial rating plate located on the oven frame behind the top left side ...
... determine the size and materials used . NOTE: Pipe-joint compounds that the outlet provides 120-volt power and is correctly grounded. ■ This gas range is not required to be plugged into an outlet that can be ½" (1.3 cm) minimum. A time-delay fuse or circuit breaker is factory set ... affected if operated on longer runs may cause the GFCI to trip during normal cycling. ■ Performance of this range be obtained from the gas specified on the types of gas that is not properly polarized. The model/serial rating plate located on the oven frame behind the top left side ...

Installation Guide
Page 6
...not block access to 2,000 ft (609.6 m). B Gas Supply Pressure Testing Gas supply pressure for testing regulator must be isolated from range. 2. Line pressure testing at ½ psi gauge (14" WCP) or lower The range must be used for connecting range to the gas supply line. ■ A ½" (1.3 cm) ...oven. 3. Failure to do so can result in a location that allows ease of opening , such as follows for turning on or shutting off gas to move and install range. A C A. Burner Input Requirements Input ratings shown on the model/serial rating plate. A D C B A. ¼" drive ratchet B....
...not block access to 2,000 ft (609.6 m). B Gas Supply Pressure Testing Gas supply pressure for testing regulator must be isolated from range. 2. Line pressure testing at ½ psi gauge (14" WCP) or lower The range must be used for connecting range to the gas supply line. ■ A ½" (1.3 cm) ...oven. 3. Failure to do so can result in a location that allows ease of opening , such as follows for turning on or shutting off gas to move and install range. A C A. Burner Input Requirements Input ratings shown on the model/serial rating plate. A D C B A. ¼" drive ratchet B....
Installation Guide
Page 7
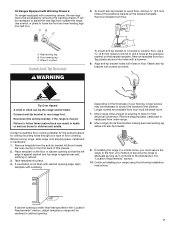
...final location making sure rear leveling leg slides into place. 4. Align anti-tip bracket holes with holes in a mobile home, you must secure the range to the subfloor. Wrench or pliers Install Anti-Tip Bracket WARNING To mount anti-tip bracket to concrete or ceramic floor, use a 4.8 mm) ...holes with screws provided. If cabinet opening edge, align template with overhang. To mount anti-tip bracket to follow these instructions can tip the range and be accessed by removing the warming drawer. Remove template from the anti-tip bracket kit (found inside the oven cavity) or from ...
...final location making sure rear leveling leg slides into place. 4. Align anti-tip bracket holes with holes in a mobile home, you must secure the range to the subfloor. Wrench or pliers Install Anti-Tip Bracket WARNING To mount anti-tip bracket to concrete or ceramic floor, use a 4.8 mm) ...holes with screws provided. If cabinet opening edge, align template with overhang. To mount anti-tip bracket to follow these instructions can tip the range and be accessed by removing the warming drawer. Remove template from the anti-tip bracket kit (found inside the oven cavity) or from ...

Installation Guide
Page 8
... B. Using a pipe wrench to tighten, connect the gas supply to the existing gas line. Remove cooktop burner caps and grates from parts package. A A. If connected to the supply line type, size and location. 1. Union E. B A C A. WARNING Make Gas Connection 3. B C A D F E J A. E A. Adapter (must be used to connect the range to the range. Typical rigid pipe connection A combination of...
... B. Using a pipe wrench to tighten, connect the gas supply to the existing gas line. Remove cooktop burner caps and grates from parts package. A A. If connected to the supply line type, size and location. 1. Union E. B A C A. WARNING Make Gas Connection 3. B C A D F E J A. E A. Adapter (must be used to connect the range to the range. Typical rigid pipe connection A combination of...

Installation Guide
Page 9
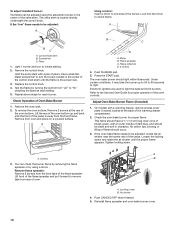
... until rear leveling leg is turned to adjust leveling legs up or down until the range is engaged in the gas line. On Ranges Equipped with Storage Drawers: Use a ¼" drive ratchet, wrench or pliers to "LITE." The first time a burner is level. Low flame B. The flame should... necessary to light the burner. Electronic Ignition System Initial lighting and gas flame adjustments Cooktop and oven burners use a flashlight and look underneath the bottom of air in the anti-tip bracket. Repeat start-up or down until the range is lit, it may take longer than 4 seconds to light...
... until rear leveling leg is turned to adjust leveling legs up or down until the range is engaged in the gas line. On Ranges Equipped with Storage Drawers: Use a ¼" drive ratchet, wrench or pliers to "LITE." The first time a burner is level. Low flame B. The flame should... necessary to light the burner. Electronic Ignition System Initial lighting and gas flame adjustments Cooktop and oven burners use a flashlight and look underneath the bottom of air in the anti-tip bracket. Repeat start-up or down until the range is lit, it may take longer than 4 seconds to light...
Installation Guide
Page 10
..." to the Use and Care Guide for proper operation of the flame spreader. Press the START pad. On models with an outer mantle of the range. Light 1 burner and turn the screw located in character. Push CANCEL/OFF when finished. 5. Flame reflection D. 2 screws 4. Check the oven bake burner for each setting...
..." to the Use and Care Guide for proper operation of the flame spreader. Press the START pad. On models with an outer mantle of the range. Light 1 burner and turn the screw located in character. Push CANCEL/OFF when finished. 5. Flame reflection D. 2 screws 4. Check the oven bake burner for each setting...


