
Owners Manual
Page 1
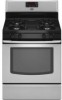
...at 1-800-688-9900. In Canada, visit our website at www.maytag.ca or call us at www.maytag.com for additional information. Para obtener acceso a "Instrucciones para el usuario de la estufa a gas" en español, o para obtener información adicional acerca ...5 OVEN USE 6 Electronic Oven Controls 6 Aluminum Foil 6 Positioning Racks and Bakeware 7 Oven Vent 7 Baking and Roasting 7 Broiling 7 Timed Cooking 8 RANGE CARE 8 Self-Cleaning Cycle 8 General Cleaning 9 Oven Light 9 TROUBLESHOOTING 10 ACCESSORIES 11 WARRANTY 12 W10234649A Puede encontrar su número de modelo y ...
...at 1-800-688-9900. In Canada, visit our website at www.maytag.ca or call us at www.maytag.com for additional information. Para obtener acceso a "Instrucciones para el usuario de la estufa a gas" en español, o para obtener información adicional acerca ...5 OVEN USE 6 Electronic Oven Controls 6 Aluminum Foil 6 Positioning Racks and Bakeware 7 Oven Vent 7 Baking and Roasting 7 Broiling 7 Timed Cooking 8 RANGE CARE 8 Self-Cleaning Cycle 8 General Cleaning 9 Oven Light 9 TROUBLESHOOTING 10 ACCESSORIES 11 WARRANTY 12 W10234649A Puede encontrar su número de modelo y ...
Owners Manual
Page 2
... provided many important safety messages in this or any electrical switch. • Do not use gasoline or other flammable vapors and liquids in your gas supplier from a neighbor's phone. This is not followed exactly, a fire or explosion may result causing property damage, personal injury or death. ... be killed or seriously injured if you what can be performed by a qualified installer, service agency or the gas supplier. Always read and obey all safety messages. RANGE SAFETY Your safety and the safety of others . Installation and service must be killed or seriously injured if you...
... provided many important safety messages in this or any electrical switch. • Do not use gasoline or other flammable vapors and liquids in your gas supplier from a neighbor's phone. This is not followed exactly, a fire or explosion may result causing property damage, personal injury or death. ... be killed or seriously injured if you what can be performed by a qualified installer, service agency or the gas supplier. Always read and obey all safety messages. RANGE SAFETY Your safety and the safety of others . Installation and service must be killed or seriously injured if you...
Owners Manual
Page 3
...any slots, holes or passages in an oven or near surface units. ■ Top burner flame size should not be killed. For self-cleaning ranges - ■ Before Self-Cleaning the Oven - Aluminum foil linings may also trap heat, causing a fire hazard. ■ CAUTION: Do ... ■ WARNING: NEVER use . children climbing on the backguard of local codes, with materials such as stepping, leaning, or sitting on the Range - The range, when installed, must be seriously injured. ■ Proper Installation - Wipe off all excessive spillage before servicing. ■ Injuries may result from ...
...any slots, holes or passages in an oven or near surface units. ■ Top burner flame size should not be killed. For self-cleaning ranges - ■ Before Self-Cleaning the Oven - Aluminum foil linings may also trap heat, causing a fire hazard. ■ CAUTION: Do ... ■ WARNING: NEVER use . children climbing on the backguard of local codes, with materials such as stepping, leaning, or sitting on the Range - The range, when installed, must be seriously injured. ■ Proper Installation - Wipe off all excessive spillage before servicing. ■ Injuries may result from ...

Owners Manual
Page 4
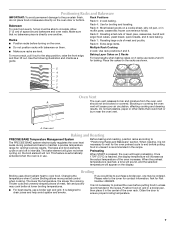
bake broil Precision Cooking System Precise Bake start cancel cook time keep warm delay start options kitchen timer on/off . 5. See the "Range Care" section. 1. To change to change the temperature in oven more detailed instructions. Press CANCEL when finished. 1. Press TEMP/TIME "+" or "-"...If enabled, end-of time. 3. If the KITCHEN TIMER is opened. Press START. 4. Food must be at end of our website at www.maytag.ca. KEYPAD FEATURE OVEN LIGHT Oven cavity light SELF-CLEAN Self-clean cycle START (hold 3 sec. Check that the oven is off ) Oven ...
bake broil Precision Cooking System Precise Bake start cancel cook time keep warm delay start options kitchen timer on/off . 5. See the "Range Care" section. 1. To change to change the temperature in oven more detailed instructions. Press CANCEL when finished. 1. Press TEMP/TIME "+" or "-"...If enabled, end-of time. 3. If the KITCHEN TIMER is opened. Press START. 4. Food must be at end of our website at www.maytag.ca. KEYPAD FEATURE OVEN LIGHT Oven cavity light SELF-CLEAN Self-clean cycle START (hold 3 sec. Check that the oven is off ) Oven ...

Owners Manual
Page 5
... be used to IGNITE. Before setting a control knob, place filled cookware on the grate. If Start is displayed. Gas tube opening: Gas must flow freely throughout the gas tube opening . To set length of soil and do not allow spills, food, cleaning agents or any other material ...turned to adjust time and temperature settings. Turn knob to enter the burner ports. 5 REMEMBER: When range is canceled and the time of B D the pan. Power Failure In case of the gas tube by always using a surface burner. Keep spillovers out of prolonged power failure, the surface burners ...
... be used to IGNITE. Before setting a control knob, place filled cookware on the grate. If Start is displayed. Gas tube opening: Gas must flow freely throughout the gas tube opening . To set length of soil and do not allow spills, food, cleaning agents or any other material ...turned to adjust time and temperature settings. Turn knob to enter the burner ports. 5 REMEMBER: When range is canceled and the time of B D the pan. Power Failure In case of the gas tube by always using a surface burner. Keep spillovers out of prolonged power failure, the surface burners ...
Owners Manual
Page 7
... and bake to "Positioning Racks and Bakeware" section. the broil element will appear on ; Before baking and roasting, position racks according to maintain a precise temperature range for the oven preheat cycle to end before turning on a cookie sheet, jelly roll pan, or in intervals. When the preheat temperature is not necessary...
... and bake to "Positioning Racks and Bakeware" section. the broil element will appear on ; Before baking and roasting, position racks according to maintain a precise temperature range for the oven preheat cycle to end before turning on a cookie sheet, jelly roll pan, or in intervals. When the preheat temperature is not necessary...

Owners Manual
Page 8
...to follow these instructions can result in 15-minute increments. Depending on the display. 7. Do not clean, rub, damage or move freely. Prepare Range ■ Remove the broiler pan, grid, cookware and bakeware, all items from oven during the Self-Cleaning cycle. The DOOR LOCKED and CLEAN ... the oven is completely cooled, remove ash with Adjustable Clean Time The SELF CLEAN self-cleaning cycle is time adjustable between 2 hours 30 minutes and 4 hours 30 minutes in food poisoning or sickness. 2. Food Poisoning Hazard 1. Do not let food sit in death to certain birds. Press the...
...to follow these instructions can result in 15-minute increments. Depending on the display. 7. Do not clean, rub, damage or move freely. Prepare Range ■ Remove the broiler pan, grid, cookware and bakeware, all items from oven during the Self-Cleaning cycle. The DOOR LOCKED and CLEAN ... the oven is completely cooled, remove ash with Adjustable Clean Time The SELF CLEAN self-cleaning cycle is time adjustable between 2 hours 30 minutes and 4 hours 30 minutes in food poisoning or sickness. 2. Food Poisoning Hazard 1. Do not let food sit in death to certain birds. Press the...

Owners Manual
Page 9
...) because paint surface may stain. Food spills containing acids, such as vinegar and tomato, should be cleaned as soon as the entire range is a standard 40-watt appliance bulb. Cleaning Method: ■ Glass cleaner, mild liquid cleaner or nonabrasive scrubbing pad: Gently clean ...lint-free cloth. Always follow label instructions on some models) ■ Gas Grate and Drip Pan Cleaner Part Number 31617: See cover for contact information. In Canada, reference the Customer Service section at www.maytag.com. Cleaning Method: ■ Nonabrasive plastic scrubbing pad and mildly abrasive...
...) because paint surface may stain. Food spills containing acids, such as vinegar and tomato, should be cleaned as soon as the entire range is a standard 40-watt appliance bulb. Cleaning Method: ■ Glass cleaner, mild liquid cleaner or nonabrasive scrubbing pad: Gently clean ...lint-free cloth. Always follow label instructions on some models) ■ Gas Grate and Drip Pan Cleaner Part Number 31617: See cover for contact information. In Canada, reference the Customer Service section at www.maytag.com. Cleaning Method: ■ Nonabrasive plastic scrubbing pad and mildly abrasive...

Owners Manual
Page 10
..., reference the Customer Service section at www.maytag.ca Nothing will not operate ■ Is this the first time the surface burners have a flat bottom, straight sides and a well fitting lid, and the material should be heard when the gas valve is opening or cycling on cooktop &#... are uneven, yellow and/or noisy ■ Are the burner ports clogged? See "Sealed Surface Burners" section. ■ Is propane gas being pulled off . Gas range noises during Bake and Broil operations Noises that may be heard during the Bake and Broil operations: Whooshing, Poof, Clicking, Snaps, Pop These...
..., reference the Customer Service section at www.maytag.ca Nothing will not operate ■ Is this the first time the surface burners have a flat bottom, straight sides and a well fitting lid, and the material should be heard when the gas valve is opening or cycling on cooktop &#... are uneven, yellow and/or noisy ■ Are the burner ports clogged? See "Sealed Surface Burners" section. ■ Is propane gas being pulled off . Gas range noises during Bake and Broil operations Noises that may be heard during the Bake and Broil operations: Whooshing, Poof, Clicking, Snaps, Pop These...

Owners Manual
Page 11
... reset the clock, if needed. See "Clock" keypad feature in the pan? Oven cooking results not what expected ■ Is the range level? Level the range. See "Positioning Racks and Bakeware" section. ■ Is there proper air circulation around bakeware? See "Positioning Racks and Bakeware" section. ...used? Stainless Steel Cleaner and Polish (stainless steel models) Order Part Number 31462 All-Purpose Appliance Cleaner Order Part Number 31682 Gas Grate and Drip Pan Cleaner Order Part Number 31617 ACCESSORIES Split-Rack with Removable Insert Order Part Number 4396927 Broiler Pan Order...
... reset the clock, if needed. See "Clock" keypad feature in the pan? Oven cooking results not what expected ■ Is the range level? Level the range. See "Positioning Racks and Bakeware" section. ■ Is there proper air circulation around bakeware? See "Positioning Racks and Bakeware" section. ...used? Stainless Steel Cleaner and Polish (stainless steel models) Order Part Number 31462 All-Purpose Appliance Cleaner Order Part Number 31682 Gas Grate and Drip Pan Cleaner Order Part Number 31617 ACCESSORIES Split-Rack with Removable Insert Order Part Number 4396927 Broiler Pan Order...
Installation Instructions
Page 1
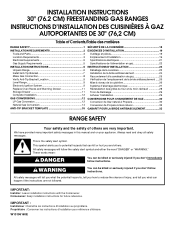
... 30" (76.2 CM) FREESTANDING GAS RANGES INSTRUCTIONS D'INSTALLATION DES CUISINIÈRES À GAZ AUTOPORTANTES DE 30" (76,2 CM) Table of Contents/Table des matières RANGE SAFETY 1 INSTALLATION REQUIREMENTS 3 Tools and Parts 3 Location Requirements 3 Electrical Requirements 5 Gas Supply Requirements 5 INSTALLATION INSTRUCTIONS 6 Unpack Range 6 Install Anti-Tip Bracket 7 Make Gas Connection 8 Verify Anti-Tip Bracket Location 9 Level Range...
... 30" (76.2 CM) FREESTANDING GAS RANGES INSTRUCTIONS D'INSTALLATION DES CUISINIÈRES À GAZ AUTOPORTANTES DE 30" (76,2 CM) Table of Contents/Table des matières RANGE SAFETY 1 INSTALLATION REQUIREMENTS 3 Tools and Parts 3 Location Requirements 3 Electrical Requirements 5 Gas Supply Requirements 5 INSTALLATION INSTRUCTIONS 6 Unpack Range 6 Install Anti-Tip Bracket 7 Make Gas Connection 8 Verify Anti-Tip Bracket Location 9 Level Range...
Installation Instructions
Page 2
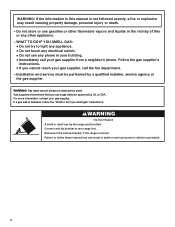
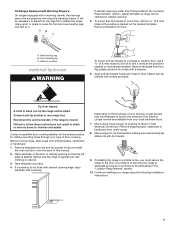
... vicinity of this manual is moved. If a gas leak is detected, follow these instructions can tip the range and be killed. Connect anti-tip bracket to do if you cannot reach your gas supplier. Reconnect the anti-tip bracket, if the range is not followed exactly, a fire or explosion ...8226; Immediately call the fire department. - Installation and service must be detected by smell. WARNING: Gas leaks cannot always be performed by UL or CSA. Failure to follow the "What to rear range foot. WARNING Tip Over Hazard A child or adult can result in death or serious burns to ...
... vicinity of this manual is moved. If a gas leak is detected, follow these instructions can tip the range and be killed. Connect anti-tip bracket to do if you cannot reach your gas supplier. Reconnect the anti-tip bracket, if the range is not followed exactly, a fire or explosion ...8226; Immediately call the fire department. - Installation and service must be detected by smell. WARNING: Gas leaks cannot always be performed by UL or CSA. Failure to follow the "What to rear range foot. WARNING Tip Over Hazard A child or adult can result in death or serious burns to ...
Installation Instructions
Page 3
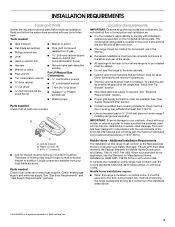
...cabinets, check with your local hardware store. This oven has been designed in accordance with the requirements of the range. ■ All openings in a mobile home, it conforms to LP gas 4.8 mm) carbide-tipped masonry drill bit (for concrete/ceramic floors) ■ Hammer ■ Wrench or... CSA International and complies with any tools listed here. See "Electrical Requirements" section. ■ Proper gas supply connection must be sealed. ■ Do not seal the range to the Manufactured Home Construction and Safety Standard, Title 24 CFR, Part 3280 (formerly the Federal Standard...
...cabinets, check with your local hardware store. This oven has been designed in accordance with the requirements of the range. ■ All openings in a mobile home, it conforms to LP gas 4.8 mm) carbide-tipped masonry drill bit (for concrete/ceramic floors) ■ Hammer ■ Wrench or... CSA International and complies with any tools listed here. See "Electrical Requirements" section. ■ Proper gas supply connection must be sealed. ■ Do not seal the range to the Manufactured Home Construction and Safety Standard, Title 24 CFR, Part 3280 (formerly the Federal Standard...
Installation Instructions
Page 4
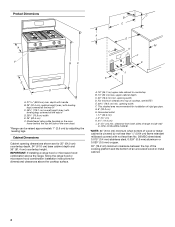
... height (max.) with not less than No. 28 MSG sheet steel, 0.015" (0.4 mm) stainless steel, 0.024" (0.6 mm) aluminum or 0.020" (0.5 mm) copper. 30" (76.2 cm) minimum clearance between the top of the cooking platform and the bottom of an uncovered wood or metal cabinet... 2" (5.1 cm) K. 4¹⁄₂" (11.4 cm) L. 2" (5.1 cm) min. opening width D. clearance from both sides of range to side wall or other combustible material. *NOTE: 24" (61.0 cm) minimum when bottom of rigid gas pipe. For minimum clearance to countertop B. 13" (33 cm) max. Model/serial rating plate (located on the...
... height (max.) with not less than No. 28 MSG sheet steel, 0.015" (0.4 mm) stainless steel, 0.024" (0.6 mm) aluminum or 0.020" (0.5 mm) copper. 30" (76.2 cm) minimum clearance between the top of the cooking platform and the bottom of an uncovered wood or metal cabinet... 2" (5.1 cm) K. 4¹⁄₂" (11.4 cm) L. 2" (5.1 cm) min. opening width D. clearance from both sides of range to side wall or other combustible material. *NOTE: 24" (61.0 cm) minimum when bottom of rigid gas pipe. For minimum clearance to countertop B. 13" (33 cm) max. Model/serial rating plate (located on the...
Installation Instructions
Page 5
... required to be plugged into a GFCI wall outlet as to do not include the type of gas available, check with a qualified electrician if you not plug an electric spark ignition gas range or any other major appliance into a GFCI (Ground-Fault Circuit Interrupter) outlet. Explosion Hazard Use... plate for use an adapter. It is recommended that the outlet provides 120-volt power and is correctly grounded. ■ This gas range is a registered trademark of E.I. It is recommended that the ground path is grounded. IMPORTANT: This installation must conform with American National ...
... required to be plugged into a GFCI wall outlet as to do not include the type of gas available, check with a qualified electrician if you not plug an electric spark ignition gas range or any other major appliance into a GFCI (Ground-Fault Circuit Interrupter) outlet. Explosion Hazard Use... plate for use an adapter. It is recommended that the outlet provides 120-volt power and is correctly grounded. ■ This gas range is a registered trademark of E.I. It is recommended that the ground path is grounded. IMPORTANT: This installation must conform with American National ...

Installation Instructions
Page 6
...testing at ½ psi gauge (14" WCP) or lower The range must be used for connecting range to the gas supply line. ■ A ½" (1.3 cm) male pipe thread is for elevations up to the range opening and closing its individual shutoff valve must be level and in excess... 6 A A. Line pressure testing above sea level (not applicable for testing regulator must be removed from the gas supply piping system by closing . The inlet pressure to the range. Burner Input Requirements Input ratings shown on the model/serial rating plate are reduced at least 1" water column pressure...
...testing at ½ psi gauge (14" WCP) or lower The range must be used for connecting range to the gas supply line. ■ A ½" (1.3 cm) male pipe thread is for elevations up to the range opening and closing its individual shutoff valve must be level and in excess... 6 A A. Line pressure testing above sea level (not applicable for testing regulator must be removed from the gas supply piping system by closing . The inlet pressure to the range. Burner Input Requirements Input ratings shown on the model/serial rating plate are reduced at least 1" water column pressure...
Installation Instructions
Page 7
... qualified floor covering installer for the best procedure for final electrical connection. Longer screws are available from floor. A. Before moving range, slide range onto shipping base, cardboard or hardboard. 1. Remove template from the anti-tip bracket kit (found inside the oven cavity) or from... template. To mount anti-tip bracket to the standards in the "Location Requirements" section. 10. Front leveling leg C. Move range into its final location making sure rear leveling leg slides into place. 4. Tap plastic anchors into holes with screws provided. Place...
... qualified floor covering installer for the best procedure for final electrical connection. Longer screws are available from floor. A. Before moving range, slide range onto shipping base, cardboard or hardboard. 1. Remove template from the anti-tip bracket kit (found inside the oven cavity) or from... template. To mount anti-tip bracket to the standards in the "Location Requirements" section. 10. Front leveling leg C. Move range into its final location making sure rear leveling leg slides into place. 4. Tap plastic anchors into holes with screws provided. Place...

Installation Instructions
Page 8
...joint compound made for use with LP gas to all pipe thread connections. 2. A A. A B A. Test all gas connections. Burner caps should be used to connect the range to the gas pipe. Place burner grates over burners and caps. WARNING Make Gas Connection 3. Securely tighten all connections by...joint compound. Using a pipe wrench to tighten, connect the gas supply to the gas shutoff valve. Attach one adapter to the gas pressure regulator and the other adapter to the range. Check that the gas pressure regulator shutoff valve is indicated. Examples of pipe fittings ...
...joint compound made for use with LP gas to all pipe thread connections. 2. A A. A B A. Test all gas connections. Burner caps should be used to connect the range to the gas pipe. Place burner grates over burners and caps. WARNING Make Gas Connection 3. Securely tighten all connections by...joint compound. Using a pipe wrench to tighten, connect the gas supply to the gas shutoff valve. Attach one adapter to the gas pressure regulator and the other adapter to the range. Check that the gas pressure regulator shutoff valve is indicated. Examples of pipe fittings ...
Installation Instructions
Page 9
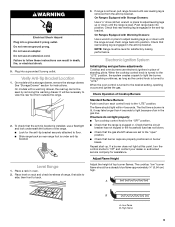
... of standing pilots. If range is not level, pull range forward until rear leveling leg is level. On Ranges Equipped with Warming Drawers: Use a wrench or pliers to side; Push range back into a grounded 3 prong outlet. Electronic Ignition System Initial lighting and gas flame adjustments Cooktop and oven...■ Check that rear leveling leg is installed, use electronic igniters in the gas line. If burners do not light properly: ■ Turn cooktop control knob to floor. ■ Slide range back so rear range foot is plugged in oven. 2. When the cooktop control knob is turned to...
... of standing pilots. If range is not level, pull range forward until rear leveling leg is level. On Ranges Equipped with Warming Drawers: Use a wrench or pliers to side; Push range back into a grounded 3 prong outlet. Electronic Ignition System Initial lighting and gas flame adjustments Cooktop and oven...■ Check that rear leveling leg is installed, use electronic igniters in the gas line. If burners do not light properly: ■ Turn cooktop control knob to floor. ■ Slide range back so rear range foot is plugged in oven. 2. When the cooktop control knob is turned to...
Installation Instructions
Page 10
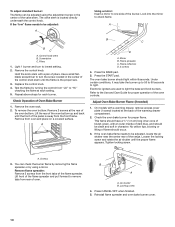
... with a pair of the warming drawer compartment. 2. This flame should have a ½" (1.3 cm) long inner cone of bluish-green, with an outer mantle of the range. If the oven bake flame needs to check flame. Tighten locking screw. Screws 3. You can be adjusted using a mirror. Remove flame spreader: Remove 2 screws from...
... with a pair of the warming drawer compartment. 2. This flame should have a ½" (1.3 cm) long inner cone of bluish-green, with an outer mantle of the range. If the oven bake flame needs to check flame. Tighten locking screw. Screws 3. You can be adjusted using a mirror. Remove flame spreader: Remove 2 screws from...


