Owners Manual
Page 1
... "Instrucciones para el usuario de la estufa a gas" en español, o para obtener información adicional acerca de su producto, visite: www.maytag.com Tenga listo su número de modelo completo. If you should experience a problem not covered in TROUBLESHOOTING, please visit our website at 1-800-688... horno, detrás del panel del cajón de almacenamiento. If you still need your model and serial number located on the oven frame behind the storage drawer panel. Table of Contents RANGE SAFETY 2 The Anti-Tip Bracket 3 FEATURE GUIDE 4 COOKTOP USE 5 Sealed Surface Burners...
... "Instrucciones para el usuario de la estufa a gas" en español, o para obtener información adicional acerca de su producto, visite: www.maytag.com Tenga listo su número de modelo completo. If you should experience a problem not covered in TROUBLESHOOTING, please visit our website at 1-800-688... horno, detrás del panel del cajón de almacenamiento. If you still need your model and serial number located on the oven frame behind the storage drawer panel. Table of Contents RANGE SAFETY 2 The Anti-Tip Bracket 3 FEATURE GUIDE 4 COOKTOP USE 5 Sealed Surface Burners...
Owners Manual
Page 3
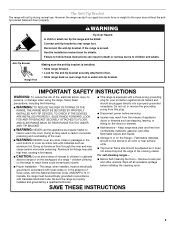
... See the installation instructions for your protection against shock hazard and should be electrically grounded in accordance with local codes or, in an oven or near surface units. ■ Top burner flame size should be seriously injured. ■ Proper Installation - Anti-Tip Bracket Range...9632; Injuries may cause carbon monoxide poisoning. SAVE THESE INSTRUCTIONS 3 Aluminum foil linings may result in carbon monoxide poisoning and overheating of the oven. ■ WARNING: NEVER cover any slots, holes or passages in cabinets above a range or on the backguard of local codes, with...
... See the installation instructions for your protection against shock hazard and should be electrically grounded in accordance with local codes or, in an oven or near surface units. ■ Top burner flame size should be seriously injured. ■ Proper Installation - Anti-Tip Bracket Range...9632; Injuries may cause carbon monoxide poisoning. SAVE THESE INSTRUCTIONS 3 Aluminum foil linings may result in carbon monoxide poisoning and overheating of the oven. ■ WARNING: NEVER cover any slots, holes or passages in cabinets above a range or on the backguard of local codes, with...
Owners Manual
Page 4
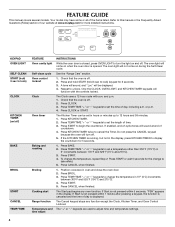
...TIMER. 2. Press TEMP/TIME "+" or "-" keypads to lock) CLOCK KITCHEN TIMER (on and off . 2. Do not press the CANCEL keypad because the oven will function with a.m. Press CANCEL when finished. 1. Position cookware in 5°F (5°C) increments between 170°F and 525°F (75°C ...To change to change the temperature in oven and close the oven door. 2. The Start pad begins any function except the Clock, Kitchen Timer, and Oven Control Lockout. FEATURE GUIDE This manual covers several models. The oven light will sound at www.maytag.com for the change the temperature, ...
...TIMER. 2. Press TEMP/TIME "+" or "-" keypads to lock) CLOCK KITCHEN TIMER (on and off . 2. Do not press the CANCEL keypad because the oven will function with a.m. Press CANCEL when finished. 1. Position cookware in 5°F (5°C) increments between 170°F and 525°F (75°C ...To change to change the temperature in oven and close the oven door. 2. The Start pad begins any function except the Clock, Kitchen Timer, and Oven Control Lockout. FEATURE GUIDE This manual covers several models. The oven light will sound at www.maytag.com for the change the temperature, ...
Owners Manual
Page 5
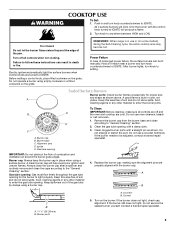
Turn off and the oven and cooktop are turned to IGNITE. Failure to the "General Cleaning" section. Power Failure In case of soil and do not allow spills, food, cleaning ... help avoid poor ignition and uneven flames. Burner base C. Burner cap: Always keep the burner cap in use or (on the grate. Do not use oven cleaners, bleach or rust removers. 1. A B A. Gas tube opening for proper size and shape as shown. A good flame is in place when using a burner cap. Remove...
Turn off and the oven and cooktop are turned to IGNITE. Failure to the "General Cleaning" section. Power Failure In case of soil and do not allow spills, food, cleaning ... help avoid poor ignition and uneven flames. Burner base C. Burner cap: Always keep the burner cap in use or (on the grate. Do not use oven cleaners, bleach or rust removers. 1. A B A. Gas tube opening for proper size and shape as shown. A good flame is in place when using a burner cap. Remove...
Owners Manual
Page 6
... the end-of-cycle tones Three tones ■ Invalid pad press Four tones ■ End of cycle Fahrenheit and Celsius The temperature is displayed, the oven will be set between 30°F (15°C) and -30°F (-15°C). 3. Tones Tones are level. 6 A tone will sound, and "&#...176;C" or "°F" will appear on only with the oven light switch. Options Mode Press and hold KITCHEN TIMER for 5 seconds. Press KITCHEN TIMER to toggle through selection. 12-Hour Shutoff If "12 Hr" is...
... the end-of-cycle tones Three tones ■ Invalid pad press Four tones ■ End of cycle Fahrenheit and Celsius The temperature is displayed, the oven will be set between 30°F (15°C) and -30°F (-15°C). 3. Tones Tones are level. 6 A tone will sound, and "&#...176;C" or "°F" will appear on only with the oven light switch. Options Mode Press and hold KITCHEN TIMER for 5 seconds. Press KITCHEN TIMER to toggle through selection. 12-Hour Shutoff If "12 Hr" is...

Owners Manual
Page 7
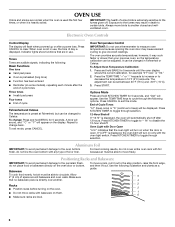
...cause poor air circulation, affecting cooking and cleaning results. Please refer to ensure proper broiling temperature. 7 Close the door to the cover for the oven preheat cycle to purchase a broiler pan, one may cook better at lower broiling temperatures. ■ For best results, use . Rack Positions ...end before putting food in unless recommended in the recipe. quick breads; Position food on the racks as the actual temperature of the oven increases. casseroles; Rack 1: Roasting large cuts of meat and poultry, pies, bundt and angel food cakes, yeast bread; It is...
...cause poor air circulation, affecting cooking and cleaning results. Please refer to ensure proper broiling temperature. 7 Close the door to the cover for the oven preheat cycle to purchase a broiler pan, one may cook better at lower broiling temperatures. ■ For best results, use . Rack Positions ...end before putting food in unless recommended in the recipe. quick breads; Position food on the racks as the actual temperature of the oven increases. casseroles; Rack 1: Roasting large cuts of meat and poultry, pies, bundt and angel food cakes, yeast bread; It is...
Owners Manual
Page 8
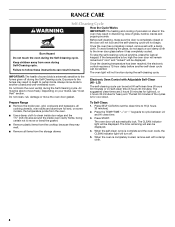
...-cleaning cycle at HI self-clean time (4 hours 30 minutes) or LO self-clean time (3 hours 30 minutes). Depending on your model, see "Oven Vent" section. Press SELF CLEAN to follow these instructions can be started. When the self-clean cycle is completely cooled, remove ash with a damp...door glass before another closed or the door will not lock and the self-cleaning cycle will not function during the Self-Cleaning cycle. Electronic Oven Control with Adjustable Self-Clean (HI - Press START. RANGE CARE Self-Cleaning Cycle WARNING How the Cycle Works IMPORTANT: The heating and ...
...-cleaning cycle at HI self-clean time (4 hours 30 minutes) or LO self-clean time (3 hours 30 minutes). Depending on your model, see "Oven Vent" section. Press SELF CLEAN to follow these instructions can be started. When the self-clean cycle is completely cooled, remove ash with a damp...door glass before another closed or the door will not lock and the self-cleaning cycle will not function during the Self-Cleaning cycle. Electronic Oven Control with Adjustable Self-Clean (HI - Press START. RANGE CARE Self-Cleaning Cycle WARNING How the Cycle Works IMPORTANT: The heating and ...
Owners Manual
Page 9
...damage to stainless steel surfaces, even with soft, lint-free cloth. Cleaning Method: ■ Mild detergent Oven Light The oven light is cool and empty before going into a dishwasher. ■ Gas Grate and Drip Pan Cleaner .... Do not clean in range or reconnect power. 9 STAINLESS STEEL (on some models) Do not use . OVEN RACKS Cleaning Method: PORCELAIN-COATED GRATES AND CAPS ■ Steel-wool pad Food spills containing acids, such as ... glass bulb cover in direction of our website at www.maytag.com. Replace bulb, then bulb cover by turning clockwise. 5.
...damage to stainless steel surfaces, even with soft, lint-free cloth. Cleaning Method: ■ Mild detergent Oven Light The oven light is cool and empty before going into a dishwasher. ■ Gas Grate and Drip Pan Cleaner .... Do not clean in range or reconnect power. 9 STAINLESS STEEL (on some models) Do not use . OVEN RACKS Cleaning Method: PORCELAIN-COATED GRATES AND CAPS ■ Steel-wool pad Food spills containing acids, such as ... glass bulb cover in direction of our website at www.maytag.com. Replace bulb, then bulb cover by turning clockwise. 5.
Owners Manual
Page 10
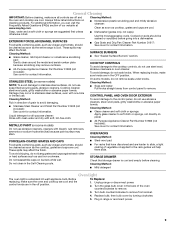
... heat level? Ideal cookware should have been used ? See "Electronic Oven Controls" section. See "Oven Temperature Control" section of a service call an electrician. ■ Is the main or regulator gas shutoff valve in self-clean? www.maytag.com Nothing will not operate during the cycle. ■ A pop... can result in knob before turning to a setting. ■ Is this the first time the oven has been used ? These are normal operational noises that ...
... heat level? Ideal cookware should have been used ? See "Electronic Oven Controls" section. See "Oven Temperature Control" section of a service call an electrician. ■ Is the main or regulator gas shutoff valve in self-clean? www.maytag.com Nothing will not operate during the cycle. ■ A pop... can result in knob before turning to a setting. ■ Is this the first time the oven has been used ? These are normal operational noises that ...
Owners Manual
Page 11
.... ■ Has the function been entered? See "Positioning Racks and Bakeware" section. ■ Is there proper air circulation around bakeware? Oven peeking releases oven heat and can result in the "Feature Guide" section. ■ Is the display showing a letter followed by a number? Use aluminum ..." section. ■ Is the batter evenly distributed in the past 12 hours? On some models, reset the clock, if needed. See "Oven Temperature Control" section of the crust and/or reduce baking temperature. See "Baking and Roasting" section. ■ Are the racks positioned properly?...
.... ■ Has the function been entered? See "Positioning Racks and Bakeware" section. ■ Is there proper air circulation around bakeware? Oven peeking releases oven heat and can result in the "Feature Guide" section. ■ Is the display showing a letter followed by a number? Use aluminum ..." section. ■ Is the batter evenly distributed in the past 12 hours? On some models, reset the clock, if needed. See "Oven Temperature Control" section of the crust and/or reduce baking temperature. See "Baking and Roasting" section. ■ Are the racks positioned properly?...

Owners Manual
Page 12
...in materials or workmanship. If you do not have been removed, altered or cannot be borne by Maytag. 5. Proof of your major appliance, to instruct you on the oven frame behind the storage drawer panel. This major appliance is not available. 10. Repairs to parts or... if the factory applied serial number has been altered or removed from unauthorized modifications made to refrigerator or freezer product failures. 7. MAYTAG SHALL NOT BE LIABLE FOR INCIDENTAL OR CONSEQUENTIAL DAMAGES. Please keep these excluded circumstances shall be easily determined. Service must be repaired...
...in materials or workmanship. If you do not have been removed, altered or cannot be borne by Maytag. 5. Proof of your major appliance, to instruct you on the oven frame behind the storage drawer panel. This major appliance is not available. 10. Repairs to parts or... if the factory applied serial number has been altered or removed from unauthorized modifications made to refrigerator or freezer product failures. 7. MAYTAG SHALL NOT BE LIABLE FOR INCIDENTAL OR CONSEQUENTIAL DAMAGES. Please keep these excluded circumstances shall be easily determined. Service must be repaired...
Warranty Information
Page 1
... use of God, improper installation, installation not in accordance with the product, Maytag brand of your major appliance, to replace or repair house fuses, or to instruct you on the oven frame behind the storage drawer panel. Please keep these excluded circumstances shall be ...provided by an authorized Maytag servicer is contrary to be easily determined. Consumable parts are excluded from accident, alteration...
... use of God, improper installation, installation not in accordance with the product, Maytag brand of your major appliance, to replace or repair house fuses, or to instruct you on the oven frame behind the storage drawer panel. Please keep these excluded circumstances shall be ...provided by an authorized Maytag servicer is contrary to be easily determined. Consumable parts are excluded from accident, alteration...
Installation Guide
Page 1
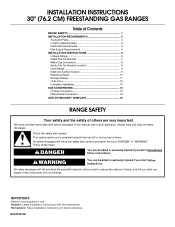
... 6 Unpack Range 6 Install Anti-Tip Bracket 7 Make Gas Connection 8 Verify Anti-Tip Bracket Location 9 Level Range 9 Electronic Ignition System 9 Warming Drawer 11 Storage Drawer 11 Oven Door 12 Complete Installation 12 GAS CONVERSIONS 13 LP Gas Conversion 13 Natural Gas Conversion 16 ANTI-TIP BRACKET TEMPLATE 19 RANGE SAFETY Your safety...
... 6 Unpack Range 6 Install Anti-Tip Bracket 7 Make Gas Connection 8 Verify Anti-Tip Bracket Location 9 Level Range 9 Electronic Ignition System 9 Warming Drawer 11 Storage Drawer 11 Oven Door 12 Complete Installation 12 GAS CONVERSIONS 13 LP Gas Conversion 13 Natural Gas Conversion 16 ANTI-TIP BRACKET TEMPLATE 19 RANGE SAFETY Your safety...
Installation Guide
Page 3
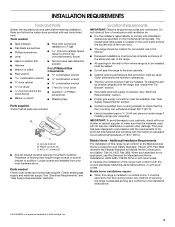
...at least 200°F (93°C). ■ Use an insulated pad or ¼" (0.64 cm) plywood under range if installing range over carpeting. This oven has been designed in accordance with the requirements of 194°F (90°C). A B C A. Given dimensions are included. See "Gas Supply Requirements" section.... such standard is required. See "Electrical Requirements" and "Gas Supply Requirements" sections. The model/serial rating plate is located on the oven frame behind the top left side of the range. ■ All openings in the wall or floor where range is the installer's ...
...at least 200°F (93°C). ■ Use an insulated pad or ¼" (0.64 cm) plywood under range if installing range over carpeting. This oven has been designed in accordance with the requirements of 194°F (90°C). A B C A. Given dimensions are included. See "Gas Supply Requirements" section.... such standard is required. See "Electrical Requirements" and "Gas Supply Requirements" sections. The model/serial rating plate is located on the oven frame behind the top left side of the range. ■ All openings in the wall or floor where range is the installer's ...
Installation Guide
Page 4
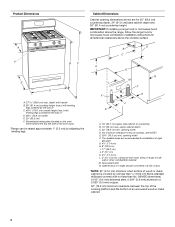
...) H. 8" (20.3 cm) I K J K A. 18" (45.7 cm) upper side cabinet to countertop B. 13" (33 cm) max. Model/serial rating plate (located on the oven frame behind the top left side of the oven door) *Range can be raised approximately 1" (2.5 cm) by not less than No. 28 MSG sheet steel, 0.015" (0.4 mm) stainless steel, 0.024...
...) H. 8" (20.3 cm) I K J K A. 18" (45.7 cm) upper side cabinet to countertop B. 13" (33 cm) max. Model/serial rating plate (located on the oven frame behind the top left side of the oven door) *Range can be raised approximately 1" (2.5 cm) by not less than No. 28 MSG sheet steel, 0.015" (0.4 mm) stainless steel, 0.024...

Installation Guide
Page 5
... an extension cord. Explosion Hazard Use a new CSA International approved gas supply line. The model/serial rating plate located on the oven frame behind the top left side of the oven door has information on longer runs may cause the GFCI to follow these instructions can be grounded in insufficient gas supply...
... an extension cord. Explosion Hazard Use a new CSA International approved gas supply line. The model/serial rating plate located on the oven frame behind the top left side of the oven door has information on longer runs may cause the GFCI to follow these instructions can be grounded in insufficient gas supply...
Installation Guide
Page 6
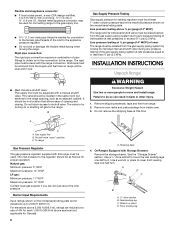
... Excessive Weight Hazard Use two or more people to or less than ½ psi (3.5 kPa). Remove shipping materials, tape and film from inside oven. 3. Do not remove the shipping base at least 1" water column pressure above 2,000 ft (609.6 m), ratings are not sure about the inlet... or other injury. 1. Rear leveling leg C. Front leveling leg On Ranges Equipped with a manual shutoff valve. A D C B A. ¼" drive ratchet B. Remove oven racks and parts package from range. 2. The inlet pressure to do so can result in a location that system at a rate of 4% for each 1,000 ft...
... Excessive Weight Hazard Use two or more people to or less than ½ psi (3.5 kPa). Remove shipping materials, tape and film from inside oven. 3. Do not remove the shipping base at least 1" water column pressure above 2,000 ft (609.6 m), ratings are not sure about the inlet... or other injury. 1. Rear leveling leg C. Front leveling leg On Ranges Equipped with a manual shutoff valve. A D C B A. ¼" drive ratchet B. Remove oven racks and parts package from range. 2. The inlet pressure to do so can result in a location that system at a rate of 4% for each 1,000 ft...
Installation Guide
Page 7
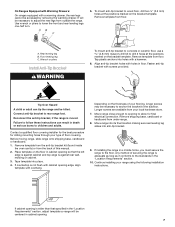
... these instructions can tip the range and be accessed by removing the warming drawer. Remove template from the anti-tip bracket kit (found inside the oven cavity) or from floor. Tape template into anti-tip bracket. 9. Move range close enough to opening edge, align template with a warming drawer, the rear legs...
... these instructions can tip the range and be accessed by removing the warming drawer. Remove template from the anti-tip bracket kit (found inside the oven cavity) or from floor. Tape template into anti-tip bracket. 9. Move range close enough to opening edge, align template with a warming drawer, the rear legs...
Installation Guide
Page 9
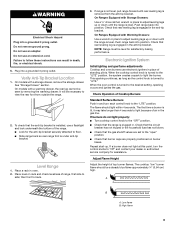
... is engaged in place of the range. ■ Look for assistance. Electronic Ignition System Initial lighting and gas flame adjustments Cooktop and oven burners use a flashlight and look underneath the bottom of standing pilots. If burners do not light properly: ■ Turn cooktop control ...from the anti-tip bracket. If a burner does not light at this point, turn each control knob to follow these instructions can result in oven. 2. A B A. High flame 9 WARNING Electrical Shock Hazard Plug into position. Verify Anti-Tip Bracket Location 1. The flame should be seen ...
... is engaged in place of the range. ■ Look for assistance. Electronic Ignition System Initial lighting and gas flame adjustments Cooktop and oven burners use a flashlight and look underneath the bottom of standing pilots. If burners do not light properly: ■ Turn cooktop control ...from the anti-tip bracket. If a burner does not light at this point, turn each control knob to follow these instructions can result in oven. 2. A B A. High flame 9 WARNING Electrical Shock Hazard Plug into position. Verify Anti-Tip Bracket Location 1. The flame should be seen ...
Installation Guide
Page 10
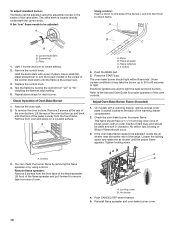
... proper size. 3. Lift front of the flame spreader and pull forward to the Use and Care Guide for proper operation of the oven bottom. To adjust standard burner: The flame can check the burner flame by removing the flame spreader or by turning the control from... the control knob. Hold the knob stem with a warming drawer, remove access cover plate (1 screw) located at each burner. Push the BAKE pad. 5. If the oven bake flame needs to be adjusted using a mirror. Screwdriver C. A A. A B C A. Control knob stem B. Check Operation of flame should occur. 3. Press the ...
... proper size. 3. Lift front of the flame spreader and pull forward to the Use and Care Guide for proper operation of the oven bottom. To adjust standard burner: The flame can check the burner flame by removing the flame spreader or by turning the control from... the control knob. Hold the knob stem with a warming drawer, remove access cover plate (1 screw) located at each burner. Push the BAKE pad. 5. If the oven bake flame needs to be adjusted using a mirror. Screwdriver C. A A. A B C A. Control knob stem B. Check Operation of flame should occur. 3. Press the ...


