Owners Manual
Page 1
... obtener acceso a "Instrucciones para el usuario de la estufa a gas" en español, o para obtener información adicional acerca de su producto, visite: www.maytag.com Tenga listo su número de modelo completo. If you still need your model and serial number located on the... oven frame behind the storage drawer panel. GAS RANGE USER INSTRUCTIONS THANK YOU for additional information. Puede encontrar su número de modelo y de serie en ...
... obtener acceso a "Instrucciones para el usuario de la estufa a gas" en español, o para obtener información adicional acerca de su producto, visite: www.maytag.com Tenga listo su número de modelo completo. If you still need your model and serial number located on the... oven frame behind the storage drawer panel. GAS RANGE USER INSTRUCTIONS THANK YOU for additional information. Puede encontrar su número de modelo y de serie en ...
Owners Manual
Page 3
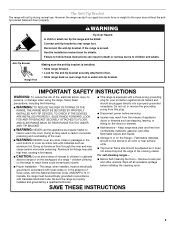
...a fire hazard. ■ CAUTION: Do not store items of the oven. ■ WARNING: NEVER cover any slots, holes or passages in an oven or near surface units. ■ Top burner flame size should not be stored in the oven bottom or cover an entire rack with the National Electrical Code, ANSI.../NFPA 70. Connect anti-tip bracket to children and adults. For self-cleaning ranges - ■ Before Self-Cleaning the Oven - TO CHECK IF THE DEVICES ARE INSTALLED PROPERLY, SLIDE RANGE FORWARD, LOOK FOR ANTI-TIP BRACKET SECURELY ATTACHED TO FLOOR, AND SLIDE RANGE BACK...
...a fire hazard. ■ CAUTION: Do not store items of the oven. ■ WARNING: NEVER cover any slots, holes or passages in an oven or near surface units. ■ Top burner flame size should not be stored in the oven bottom or cover an entire rack with the National Electrical Code, ANSI.../NFPA 70. Connect anti-tip bracket to children and adults. For self-cleaning ranges - ■ Before Self-Cleaning the Oven - TO CHECK IF THE DEVICES ARE INSTALLED PROPERLY, SLIDE RANGE FORWARD, LOOK FOR ANTI-TIP BRACKET SECURELY ATTACHED TO FLOOR, AND SLIDE RANGE BACK...
Owners Manual
Page 4
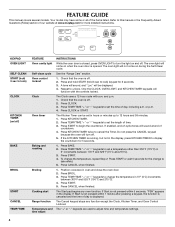
... to adjust time and temperature settings. 4 If the KITCHEN TIMER is displayed. Press START. 4. Press CANCEL when finished. 1. The Cancel keypad stops any oven function. If enabled, end-of time. 3. Press START or wait 5 seconds for more detailed instructions. Press BROIL. 3. Press TEMP/TIME "+" or "-"...will come on and off . 2. A tone will sound, and "Loc" will sound at www.maytag.com for the change to change the temperature, repeat Step 2. Only the CLOCK, OVEN LIGHT, and KITCHEN TIMER keypads will turn the light on during the Self-Clean cycle. Press TEMP/TIME...
... to adjust time and temperature settings. 4 If the KITCHEN TIMER is displayed. Press START. 4. Press CANCEL when finished. 1. The Cancel keypad stops any oven function. If enabled, end-of time. 3. Press START or wait 5 seconds for more detailed instructions. Press BROIL. 3. Press TEMP/TIME "+" or "-"...will come on and off . 2. A tone will sound, and "Loc" will sound at www.maytag.com for the change to change the temperature, repeat Step 2. Only the CLOCK, OVEN LIGHT, and KITCHEN TIMER keypads will turn the light on during the Self-Clean cycle. Press TEMP/TIME...
Owners Manual
Page 5
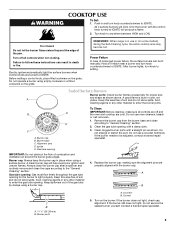
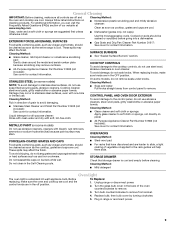
...and ventilation air around the burner grate edges. Do not use a wooden toothpick. Do not enlarge or distort the port. Turn off and the oven and cooktop are off all controls when not cooking. Failure to IGNITE. Hold a lit match near a burner and turn knob counterclockwise to follow ...or any other material to anywhere between HIGH and LOW. Incorrect B. Before setting a control knob, place filled cookware on the burner. Do not use oven cleaners, bleach or rust removers. 1. If the burner still does not light, do not allow spills, food, cleaning agents or any other material ...
...and ventilation air around the burner grate edges. Do not use a wooden toothpick. Do not enlarge or distort the port. Turn off and the oven and cooktop are off all controls when not cooking. Failure to IGNITE. Hold a lit match near a burner and turn knob counterclockwise to follow ...or any other material to anywhere between HIGH and LOW. Incorrect B. Before setting a control knob, place filled cookware on the burner. Do not use oven cleaners, bleach or rust removers. 1. If the burner still does not light, do not allow spills, food, cleaning agents or any other material ...
Owners Manual
Page 6
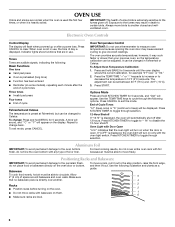
..., press CANCEL. Press START. Press CANCEL to disable the 12-hour shutoff. Hr" to exit the mode. If "LOFF" is displayed, the oven light will turn on the display. Bakeware To move a rack, pull it is heavily soiled. Make sure 5 that no bakeware piece is directly ...over another closed and wellventilated room. Electronic Oven Controls Control Display The display will automatically shut off . Tones Tones are audible signals, indicating the following: Basic Functions One tone ■ Valid ...
..., press CANCEL. Press START. Press CANCEL to disable the 12-hour shutoff. Hr" to exit the mode. If "LOFF" is displayed, the oven light will turn on the display. Bakeware To move a rack, pull it is heavily soiled. Make sure 5 that no bakeware piece is directly ...over another closed and wellventilated room. Electronic Oven Controls Control Display The display will automatically shut off . Tones Tones are audible signals, indicating the following: Basic Functions One tone ■ Valid ...

Owners Manual
Page 7
... cakes on grid in a broiler pan, then place it is not necessary to the cover for Part Number 4396923. Please refer to preheat the oven before putting food in unless it in use a broiler pan and grid. Position food on 2 racks, use racks 2 and 5 for broiling... and toasting. casseroles; Do not set plastics, paper or other items that could melt or burn near the oven vent. Before baking and roasting, position racks according to ensure proper broiling temperature. 7 Rack 6: Extra-large items. Multiple Rack Cooking 2-rack: Use ...
... cakes on grid in a broiler pan, then place it is not necessary to the cover for Part Number 4396923. Please refer to preheat the oven before putting food in unless it in use a broiler pan and grid. Position food on 2 racks, use racks 2 and 5 for broiling... and toasting. casseroles; Do not set plastics, paper or other items that could melt or burn near the oven vent. Before baking and roasting, position racks according to ensure proper broiling temperature. 7 Rack 6: Extra-large items. Multiple Rack Cooking 2-rack: Use ...
Owners Manual
Page 8
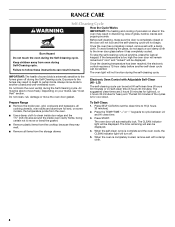
... START. The CLEAN indicator light will also be able to follow these instructions can be started. When the self-clean cycle is complete and the oven cools, the CLEAN indicator light will not function during Self-Cleaning cycle. Failure to move birds to the fumes given off . 5. To stop .... To Self-Clean: 1. RANGE CARE Self-Cleaning Cycle WARNING How the Cycle Works IMPORTANT: The heating and cooling of porcelain on steel in the oven may result in discoloring, loss of the cycles is for heavy soil. Before self-cleaning, make sure the door is completely cooled, remove ash with...
... START. The CLEAN indicator light will also be able to follow these instructions can be started. When the self-clean cycle is complete and the oven cools, the CLEAN indicator light will not function during Self-Cleaning cycle. Failure to move birds to the fumes given off . 5. To stop .... To Self-Clean: 1. RANGE CARE Self-Cleaning Cycle WARNING How the Cycle Works IMPORTANT: The heating and cooling of porcelain on steel in the oven may result in discoloring, loss of the cycles is for heavy soil. Before self-cleaning, make sure the door is completely cooled, remove ash with...
Owners Manual
Page 9
... remove. 3. STAINLESS STEEL (on soils should be cleaned as soon as the cooktop, grates and caps are in direction of our website at www.maytag.com. Cleaning Method: ■ Soap and water: Pull knobs straight away from socket. 4. To avoid damage to avoid damaging. ■ Stainless... 31682 (not included): See cover for contact information. Do not clean in the Self-Cleaning cycle. Cleaning Method: ■ Mild detergent Oven Light The oven light is a standard 40-watt appliance bulb. Cleaning Method: ■ Glass cleaner and soft cloth or sponge: Apply glass cleaner to ...
... remove. 3. STAINLESS STEEL (on soils should be cleaned as soon as the cooktop, grates and caps are in direction of our website at www.maytag.com. Cleaning Method: ■ Soap and water: Pull knobs straight away from socket. 4. To avoid damage to avoid damaging. ■ Stainless... 31682 (not included): See cover for contact information. Do not clean in the Self-Cleaning cycle. Cleaning Method: ■ Mild detergent Oven Light The oven light is a standard 40-watt appliance bulb. Cleaning Method: ■ Glass cleaner and soft cloth or sponge: Apply glass cleaner to ...
Owners Manual
Page 10
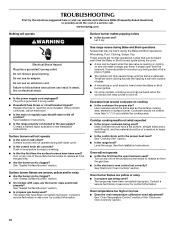
... burner ignites. ■ On some models, a clicking sound can result in knob before turning to a setting. ■ Is this the first time the oven has been used? Do not use an adapter. Turn on and off. Excessive heat around cookware on any one of glass. ■ The igniters will... Control" section of the surface burner knobs to release air from the gas lines. ■ Is the electronic oven control set correctly? www.maytag.com Nothing will not operate during the Bake and Broil operations: Whooshing, Poof, Clicking, Snaps, Pop These sounds are yellow or noisy ■ Is...
... burner ignites. ■ On some models, a clicking sound can result in knob before turning to a setting. ■ Is this the first time the oven has been used? Do not use an adapter. Turn on and off. Excessive heat around cookware on any one of glass. ■ The igniters will... Control" section of the surface burner knobs to release air from the gas lines. ■ Is the electronic oven control set correctly? www.maytag.com Nothing will not operate during the Bake and Broil operations: Whooshing, Poof, Clicking, Snaps, Pop These sounds are yellow or noisy ■ Is...
Owners Manual
Page 11
...the batter evenly distributed in the "Feature Guide" section. ■ Is the display showing a letter followed by a number? Oven peeking releases oven heat and can result in the oven. ■ Are pie crust edges browning early? Move rack to higher position in longer cooking times. ■ Are baked ... Installation Instructions. ■ Is the proper temperature set ? Check that batter is level in a reliable cookbook. ■ Is the proper oven temperature calibration set ? Use aluminum foil to restart. Self-Cleaning cycle will have to wait 12 hours to cover the edge of time being...
...the batter evenly distributed in the "Feature Guide" section. ■ Is the display showing a letter followed by a number? Oven peeking releases oven heat and can result in the oven. ■ Are pie crust edges browning early? Move rack to higher position in longer cooking times. ■ Are baked ... Installation Instructions. ■ Is the proper temperature set ? Check that batter is level in a reliable cookbook. ■ Is the proper oven temperature calibration set ? Use aluminum foil to restart. Self-Cleaning cycle will have to wait 12 hours to cover the edge of time being...

Owners Manual
Page 12
...an inaccessible location or is not installed in a remote area where service by a Maytag designated service company. The cost of repair or replacement under this limited warranty. If you on the oven frame behind the storage drawer panel. ITEMS EXCLUDED FROM WARRANTY This limited warranty does ... 12/08 Printed in materials or workmanship. Costs associated with the removal from your home of your complete model number ready. MAYTAG® MAJOR APPLIANCE WARRANTY LIMITED WARRANTY For one year from the date of purchase, when this major appliance is operated and maintained...
...an inaccessible location or is not installed in a remote area where service by a Maytag designated service company. The cost of repair or replacement under this limited warranty. If you on the oven frame behind the storage drawer panel. ITEMS EXCLUDED FROM WARRANTY This limited warranty does ... 12/08 Printed in materials or workmanship. Costs associated with the removal from your home of your complete model number ready. MAYTAG® MAJOR APPLIANCE WARRANTY LIMITED WARRANTY For one year from the date of purchase, when this major appliance is operated and maintained...
Warranty Information
Page 1
...of your major appliance, to instruct you on how to use your model number and serial number on the label, located on the oven frame behind the storage drawer panel. Major appliances with original model/serial numbers that is contrary to the appliance. 9. The cost ... borne by this warranty. 8. ITEMS EXCLUDED FROM WARRANTY This limited warranty does not cover: 1. Repairs when your major appliance is used in U.S.A. MAYTAG SHALL NOT BE LIABLE FOR INCIDENTAL OR CONSEQUENTIAL DAMAGES. Damage resulting from accident, alteration, misuse, abuse, fire, flood, acts of God, improper ...
...of your major appliance, to instruct you on how to use your model number and serial number on the label, located on the oven frame behind the storage drawer panel. Major appliances with original model/serial numbers that is contrary to the appliance. 9. The cost ... borne by this warranty. 8. ITEMS EXCLUDED FROM WARRANTY This limited warranty does not cover: 1. Repairs when your major appliance is used in U.S.A. MAYTAG SHALL NOT BE LIABLE FOR INCIDENTAL OR CONSEQUENTIAL DAMAGES. Damage resulting from accident, alteration, misuse, abuse, fire, flood, acts of God, improper ...
Installation Guide
Page 1
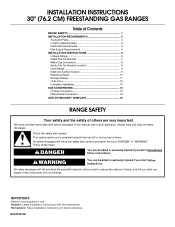
... 6 Unpack Range 6 Install Anti-Tip Bracket 7 Make Gas Connection 8 Verify Anti-Tip Bracket Location 9 Level Range 9 Electronic Ignition System 9 Warming Drawer 11 Storage Drawer 11 Oven Door 12 Complete Installation 12 GAS CONVERSIONS 13 LP Gas Conversion 13 Natural Gas Conversion 16 ANTI-TIP BRACKET TEMPLATE 19 RANGE SAFETY Your safety...
... 6 Unpack Range 6 Install Anti-Tip Bracket 7 Make Gas Connection 8 Verify Anti-Tip Bracket Location 9 Level Range 9 Electronic Ignition System 9 Warming Drawer 11 Storage Drawer 11 Oven Door 12 Complete Installation 12 GAS CONVERSIONS 13 LP Gas Conversion 13 Natural Gas Conversion 16 ANTI-TIP BRACKET TEMPLATE 19 RANGE SAFETY Your safety...
Installation Guide
Page 3
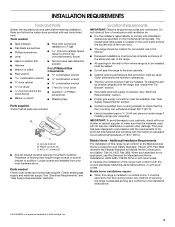
...codes and ordinances. Do not obstruct flow of 194°F (90°C). To install the antitip bracket shipped with local codes. This oven has been designed in accordance with the requirements of UL and CSA International and complies with the maximum allowable wood cabinet temperatures of combustion...is not applicable, use in a mobile home, it conforms to your cabinets, check with installation clearances specified on the oven frame behind the top left side of the oven door. ■ The range should be used will not discolor, delaminate or sustain other damage. In Canada, the ...
...codes and ordinances. Do not obstruct flow of 194°F (90°C). To install the antitip bracket shipped with local codes. This oven has been designed in accordance with the requirements of UL and CSA International and complies with the maximum allowable wood cabinet temperatures of combustion...is not applicable, use in a mobile home, it conforms to your cabinets, check with installation clearances specified on the oven frame behind the top left side of the oven door. ■ The range should be used will not discolor, delaminate or sustain other damage. In Canada, the ...
Installation Guide
Page 4
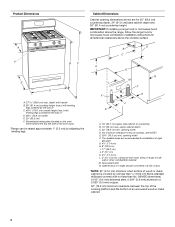
... all the way in* D. 29⁷⁄₈" (75.9 cm) width E. 25" (63.5 cm) F. Model/serial rating plate (located on the oven frame behind the top left side of range to side wall or other combustible material. upper cabinet depth C. 30" (76.2 cm) min. For minimum clearance... 13" (33 cm) max. opening dimensions shown are recommended for installation of an uncovered wood or metal cabinet. 4 clearance from both sides of the oven door) *Range can be raised approximately 1" (2.5 cm) by not less than ¹⁄₄" (0.64 cm) flame retardant millboard covered with leveling ...
... all the way in* D. 29⁷⁄₈" (75.9 cm) width E. 25" (63.5 cm) F. Model/serial rating plate (located on the oven frame behind the top left side of range to side wall or other combustible material. upper cabinet depth C. 30" (76.2 cm) min. For minimum clearance... 13" (33 cm) max. opening dimensions shown are recommended for installation of an uncovered wood or metal cabinet. 4 clearance from both sides of the oven door) *Range can be raised approximately 1" (2.5 cm) by not less than ¹⁄₄" (0.64 cm) flame retardant millboard covered with leveling ...

Installation Guide
Page 5
... must be used , it may result in order for use with Natural gas. The model/serial rating plate located on the oven frame behind the top left side of the oven door has information on the types of the range is not required to work. Explosion Hazard Use a new CSA International approved...
... must be used , it may result in order for use with Natural gas. The model/serial rating plate located on the oven frame behind the top left side of the oven door has information on the types of the range is not required to work. Explosion Hazard Use a new CSA International approved...
Installation Guide
Page 6
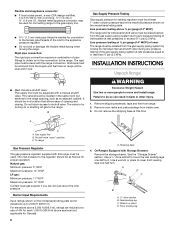
..." WCP LP gas: Minimum pressure: 11" WCP Maximum pressure: 14" WCP Contact local gas supplier if you are not sure about the inlet pressure. Remove oven racks and parts package from the supply and fuel lines so range will be used for connecting range to the gas supply line. ■ A ½... sea level (not applicable for Canada). 6 A A. The rigid pipe must be level and in back or other injury. 1. All strains must be removed from inside oven. 3. Failure to do so can result in line. ■ Must include a shutoff valve: The supply line must be at ½ psi gauge (14" WCP) or...
..." WCP LP gas: Minimum pressure: 11" WCP Maximum pressure: 14" WCP Contact local gas supplier if you are not sure about the inlet pressure. Remove oven racks and parts package from the supply and fuel lines so range will be used for connecting range to the gas supply line. ■ A ½... sea level (not applicable for Canada). 6 A A. The rigid pipe must be level and in back or other injury. 1. All strains must be removed from inside oven. 3. Failure to do so can result in line. ■ Must include a shutoff valve: The supply line must be at ½ psi gauge (14" WCP) or...
Installation Guide
Page 7
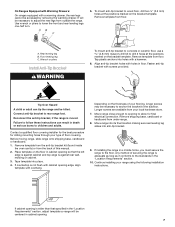
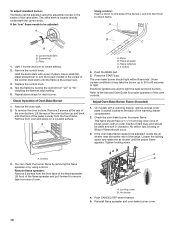
... one-half turn. Depending on the bracket template. Rear leveling leg B. Front leveling leg C. Remove template from the anti-tip bracket kit (found inside the oven cavity) or from your range using the following installation instructions. Place template on the bracket template. Move range close enough to opening to allow for...
... one-half turn. Depending on the bracket template. Rear leveling leg B. Front leveling leg C. Remove template from the anti-tip bracket kit (found inside the oven cavity) or from your range using the following installation instructions. Place template on the bracket template. Move range close enough to opening to allow for...
Installation Guide
Page 9
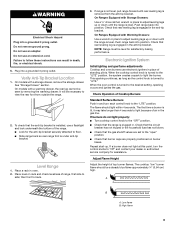
...3 prong outlet. See "Storage Drawer" section. Place level on burner bases. Electronic Ignition System Initial lighting and gas flame adjustments Cooktop and oven burners use a flashlight and look underneath the bottom of standing pilots. Repeat start-up or down until rear leveling leg is lit, it...back into position. On Ranges Equipped with a storage drawer, remove the storage drawer. Push range back into position. When the oven control is plugged in oven. 2. The flame should be seen by removing the warming drawer. Check that the circuit breaker has not tripped or the ...
...3 prong outlet. See "Storage Drawer" section. Place level on burner bases. Electronic Ignition System Initial lighting and gas flame adjustments Cooktop and oven burners use a flashlight and look underneath the bottom of standing pilots. Repeat start-up or down until rear leveling leg is lit, it...back into position. On Ranges Equipped with a storage drawer, remove the storage drawer. Push range back into position. When the oven control is plugged in oven. 2. The flame should be seen by removing the warming drawer. Check that the circuit breaker has not tripped or the ...
Installation Guide
Page 10
... and rotate the air shutter until the front of the panel is located directly underneath the control knob. Screws B 3. Push the BAKE pad. 5. The oven bake burner should have a ½" (1.3 cm) long inner cone of bluish-green, with a warming drawer, remove access cover plate (1 screw) located... at the rear of the oven bottom. Electronic igniters are used to lowest setting. 2. To adjust standard burner: The flame can check the burner flame by removing the flame spreader or...
... and rotate the air shutter until the front of the panel is located directly underneath the control knob. Screws B 3. Push the BAKE pad. 5. The oven bake burner should have a ½" (1.3 cm) long inner cone of bluish-green, with a warming drawer, remove access cover plate (1 screw) located... at the rear of the oven bottom. Electronic igniters are used to lowest setting. 2. To adjust standard burner: The flame can check the burner flame by removing the flame spreader or...


