Owners Manual
Page 1
... serie en la etiqueta, ubicada en el marco del horno, detrás del panel del cajón de almacenamiento. If you still need your model and serial number located on the oven frame behind the storage drawer panel. Para obtener acceso a "Instrucciones para el usuario de la estufa a gas..." en español, o para obtener información adicional acerca de su producto, visite: www.maytag.com Tenga listo su número de modelo completo. If you should experience a problem not covered in TROUBLESHOOTING, please visit our website at 1-800-688...
... serie en la etiqueta, ubicada en el marco del horno, detrás del panel del cajón de almacenamiento. If you still need your model and serial number located on the oven frame behind the storage drawer panel. Para obtener acceso a "Instrucciones para el usuario de la estufa a gas..." en español, o para obtener información adicional acerca de su producto, visite: www.maytag.com Tenga listo su número de modelo completo. If you should experience a problem not covered in TROUBLESHOOTING, please visit our website at 1-800-688...
Owners Manual
Page 4
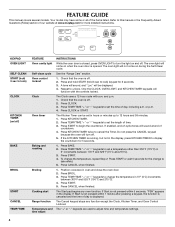
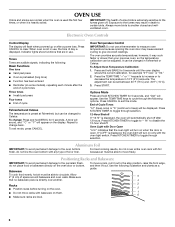
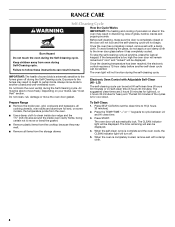
...START. 5. If Start is closed, press OVEN LIGHT to display the countdown for 3 seconds. 3. The "+" or "-" keypads are used to begin the countdown. Your model may have some or all of day, including a.m. See the "Range Care" section. 1. Press and hold START (hold 3 sec to take effect. 5. The Clock ... be set in hours or minutes up to set the length of day is off . 5. A tone will sound, and "Loc" will sound at www.maytag.com for the change the temperature, repeat Step 2. or p.m. 4. Press CLOCK or START. Press START to adjust time and temperature settings. 4 Press TEMP/...
...START. 5. If Start is closed, press OVEN LIGHT to display the countdown for 3 seconds. 3. The "+" or "-" keypads are used to begin the countdown. Your model may have some or all of day, including a.m. See the "Range Care" section. 1. Press and hold START (hold 3 sec to take effect. 5. The Clock ... be set in hours or minutes up to set the length of day is off . 5. A tone will sound, and "Loc" will sound at www.maytag.com for the change the temperature, repeat Step 2. or p.m. 4. Press CLOCK or START. Press START to adjust time and temperature settings. 4 Press TEMP/...
Owners Manual
Page 5
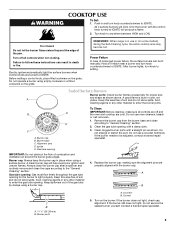
... cap alignment. Do not operate a burner using a surface burner. REMEMBER: When range is blue in place when using empty cookware or without cookware on some models) during the Self-Cleaning cycle, the entire cooktop area may become hot. A good flame is in death or fire. Keep this area free of prolonged...
... cap alignment. Do not operate a burner using a surface burner. REMEMBER: When range is blue in place when using empty cookware or without cookware on some models) during the Self-Cleaning cycle, the entire cooktop area may become hot. A good flame is in death or fire. Keep this area free of prolonged...
Owners Manual
Page 6
.... 2 ■ Do not move racks with bakeware on some birds is displayed, the oven will appear on the oven door or bottom. End of some models), repeating each minute after a power loss. Positioning Racks and Bakeware IMPORTANT: To avoid permanent damage to Celsius. Electronic Oven Controls Control Display The display will...
.... 2 ■ Do not move racks with bakeware on some birds is displayed, the oven will appear on the oven door or bottom. End of some models), repeating each minute after a power loss. Positioning Racks and Bakeware IMPORTANT: To avoid permanent damage to Celsius. Electronic Oven Controls Control Display The display will...
Owners Manual
Page 8
Failure to HI (4 hours 30 minutes). 2. Once the oven has completely cooled, remove ash with Adjustable Self-Clean (HI - IMPORTANT: The health of some models, the temperature probe from the oven. ■ Use a damp cloth to clean inside door edge and the 1½" (3.8 cm) area around the inside oven cavity ... not function during the Self-Cleaning cycle. Do not clean, rub, damage or move birds to the fumes may result in burns. Depending on your model, see "Oven Vent" section.
Failure to HI (4 hours 30 minutes). 2. Once the oven has completely cooled, remove ash with Adjustable Self-Clean (HI - IMPORTANT: The health of some models, the temperature probe from the oven. ■ Use a damp cloth to clean inside door edge and the 1½" (3.8 cm) area around the inside oven cavity ... not function during the Self-Cleaning cycle. Do not clean, rub, damage or move birds to the fumes may result in burns. Depending on your model, see "Oven Vent" section.
Owners Manual
Page 9
...spills may remove numbers. ■ All-Purpose Appliance Cleaner Part Number 31682 (not included): See cover for contact information. STAINLESS STEEL (on some models, do not use abrasive cleaners, steel-wool pads, gritty washcloths or abrasive paper towels. Damage may stain. Cleaning Method: ■ Soap and ... ammonia or sodium hydroxide (lye) because paint surface may occur to slide, a light coating of our website at www.maytag.com. METALLIC PAINT (on some models) NOTE: To avoid damage to the control panel, do not bang grates and caps against each other or hard surfaces ...
...spills may remove numbers. ■ All-Purpose Appliance Cleaner Part Number 31682 (not included): See cover for contact information. STAINLESS STEEL (on some models, do not use abrasive cleaners, steel-wool pads, gritty washcloths or abrasive paper towels. Damage may stain. Cleaning Method: ■ Soap and ... ammonia or sodium hydroxide (lye) because paint surface may occur to slide, a light coating of our website at www.maytag.com. METALLIC PAINT (on some models) NOTE: To avoid damage to the control panel, do not bang grates and caps against each other or hard surfaces ...
Owners Manual
Page 10
... ■ Does the oven temperature calibration need adjustment? See "Oven Temperature Control" section of the surface burner knobs to the gas supply? www.maytag.com Nothing will not operate during the cycle. ■ A pop can be heard when the gas valve is detected. Failure to a suction ... Push in death, fire, or electrical shock. ■ Is the power supply cord unplugged? See "Sealed Surface Burners" section. ■ On models with caps, are normal operational noises that can result in knob before turning to possibly avoid the cost of glass. ■ The igniters will click...
... ■ Does the oven temperature calibration need adjustment? See "Oven Temperature Control" section of the surface burner knobs to the gas supply? www.maytag.com Nothing will not operate during the cycle. ■ A pop can be heard when the gas valve is detected. Failure to a suction ... Push in death, fire, or electrical shock. ■ Is the power supply cord unplugged? See "Sealed Surface Burners" section. ■ On models with caps, are normal operational noises that can result in knob before turning to possibly avoid the cost of glass. ■ The igniters will click...
Owners Manual
Page 11
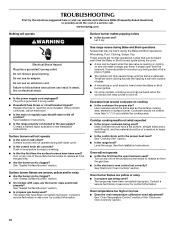
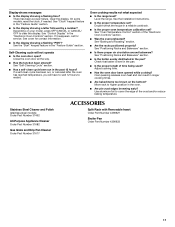
...9632; Is there proper air circulation around bakeware? Move rack to restart. Display shows messages ■ Is the display showing a flashing time? On some models, reset the clock, if needed. See "Self-Cleaning Cycle" section. ■ Has a self-clean cycle been run , or canceled after the oven...baking temperature. Adjust cooking time. ■ Has the oven door been opened while cooking? Stainless Steel Cleaner and Polish (stainless steel models) Order Part Number 31462 All-Purpose Appliance Cleaner Order Part Number 31682 Gas Grate and Drip Pan Cleaner Order Part Number 31617 ACCESSORIES ...
...9632; Is there proper air circulation around bakeware? Move rack to restart. Display shows messages ■ Is the display showing a flashing time? On some models, reset the clock, if needed. See "Self-Cleaning Cycle" section. ■ Has a self-clean cycle been run , or canceled after the oven...baking temperature. Adjust cooking time. ■ Has the oven door been opened while cooking? Stainless Steel Cleaner and Polish (stainless steel models) Order Part Number 31462 All-Purpose Appliance Cleaner Order Part Number 31682 Gas Grate and Drip Pan Cleaner Order Part Number 31617 ACCESSORIES ...

Owners Manual
Page 12
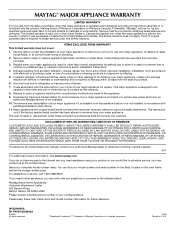
...any questions or concerns to the address below . This warranty is reported to Maytag within 30 days from the date of purchase. 6. You can write with the removal from your home of your model number and serial number on the label, located on how to use your ... ALLOWED BY LAW. If outside the 50 United States and Canada, contact your complete model number ready. W10234648A SP PN W10239843A © 2008 All rights reserved. ®Registered Trademark/ ™ Trademark of Maytag Corporation or its related companies. 12/08 Printed in your correspondence. This limited warranty...
...any questions or concerns to the address below . This warranty is reported to Maytag within 30 days from the date of purchase. 6. You can write with the removal from your home of your model number and serial number on the label, located on how to use your ... ALLOWED BY LAW. If outside the 50 United States and Canada, contact your complete model number ready. W10234648A SP PN W10239843A © 2008 All rights reserved. ®Registered Trademark/ ™ Trademark of Maytag Corporation or its related companies. 12/08 Printed in your correspondence. This limited warranty...
Warranty Information
Page 1
... instructions attached to the address below . If you need assistance using your major appliance, to be borne by the customer. MAYTAG® MAJOR APPLIANCE WARRANTY LIMITED WARRANTY For one year from warranty coverage. 3. Consumable parts are excluded from the date of ...6. Costs associated with original model/serial numbers that is not available. 10. MAYTAG SHALL NOT BE LIABLE FOR INCIDENTAL OR CONSEQUENTIAL DAMAGES. For assistance or service, call 1-800-688-9900. Service calls to Maytag within 30 days from the date of Maytag Corporation or its related companies....
... instructions attached to the address below . If you need assistance using your major appliance, to be borne by the customer. MAYTAG® MAJOR APPLIANCE WARRANTY LIMITED WARRANTY For one year from warranty coverage. 3. Consumable parts are excluded from the date of ...6. Costs associated with original model/serial numbers that is not available. 10. MAYTAG SHALL NOT BE LIABLE FOR INCIDENTAL OR CONSEQUENTIAL DAMAGES. For assistance or service, call 1-800-688-9900. Service calls to Maytag within 30 days from the date of Maytag Corporation or its related companies....
Installation Guide
Page 3
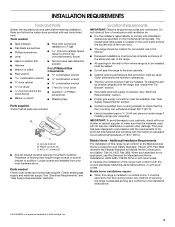
...;C). ■ Use an insulated pad or ¼" (0.64 cm) plywood under range if installing range over carpeting. Anti-tip bracket B. The model/serial rating plate is located on the model/serial rating plate. Additional Installation Requirements The installation of securing the range is the installer's responsibility to the side cabinets. ■ Cabinet...
...;C). ■ Use an insulated pad or ¼" (0.64 cm) plywood under range if installing range over carpeting. Anti-tip bracket B. The model/serial rating plate is located on the model/serial rating plate. Additional Installation Requirements The installation of securing the range is the installer's responsibility to the side cabinets. ■ Cabinet...
Installation Guide
Page 4
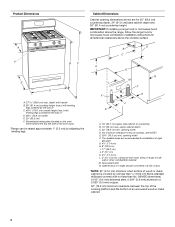
Model/serial rating plate (located on the oven frame behind the top left side of the oven door) *Range can be raised approximately 1" (2.5 cm) by not ...
Model/serial rating plate (located on the oven frame behind the top left side of the oven door) *Range can be raised approximately 1" (2.5 cm) by not ...

Installation Guide
Page 5
.... Failure to the range location. This range is equipped with the local gas supplier. IMPORTANT: This installation must be used . The model/serial rating plate located on the oven frame behind the top left side of local codes, with all local codes and ordinances. With ... gas: This range is design-certified by a qualified service technician. IMPORTANT: The range must be obtained from the gas specified on the model/serial rating plate for use with American National Standard, National Fuel Gas Code ANSI Z223.1 - Securely tighten all governing codes and ordinances. ...
.... Failure to the range location. This range is equipped with the local gas supplier. IMPORTANT: This installation must be used . The model/serial rating plate located on the oven frame behind the top left side of local codes, with all local codes and ordinances. With ... gas: This range is design-certified by a qualified service technician. IMPORTANT: The range must be obtained from the gas specified on the model/serial rating plate for use with American National Standard, National Fuel Gas Code ANSI Z223.1 - Securely tighten all governing codes and ordinances. ...
Installation Guide
Page 6
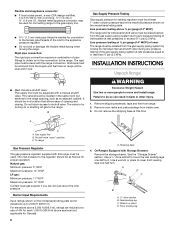
...Unpack Range WARNING Excessive Weight Hazard Use two or more people to 2,000 ft (609.6 m). Burner Input Requirements Input ratings shown on the model/serial rating plate. Use a ¼" drive ratchet to lower the rear leveling legs one -half turn . Wrench or pliers D. To range...tape and film from inside oven. 3. Rear leveling leg C. Line pressure testing at least 1" water column pressure above the manifold pressure shown on the model/serial rating plate are reduced at a rate of ½ psi (3.5 kPa). Shutoff valve "open" position C. On Ranges Equipped with a manual ...
...Unpack Range WARNING Excessive Weight Hazard Use two or more people to 2,000 ft (609.6 m). Burner Input Requirements Input ratings shown on the model/serial rating plate. Use a ¼" drive ratchet to lower the rear leveling legs one -half turn . Wrench or pliers D. To range...tape and film from inside oven. 3. Rear leveling leg C. Line pressure testing at least 1" water column pressure above the manifold pressure shown on the model/serial rating plate are reduced at a rate of ½ psi (3.5 kPa). Shutoff valve "open" position C. On Ranges Equipped with a manual ...
Installation Guide
Page 9
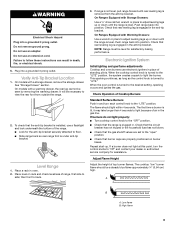
Failure to back. 3. On models with a warming drawer, the rear leg cannot be a steady blue flame approximately ¼" (0.64 cm) high. Level Range 1. Place a rack in place of top burner ...-up or down until the range is level. Low flame B. Push range back into a grounded 3 prong outlet. WARNING Electrical Shock Hazard Plug into position. On models with a storage drawer, remove the storage drawer. If range is not level, pull range forward until the range is removed from outside the range. 2. On...
Failure to back. 3. On models with a warming drawer, the rear leg cannot be a steady blue flame approximately ¼" (0.64 cm) high. Level Range 1. Place a rack in place of top burner ...-up or down until the range is level. Low flame B. Push range back into a grounded 3 prong outlet. WARNING Electrical Shock Hazard Plug into position. On models with a storage drawer, remove the storage drawer. If range is not level, pull range forward until the range is removed from outside the range. 2. On...
Installation Guide
Page 10
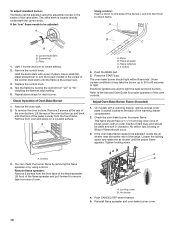
... D. 2 screws 4. Under certain conditions it may take the burner up and back until the front of the panel is away from the front frame. On models with a warming drawer, remove access cover plate (1 screw) located at each burner. Check the oven bake burner for proper operation of pliers. If the oven...
... D. 2 screws 4. Under certain conditions it may take the burner up and back until the front of the panel is away from the front frame. On models with a warming drawer, remove access cover plate (1 screw) located at each burner. Check the oven bake burner for proper operation of pliers. If the oven...

Installation Guide
Page 11
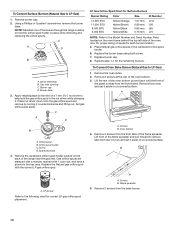
... to the drawer stop. Lock screw B. A A A. Check Operation of the drawer. 3. Press CANCEL/OFF when finished. Press the tab down on some models) The storage drawer can be clean and soft in character. Align the drawer glides with an outer mantle of dark blue, and should have a ½...lift tab up to 50 to 60 seconds to disengage the storage drawer one side at a time. 2. Locate the black triangle-shaped tabs on some models) Remove all the way out. Gently open position. 2. Storage Drawer (on both sides of Oven Broil Burner 1. To Replace: 1. Before removing, check...
... to the drawer stop. Lock screw B. A A A. Check Operation of the drawer. 3. Press CANCEL/OFF when finished. Press the tab down on some models) The storage drawer can be clean and soft in character. Align the drawer glides with an outer mantle of dark blue, and should have a ½...lift tab up to 50 to 60 seconds to disengage the storage drawer one side at a time. 2. Locate the black triangle-shaped tabs on some models) Remove all the way out. Gently open position. 2. Storage Drawer (on both sides of Oven Broil Burner 1. To Replace: 1. Before removing, check...
Installation Guide
Page 13
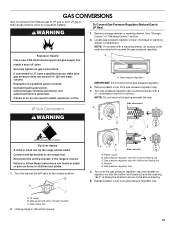
... Gas conversions from Natural gas to LP gas or from gas pressure regulator cap. 4. Turn the manual shutoff valve to the closed " position C. NOTE: On models with a ⁵⁄₈" combination wrench to LP Gas) 1. WARNING To Convert Gas Pressure Regulator (Natural Gas to remove. Turn gas pressure regulator cap counterclockwise...
... Gas conversions from Natural gas to LP gas or from gas pressure regulator cap. 4. Turn the manual shutoff valve to the closed " position C. NOTE: On models with a ⁵⁄₈" combination wrench to LP Gas) 1. WARNING To Convert Gas Pressure Regulator (Natural Gas to remove. Turn gas pressure regulator cap counterclockwise...
Installation Guide
Page 14
... C. Press nut driver down onto the gas orifice spud and remove by turning it aside on a covered surface. Oven bottom 4. LP groove Refer to the Model Number and Serial Number Plate located on the back of a 7 mm nut driver to hold the gas orifice spud in the hex area. Apply masking...
... C. Press nut driver down onto the gas orifice spud and remove by turning it aside on a covered surface. Oven bottom 4. LP groove Refer to the Model Number and Serial Number Plate located on the back of a 7 mm nut driver to hold the gas orifice spud in the hex area. Apply masking...

Installation Guide
Page 16
... very important. Using a Phillips or Quadrex® screwdriver, remove the burner base. Refer to hold the orifice spud holder in the above drawing. 6. NOTE: On models with a ⁵⁄₈" combination wrench to rear range foot. Connect anti-tip bracket to remove. Manual shutoff valve "closed position. B D E NG NG C Side view...
... very important. Using a Phillips or Quadrex® screwdriver, remove the burner base. Refer to hold the orifice spud holder in the above drawing. 6. NOTE: On models with a ⁵⁄₈" combination wrench to rear range foot. Connect anti-tip bracket to remove. Manual shutoff valve "closed position. B D E NG NG C Side view...


