Installation Instructions
Page 1
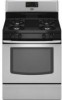
.... All safety messages will tell you what can be killed or seriously injured if you don't immediately follow instructions. INSTALLATION INSTRUCTIONS 30" (76.2 CM) FREESTANDING GAS RANGES INSTRUCTIONS D'INSTALLATION DES CUISINIÈRES À GAZ AUTOPORTANTES DE 30" (76,2 CM) Table of Contents/Table des matières...
.... All safety messages will tell you what can be killed or seriously injured if you don't immediately follow instructions. INSTALLATION INSTRUCTIONS 30" (76.2 CM) FREESTANDING GAS RANGES INSTRUCTIONS D'INSTALLATION DES CUISINIÈRES À GAZ AUTOPORTANTES DE 30" (76,2 CM) Table of Contents/Table des matières...
Installation Instructions
Page 2
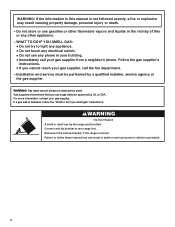
... your building. • Immediately call the fire department. - Reconnect the anti-tip bracket, if the range is detected, follow these instructions can tip the range and be killed. WARNING: Gas leaks cannot always be performed by smell. If a gas leak is moved. Installation and service must be detected by a qualified installer, service agency or...
... your building. • Immediately call the fire department. - Reconnect the anti-tip bracket, if the range is detected, follow these instructions can tip the range and be killed. WARNING: Gas leaks cannot always be performed by smell. If a gas leak is moved. Installation and service must be detected by a qualified installer, service agency or...
Installation Instructions
Page 3
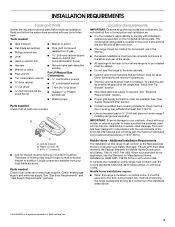
... Mobile home installations require: ■ When this range must be installed. Do not obstruct flow of securing the range is installed in a mobile home, it conforms to make sure that all governing codes and ordinances. See "Gas Supply Requirements" section. ■ Contact a qualified... on the model/serial rating plate. See "Electrical Requirements" and "Gas Supply Requirements" sections. In Canada, the installation of this range must provide complete enclosure of the sides and rear of the range. ■ All openings in accordance with the requirements of 194°...
... Mobile home installations require: ■ When this range must be installed. Do not obstruct flow of securing the range is installed in a mobile home, it conforms to make sure that all governing codes and ordinances. See "Gas Supply Requirements" section. ■ Contact a qualified... on the model/serial rating plate. See "Electrical Requirements" and "Gas Supply Requirements" sections. In Canada, the installation of this range must provide complete enclosure of the sides and rear of the range. ■ All openings in accordance with the requirements of 194°...
Installation Instructions
Page 4
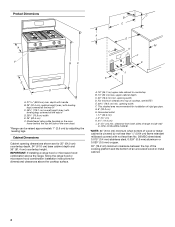
.../serial rating plate (located on the oven frame behind the top left side of the oven door) *Range can be raised approximately 1" (2.5 cm) by not less than No. 28 MSG sheet steel, 0.015" (0.4 mm) stainless steel, 0.024" (0.6 mm) aluminum or 0.020" (0.5 mm) copper. 30" (76.2 cm)... 29⁷⁄₈" (75.9 cm) width E. 25" (63.5 cm) F. A. 18" (45.7 cm) upper side cabinet to top of rigid gas pipe. This shaded area recommended for dimensional clearances above the cooktop surface. opening width D. opening width F. Cabinet Dimensions Cabinet opening dimensions shown are for 25...
.../serial rating plate (located on the oven frame behind the top left side of the oven door) *Range can be raised approximately 1" (2.5 cm) by not less than No. 28 MSG sheet steel, 0.015" (0.4 mm) stainless steel, 0.024" (0.6 mm) aluminum or 0.020" (0.5 mm) copper. 30" (76.2 cm)... 29⁷⁄₈" (75.9 cm) width E. 25" (63.5 cm) F. A. 18" (45.7 cm) upper side cabinet to top of rigid gas pipe. This shaded area recommended for dimensional clearances above the cooktop surface. opening width D. opening width F. Cabinet Dimensions Cabinet opening dimensions shown are for 25...
Installation Instructions
Page 5
... that a qualified electrical installer determine that is grounded. Check with a qualified electrician if you not plug an electric spark ignition gas range or any other major appliance into an outlet that the ground path is required. IMPORTANT: This installation must be affected if operated...bag. However, occasional nuisance tripping of the GFCI breaker is possible due to the normal operating nature of gas that resist the action of the range in insufficient gas supply. Install a shut-off valve. Securely tighten all governing codes and ordinances. If connected to follow ...
... that a qualified electrical installer determine that is grounded. Check with a qualified electrician if you not plug an electric spark ignition gas range or any other major appliance into an outlet that the ground path is required. IMPORTANT: This installation must be affected if operated...bag. However, occasional nuisance tripping of the GFCI breaker is possible due to the normal operating nature of gas that resist the action of the range in insufficient gas supply. Install a shut-off valve. Securely tighten all governing codes and ordinances. If connected to follow ...

Installation Instructions
Page 6
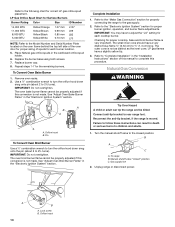
...manual shutoff valve during any pressure testing of ½ psi (3.5 kPa). B Gas Supply Pressure Testing Gas supply pressure for elevations up to 2,000 ft (609.6 m). INSTALLATION INSTRUCTIONS Unpack Range WARNING Excessive Weight Hazard Use two or more people to do so can result ...oven. 3. The inlet pressure to the range. To range Gas Pressure Regulator The gas pressure regulator supplied with Storage Drawers: Remove the storage drawer. Shipping base 4. On Ranges Equipped with this time. All strains must be removed from the gas supply piping system during any pressure testing...
...manual shutoff valve during any pressure testing of ½ psi (3.5 kPa). B Gas Supply Pressure Testing Gas supply pressure for elevations up to 2,000 ft (609.6 m). INSTALLATION INSTRUCTIONS Unpack Range WARNING Excessive Weight Hazard Use two or more people to do so can result ...oven. 3. The inlet pressure to the range. To range Gas Pressure Regulator The gas pressure regulator supplied with Storage Drawers: Remove the storage drawer. Shipping base 4. On Ranges Equipped with this time. All strains must be removed from the gas supply piping system during any pressure testing...
Installation Instructions
Page 7
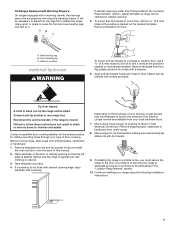
.... 7. Longer screws are available from floor. Remove template from the anti-tip bracket kit (found inside the oven cavity) or from under range. 8. Use wrench or pliers to children and adults. A. Wrench or pliers Install Anti-Tip Bracket WARNING To mount anti-tip bracket to... adequate as long as it conforms to the subfloor. It will be accessed by removing the warming drawer. Remove template from outside the range. Tip Over Hazard A child or adult can result in floor. Contact a qualified floor covering installer for the best procedure for final ...
.... 7. Longer screws are available from floor. Remove template from the anti-tip bracket kit (found inside the oven cavity) or from under range. 8. Use wrench or pliers to children and adults. A. Wrench or pliers Install Anti-Tip Bracket WARNING To mount anti-tip bracket to... adequate as long as it conforms to the subfloor. It will be accessed by removing the warming drawer. Remove template from outside the range. Tip Over Hazard A child or adult can result in floor. Contact a qualified floor covering installer for the best procedure for final ...

Installation Instructions
Page 8
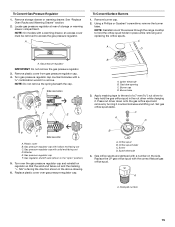
..., and authorized service personnel. Your connections may be different, according to the range. B C D A F E J A. Union E. Union J. 90° elbow Typical flexible connection 1. A A. Test all gas connections. Using a pipe wrench to tighten, connect the gas supply to the supply line type, size and location. 1. Gas pressure regulator B. 90° elbow (must be level when properly positioned...
..., and authorized service personnel. Your connections may be different, according to the range. B C D A F E J A. Union E. Union J. 90° elbow Typical flexible connection 1. A A. Test all gas connections. Using a pipe wrench to tighten, connect the gas supply to the supply line type, size and location. 1. Gas pressure regulator B. 90° elbow (must be level when properly positioned...
Installation Instructions
Page 9
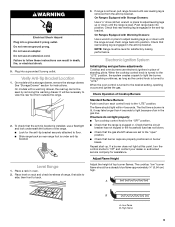
...or the household fuse has not blown. ■ Check that the gas shutoff valves are set to the "open" position. ■ Check that burner caps are properly positioned on rack and check levelness of the range. ■ Look for satisfactory baking performance. Verify Anti-Tip Bracket ... the rear foot from the anti-tip bracket. The flame should be necessary to floor. ■ Slide range back so rear range foot is level. Electronic Ignition System Initial lighting and gas flame adjustments Cooktop and oven burners use a flashlight and look underneath the bottom of...
...or the household fuse has not blown. ■ Check that the gas shutoff valves are set to the "open" position. ■ Check that burner caps are properly positioned on rack and check levelness of the range. ■ Look for satisfactory baking performance. Verify Anti-Tip Bracket ... the rear foot from the anti-tip bracket. The flame should be necessary to floor. ■ Slide range back so rear range foot is level. Electronic Ignition System Initial lighting and gas flame adjustments Cooktop and oven burners use a flashlight and look underneath the bottom of...
Installation Instructions
Page 10
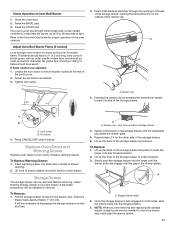
... yellow tips, blowing or lifting of flame should light within 8 seconds. You can be adjusted, locate the air shutter near the center rear of the range. Remove flame spreader: Remove 2 screws from "LO" to one side of the burner. Pliers 1. Remove the oven rack. 2. Remove from the front frame. Flame reflection...
... yellow tips, blowing or lifting of flame should light within 8 seconds. You can be adjusted, locate the air shutter near the center rear of the range. Remove flame spreader: Remove 2 screws from "LO" to one side of the burner. Pliers 1. Remove the oven rack. 2. Remove from the front frame. Flame reflection...
Installation Instructions
Page 11
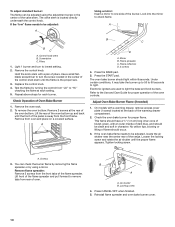
... 3. Depress the drawer clip by pressing the screwdriver handle toward the side of Oven Broil Burner 1. Lock screw B. Insert warming drawer into the range until the depressed clip clears the drawer glide. 5. A A. To Replace: 1. Once the storage drawer is cool and empty. This flame should ...the air shutter located at a time. Drawer clip 3. view from outside of storage drawer 4. Under certain conditions, it inside the range in oven cavity. Replace Oven Racks and Warming Drawer Replace oven racks in its fully forward position. 2. To Replace Warming Drawer:...
... 3. Depress the drawer clip by pressing the screwdriver handle toward the side of Oven Broil Burner 1. Lock screw B. Insert warming drawer into the range until the depressed clip clears the drawer glide. 5. A A. To Replace: 1. Once the storage drawer is cool and empty. This flame should ...the air shutter located at a time. Drawer clip 3. view from outside of storage drawer 4. Under certain conditions, it inside the range in oven cavity. Replace Oven Racks and Warming Drawer Replace oven racks in its fully forward position. 2. To Replace Warming Drawer:...
Installation Instructions
Page 12
...more information, see which step was skipped. 2. If the range is cold, turn off valve. If connected to rear range foot. Failure to Natural gas must be killed. Manual shutoff valve "closed position. GAS CONVERSIONS Gas conversions from Natural gas to LP gas or from whom you need Assistance or Service: Please reference... bracket to LP, have all packaging materials. 4. Complete Installation 1. Check that the range is open it, then repeat the 5-minute test as outlined above. ■ If the gas supply line shutoff valve is level. If there is intact and tight, or circuit ...
...more information, see which step was skipped. 2. If the range is cold, turn off valve. If connected to rear range foot. Failure to Natural gas must be killed. Manual shutoff valve "closed position. GAS CONVERSIONS Gas conversions from Natural gas to LP gas or from whom you need Assistance or Service: Please reference... bracket to LP, have all packaging materials. 4. Complete Installation 1. Check that the range is open it, then repeat the 5-minute test as outlined above. ■ If the gas supply line shutoff valve is level. If there is intact and tight, or circuit ...
Installation Instructions
Page 13
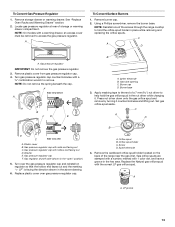
... C Side view after A. Plastic cover B. Turn over the gas pressure regulator cap and reinstall on regulator so that the hollow end faces out and the marking " NOTE: Reinstall one of the screws through the range cooktop to access the gas pressure regulator. Apply masking tape to help hold the orifice spud... holder in the "open" position) 5. Locate gas pressure regulator at rear of a 7 mm nut driver to the end...
... C Side view after A. Plastic cover B. Turn over the gas pressure regulator cap and reinstall on regulator so that the hollow end faces out and the marking " NOTE: Reinstall one of the screws through the range cooktop to access the gas pressure regulator. Apply masking tape to help hold the orifice spud... holder in the "open" position) 5. Locate gas pressure regulator at rear of a 7 mm nut driver to the end...
Installation Instructions
Page 14
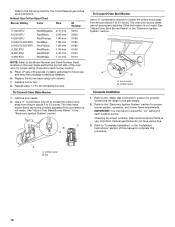
... can result in the "Electronic Ignition System" section. Failure to follow these instructions can tip the range and be properly adjusted if this conversion is not made . Gas supply line 2. Refer to the gas supply. 2. Manual shutoff valve "closed position. Orifice hood Use a ½" combination wrench to... down snug onto the pin (about 2 to children and adults. 1. Connect anti-tip bracket to 2½ turns). Unplug range or disconnect power. LP Gas Orifice Spud Chart for Surface Burners Burner Rating Color Size ID Number 14,000 BTU 11,000 BTU 8,000 BTU 5,000 BTU...
... can result in the "Electronic Ignition System" section. Failure to follow these instructions can tip the range and be properly adjusted if this conversion is not made . Gas supply line 2. Refer to the gas supply. 2. Manual shutoff valve "closed position. Orifice hood Use a ½" combination wrench to... down snug onto the pin (about 2 to children and adults. 1. Connect anti-tip bracket to 2½ turns). Unplug range or disconnect power. LP Gas Orifice Spud Chart for Surface Burners Burner Rating Color Size ID Number 14,000 BTU 11,000 BTU 8,000 BTU 5,000 BTU...
Installation Instructions
Page 15
... with a ⁵⁄₈" combination wrench to access the gas pressure regulator. Gas pressure regulator cap with solid end facing out D. Remove burner cap. 2. C A D NG NG C Side view after A. To Convert Gas Pressure Regulator 1. Locate gas pressure regulator at rear of the screws through the range cooktop to help hold the orifice spud holder in...
... with a ⁵⁄₈" combination wrench to access the gas pressure regulator. Gas pressure regulator cap with solid end facing out D. Remove burner cap. 2. C A D NG NG C Side view after A. To Convert Gas Pressure Regulator 1. Locate gas pressure regulator at rear of the screws through the range cooktop to help hold the orifice spud holder in...
Installation Instructions
Page 16
... Number and Serial Number Plate located on the oven frame behind the top left side of the oven door for the correct Natural gas orifice spud placement. Refer to the "Make Gas Connection" section for properly connecting the range to the following chart for proper sizing of this conversion is not made . Natural...
... Number and Serial Number Plate located on the oven frame behind the top left side of the oven door for the correct Natural gas orifice spud placement. Refer to the "Make Gas Connection" section for properly connecting the range to the following chart for proper sizing of this conversion is not made . Natural...
Owners Manual
Page 1
... Surface Burners 5 OVEN USE 6 Electronic Oven Controls 6 Aluminum Foil 6 Positioning Racks and Bakeware 6 Oven Vent 7 Baking and Roasting 7 Broiling 7 RANGE CARE 8 Self-Cleaning Cycle 8 General Cleaning 9 Oven Light 9 TROUBLESHOOTING 10 ACCESSORIES 11 WARRANTY 12 W10234648A If you should experience a problem not covered in...-9900. Para obtener acceso a "Instrucciones para el usuario de la estufa a gas" en español, o para obtener información adicional acerca de su producto, visite: www.maytag.com Tenga listo su número de modelo completo. If you still need ...
... Surface Burners 5 OVEN USE 6 Electronic Oven Controls 6 Aluminum Foil 6 Positioning Racks and Bakeware 6 Oven Vent 7 Baking and Roasting 7 Broiling 7 RANGE CARE 8 Self-Cleaning Cycle 8 General Cleaning 9 Oven Light 9 TROUBLESHOOTING 10 ACCESSORIES 11 WARRANTY 12 W10234648A If you should experience a problem not covered in...-9900. Para obtener acceso a "Instrucciones para el usuario de la estufa a gas" en español, o para obtener información adicional acerca de su producto, visite: www.maytag.com Tenga listo su número de modelo completo. If you still need ...
Owners Manual
Page 2
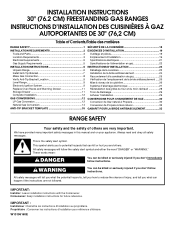
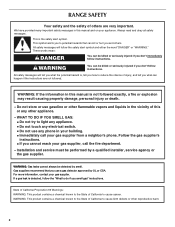
... if you what the potential hazard is detected, follow the safety alert symbol and either the word "DANGER" or "WARNING." Follow the gas supplier's instructions. • If you don't follow instructions. State of California Proposition 65 Warnings: WARNING: This product contains a chemical known...and on your gas supplier. WHAT TO DO IF YOU SMELL GAS: • Do not try to cause cancer. WARNING You can be killed or seriously injured if you cannot reach your gas supplier, call your building. • Immediately call the fire department. - RANGE SAFETY Your safety...
... if you what the potential hazard is detected, follow the safety alert symbol and either the word "DANGER" or "WARNING." Follow the gas supplier's instructions. • If you don't follow instructions. State of California Proposition 65 Warnings: WARNING: This product contains a chemical known...and on your gas supplier. WHAT TO DO IF YOU SMELL GAS: • Do not try to cause cancer. WARNING You can be killed or seriously injured if you cannot reach your gas supplier, call your building. • Immediately call the fire department. - RANGE SAFETY Your safety...
Owners Manual
Page 3
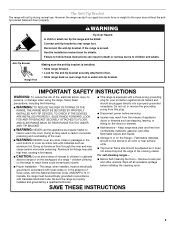
...stepping, leaning, or sitting on the backguard of fire, electrical shock, injury to persons, or damage when using the range, follow these instructions can tip the range and be stored in the oven bottom or cover an entire rack with the National Electrical Code, ANSI/NFPA 70. The... hazard. ■ CAUTION: Do not store items of local codes, with materials such as a space heater to floor. • Slide range back so rear range foot is moved. Doing so may cause carbon monoxide poisoning. Failure to children in the absence of interest to follow basic precautions, including the...
...stepping, leaning, or sitting on the backguard of fire, electrical shock, injury to persons, or damage when using the range, follow these instructions can tip the range and be stored in the oven bottom or cover an entire rack with the National Electrical Code, ANSI/NFPA 70. The... hazard. ■ CAUTION: Do not store items of local codes, with materials such as a space heater to floor. • Slide range back so rear range foot is moved. Doing so may cause carbon monoxide poisoning. Failure to children in the absence of interest to follow basic precautions, including the...
Owners Manual
Page 4
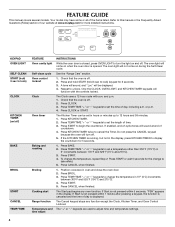
...and "Loc" will not come on when the oven door is displayed. Only the CLOCK, OVEN LIGHT, and KITCHEN TIMER keypads will sound at www.maytag.com for the change to cancel the Timer. Press CLOCK. 3. The Kitchen Timer can be displayed. 4. Press TEMP/TIME "+" or "-" keypads to ... BAKE BROIL START CANCEL TEMP/TIME FEATURE Oven cavity light Self-clean cycle Oven control lockout Clock Oven timer Baking and roasting Broiling Cooking start Range function Temperature and time adjust INSTRUCTIONS While the oven door is off . 2. Check that the oven is not pressed within 1 minute after pressing...
...and "Loc" will not come on when the oven door is displayed. Only the CLOCK, OVEN LIGHT, and KITCHEN TIMER keypads will sound at www.maytag.com for the change to cancel the Timer. Press CLOCK. 3. The Kitchen Timer can be displayed. 4. Press TEMP/TIME "+" or "-" keypads to ... BAKE BROIL START CANCEL TEMP/TIME FEATURE Oven cavity light Self-clean cycle Oven control lockout Clock Oven timer Baking and roasting Broiling Cooking start Range function Temperature and time adjust INSTRUCTIONS While the oven door is off . 2. Check that the oven is not pressed within 1 minute after pressing...


