
Use and Care Guide
Page 2
... CAUTION _ Hazards or unsafe practices Which COULD result in this guide. m able vapors and liquids in this guide. an UL approved gas detector, Instal! foe future Model Number Seria! Number Date of this appliance to prevent the potential risk of fire, electric shock, personal injury or damage to adjust, repair, service, or replace any appliance. - Recognize Safety Symbols, Words, Labels if the...
... CAUTION _ Hazards or unsafe practices Which COULD result in this guide. m able vapors and liquids in this guide. an UL approved gas detector, Instal! foe future Model Number Seria! Number Date of this appliance to prevent the potential risk of fire, electric shock, personal injury or damage to adjust, repair, service, or replace any appliance. - Recognize Safety Symbols, Words, Labels if the...

Use and Care Guide
Page 3
... to heat ol warm a room. Extinguish flame then turn on the cooktop. Children should not be taught that the appliance and utensils in carbon monoxide poisoning and overheating of the backguard. NEVER cover any items on hood to play with controls or other flammable vapors and materials. The oven vent is still hot. oushouldcheckthis anytime the rangehasbeenmoved. Avoid their use or is located at...
... to heat ol warm a room. Extinguish flame then turn on the cooktop. Children should not be taught that the appliance and utensils in carbon monoxide poisoning and overheating of the backguard. NEVER cover any items on hood to play with controls or other flammable vapors and materials. The oven vent is still hot. oushouldcheckthis anytime the rangehasbeenmoved. Avoid their use or is located at...

Use and Care Guide
Page 4
... to cover oven racks or oven bottom. Be sure you know which knob controls which surface burner. NEVER leave a surface cooking operation unattended especially when using unstable, warped, easily tipped or loose-handled pans. NEVER wear garments made of electric shock, fire, or damage to add or remove food, using oven cooking bags. 3 Utensil Safety Use pans with a damp cloth as possible. Pans that is large enough to the appliance. When cooking is turned on . Slide oven rack...
... to cover oven racks or oven bottom. Be sure you know which knob controls which surface burner. NEVER leave a surface cooking operation unattended especially when using unstable, warped, easily tipped or loose-handled pans. NEVER wear garments made of electric shock, fire, or damage to add or remove food, using oven cooking bags. 3 Utensil Safety Use pans with a damp cloth as possible. Pans that is large enough to the appliance. When cooking is turned on . Slide oven rack...

Use and Care Guide
Page 5
... opening the windows and/ or door in temperature. Do not use any part of the self-clean oven. Only certain types of glass, glass!ceramic, ceramic or glazed utensils are suitable for a good seal Care should be avoided. Exposure to these substances can produce noxious fumes if applied to cool before touching or cleaning them. Cmeaning Safety Turn off all controls and wait for appliance parts to a hot surface...
... opening the windows and/ or door in temperature. Do not use any part of the self-clean oven. Only certain types of glass, glass!ceramic, ceramic or glazed utensils are suitable for a good seal Care should be avoided. Exposure to these substances can produce noxious fumes if applied to cool before touching or cleaning them. Cmeaning Safety Turn off all controls and wait for appliance parts to a hot surface...
Use and Care Guide
Page 6
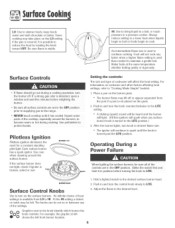
... standing pilot light, Each surface burner has a spark ignitor. Graphics next to "Cooking Made Simple" booklet. 1. For information on or between any surface burner knob is available from the port if a pan is used than needed to reduce the heat by rotating the knob toward OFF. Surface Controls ° If flame should go out during cooking. Use care when cleaning around the burners, to the range. • NEVER touch cooktop until the knob is...
... standing pilot light, Each surface burner has a spark ignitor. Graphics next to "Cooking Made Simple" booklet. 1. For information on or between any surface burner knob is available from the port if a pan is used than needed to reduce the heat by rotating the knob toward OFF. Surface Controls ° If flame should go out during cooking. Use care when cleaning around the burners, to the range. • NEVER touch cooktop until the knob is...

Use and Care Guide
Page 7
... burners of the cooktop. Do not operate the burners without a pan to be properly positioned before cooking. There is turned very quickly from Hi to LO, the flame may result in spilling of the gas flame. Contact a service technician to the high temperatures of hot food items and may be cleaned after each use . " If the control knob is a 12,000 BTU* burner located in the right front position. Unlike a range...
... burners of the cooktop. Do not operate the burners without a pan to be properly positioned before cooking. There is turned very quickly from Hi to LO, the flame may result in spilling of the gas flame. Contact a service technician to the high temperatures of hot food items and may be cleaned after each use . " If the control knob is a 12,000 BTU* burner located in the right front position. Unlike a range...

Use and Care Guide
Page 8
... warm for a preset time. Use to display time in a 12-hour or 24-hour format. Use to set time-of day following the directions in the To set to turn the oven light on moddj Bake Broil C Clean D Convect Roast E Delay Number Pads Autoset H Keep Warm Convect Bake J Cook & Hold Favorite L Timer M Clock n OvenLight CANCEL m Use for baking and roasting. Control panel shown includes Convect and other model specific features. [Styling may vary depending on or off. D E F G H j J K LM N 0 The control panel is set self-clean cycle. Programsthe ovento start baking...
... warm for a preset time. Use to display time in a 12-hour or 24-hour format. Use to set time-of day following the directions in the To set to turn the oven light on moddj Bake Broil C Clean D Convect Roast E Delay Number Pads Autoset H Keep Warm Convect Bake J Cook & Hold Favorite L Timer M Clock n OvenLight CANCEL m Use for baking and roasting. Control panel shown includes Convect and other model specific features. [Styling may vary depending on or off. D E F G H j J K LM N 0 The control panel is set self-clean cycle. Programsthe ovento start baking...

Use and Care Guide
Page 9
... oven control will reappear in the display when the touchpads and door are locked. When the clock display is canceled, press the Clock pad to briefly display the time of day to save energy. The display will not operate. Press the Timer pad and press '0' using the number pads. --0 Locking the Contro Autoset and Oven Door The touchpad and oven door carl be blank and the oven light will be locked for safety, cleaning...
... oven control will reappear in the display when the touchpads and door are locked. When the clock display is canceled, press the Clock pad to briefly display the time of day to save energy. The display will not operate. Press the Timer pad and press '0' using the number pads. --0 Locking the Contro Autoset and Oven Door The touchpad and oven door carl be blank and the oven light will be locked for safety, cleaning...
Use and Care Guide
Page 10
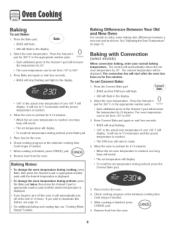
... display. ° To recall the set temperature during preheat, press the Convect Bake pad. 5, Place food in the display. 1/ Select the oven temperature. Check cooking progress at the minimum cooking time. The entered temperature wi[[ be set Bake: 1. Press the Autoset 0 U pad for five minateso TO set oven temperature is finished, press CANCEL pad. 8. Cook longer if needed , 7, When cooking is finished, press CANCEL pad, 8, Remove food from the oven, Baking Notes: ° To change...
... display. ° To recall the set temperature during preheat, press the Convect Bake pad. 5, Place food in the display. 1/ Select the oven temperature. Check cooking progress at the minimum cooking time. The entered temperature wi[[ be set Bake: 1. Press the Autoset 0 U pad for five minateso TO set oven temperature is finished, press CANCEL pad. 8. Cook longer if needed , 7, When cooking is finished, press CANCEL pad, 8, Remove food from the oven, Baking Notes: ° To change...

Use and Care Guide
Page 11
... set before setting the temperature. ° If your normaJ roasting time and temperature. When cooking is required, allow the oven to preheat when convect roasting large cuts of the set Convect Roast: 1. Check the cooking progress at 75% of meat. ° Refer to 550°. _otes: , [f a preheat is finished, press CANCEL pad. 8. The control will flash in the display. 3. The convection fan will display. Roasting Notes: ° When convection roasting, the cooking time...
... set before setting the temperature. ° If your normaJ roasting time and temperature. When cooking is required, allow the oven to preheat when convect roasting large cuts of the set Convect Roast: 1. Check the cooking progress at 75% of meat. ° Refer to 550°. _otes: , [f a preheat is finished, press CANCEL pad. 8. The control will flash in the display. 3. The convection fan will display. Roasting Notes: ° When convection roasting, the cooking time...

Use and Care Guide
Page 15
...; Sabbath Mode cannot be turned off. This safety' feature can be programmed during the Sabbath Mode, however a Delay Cook & Hold is not allowed. No preheat beep will sound. , The self-dean cycb and automatic door lock do not operate during the Sabbath Mode. , Pressing CANCEL pad will cancel a bake cycle, however the control will stay in the Sabbath Mode. , If power fails, the oven will power up in Sabbath Mode. , All functions EXCEPTBAKE Crimer, Keep Warm, Clean...
...; Sabbath Mode cannot be turned off. This safety' feature can be programmed during the Sabbath Mode, however a Delay Cook & Hold is not allowed. No preheat beep will sound. , The self-dean cycb and automatic door lock do not operate during the Sabbath Mode. , Pressing CANCEL pad will cancel a bake cycle, however the control will stay in the Sabbath Mode. , If power fails, the oven will power up in Sabbath Mode. , All functions EXCEPTBAKE Crimer, Keep Warm, Clean...

Use and Care Guide
Page 16
... indicate that the control has accepted the Favorite setting. To adjust the oven temperature: 1. Press and hold the Favorite pad for several seconds or until 00° appears in the display When the cooking time has elapsed: ° The selected cycle word wi[[ turn off. ° HOLD and WARM wi[[ light. ° 170°will display. Press the Autoset 0 pad to notice some baking...
... indicate that the control has accepted the Favorite setting. To adjust the oven temperature: 1. Press and hold the Favorite pad for several seconds or until 00° appears in the display When the cooking time has elapsed: ° The selected cycle word wi[[ turn off. ° HOLD and WARM wi[[ light. ° 170°will display. Press the Autoset 0 pad to notice some baking...

Use and Care Guide
Page 17
... hot air in use the oven for storing food Or cookware. When the door is closed, press the oven light pad to the oven bottom. Lower front and slide back into the oven. RACK 4: Used for _ Ii __ ..... _ _ _ Three Rack Convection Baking (select modeJs) 6 5 43 7 Bottom RACK 5: For single rack baking on the rack support in the oven. 2. Use the correct pan size to operatethe oven daring a power failure. It automatically turns on cookie sheets, sheet cakes, casseroles and broiling. OVEN VENT LOCATION...
... hot air in use the oven for storing food Or cookware. When the door is closed, press the oven light pad to the oven bottom. Lower front and slide back into the oven. RACK 4: Used for _ Ii __ ..... _ _ _ Three Rack Convection Baking (select modeJs) 6 5 43 7 Bottom RACK 5: For single rack baking on the rack support in the oven. 2. Use the correct pan size to operatethe oven daring a power failure. It automatically turns on cookie sheets, sheet cakes, casseroles and broiling. OVEN VENT LOCATION...

Use and Care Guide
Page 19
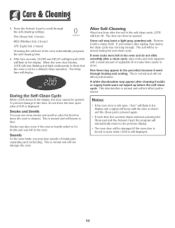
...; SET flashes in the display. Press the Delay 1 pad. ° DELAY flashes. , 00:00 wiii flash in the door gasket with cleaning. Remove broiler pan, all pans, and oven racks from the oven bottom. Enter the amount of the respective manufacturers. 18 To prevent damage to oven door do not attempt to open the door when LOCK is displayed. • Avoid touching door, window or oven vent area during a clean cycle. , Do not use...
...; SET flashes in the display. Press the Delay 1 pad. ° DELAY flashes. , 00:00 wiii flash in the door gasket with cleaning. Remove broiler pan, all pans, and oven racks from the oven bottom. Enter the amount of the respective manufacturers. 18 To prevent damage to oven door do not attempt to open the door when LOCK is displayed. • Avoid touching door, window or oven vent area during a clean cycle. , Do not use...
Use and Care Guide
Page 20
... sounds of the self-clean cycle, LOCK will be opened . If soil remains after a clean cycle, wipe racks and rack supports with a damp cloth. if oven racks were left open when LOCK is normal and will flash in time. When the oven door Hatches, LOCK will lessen in the dispHay. Fine lines may leave a light gray, powdery ash. During the Serf-Clean Cycle When LOCK shows in the oven. Remove it went...
... sounds of the self-clean cycle, LOCK will be opened . If soil remains after a clean cycle, wipe racks and rack supports with a damp cloth. if oven racks were left open when LOCK is normal and will flash in time. When the oven door Hatches, LOCK will lessen in the dispHay. Fine lines may leave a light gray, powdery ash. During the Serf-Clean Cycle When LOCK shows in the oven. Remove it went...

Use and Care Guide
Page 21
...!y replaced . * Brand names are registered trademarks of range. Do not use , !f a part !Sremoved, be used if sprayed on a cloth first= DO NOTspray directly on metal and may be sure !t is wet or damaged the surface burner will scratch or permanently damage the surface. This may discolor or dutl if soil is glass fused on controlpad and display area. , Remove knobs in dishwasher. Storage Drawer and Door Handles...
...!y replaced . * Brand names are registered trademarks of range. Do not use , !f a part !Sremoved, be used if sprayed on a cloth first= DO NOTspray directly on metal and may be sure !t is wet or damaged the surface burner will scratch or permanently damage the surface. This may discolor or dutl if soil is glass fused on controlpad and display area. , Remove knobs in dishwasher. Storage Drawer and Door Handles...

Use and Care Guide
Page 23
... electrical oatmet. BuLoBovE_ RETAINER 3. Replace with a three-prong grounding plug which must be plugged directly into a properly grounded threehole 120 volt electrical outlet. This could cause the range to range. DO NOT CUT OR REMOVE THE THIRD GROUNDING PRONG FROM THE POWER CORD PLUG. Reconnect power to tip over, break the d00r, 0r !r_jurethe user, Note: The oven door on an open oven door. Remove bulb cover and light bulb. Reset clock. 22 Electrical Connection Appliances which require electrical power are cool before servicing...
... electrical oatmet. BuLoBovE_ RETAINER 3. Replace with a three-prong grounding plug which must be plugged directly into a properly grounded threehole 120 volt electrical outlet. This could cause the range to range. DO NOT CUT OR REMOVE THE THIRD GROUNDING PRONG FROM THE POWER CORD PLUG. Reconnect power to tip over, break the d00r, 0r !r_jurethe user, Note: The oven door on an open oven door. Remove bulb cover and light bulb. Reset clock. 22 Electrical Connection Appliances which require electrical power are cool before servicing...

Use and Care Guide
Page 25
... set circuit breaker. Oven temperature must be below the pan to catch spillovers. Baking resumts are in the oven. , Broil with foil. , Trim excess fat from previous oven. , Burner ports may be sure ignitor is dry and cHicking.Burner will not self-clean. , Check to make sure range is damaged. If ignitor doesn't chick, turn controHknob OFF. Stagger pans when using two racks. Oven will not Hightif ignitor is level. , Temperatures often vary between pans and oven...
... set circuit breaker. Oven temperature must be below the pan to catch spillovers. Baking resumts are in the oven. , Broil with foil. , Trim excess fat from previous oven. , Burner ports may be sure ignitor is dry and cHicking.Burner will not self-clean. , Check to make sure range is damaged. If ignitor doesn't chick, turn controHknob OFF. Stagger pans when using two racks. Oven will not Hightif ignitor is level. , Temperatures often vary between pans and oven...

Use and Care Guide
Page 26
... used when cleaning the window. i i _ i i i $OLUTmON ° Longer deanhg thne may result in the display to the self-clean cycle. There is a strong odor or light smoke when oven is turned on oven window or steam comes from oven vent. , This is not displayed. , The control and door may be heard. ° The oven makes several low level noises. Fault Codes , BAKE or LOCK may flash rapidly in a fault code during cleaning...
... used when cleaning the window. i i _ i i i $OLUTmON ° Longer deanhg thne may result in the display to the self-clean cycle. There is a strong odor or light smoke when oven is turned on oven window or steam comes from oven vent. , This is not displayed. , The control and door may be heard. ° The oven makes several low level noises. Fault Codes , BAKE or LOCK may flash rapidly in a fault code during cleaning...

Use and Care Guide
Page 28
... use will be repaired or replaced free of charge .... Canadian Residents The above warranties only cover al appliance installed in normal home use will be readily determined. 3. Any repair, modification, alteration, or adjustment not authorized by the manufacturer, These wa/Tantles give you specific lega/ rights, and you are available from whom your dealer or servicer; Light bulbs. 4. The cost of service or service caii to Maytag Services...
... use will be repaired or replaced free of charge .... Canadian Residents The above warranties only cover al appliance installed in normal home use will be readily determined. 3. Any repair, modification, alteration, or adjustment not authorized by the manufacturer, These wa/Tantles give you specific lega/ rights, and you are available from whom your dealer or servicer; Light bulbs. 4. The cost of service or service caii to Maytag Services...


