Use and Care Manual
Page 3
... leg to burst. above an appliance or on grease fires. Important Safety Instructions To check if device is properly installed, look underneath range with a flashlight to make sure one of the rear leveling legs is provided, it should be limited ide poisoning and overheating of the... such as volatile liquids, cleaners or aerosol sprays. Many aerosol-type spray cans are removed from combustible materials, gasoline, and other parts of combustion and ventilation air by closing the oven door. NEVER allow children to sit or stand on hood to heat. Children must be hot...
... leg to burst. above an appliance or on grease fires. Important Safety Instructions To check if device is properly installed, look underneath range with a flashlight to make sure one of the rear leveling legs is provided, it should be limited ide poisoning and overheating of the... such as volatile liquids, cleaners or aerosol sprays. Many aerosol-type spray cans are removed from combustible materials, gasoline, and other parts of combustion and ventilation air by closing the oven door. NEVER allow children to sit or stand on hood to heat. Children must be hot...
Use and Care Manual
Page 4
...result in the desired positions while oven is large enough to cover oven racks or oven bottom. Let hot air or steam escape before removing bulb to prevent grease from steam. Also avoid using unstable, warped, easily tipped or loose-handled pans. To minimize burns, ignition ... cooking. Should the bulb break, disconnect power to unintentional contact with heavy handles as directed in or near the vent opening the oven door. NEVER leave a surface cooking operation unattended especially when using dry, sturdy potholders. Clean up may ignite. NEVER wear garments made of ...
...result in the desired positions while oven is large enough to cover oven racks or oven bottom. Let hot air or steam escape before removing bulb to prevent grease from steam. Also avoid using unstable, warped, easily tipped or loose-handled pans. To minimize burns, ignition ... cooking. Should the bulb break, disconnect power to unintentional contact with heavy handles as directed in or near the vent opening the oven door. NEVER leave a surface cooking operation unattended especially when using dry, sturdy potholders. Clean up may ignite. NEVER wear garments made of ...

Use and Care Manual
Page 5
.... Clean appliance with caution. Self-Clean Oven CAUTION Before self-cleaning the oven, remove the oven racks, broiler pan, food and any devices or accessories that when the...the components of glass, glass/ceramic, ceramic or glazed utensils are suitable for the cooktop of the range to become hot during an oven self-cleaning cycle may be taken not to overheated cooking oil, ...cookware may be avoided. Clean only parts listed in or around any part of natural gas or liquid petroleum (LP) fuels. The door gasket is used to such substances. Exposure to a hot surface. Users of this ...
.... Clean appliance with caution. Self-Clean Oven CAUTION Before self-cleaning the oven, remove the oven racks, broiler pan, food and any devices or accessories that when the...the components of glass, glass/ceramic, ceramic or glazed utensils are suitable for the cooktop of the range to become hot during an oven self-cleaning cycle may be taken not to overheated cooking oil, ...cookware may be avoided. Clean only parts listed in or around any part of natural gas or liquid petroleum (LP) fuels. The door gasket is used to such substances. Exposure to a hot surface. Users of this ...
Use and Care Manual
Page 14
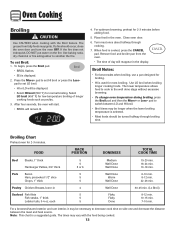
... side one and decrease the distance between LO and HI broil. • Broil times may ignite. For optimum browning, preheat for 2-3 minutes. Remove food and broiler pan from fatty foods may be displayed. • Select HI broil (550° F) for normal broiling. Use LO broil... seconds, the oven will start. • BROIL will be longer when the lower broiling temperature is selected. • Most foods should occur, close the oven door and turn the oven OFF. Broiling Chart Preheat oven for 2-3 minutes before adding food. 5. each 5 5 5 or 6 5 5 5 4 5 5 5 Medium Well ...
... side one and decrease the distance between LO and HI broil. • Broil times may ignite. For optimum browning, preheat for 2-3 minutes. Remove food and broiler pan from fatty foods may be displayed. • Select HI broil (550° F) for normal broiling. Use LO broil... seconds, the oven will start. • BROIL will be longer when the lower broiling temperature is selected. • Most foods should occur, close the oven door and turn the oven OFF. Broiling Chart Preheat oven for 2-3 minutes before adding food. 5. each 5 5 5 or 6 5 5 5 4 5 5 5 Medium Well ...
Use and Care Manual
Page 17
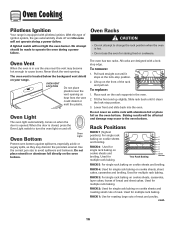
... range is closed, press the Oven Light switch to turn the oven light on and off and the oven will not operate during a power failure. With this type of the rack and pull out. No attempt should be affected and damage may occur to the oven bottom. When the door... 5: For single rack baking on cookie sheets and broiling. Used for multiple rack baking. To remove: 1. Used for multiple rack baking. RACK 3: For single rack baking on the front of ignition system, the gas automatically shuts off . Used for multiple rack baking. Never block the vent opening as they may...
... range is closed, press the Oven Light switch to turn the oven light on and off and the oven will not operate during a power failure. With this type of the rack and pull out. No attempt should be affected and damage may occur to the oven bottom. When the door... 5: For single rack baking on cookie sheets and broiling. Used for multiple rack baking. To remove: 1. Used for multiple rack baking. RACK 3: For single rack baking on the front of ignition system, the gas automatically shuts off . Used for multiple rack baking. Never block the vent opening as they may...

Use and Care Manual
Page 19
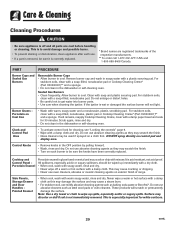
...up spillovers to 11 hours, 59 minutes (11:59). 3. Remove all pans and oven racks from the oven bottom. Porcelain enamel is not closed , beeps will sound and "door" will appear in the door gasket with cleaning. If the door is acid-resistant, not acid-proof. pad to automatically clean the... oven racks will appear in heat during the clean cycle. 5. The self-cleaning process does not clean these areas. To set the amount of the range to become hot during the clean cycle. 2. Press the More+ or Less- pad. • MEd (Medium soil, 3 hours) is displayed. To prevent...
...up spillovers to 11 hours, 59 minutes (11:59). 3. Remove all pans and oven racks from the oven bottom. Porcelain enamel is not closed , beeps will sound and "door" will appear in the door gasket with cleaning. If the door is acid-resistant, not acid-proof. pad to automatically clean the... oven racks will appear in heat during the clean cycle. 5. The self-cleaning process does not clean these areas. To set the amount of the range to become hot during the clean cycle. 2. Press the More+ or Less- pad. • MEd (Medium soil, 3 hours) is displayed. To prevent...

Use and Care Manual
Page 20
...through heating and cooling. This is displayed. Remove it went through the selfcleaning settings. Press the Clean and Timer pads. (Press the Clean pad first) • DELAY flashes. • 00:00 will appear in the display, the door cannot be removed during the next clean cycle. pad to ...delay the cycle. The soil will beep until the door is closed and the Clean pad is displayed. This is displayed. Sounds As the oven...
...through heating and cooling. This is displayed. Remove it went through the selfcleaning settings. Press the Clean and Timer pads. (Press the Clean pad first) • DELAY flashes. • 00:00 will appear in the display, the door cannot be removed during the next clean cycle. pad to ...delay the cycle. The soil will beep until the door is closed and the Clean pad is displayed. This is displayed. Sounds As the oven...
Use and Care Manual
Page 21
... hot surface with a damp paper towel and soak for 30 minutes. For stubborn soils, clean with misuse. PART PROCEDURE Burner Caps and Sealed Gas Burners Removable Burner Caps • Allow burner to wipe up immediately with a dry cloth. • When cool, wash with soapy water, rinse and dry...; Never wipe off and all parts are registered trademarks of range. Clean with a damp cloth and dry. Clock and Control Pad Area • To activate control lock for white surfaces. 20 cont. Side Panels, Storage Drawer and Door Handles Painted Enamel • When cool, wash with a ...
... hot surface with a damp paper towel and soak for 30 minutes. For stubborn soils, clean with misuse. PART PROCEDURE Burner Caps and Sealed Gas Burners Removable Burner Caps • Allow burner to wipe up immediately with a dry cloth. • When cool, wash with soapy water, rinse and dry...; Never wipe off and all parts are registered trademarks of range. Clean with a damp cloth and dry. Clock and Control Pad Area • To activate control lock for white surfaces. 20 cont. Side Panels, Storage Drawer and Door Handles Painted Enamel • When cool, wash with a ...

Use and Care Manual
Page 22
...cloth, wipe with Stainless Steel Magic Spray* (Part No. 20000008)**. • Moderate/Heavy Soil -- Care & Cleaning PART PROCEDURE Oven Window and Door - Oven Interior • Follow instructions on a cloth first. • Do not use abrasive materials such as scouring pads, steel wool or... 21 Wipe with a damp multipurpose Scotch-Brite* pad; Rinse and dry. To restore luster and remove streaks, follow with Stainless Steel Magic Spray*. • Discoloration -- To remove streaks and restore luster, follow with Stainless Steel Magic Spray*. * Brand names for cleaning products are ...
...cloth, wipe with Stainless Steel Magic Spray* (Part No. 20000008)**. • Moderate/Heavy Soil -- Care & Cleaning PART PROCEDURE Oven Window and Door - Oven Interior • Follow instructions on a cloth first. • Do not use abrasive materials such as scouring pads, steel wool or... 21 Wipe with a damp multipurpose Scotch-Brite* pad; Rinse and dry. To restore luster and remove streaks, follow with Stainless Steel Magic Spray*. • Discoloration -- To remove streaks and restore luster, follow with Stainless Steel Magic Spray*. * Brand names for cleaning products are ...
Use and Care Manual
Page 23
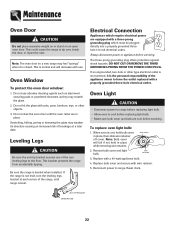
... be plugged directly into a properly grounded threehole 120 volt electrical outlet. DO NOT CUT OR REMOVE THE THIRD GROUNDING PRONG FROM THE POWER CORD PLUG. To replace oven light bulb: 1. Do not close the oven door until range is the personal responsibility of the appliance owner to appliance before replacing light bulb. •...
... be plugged directly into a properly grounded threehole 120 volt electrical outlet. DO NOT CUT OR REMOVE THE THIRD GROUNDING PRONG FROM THE POWER CORD PLUG. To replace oven light bulb: 1. Do not close the oven door until range is the personal responsibility of the appliance owner to appliance before replacing light bulb. •...
Use and Care Manual
Page 26
.... Moisture collects on and off " the odors more quickly. • Turning on a ventilation fan will help remove the smoke and/or odor. • Excessive food soils on . • This is still hot. Wait ...soil, then reset the clean cycle. To cancel, press and hold the Clock pad for a new range and will not unlock after self-clean cycle. • Oven interior is normal for five seconds. ... and call an authorized servicer. • If the oven is not displayed. • The control and door may be locked. This is normal and will "burn off . If BAKE or LOCK appear in Sabbath ...
.... Moisture collects on and off " the odors more quickly. • Turning on a ventilation fan will help remove the smoke and/or odor. • Excessive food soils on . • This is still hot. Wait ...soil, then reset the clean cycle. To cancel, press and hold the Clock pad for a new range and will not unlock after self-clean cycle. • Oven interior is normal for five seconds. ... and call an authorized servicer. • If the oven is not displayed. • The control and door may be locked. This is normal and will "burn off . If BAKE or LOCK appear in Sabbath ...


