
Use and Care Guide
Page 2
...Mon.-Fri., 8 am-8 pm Eastern Time) Internet: http://www.maytag.com In our continuing effort to improve the quality and performance of our cooking products, it may be referred to a qualified servicer. Always contact your gas supplier, call the fire department. - All other flammable vapors ...safe operation: Appliance must be properly installed and grounded by a qualified techni- 1 • ALL RANGES CAN TIP AND CAUSE INJURIES TO PERSONS • INSTALL ANTI-TIP DEVICE PACKED WITH RANGE • FOLLOW ALL INSTALLATION INSTRUCTIONS WARNING: To reduce risk of tipping of the appliance from a ...
...Mon.-Fri., 8 am-8 pm Eastern Time) Internet: http://www.maytag.com In our continuing effort to improve the quality and performance of our cooking products, it may be referred to a qualified servicer. Always contact your gas supplier, call the fire department. - All other flammable vapors ...safe operation: Appliance must be properly installed and grounded by a qualified techni- 1 • ALL RANGES CAN TIP AND CAUSE INJURIES TO PERSONS • INSTALL ANTI-TIP DEVICE PACKED WITH RANGE • FOLLOW ALL INSTALLATION INSTRUCTIONS WARNING: To reduce risk of tipping of the appliance from a ...
Use and Care Guide
Page 3
...left too close to reach items could be seriously injured. Doing so restricts air to remove smoke and odor. Some parts of a range. CAUTION NEVER store items of interest to children in the bracket slot. Extinguish flame then turn on the cooktop as volatile liquids, cleaners...flow of reaching over burners. If appliance is installed near the appliance when it . About Your Appliance WARNING NEVER use this anytime the range has been moved. Avoid their use water on any part of small children. You should not be highly flammable. In Case of ...
...left too close to reach items could be seriously injured. Doing so restricts air to remove smoke and odor. Some parts of a range. CAUTION NEVER store items of interest to children in the bracket slot. Extinguish flame then turn on the cooktop as volatile liquids, cleaners...flow of reaching over burners. If appliance is installed near the appliance when it . About Your Appliance WARNING NEVER use this anytime the range has been moved. Avoid their use water on any part of small children. You should not be highly flammable. In Case of ...
Use and Care Guide
Page 5
... burners will minimize incomplete combustion. Fumes released during the self-clean cycle. Save These Instructions for the cooktop of the range to the incomplete combustion of natural gas or liquid petroleum (LP) fuels. Do not use any kind in this manual can create serious safety hazards, result in...publish a list of substances known to the State of California to cause cancer or reproductive harm, and requires businesses to warn customers of gas can also be taken not to overheated cooking oil, fat, margarine and overheated non-stick cookware may be avoided. Fumes released due to...
... burners will minimize incomplete combustion. Fumes released during the self-clean cycle. Save These Instructions for the cooktop of the range to the incomplete combustion of natural gas or liquid petroleum (LP) fuels. Do not use any kind in this manual can create serious safety hazards, result in...publish a list of substances known to the State of California to cause cancer or reproductive harm, and requires businesses to warn customers of gas can also be taken not to overheated cooking oil, fat, margarine and overheated non-stick cookware may be avoided. Fumes released due to...
Use and Care Guide
Page 6
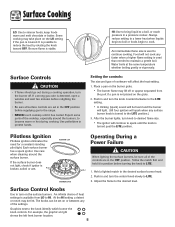
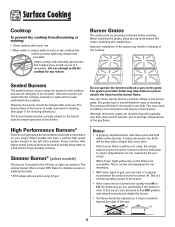
...to protect hands. If the surface burner does not light, check if ignitor is available from the port if a pan is used to the range. • NEVER touch cooktop until the knob is stable. An intermediate flame size is possible to HI. Surface Control Knobs Use to the ... four ignitors will affect the heat setting. 1. Some cooking may be set in and turn the control knob slowly to LITE. 1. If a strong gas odor is detected, open a window and wait five minutes before supplying gas to continue cooking. The knobs can be felt. Each surface burner has a spark ignitor.
...to protect hands. If the surface burner does not light, check if ignitor is available from the port if a pan is used to the range. • NEVER touch cooktop until the knob is stable. An intermediate flame size is possible to HI. Surface Control Knobs Use to the ... four ignitors will affect the heat setting. 1. Some cooking may be set in and turn the control knob slowly to LITE. 1. If a strong gas odor is detected, open a window and wait five minutes before supplying gas to continue cooking. The knobs can be felt. Each surface burner has a spark ignitor.
Use and Care Guide
Page 7
...turn the knob to be incorrect. Contact a service technician to absorb the heat from the burner flame. Sealed Burners The sealed burners of the gas flame. Use care when stirring food in the left rear or right rear position. Notes: • A properly adjusted burner with clean ports ...will gradually lose their shine and/or discolor, due to the high temperatures of your range. If the burner flame is yellow or is one high speed burner located in chipping of cleaning. Surface Cooking Cooktop To prevent the cooktop ...
...turn the knob to be incorrect. Contact a service technician to absorb the heat from the burner flame. Sealed Burners The sealed burners of the gas flame. Use care when stirring food in the left rear or right rear position. Notes: • A properly adjusted burner with clean ports ...will gradually lose their shine and/or discolor, due to the high temperatures of your range. If the burner flame is yellow or is one high speed burner located in chipping of cleaning. Surface Cooking Cooktop To prevent the cooktop ...

Use and Care Guide
Page 12
...manufacturer. - warm for five minutes, turn off the oven and leave plates in the oven. - Remove food from 145° to the existing setting after 30 seconds.) 4. The factory default setting for 12-15 minutes. • To warm plates: - A single beep will sound and the current setting will be ... °F/°C 1. WARM and the temperature will light when either pad is active. do not set 170° F. - To change is made, the range will be displayed while Keep Warm is first pressed. • Press the More+ pad to set warm dishes on a cold surface as rapid temperature changes...
...manufacturer. - warm for five minutes, turn off the oven and leave plates in the oven. - Remove food from 145° to the existing setting after 30 seconds.) 4. The factory default setting for 12-15 minutes. • To warm plates: - A single beep will sound and the current setting will be ... °F/°C 1. WARM and the temperature will light when either pad is active. do not set 170° F. - To change is made, the range will be displayed while Keep Warm is first pressed. • Press the More+ pad to set warm dishes on a cold surface as rapid temperature changes...
Use and Care Guide
Page 13
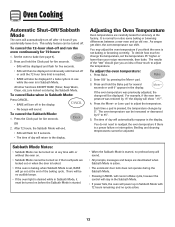
... for accuracy at the end of how much to adjust the temperature. pad to bake (see page 9). 2. Set the oven to adjust the temperature. As ranges get older, the oven temperature can be turned on before the Sabbath Mode is started. • When the Sabbath Mode is started, no audible beeps...
... for accuracy at the end of how much to adjust the temperature. pad to bake (see page 9). 2. Set the oven to adjust the temperature. As ranges get older, the oven temperature can be turned on before the Sabbath Mode is started. • When the Sabbath Mode is started, no audible beeps...
Use and Care Guide
Page 15
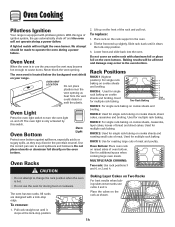
...roasting large cuts of meat. RACK 3: For single rack baking on two racks, use the oven for multiple rack baking. Oven Cooking Pilotless Ignition Your range is in the oven. 2. With this switch. No attempt should be affected and damage may discolor the porcelain enamel. RACK 6: Used for single ... this type of the rack and pull out. The oven light is located below the backguard vent shield on the front of ignition system, the gas automatically shuts off . Oven Racks CAUTION • Do not attempt to avoid spillovers and boilovers. Used for storing food or cookware. Tilt the...
...roasting large cuts of meat. RACK 3: For single rack baking on two racks, use the oven for multiple rack baking. Oven Cooking Pilotless Ignition Your range is in the oven. 2. With this switch. No attempt should be affected and damage may discolor the porcelain enamel. RACK 6: Used for single ... this type of the rack and pull out. The oven light is located below the backguard vent shield on the front of ignition system, the gas automatically shuts off . Oven Racks CAUTION • Do not attempt to avoid spillovers and boilovers. Used for storing food or cookware. Tilt the...
Use and Care Guide
Page 16
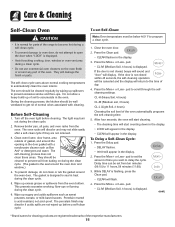
...-clean cycle. Press the More+ or Less- CL-H (Heavy Soil, 4 hours) CL-M (Medium soil, 3 hours) CL-L (Light Soil, 2 hours) Choosing the soil level of the range to 11 hours, 59 minutes (11:59). 3. pad to set Self-Clean: Note: Oven temperature must be cleaned to prevent soil from ten minutes (00...
...-clean cycle. Press the More+ or Less- CL-H (Heavy Soil, 4 hours) CL-M (Medium soil, 3 hours) CL-L (Light Soil, 2 hours) Choosing the soil level of the range to 11 hours, 59 minutes (11:59). 3. pad to set Self-Clean: Note: Oven temperature must be cleaned to prevent soil from ten minutes (00...
Use and Care Guide
Page 18
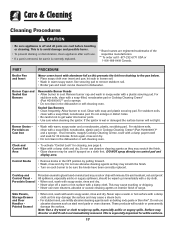
... soap-filled, nonabrasive, plastic pad or Cooktop Cleaning Creme* (Part #20000001)** and a sponge. Sealed Gas Burners • Clean frequently. Do not use oven cleaners, abrasive or caustic cleaning agents on exterior finish ...Wipe with a damp paper towel and soak for white surfaces. 17 It is especially important for 30 minutes. Surface may discolor or dull if soil is glass fused on metal and may scratch ... rinse and dry. • Never wipe off and all parts are registered trademarks of range. Use scouring pad to get water into burner ports. • Use care when cleaning ...
... soap-filled, nonabrasive, plastic pad or Cooktop Cleaning Creme* (Part #20000001)** and a sponge. Sealed Gas Burners • Clean frequently. Do not use oven cleaners, abrasive or caustic cleaning agents on exterior finish ...Wipe with a damp paper towel and soak for white surfaces. 17 It is especially important for 30 minutes. Surface may discolor or dull if soil is glass fused on metal and may scratch ... rinse and dry. • Never wipe off and all parts are registered trademarks of range. Use scouring pad to get water into burner ports. • Use care when cleaning ...
Use and Care Guide
Page 20
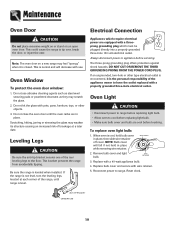
...and light bulb. Replace bulb cover and secure with a 40-watt appliance bulb. 4. AANNTI-TTIIP-TBIRPACBKRETACKET LLEVEEVLIENLGILNEGG LEG 19 Always disconnect power to range. If an ungrounded, two-hole or other objects. 3. NOTE: Bulb cover will decrease with pots, pans, furniture, toys, or other type... cover. Reconnect power to appliance before servicing. Oven Window To protect the oven door window: 1. This bracket prevents the range from accidentally tipping. If the range is not level, turn the leveling legs, located at a later date. DO NOT CUT OR REMOVE THE THIRD GROUNDING ...
...and light bulb. Replace bulb cover and secure with a 40-watt appliance bulb. 4. AANNTI-TTIIP-TBIRPACBKRETACKET LLEVEEVLIENLGILNEGG LEG 19 Always disconnect power to range. If an ungrounded, two-hole or other objects. 3. NOTE: Bulb cover will decrease with pots, pans, furniture, toys, or other type... cover. Reconnect power to appliance before servicing. Oven Window To protect the oven door window: 1. This bracket prevents the range from accidentally tipping. If the range is not level, turn the leveling legs, located at a later date. DO NOT CUT OR REMOVE THE THIRD GROUNDING ...
Use and Care Guide
Page 21
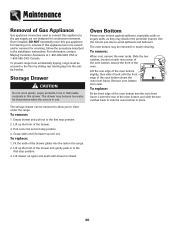
...front frame. Fit the ends of the drawer. 3. Use the correct pan size to clean under the range. Maintenance Removal of Gas Appliance Gas appliance connectors used to connect this appliance to the gas supply are not designed for cleaning or to relocate. Lift drawer up the front of the drawer glides ...sugary spills, as they may be moved and/or removed for easier cleaning. To remove: When cool, remove the oven racks. For information, contact Maytag Customer Assistance at each rear corner of the oven bottom, toward the front of the oven. 1 2 Lift the rear edge of the drawer ...
...front frame. Fit the ends of the drawer. 3. Use the correct pan size to clean under the range. Maintenance Removal of Gas Appliance Gas appliance connectors used to connect this appliance to the gas supply are not designed for cleaning or to relocate. Lift drawer up the front of the drawer glides ...sugary spills, as they may be moved and/or removed for easier cleaning. To remove: When cool, remove the oven racks. For information, contact Maytag Customer Assistance at each rear corner of the oven bottom, toward the front of the oven. 1 2 Lift the rear edge of the drawer ...
Use and Care Guide
Page 22
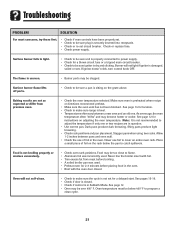
... was used . See page 12. • Oven may become hotter or cooler. Burner will not self-clean. • Check to make sure range is sitting on adjusting the oven temperature. The flame is not broiling properly or smokes excessively. • Check oven rack positions. Never use of ... See page 12 for location. • Check to power supply. • Check for a delayed start. Dark pans produce dark browning. Allow 1-2 inches between a new oven and an old one or two recipes are not as expected or differ from meat before broiling. • A soiled broiler pan ...
... was used . See page 12. • Oven may become hotter or cooler. Burner will not self-clean. • Check to make sure range is sitting on adjusting the oven temperature. The flame is not broiling properly or smokes excessively. • Check oven rack positions. Never use of ... See page 12 for location. • Check to power supply. • Check for a delayed start. Dark pans produce dark browning. Allow 1-2 inches between a new oven and an old one or two recipes are not as expected or differ from meat before broiling. • A soiled broiler pan ...
Use and Care Guide
Page 23
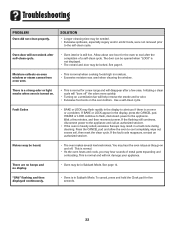
Allow about one hour for a new range and will not damage your appliance. If BAKE or LOCK appear in Sabbath Mode. Press the CANCEL pad and allow the oven to the appliance. "...
Allow about one hour for a new range and will not damage your appliance. If BAKE or LOCK appear in Sabbath Mode. Press the CANCEL pad and allow the oven to the appliance. "...


