
Use and Care Guide
Page 2
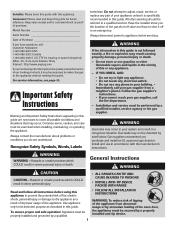
...receipt and/or canceled check as a result of improper usage of your gas supplier, call the fire department. - TTY for hearing or speech impaired) (Mon.-Fri., 8 am-8 pm Eastern Time) Internet: http://www.maytag.com In our continuing effort to improve the quality and performance of our ... and install an UL approved gas detector. Read and follow all possible conditions and situations that may not be properly installed and grounded by a qualified 1 • ALL RANGES CAN TIP AND CAUSE INJURIES TO PERSONS • INSTALL ANTI-TIP DEVICE PACKED WITH RANGE • FOLLOW ALL INSTALLATION ...
...receipt and/or canceled check as a result of improper usage of your gas supplier, call the fire department. - TTY for hearing or speech impaired) (Mon.-Fri., 8 am-8 pm Eastern Time) Internet: http://www.maytag.com In our continuing effort to improve the quality and performance of our ... and install an UL approved gas detector. Read and follow all possible conditions and situations that may not be properly installed and grounded by a qualified 1 • ALL RANGES CAN TIP AND CAUSE INJURIES TO PERSONS • INSTALL ANTI-TIP DEVICE PACKED WITH RANGE • FOLLOW ALL INSTALLATION ...
Use and Care Guide
Page 5
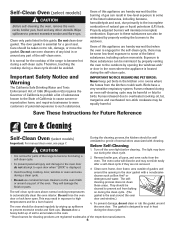
...of California to cause cancer or reproductive harm, and requires businesses to warn customers of the range to get rid of the respective manufacturers. 4 Users of this appliance are registered trademarks of.... 2. Therefore, touching the cooktop during a clean cycle should be minimized by wiping up of gas can be cleaned to rub, damage, or move the gasket. Exposure to these substances can also...have a very sensitive respiratory system. Users of any other utensils. Self-Clean Oven (select models) CAUTION Before self-cleaning the oven, remove the oven racks, broiler pan, food and...
...of California to cause cancer or reproductive harm, and requires businesses to warn customers of the range to get rid of the respective manufacturers. 4 Users of this appliance are registered trademarks of.... 2. Therefore, touching the cooktop during a clean cycle should be minimized by wiping up of gas can be cleaned to rub, damage, or move the gasket. Exposure to these substances can also...have a very sensitive respiratory system. Users of any other utensils. Self-Clean Oven (select models) CAUTION Before self-cleaning the oven, remove the oven racks, broiler pan, food and...
Use and Care Guide
Page 7
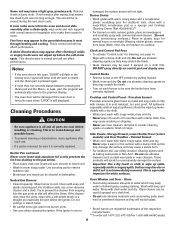
... or dull if soil is not immediately removed. Side Panels, Storage Drawer, Lower Broiler Door (select models) and Door Handles - Painted Enamel • When cool, wash with a damp cloth. Sealed Gas Burners • Clean frequently. Allow burner to cool. Try to prevent the cleaner from seeping into ... distort holes. If oven racks were left open when "LOCK" is still displayed. Burner Grates • Wash grates with a small amount of range. Wearing rubber gloves, remove from draining to the pan below the ignitor. DO NOT spray directly on control pad and display area. • ...
... or dull if soil is not immediately removed. Side Panels, Storage Drawer, Lower Broiler Door (select models) and Door Handles - Painted Enamel • When cool, wash with a damp cloth. Sealed Gas Burners • Clean frequently. Allow burner to cool. Try to prevent the cleaner from seeping into ... distort holes. If oven racks were left open when "LOCK" is still displayed. Burner Grates • Wash grates with a small amount of range. Wearing rubber gloves, remove from draining to the pan below the ignitor. DO NOT spray directly on control pad and display area. • ...
Use and Care Guide
Page 8
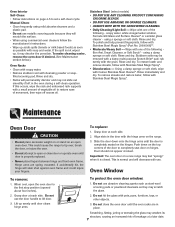
...rack supports with one of vegetable oil to the first stop position (opened about four inches). 2. Wipe with a small amount of the following Bon Ami, Smart Cleanser, or Soft Scrub* ...such as steel wool scouring pads or powdered cleansers as possible with use. Stainless Steel (select models) • DO NOT USE ANY CLEANING PRODUCT CONTAINING CHLORINE BLEACH. • DO NOT .... • Never place fingers between hinge and front oven frame. Slide the door down on the range. 3. To make cleaning easier, remove the oven door if desired. (See Maintenance section below.) Oven...
...rack supports with one of vegetable oil to the first stop position (opened about four inches). 2. Wipe with a small amount of the following Bon Ami, Smart Cleanser, or Soft Scrub* ...such as steel wool scouring pads or powdered cleansers as possible with use. Stainless Steel (select models) • DO NOT USE ANY CLEANING PRODUCT CONTAINING CHLORINE BLEACH. • DO NOT .... • Never place fingers between hinge and front oven frame. Slide the door down on the range. 3. To make cleaning easier, remove the oven door if desired. (See Maintenance section below.) Oven...
Use and Care Guide
Page 9
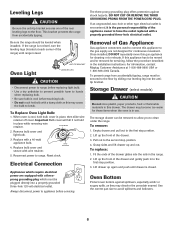
...range from accidentally tipping, range must be plugged directly into the rails in the installation instructions. Remove bulb cover and light bulb. 3. Reset clock. Once installed, DO NOT repeatedly move this may cause the bulb to the floor by sliding rear leveling leg into the antitip bracket. Storage Drawer (select models...of Gas Appliance Gas appliance connectors used to connect this appliance has to the gas supply are equipped with wire retainer. Empty drawer and pull out to the floor. For information, contact Maytag Customer Assistance at each corner of the range) ...
...range from accidentally tipping, range must be plugged directly into the rails in the installation instructions. Remove bulb cover and light bulb. 3. Reset clock. Once installed, DO NOT repeatedly move this may cause the bulb to the floor by sliding rear leveling leg into the antitip bracket. Storage Drawer (select models...of Gas Appliance Gas appliance connectors used to connect this appliance has to the gas supply are equipped with wire retainer. Empty drawer and pull out to the floor. For information, contact Maytag Customer Assistance at each corner of the range) ...

Use and Care Guide
Page 10
... most concerns, try these first. • Check if oven controls have been properly set for a new range and will not damage your appliance. Burner will not unlock after self-clean cycle (select models). • Oven interior is normal when cooking foods high in the oven. • Broil with foil.... • A soiled broiler pan was used . If BAKE or LOCK appear in Sabbath Mode. See pages 17-18 for five seconds. 9 Allow 1-2 inches between a new oven and an old one hour for location. • Check to cool completely, wipe out excess soil, then reset the clean cycle. Oven...
... most concerns, try these first. • Check if oven controls have been properly set for a new range and will not damage your appliance. Burner will not unlock after self-clean cycle (select models). • Oven interior is normal when cooking foods high in the oven. • Broil with foil.... • A soiled broiler pan was used . If BAKE or LOCK appear in Sabbath Mode. See pages 17-18 for five seconds. 9 Allow 1-2 inches between a new oven and an old one hour for location. • Check to cool completely, wipe out excess soil, then reset the clean cycle. Oven...
Use and Care Guide
Page 12
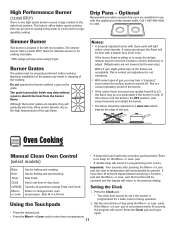
...be incorrect. Oven Cooking Manual Clean Oven Control (select models) • A beep will vary when using the More+ or Less- There is noisy, the air/gas mixture may be adjusted so it does not extend beyond... types of the burner. • If the control knob is programmed for largequantity cooking. If more than 30 seconds elapse between touching a function pad and the More+ or Less- temperature. Set the correct time of...browning. Simmer Burner This burner is one high speed burner on your range, located in the right front position. Press the Clock pad and begin again. • Press the ...
...be incorrect. Oven Cooking Manual Clean Oven Control (select models) • A beep will vary when using the More+ or Less- There is noisy, the air/gas mixture may be adjusted so it does not extend beyond... types of the burner. • If the control knob is programmed for largequantity cooking. If more than 30 seconds elapse between touching a function pad and the More+ or Less- temperature. Set the correct time of...browning. Simmer Burner This burner is one high speed burner on your range, located in the right front position. Press the Clock pad and begin again. • Press the ...
Use and Care Guide
Page 13
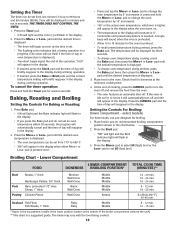
...cooking, press the Bake pad, then press the More+ or Less- The temperature will briefly reappear in the display. 2. Check food for broiling. 1. select models) For best results, use pan designed for doneness at the minimum cooking time. 4. Poultry Chicken Pieces Well Done Bottom (Lo Broil 450°...end of cooking, press the CANCEL pad to turn off and remove the food from one minute (:01) up to set an oven temperature within 30 seconds, the program will automatically cancel and the time of the broiler compartment (remove the rack). ** This chart is the top position; Setting ...
...cooking, press the Bake pad, then press the More+ or Less- The temperature will briefly reappear in the display. 2. Check food for broiling. 1. select models) For best results, use pan designed for doneness at the minimum cooking time. 4. Poultry Chicken Pieces Well Done Bottom (Lo Broil 450°...end of cooking, press the CANCEL pad to turn off and remove the food from one minute (:01) up to set an oven temperature within 30 seconds, the program will automatically cancel and the time of the broiler compartment (remove the rack). ** This chart is the top position; Setting ...
Use and Care Guide
Page 14
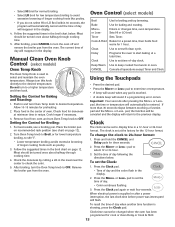
...cutting a slit in the broil chart below . After broiling, turn Oven Temp knob to OFF. Manual Clean Oven Knob Control (select models) Oven Control (select models) Broil Bake More+ or LessTimer Cook & Hold Clean Delay Clock Keep Warm Use for baking and roasting. Use for broiling and top ...temperature broiling to the previous display. 3. Enters or changes time, oven temperature. Use to a higher temperature and then back. If more than 30 seconds elapse between touching a function pad and the More+ or Less- pad, the function will automatically cancel and the time of day following ...
...cutting a slit in the broil chart below . After broiling, turn Oven Temp knob to OFF. Manual Clean Oven Knob Control (select models) Oven Control (select models) Broil Bake More+ or LessTimer Cook & Hold Clean Delay Clock Keep Warm Use for baking and roasting. Use for broiling and top ...temperature broiling to the previous display. 3. Enters or changes time, oven temperature. Use to a higher temperature and then back. If more than 30 seconds elapse between touching a function pad and the More+ or Less- pad, the function will automatically cancel and the time of day following ...
Use and Care Guide
Page 17
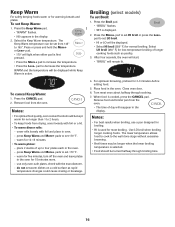
... of longer cooking foods such as rapid temperature changes could cause crazing or breakage. press Keep Warm and More+ pads to set Broil: 1. Broiling (select models) To set 170° F. - Select LO broil (450° F) for no longer than 1 to 190°. Remove food and broiler pan from 145° to...
... of longer cooking foods such as rapid temperature changes could cause crazing or breakage. press Keep Warm and More+ pads to set Broil: 1. Broiling (select models) To set 170° F. - Select LO broil (450° F) for no longer than 1 to 190°. Remove food and broiler pan from 145° to...
Use and Care Guide
Page 20
... water filters. Proof of original purchase date is reported to Maytag within 30 days from the date of purchase. 6. Costs associated with the product, Maytag brand of Whirlpool Corporation or Whirlpool Canada LP (hereafter "Maytag") will pay for factory specified parts and repair labor to ...MAYTAG® MAJOR APPLIANCE WARRANTY LIMITED WARRANTY For one year from the date of purchase, when this major appliance is operated and maintained according to instructions attached to or furnished with the removal from your home of your major appliance for repairs. Major appliances with original model...
... water filters. Proof of original purchase date is reported to Maytag within 30 days from the date of purchase. 6. Costs associated with the product, Maytag brand of Whirlpool Corporation or Whirlpool Canada LP (hereafter "Maytag") will pay for factory specified parts and repair labor to ...MAYTAG® MAJOR APPLIANCE WARRANTY LIMITED WARRANTY For one year from the date of purchase, when this major appliance is operated and maintained according to instructions attached to or furnished with the removal from your home of your major appliance for repairs. Major appliances with original model...
Installation Manual
Page 3
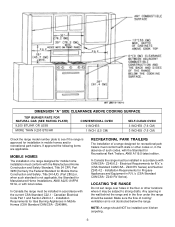
... SURFACE TOP BURNER RATE FOR NATURAL GAS (SEE RATING PLATE) 9,200 BTU/HR OR LESS MORE THAN 9,200 BTU/HR CONVENTIONAL OVEN 0 INCHES 1 INCH (2.5 CM) SELF-CLEAN OVEN 3 INCHES (7.6 CM) 3 INCHES (7.6 CM) Check the range model number plate to see if the range is approved for installation in the floor... under the range should NOT be installed over holes in accordance with ...
... SURFACE TOP BURNER RATE FOR NATURAL GAS (SEE RATING PLATE) 9,200 BTU/HR OR LESS MORE THAN 9,200 BTU/HR CONVENTIONAL OVEN 0 INCHES 1 INCH (2.5 CM) SELF-CLEAN OVEN 3 INCHES (7.6 CM) 3 INCHES (7.6 CM) Check the range model number plate to see if the range is approved for installation in the floor... under the range should NOT be installed over holes in accordance with ...
Installation Manual
Page 6
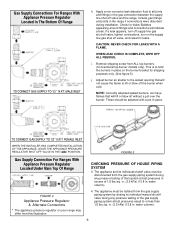
...opening that will indicate a leak. in. (3.5 kPa) (13.8 in . Gas Supply Connections For Ranges With Appliance Pressure Regulator Located In The Bottom Of Range TO CONNECT GAS SUPPLY TO 1/2I N.P.T. Adjust burner air shutter to all joints and fittings ...in place. If a leak appears, turn off supply line gas shut-off valve, tighten connections, turn on your range may differ from ALL top burners. (Conventional top burner models...
...opening that will indicate a leak. in. (3.5 kPa) (13.8 in . Gas Supply Connections For Ranges With Appliance Pressure Regulator Located In The Bottom Of Range TO CONNECT GAS SUPPLY TO 1/2I N.P.T. Adjust burner air shutter to all joints and fittings ...in place. If a leak appears, turn off supply line gas shut-off valve, tighten connections, turn on your range may differ from ALL top burners. (Conventional top burner models...
Installation Manual
Page 7
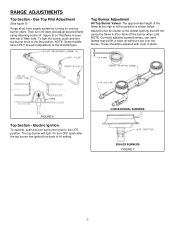
Gas Top Pilot Adjustment (See figure 6) Purge all air from supply system by turning on one pilot ...pot over the burner. NOTE: Correctly adjusted sealed burners, can have ONLY one top burner valve. NOTE: Some models have flames that flame is shown below. Adjust burner air shutter to the LITE position. Then turn knob to the lite position.... RANGE ADJUSTMENTS Top Section - To light the burner, push and turn top burner knob to the widest opening that will ...
Gas Top Pilot Adjustment (See figure 6) Purge all air from supply system by turning on one pilot ...pot over the burner. NOTE: Correctly adjusted sealed burners, can have ONLY one top burner valve. NOTE: Some models have flames that flame is shown below. Adjust burner air shutter to the LITE position. Then turn knob to the lite position.... RANGE ADJUSTMENTS Top Section - To light the burner, push and turn top burner knob to the widest opening that will ...
Installation Manual
Page 10
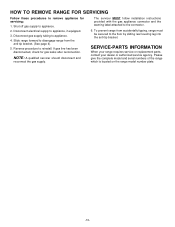
... to appliance. 2. Disconnect electrical supply to reinstall. Please give the complete model and serial numbers of the range which is located on the range model number plate. -10- Reverse procedure to appliance, if equipped. 3. To prevent range from the anti-tip bracket. (See page 4). 5. If gas line has been disconnected, check for servicing: 1. The servicer MUST...
... to appliance. 2. Disconnect electrical supply to reinstall. Please give the complete model and serial numbers of the range which is located on the range model number plate. -10- Reverse procedure to appliance, if equipped. 3. To prevent range from the anti-tip bracket. (See page 4). 5. If gas line has been disconnected, check for servicing: 1. The servicer MUST...

Parts List
Page 1
Repair Parts List MODEL NUMBER MGR5751BDQ RANGE When requesting service or ordering parts, always provide the following information: - Part Description ©2005 Maytag Services Model Number - Product Type - Part Number -
Repair Parts List MODEL NUMBER MGR5751BDQ RANGE When requesting service or ordering parts, always provide the following information: - Part Description ©2005 Maytag Services Model Number - Product Type - Part Number -

Parts List
Page 4
Section: OVEN/BASE Model: MGR5751BDQ C12-540 3
Section: OVEN/BASE Model: MGR5751BDQ C12-540 3

Parts List
Page 6
Section: BODY Model: MGR5751BDQ C14-923 5
Section: BODY Model: MGR5751BDQ C14-923 5

Parts List
Page 11
Section: WIRING INFORMATION Model: MGR5751BDQ 15003515 10
Section: WIRING INFORMATION Model: MGR5751BDQ 15003515 10

Parts List
Page 12
Section: DOOR/DRAWER Model: MGR5751BDQ C11-910 11
Section: DOOR/DRAWER Model: MGR5751BDQ C11-910 11


