Owners Manual
Page 10
... from faucet, then drain the hose. Remove the hose from the back of the dryer. Use tape to increase the default dryness level. Replace all parts and panels before servicing. If storing or moving care Install and store your dryer. Because some water may change the default settings to secure dryer...
... from faucet, then drain the hose. Remove the hose from the back of the dryer. Use tape to increase the default dryness level. Replace all parts and panels before servicing. If storing or moving care Install and store your dryer. Because some water may change the default settings to secure dryer...
Owners Manual
Page 13
... workmanship that existed when this book and your sales slip together for factory specified parts and repair labor to correct defects in a remote area where service by calling Maytag. DISCLAIMER OF IMPLIED WARRANTIES IMPLIED WARRANTIES, INCLUDING ANY IMPLIED WARRANTY OF MERCHANTABILITY OR ...OF REMEDIES; You must be found by checking the "Assistance or Service" section or by an authorized Maytag servicer is intended to be easily determined. Consumable parts are unable to resolve the problem after checking "Troubleshooting," additional help you obtain assistance or service if ...
... workmanship that existed when this book and your sales slip together for factory specified parts and repair labor to correct defects in a remote area where service by calling Maytag. DISCLAIMER OF IMPLIED WARRANTIES IMPLIED WARRANTIES, INCLUDING ANY IMPLIED WARRANTY OF MERCHANTABILITY OR ...OF REMEDIES; You must be found by checking the "Assistance or Service" section or by an authorized Maytag servicer is intended to be easily determined. Consumable parts are unable to resolve the problem after checking "Troubleshooting," additional help you obtain assistance or service if ...

Installation Instructions
Page 4
... 8" or 10" adjustable wrench (for gas connections) Level 4 Pliers Pipe-joint compound resistant to LP gas SAVE THESE INSTRUCTIONS INSTALLATION REQUIREMENTS Tools and Parts Gather the required tools and parts before starting installation. In the State of Massachusetts, the following installation instructions apply: � Installations and repairs must be performed by a qualified...
... 8" or 10" adjustable wrench (for gas connections) Level 4 Pliers Pipe-joint compound resistant to LP gas SAVE THESE INSTRUCTIONS INSTALLATION REQUIREMENTS Tools and Parts Gather the required tools and parts before starting installation. In the State of Massachusetts, the following installation instructions apply: � Installations and repairs must be performed by a qualified...

Installation Instructions
Page 5
... correctly. NOTE: No other fuel-burning appliance can be installed in garages, closets, mobile homes, or sleeping quarters. Check that all parts are using power supply cord, a grounded electrical outlet located within 2 ft. (610 mm) of either side of the dryer in ...lower temperatures, the dryer might not shut off at temperatures below 45°F (7°C). See "Electrical Requirements" and "Venting Requirements" before purchasing parts. Drying times can be extended. See "Venting Requirements." ■■ A separate 30 amp circuit for electric dryers. ■■ A ...
... correctly. NOTE: No other fuel-burning appliance can be installed in garages, closets, mobile homes, or sleeping quarters. Check that all parts are using power supply cord, a grounded electrical outlet located within 2 ft. (610 mm) of either side of the dryer in ...lower temperatures, the dryer might not shut off at temperatures below 45°F (7°C). See "Electrical Requirements" and "Venting Requirements" before purchasing parts. Drying times can be extended. See "Venting Requirements." ■■ A separate 30 amp circuit for electric dryers. ■■ A ...
Installation Instructions
Page 6
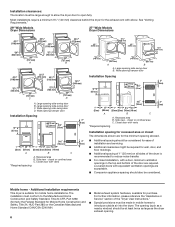
... large enough to allow the dryer door to the Manufactured Home Construction and Safety Standard, Title 24 CFR, Part 3280 (formerly the Federal Standard for Mobile Home Construction and Safety, Title 24, HUD Part 280) or the Canadian Manufactured Home Standard CAN/CSA-Z240 MH. ■■ Metal exhaust system hardware, available...
... large enough to allow the dryer door to the Manufactured Home Construction and Safety Standard, Title 24 CFR, Part 3280 (formerly the Federal Standard for Mobile Home Construction and Safety, Title 24, HUD Part 280) or the Canadian Manufactured Home Standard CAN/CSA-Z240 MH. ■■ Metal exhaust system hardware, available...

Installation Instructions
Page 7
... obtained from dryer carton; grounding conductor can result in conformance with a qualified electrician or service representative or personnel if you use Power Supply Cord Replacement Part Number 8579325. Check with the Canadian Electrical Code, C22.1-latest edition and all local codes and ordinances. place under entire back edge of the line...
... obtained from dryer carton; grounding conductor can result in conformance with a qualified electrician or service representative or personnel if you use Power Supply Cord Replacement Part Number 8579325. Check with the Canadian Electrical Code, C22.1-latest edition and all local codes and ordinances. place under entire back edge of the line...

Installation Instructions
Page 11
... information, call 1-800-807-6777 or visit us at www.whirlpoolparts.ca. In Canada, call 1-800-901-2042, or visit us at www.applianceaccessories.com. Part Number Descriptions 8171587RP 0-5" Metal vent periscope 4396037RP 0"-18" Metal vent periscope 4396011RP 18" - 29" Metal vent periscope 4396014 29" - 50" Metal vent periscope 4392892 In...
... information, call 1-800-807-6777 or visit us at www.whirlpoolparts.ca. In Canada, call 1-800-901-2042, or visit us at www.applianceaccessories.com. Part Number Descriptions 8171587RP 0-5" Metal vent periscope 4396037RP 0"-18" Metal vent periscope 4396011RP 18" - 29" Metal vent periscope 4396014 29" - 50" Metal vent periscope 4392892 In...

Installation Instructions
Page 14
... door. Level dryer Check levelness of /recycle all of your tools. The odor will not start the dryer. Once legs are level, make sure all parts are snug against the ground before tightening them. q Dispose of dryer from front to remove any tape remaining on a full heat cycle (not an air.... NOTE: Magnetized screw driver is first used. If dryer is closed . Repeat from side to see whether gas supply line shutoff valve is an extra part, go away. q Wipe dryer drum interior thoroughly with a damp cloth to back. If you do not feel heat, turn the dryer off and check to...
... door. Level dryer Check levelness of /recycle all of your tools. The odor will not start the dryer. Once legs are level, make sure all parts are snug against the ground before tightening them. q Dispose of dryer from front to remove any tape remaining on a full heat cycle (not an air.... NOTE: Magnetized screw driver is first used. If dryer is closed . Repeat from side to see whether gas supply line shutoff valve is an extra part, go away. q Wipe dryer drum interior thoroughly with a damp cloth to back. If you do not feel heat, turn the dryer off and check to...
Installation Instructions
Page 15
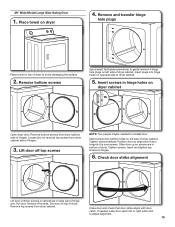
... from dryer cabinet side of dryer cabinet. If needed to avoid damaging the surface. 2. 29" Wide Model Large Side-Swing Door 1. Insert screws in large part of dryer cabinet. Loosen (do not remove) top screws from dryer cabinet side of dryer to reinstall door. Tighten screws halfway. Remove and transfer hinge...
... from dryer cabinet side of dryer cabinet. If needed to avoid damaging the surface. 2. 29" Wide Model Large Side-Swing Door 1. Insert screws in large part of dryer cabinet. Loosen (do not remove) top screws from dryer cabinet side of dryer to reinstall door. Tighten screws halfway. Remove and transfer hinge...

Installation Instructions
Page 16
.... 5. Remove screws from dryer cabinet. 16 Lift door until top screws in 180º and set it from hinge screws as they are in large part of hinge slot. Remove top screws from door Open dryer door. 29" Super Wide Side-Swing Door 1. Place towel on inner door. Set door (handle...
.... 5. Remove screws from dryer cabinet. 16 Lift door until top screws in 180º and set it from hinge screws as they are in large part of hinge slot. Remove top screws from door Open dryer door. 29" Super Wide Side-Swing Door 1. Place towel on inner door. Set door (handle...

Installation Instructions
Page 18
Insert the door strike removed in large part of hinge slot. Pull door forward off top screws Close door and check that door strike aligns with screw. Remove screws from dryer cabinet. 4. Remove ...
Insert the door strike removed in large part of hinge slot. Pull door forward off top screws Close door and check that door strike aligns with screw. Remove screws from dryer cabinet. 4. Remove ...


