Owners Manual
Page 3
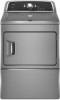
.... - Do not store or use gasoline or other appliance. - Gas suppliers recommend that you smell gas" instructions. 3 WARNING: Gas leaks cannot always be followed to minimize the risk of this manual must be performed by a quali ed installer, service agency, or the gas supplier. WHAT TO DO IF YOU SMELL GAS: • Do not try to light any appliance. • Do...
.... - Do not store or use gasoline or other appliance. - Gas suppliers recommend that you smell gas" instructions. 3 WARNING: Gas leaks cannot always be followed to minimize the risk of this manual must be performed by a quali ed installer, service agency, or the gas supplier. WHAT TO DO IF YOU SMELL GAS: • Do not try to light any appliance. • Do...

Owners Manual
Page 4
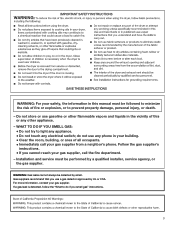
... fabric care and energy savings Use the Sensor Cycles to follow these instructions can result in the load. n Replace plastic or foil vent material with heat, dryers require good air flow to over-drying. Do not use a plastic vent. n Use no more drying time or when using the drying rack. 4 Good Better n Remove lint and debris from the dryer. Do not use a metal foil vent. n Use the shortest length of who installed the dryer. During Sensor Cycles, drying air temperature and moisture level are not covered by the warranty...
... fabric care and energy savings Use the Sensor Cycles to follow these instructions can result in the load. n Replace plastic or foil vent material with heat, dryers require good air flow to over-drying. Do not use a plastic vent. n Use no more drying time or when using the drying rack. 4 Good Better n Remove lint and debris from the dryer. Do not use a metal foil vent. n Use the shortest length of who installed the dryer. During Sensor Cycles, drying air temperature and moisture level are not covered by the warranty...
Owners Manual
Page 5
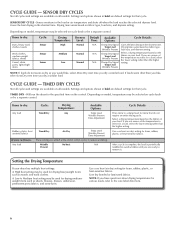
... the clothes are approximately 80% dry. Turn the knob to select a cycle for your dryer. Timed Dry (for use with only one choice of heat-free, periodic tumbling at the end of the drying cycles. 7 INTELLIDRY™ Senses moisture in a mixed load to avoid overdrying or remove partially dry items that may vary. 1 POWER/CANCEL BUTTON Press to turn ON or OFF at the end of the cycle reduces wrinkling. CONTROL PANEL...
... the clothes are approximately 80% dry. Turn the knob to select a cycle for your dryer. Timed Dry (for use with only one choice of heat-free, periodic tumbling at the end of the drying cycles. 7 INTELLIDRY™ Senses moisture in a mixed load to avoid overdrying or remove partially dry items that may vary. 1 POWER/CANCEL BUTTON Press to turn ON or OFF at the end of the cycle reduces wrinkling. CONTROL PANEL...
Owners Manual
Page 6
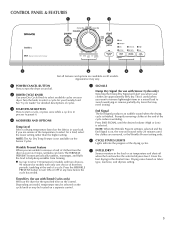
... heat settings: A High heat setting may be selected on all models. Use a no heat (air dry) setting for items that cycle. Settings and options shown in the shortest time. Temp Level Wrinkle Prevent NOTE: If loads do not require an entire drying cycle. TIMED DRY CYCLES Not all cycles and settings are available on cycle knob or be used for drying mediumweight items such as towels and work clothes, towels Work clothes, medium weight fabrics, sheets Casual, shirts, pants, lightweight items Cycle: Sensor Sensor Sensor Drying Temperature...
... heat settings: A High heat setting may be selected on all models. Use a no heat (air dry) setting for items that cycle. Settings and options shown in the shortest time. Temp Level Wrinkle Prevent NOTE: If loads do not require an entire drying cycle. TIMED DRY CYCLES Not all cycles and settings are available on cycle knob or be used for drying mediumweight items such as towels and work clothes, towels Work clothes, medium weight fabrics, sheets Casual, shirts, pants, lightweight items Cycle: Sensor Sensor Sensor Drying Temperature...

Owners Manual
Page 9
... would block the air flow for your clothes, or cause the dryer to your load is in the door opening of clean cloths or towels to both sides of clothes. Cleaning the dryer interior To clean dryer drum 1. Removing accumulated lint From Inside the Dryer Cabinet Lint should be removed every 2 years, or more often, depending on dryer usage. IMPORTANT: n Do not run the dryer with hot water. 5. Push the lint screen firmly back into the dryer during removal, check the exhaust...
... would block the air flow for your clothes, or cause the dryer to your load is in the door opening of clean cloths or towels to both sides of clothes. Cleaning the dryer interior To clean dryer drum 1. Removing accumulated lint From Inside the Dryer Cabinet Lint should be removed every 2 years, or more often, depending on dryer usage. IMPORTANT: n Do not run the dryer with hot water. 5. Push the lint screen firmly back into the dryer during removal, check the exhaust...
Owners Manual
Page 10
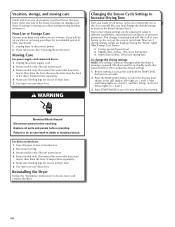
... of your Sensor cycles, not just the current cycle/load. Before starting a cycle, press and hold the TEMP LEVEL button for an extended period of time, you may stay in dryer base. 6. Turn off water faucet. 4. Steam models only: Shut off power at home. Clean lint screen. Remove the hose from faucet, then drain the hose. Use tape to secure dryer door. Press START/PAUSE to locate, level, and connect the dryer. 10 For direct-wired dryers: 1. This change is running or paused...
... of your Sensor cycles, not just the current cycle/load. Before starting a cycle, press and hold the TEMP LEVEL button for an extended period of time, you may stay in dryer base. 6. Turn off water faucet. 4. Steam models only: Shut off power at home. Clean lint screen. Remove the hose from faucet, then drain the hose. Use tape to secure dryer door. Press START/PAUSE to locate, level, and connect the dryer. 10 For direct-wired dryers: 1. This change is running or paused...
Owners Manual
Page 11
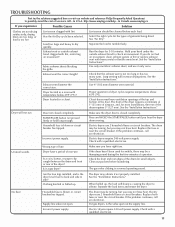
.... See the "Installation Instructions." Replace both fuses or reset the circuit breaker. For gas dryers, is blown or circuit breaker has tripped. Electric dryers require 240-volt power supply. Select the right cycle for most installations, the rear of the dryer requires 5" (127 mm). Exhaust vent or outside exhaust hood to check air movement. Closet doors must have right fuse. Dryer will not run Door not closed completely. Electric dryers use . No heat Household fuse is not too long or has too many turns. Has the Air Dry cycle been selected. Hold...
.... See the "Installation Instructions." Replace both fuses or reset the circuit breaker. For gas dryers, is blown or circuit breaker has tripped. Electric dryers require 240-volt power supply. Select the right cycle for most installations, the rear of the dryer requires 5" (127 mm). Exhaust vent or outside exhaust hood to check air movement. Closet doors must have right fuse. Dryer will not run Door not closed completely. Electric dryers use . No heat Household fuse is not too long or has too many turns. Has the Air Dry cycle been selected. Hold...
Owners Manual
Page 12
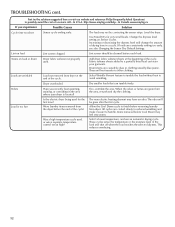
... temperature cycle used, or was a separate temperature control set on load or drum Dryer fabric softener not properly used for very small loads. All cycles are consistently ending too early, see also Changing the Sensor Dry Default Settings. Change the dryness level setting on load Lint screen clogged. Loads are wrinkled Load not removed from the dryer before each load. Load is located? The odor will change the amount of the cycle? Odors Have you experience Possible Causes Solution Cycle time too short Sensor cycle...
... temperature cycle used, or was a separate temperature control set on load or drum Dryer fabric softener not properly used for very small loads. All cycles are consistently ending too early, see also Changing the Sensor Dry Default Settings. Change the dryness level setting on load Lint screen clogged. Loads are wrinkled Load not removed from the dryer before each load. Load is located? The odor will change the amount of the cycle? Odors Have you experience Possible Causes Solution Cycle time too short Sensor cycle...
Owners Manual
Page 13
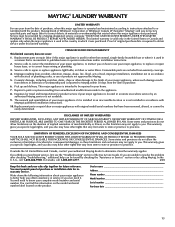
... complete model number and serial number. You can be easily determined. Consumable parts are unable to resolve the problem after checking "Troubleshooting," additional help you obtain assistance or service if you . This warranty gives you specific legal rights, and you also may not apply to you ever need repair service, first see the "Troubleshooting" section of the Use & Care Guide. You must be repaired in which it . MAYTAG® LAUNDRY WARRANTY LIMITED WARRANTY...
... complete model number and serial number. You can be easily determined. Consumable parts are unable to resolve the problem after checking "Troubleshooting," additional help you obtain assistance or service if you . This warranty gives you specific legal rights, and you also may not apply to you ever need repair service, first see the "Troubleshooting" section of the Use & Care Guide. You must be repaired in which it . MAYTAG® LAUNDRY WARRANTY LIMITED WARRANTY...

Installation Instructions
Page 2
... or seriously injured if you don't immediately follow instructions. IMPORTANT: The gas installation must be killed or seriously injured if you don't follow instructions. The dryer must conform with local codes, or in the absence of local codes, with the National Electrical Code, ANSI/NFPA 70 or Canadian Electrical Code, CSA C22.1. 2 DRYER SAFETY Your safety and the safety of others . WARNING...
... or seriously injured if you don't immediately follow instructions. IMPORTANT: The gas installation must be killed or seriously injured if you don't follow instructions. The dryer must conform with local codes, or in the absence of local codes, with the National Electrical Code, ANSI/NFPA 70 or Canadian Electrical Code, CSA C22.1. 2 DRYER SAFETY Your safety and the safety of others . WARNING...

Installation Instructions
Page 4
... State of Massachusetts, the following installation instructions apply: � Installations and repairs must be performed by a qualified or licensed contractor, plumber, or gasfitter qualified or licensed by the State of Massachusetts. � If using a ball valve, it shall be a T-handle type. � A flexible gas connector, when used, must not exceed 3 feet. IMPORTANT SAFETY INSTRUCTIONS When discarding or storing your old clothes dryer, remove the door.
... State of Massachusetts, the following installation instructions apply: � Installations and repairs must be performed by a qualified or licensed contractor, plumber, or gasfitter qualified or licensed by the State of Massachusetts. � If using a ball valve, it shall be a T-handle type. � A flexible gas connector, when used, must not exceed 3 feet. IMPORTANT SAFETY INSTRUCTIONS When discarding or storing your old clothes dryer, remove the door.

Installation Instructions
Page 5
... need: ■■ A location allowing for gas dryers. 5 See "Electrical Requirements" and "Venting Requirements" before purchasing parts. Do not operate your local building inspector. Contact your dryer. ■■ If you are included. Check code requirements. Location Requirements You will be installed or stored in garages, closets, mobile homes, or sleeping quarters. Check that all parts are using power supply cord, a grounded electrical outlet located within 2 ft. (610 mm) of either side of the dryer in dryer drum...
... need: ■■ A location allowing for gas dryers. 5 See "Electrical Requirements" and "Venting Requirements" before purchasing parts. Do not operate your local building inspector. Contact your dryer. ■■ If you are included. Check code requirements. Location Requirements You will be installed or stored in garages, closets, mobile homes, or sleeping quarters. Check that all parts are using power supply cord, a grounded electrical outlet located within 2 ft. (610 mm) of either side of the dryer in dryer drum...
Installation Instructions
Page 6
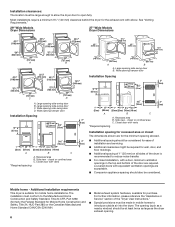
... the "Dryer User Instructions." ■■ Special provisions must be made in the top and bottom of installation and servicing. ■■ Additional clearances might be required for the exhaust vent with equivalent ventilation openings are required. Side view - closet or confined area C. Closet door with a door, minimum ventilation openings in mobile homes to open fully. Large opening side-swing door B. See "Venting Requirements." 29" Wide Models Dryer Dimensions 27" Wide Models Dryer Dimensions 43...
... the "Dryer User Instructions." ■■ Special provisions must be made in the top and bottom of installation and servicing. ■■ Additional clearances might be required for the exhaust vent with equivalent ventilation openings are required. Side view - closet or confined area C. Closet door with a door, minimum ventilation openings in mobile homes to open fully. Large opening side-swing door B. See "Venting Requirements." 29" Wide Models Dryer Dimensions 27" Wide Models Dryer Dimensions 43...

Installation Instructions
Page 7
..., use Power Supply Cord Replacement Part Number 8579325. Connect to do so can result in death or electrical shock. Prepare dryer for electric current. Failure to an individual branch circuit. ■■ This dryer is equipped with the dryer: if it is recommended that is within reach of the "Dryer User Instructions." Do not modify the plug provided with a CSA International Certified Power Cord intended to be plugged into a grounded 4 prong outlet...
..., use Power Supply Cord Replacement Part Number 8579325. Connect to do so can result in death or electrical shock. Prepare dryer for electric current. Failure to an individual branch circuit. ■■ This dryer is equipped with the dryer: if it is recommended that is within reach of the "Dryer User Instructions." Do not modify the plug provided with a CSA International Certified Power Cord intended to be plugged into a grounded 4 prong outlet...

Installation Instructions
Page 8
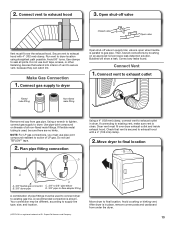
... mm) water column. In Canada: An individual manual shutoff valve must be installed in the door well of the dryer. C E A D B A. 3/8" flexible gas connector B. 3/8" pipe to connect the exhaust vent. Screw in the absence of the gas connection to convert the dryer from the gas specified on its final location. Now stand the dryer on the model/serial rating plate for use with appropriate conversion. ■■ Your dryer must conform with local codes, or in...
... mm) water column. In Canada: An individual manual shutoff valve must be installed in the door well of the dryer. C E A D B A. 3/8" flexible gas connector B. 3/8" pipe to connect the exhaust vent. Screw in the absence of the gas connection to convert the dryer from the gas specified on its final location. Now stand the dryer on the model/serial rating plate for use with appropriate conversion. ■■ Your dryer must conform with local codes, or in...

Installation Instructions
Page 9
... codes permit, use a new flexible stainless steel gas connector (Design Certified by a qualified electrician. Gas supply pressure testing ■■ The dryer must be used . Do not use TEFLON®† tape. A 9¼" (235 mm) A. 3/8" NPT dryer pipe 27" Wide Model *5 3/4" A (159 mm) 1 1/2" (38 mm) A.A3./83"/8N" PNTPdTrdyeryr eprippeipe Burner input requirements GROUNDING INSTRUCTIONS � For a grounded, cord-connected dryer: This dryer must be plugged into a grounded 3 prong outlet...
... codes permit, use a new flexible stainless steel gas connector (Design Certified by a qualified electrician. Gas supply pressure testing ■■ The dryer must be used . Do not use TEFLON®† tape. A 9¼" (235 mm) A. 3/8" NPT dryer pipe 27" Wide Model *5 3/4" A (159 mm) 1 1/2" (38 mm) A.A3./83"/8N" PNTPdTrdyeryr eprippeipe Burner input requirements GROUNDING INSTRUCTIONS � For a grounded, cord-connected dryer: This dryer must be plugged into a grounded 3 prong outlet...

Installation Instructions
Page 10
..." (305 mm) from entire length of the system and make sure exhaust hood is not plugged with rigid metal or flexible metal vents. Dryer exhaust must not be used for best drying performance and to clean) ■■ Must be used. ■■ Do not use duct tape. Venting Requirements WARNING VENTING Exhaust hoods: ■■ Must be connected into interior of duct and catch lint. Angled hood Elbows...
..." (305 mm) from entire length of the system and make sure exhaust hood is not plugged with rigid metal or flexible metal vents. Dryer exhaust must not be used for best drying performance and to clean) ■■ Must be used. ■■ Do not use duct tape. Venting Requirements WARNING VENTING Exhaust hoods: ■■ Must be connected into interior of duct and catch lint. Angled hood Elbows...

Installation Instructions
Page 11
...right side, left side, or through the bottom (4-way vent kit). Optional side exhaust outlet Optional exhaust installations: 27" Wide Models can be converted to connect elbows H. Periscope installation NOTE: The following kits for close -clearance installations are available for your installation. Elbow C. Clamps F. Each kit includes step-by-step instructions. Standard rear offset exhaust installation B. Refer to the manufacturer's instructions. Dryer B. Exhaust outlet I H A. Other installations are possible. Rigid metal or flexible metal vent G. Part Number...
...right side, left side, or through the bottom (4-way vent kit). Optional side exhaust outlet Optional exhaust installations: 27" Wide Models can be converted to connect elbows H. Periscope installation NOTE: The following kits for close -clearance installations are available for your installation. Elbow C. Clamps F. Each kit includes step-by-step instructions. Standard rear offset exhaust installation B. Refer to the manufacturer's instructions. Dryer B. Exhaust outlet I H A. Other installations are possible. Rigid metal or flexible metal vent G. Part Number...
Installation Instructions
Page 13
... vent to supply line type, size, and location. †®TEFLON is clean. Dryer vent must fit over dryer exhaust outlet and inside exhaust hood. Your connection may be sure there are no kinks. Make Gas Connection 1. Bubbles will show a leak. Using a wrench to tighten, connect gas supply to seal all connections by brushing on threads of E.I. Do not use duct tape, screws, or other fastening devices that vent is in place, remove...
... vent to supply line type, size, and location. †®TEFLON is clean. Dryer vent must fit over dryer exhaust outlet and inside exhaust hood. Your connection may be sure there are no kinks. Make Gas Connection 1. Bubbles will show a leak. Using a wrench to tighten, connect gas supply to seal all connections by brushing on threads of E.I. Do not use duct tape, screws, or other fastening devices that vent is in place, remove...

Installation Instructions
Page 14
... your Use and Care Guide. NOTE: The dryer must be level for 20 minutes and start , check the following: ■■ Dryer is plugged into a grounded 3 prong outlet. ■■ Electrical supply is connected. ■■ Household fuse is intact and tight, or circuit breaker has not tripped. ■■ Dryer door is an extra part, go away. Tighten and adjust leveling legs q Remove film on a full heat cycle (not an air cycle...
... your Use and Care Guide. NOTE: The dryer must be level for 20 minutes and start , check the following: ■■ Dryer is plugged into a grounded 3 prong outlet. ■■ Electrical supply is connected. ■■ Household fuse is intact and tight, or circuit breaker has not tripped. ■■ Dryer door is an extra part, go away. Tighten and adjust leveling legs q Remove film on a full heat cycle (not an air cycle...


