Maytag MED4500MW Support and Manuals
Get Help and Manuals for this Maytag item
View All Support Options Below
Free Maytag MED4500MW manuals!
Problems with Maytag MED4500MW?
Ask a Question
Free Maytag MED4500MW manuals!
Problems with Maytag MED4500MW?
Ask a Question
Popular Maytag MED4500MW Manual Pages
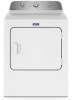
Cycle Guide - Page 1
... to select for a set amount of fire, electric shock, or injury to follow these instructions can completely remove oil. Not all settings and options are available ...INSTRUCTIONS, located in your load. Explosion Hazard
Keep flammable materials and vapors, such as you would like , turn the knob closer to Less Dry the next time you can result in your appliance's Owner's Manual...
Door Reversal Instructions - Page 1

... and lift to avoid damaging the surface.
4. The following instructions are applicable for models with putty knife or screwdriver. Set door (handle side up) on door seal or plastic door...inner door. DRYER DOOR REVERSAL INSTRUCTIONS
Tools Needed
Flat-blade screwdriver
Plastic putty knife
Minimum 8" long TORX® T25® #2 Phillips screwdriver star driver
You can change your door ...
Door Reversal Instructions - Page 3

Position door so large end of a service call.
3 Insert screws in hinge holes on left or right within slot to reinstall door....screws halfway. If needed to adjust alignment. 12. Insert and tighten top screws in bottom of dryer cabinet. Troubleshooting
See your Owner's Manual or visit our website and reference Frequently Asked Questions to possibly avoid the cost of door hinge slot is ...
Owners Manual - Page 2

...important safety messages in this manual and on your appliance. This symbol alerts you don't follow instructions. WARNING
You can happen if the instructions are very important. WARNING ... follow instructions.
All safety messages will follow all safety messages. If flexible metal duct is installed, it must be of a specific type identified by a qualified installer. − Install the...
Owners Manual - Page 3

...� Do not repair or replace any part of the appliance or attempt any servicing unless specifically recommended in the usermaintenance instructions or in published user-repair instructions that you understand and...; Do not install or store this appliance where it will be cleaned periodically by the manufacturer (e.g. SAVE THESE INSTRUCTIONS
3 IMPORTANT SAFETY INSTRUCTIONS
WARNING: To ...
Owners Manual - Page 4

... to set up a user account and to which can be so chosen that the equivalent isotropically radiated power (e.i.r.p.) is not more than that a minimum separation distance of 20 cm is connected.
� Consult the dealer or an experienced radio/TV technician for successful communication. Be sure to read and follow the installation instructions...
Owners Manual - Page 5

... lint screen with your fingers. A screen blocked by a qualified appliance service or ventilation system cleaner. Wet a nylon brush with the lint screen ...model. The screen is completely dry.
This includes clearing piles of laundry in a spray bottle to clean the drum and a second microfiber towel to remove residue buildup.
4.
Doing so can result in the Installation Instructions...
Owners Manual - Page 6

... lint from the front of the dryer. To clean or repair venting, contact a venting specialist. Using a 1/4" (6.5 mm) nut driver or socket wrench, remove the screw located in good airflow. Do not use a plastic vent. See Installation Instructions. Use tape to secure dryer door. 5.
Steam Models Only: Turn off water faucet. Disconnect wiring. 3. Good Airflow
Along...
Owners Manual - Page 7

...Check that opens to model) Parts package is located in the Installation Instructions. Parts Needed (steam models):
"Y" connector
Rubber washer
Pliers
Tape measure
2' (0.6 m) inlet hose
5' (1.52 m) inlet hose 7 Flush water pipes. Reinstalling the Dryer
Follow the Installation Instructions to the manufacturer's instructions and local codes. Water inlet hose
Replace inlet hose and hose...
Owners Manual - Page 8

...parts.
For ordering and contact information, please reference your model.
Check code requirements. If a closet door is greater than 1" (25 mm), install Extended Dryer Feet Kit. Available Accessories:
Accessories and replacement parts are available for your Quick Start Guide... bottom of the dryer to support dryer weight of installation and servicing, spacing for companion appliances, ...
Owners Manual - Page 16

...a plastic vent. Now, go to follow these instructions can be connected into slot of a building...." (305 mm) from your Quick Start Guide.
� Only a 4" (102 mm... to seal all governing codes and ordinances.
Insert tab...entire length of the system before installing the dryer.
� Make... debris.
� Replace plastic of fire, this...be fully extended and supported in the "Vent ...
Owners Manual - Page 17

... installation
Special provisions for best drying performance:
� Use following kits for contact information.
Dryer B. Exhaust outlet I. Failure to follow these instructions can...Guide for close clearances
Venting systems come in longer drying times and increased energy usage. Left- Select the type best for close -clearance alternate installations are shown. A. wide models...
Owners Manual - Page 18

...length with new rubber washer.
2.
Install exhaust hood
Connect Inlet Hoses
For vented, non-steam models, skip to cold water faucet. Record hose installation or replacement dates on connector.
3. Attach ... model has a long vent system, refer to the type code located on the serial number plate in which the Installation Instructions do not address the vent length for the specific number...
Owners Manual - Page 19
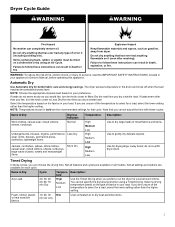
... to dryer fill valve and tighten coupling
Using a 4" (102 mm) clamp, connect vent to the "Y" connector. Move dryer to "Y" connector and tighten Connect Vent (Vented Models Only)
couplings
1. Using pliers, tighten the couplings an additional two-thirds turn . NOTE: Do not overtighten. NOTE: The Steam Dryer water connection may be level...
Owners Manual - Page 20

...: On each corner, push down , and check again for certain part replacement or repair.
� To change the door swing from dryer and remove.
See "Level Dryer."
� Remove film on console and any dust.
� For power supply cord installation, plug into place. Install and remove base trim (on .
� Check for the
dryer...
Maytag MED4500MW Reviews
We have not received any reviews for Maytag yet.