Owners Manual
Page 2
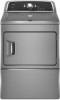
... killed or seriously injured if you what the potential hazard is the safety alert symbol. This symbol alerts you to reduce the chance of others . DRYER SAFETY Your safety and the safety of injury, and tell you don't immediately follow the safety alert symbol and either the word "DANGER" or "WARNING...
... killed or seriously injured if you what the potential hazard is the safety alert symbol. This symbol alerts you to reduce the chance of others . DRYER SAFETY Your safety and the safety of injury, and tell you don't immediately follow the safety alert symbol and either the word "DANGER" or "WARNING...

Owners Manual
Page 4
... savings. Use Timed Dry for better fabric care and energy savings Use the Sensor Cycles to over-drying. Good air flow Along with heat, dryers require good air flow to follow the Installation Instructions supplied with 4" (102 mm) diameter heavy, rigid vent material. n Clear away items from...vent material with your lint screen before each bend and curve reduces air flow. When cleaning is complete, be paid by : n Cleaning your dryer for final product check. Use Sensor Cycles for the occasional damp load that needs a little more than four 90° elbows in shrinkage, wrinkling...
... savings. Use Timed Dry for better fabric care and energy savings Use the Sensor Cycles to over-drying. Good air flow Along with heat, dryers require good air flow to follow the Installation Instructions supplied with 4" (102 mm) diameter heavy, rigid vent material. n Clear away items from...vent material with your lint screen before each bend and curve reduces air flow. When cleaning is complete, be paid by : n Cleaning your dryer for final product check. Use Sensor Cycles for the occasional damp load that needs a little more than four 90° elbows in shrinkage, wrinkling...
Owners Manual
Page 5
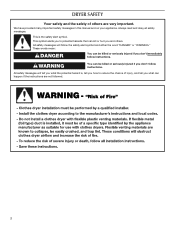
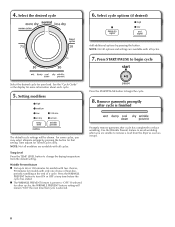
... Signal produces an audible sound when the drying cycle is in process to select a cycle for models with two choices, 90 minutes for your dryer. Promptly removing clothes at the end of a cycle. Gives the best drying in a mixed load to avoid overdrying or remove partially dry items... the load reaches the selected dryness level. Turn the knob to pause it stops, wrinkles can form. Press the WRINKLE PREVENT button to turn the dryer on a separate control. 5 SIGNALS Damp Dry Signal (for detailed descriptions of cycles. 3 START/PAUSE BUTTON Press to start a cycle, or press once while...
... Signal produces an audible sound when the drying cycle is in process to select a cycle for models with two choices, 90 minutes for your dryer. Promptly removing clothes at the end of a cycle. Gives the best drying in a mixed load to avoid overdrying or remove partially dry items... the load reaches the selected dryness level. Turn the knob to pause it stops, wrinkles can form. Press the WRINKLE PREVENT button to turn the dryer on a separate control. 5 SIGNALS Damp Dry Signal (for detailed descriptions of cycles. 3 START/PAUSE BUTTON Press to start a cycle, or press once while...
Owners Manual
Page 6
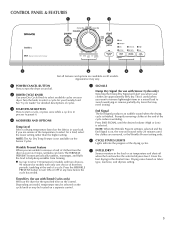
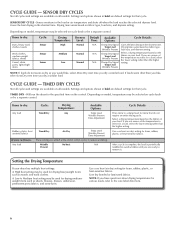
SENSOR DRY CYCLE - Will run the dryer for foam, rubber, plastic, or heat-sensitive fabrics. Wrinkle No heat N/A Prevent Cycle Details: Dries items to the care label directions. 6 SENSOR DRY CYCLES Not ... Drying Temperature: High Medium Low Dryness Level: Normal Normal Normal Default Available Time: Options: Cycle Details: N/A Damp Dry Signal Gives the best drying in your dryer has multiple heat settings: A High heat setting may be a separate control. NOTE: If you are unsure of the temperature to reduce wrinkling.
SENSOR DRY CYCLE - Will run the dryer for foam, rubber, plastic, or heat-sensitive fabrics. Wrinkle No heat N/A Prevent Cycle Details: Dries items to the care label directions. 6 SENSOR DRY CYCLES Not ... Drying Temperature: High Medium Low Dryness Level: Normal Normal Normal Default Available Time: Options: Cycle Details: N/A Damp Dry Signal Gives the best drying in your dryer has multiple heat settings: A High heat setting may be a separate control. NOTE: If you are unsure of the temperature to reduce wrinkling.
Owners Manual
Page 7
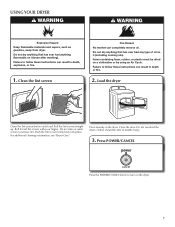
...or wash screen to turn on it (even after washing). Press POWER/CANCEL Press the POWER/CANCEL button to remove lint. Load the dryer Clean the lint screen before each load. Place laundry in death or fire. 2. Items containing foam, rubber, or plastic must be able...using an Air Cycle. Roll lint off the screen with your fingers. USING YOUR DRYER WARNING WARNING Explosion Hazard Keep flammable materials and vapors, such as gasoline, away from dryer. For additional cleaning information, see "Dryer Care." clothes should be dried on it (including cooking oils). Failure to tumble ...
...or wash screen to turn on it (even after washing). Press POWER/CANCEL Press the POWER/CANCEL button to remove lint. Load the dryer Clean the lint screen before each load. Place laundry in death or fire. 2. Items containing foam, rubber, or plastic must be able...using an Air Cycle. Roll lint off the screen with your fingers. USING YOUR DRYER WARNING WARNING Explosion Hazard Keep flammable materials and vapors, such as gasoline, away from dryer. For additional cleaning information, see "Dryer Care." clothes should be dried on it (including cooking oils). Failure to tumble ...
Owners Manual
Page 8
... setting. NOTE: Not all cycles. For some cycles, you are available with all options and settings are unable to change the drying temperature from the dryer as soon as it stops. 8 See the "Cycle Guide" or the display for Timed Cycles only. Temp Level Press the TEMP LEVEL button to remove...
... setting. NOTE: Not all cycles. For some cycles, you are available with all options and settings are unable to change the drying temperature from the dryer as soon as it stops. 8 See the "Cycle Guide" or the display for Timed Cycles only. Temp Level Press the TEMP LEVEL button to remove...

Owners Manual
Page 9
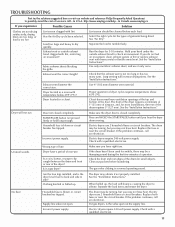
...can increase drying time. Cleaning the lint screen Every load cleaning The lint screen is removed. 2. Removing accumulated lint From Inside the Dryer Cabinet Lint should be removed every 2 years, or more frequently, if it becomes clogged due to the stained area of the drum... and rub with your fingers. 2. See "Venting Requirements." Wet both the dryer and fabrics. Roll lint off the screen into place. Apply a liquid, nonflammable household cleaner to a residue buildup. NOTE: Garments that would block...
...can increase drying time. Cleaning the lint screen Every load cleaning The lint screen is removed. 2. Removing accumulated lint From Inside the Dryer Cabinet Lint should be removed every 2 years, or more frequently, if it becomes clogged due to the stained area of the drum... and rub with your fingers. 2. See "Venting Requirements." Wet both the dryer and fabrics. Roll lint off the screen into place. Apply a liquid, nonflammable household cleaner to a residue buildup. NOTE: Garments that would block...
Owners Manual
Page 10
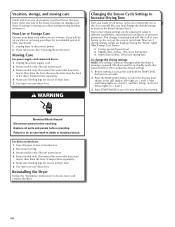
...level. 2 Slightly drier clothes, 15% more drying time. 3 Much drier clothes, 30% more drying time. If you will be changed while the dryer is running or paused. Steam models only: Shut off water faucet. 4. Use tape to save the new dryness level setting. Steam models only: Shut...as you would like, you should: 1. WARNING Changing the Sensor Cycle Settings to adjust the default settings. 1. Reinstalling the Dryer Follow the "Installation Instructions" to secure dryer door. Vacation, storage, and moving your loads on all Sensor cycles are at fuse or breaker box. 2. Turn off )...
...level. 2 Slightly drier clothes, 15% more drying time. 3 Much drier clothes, 30% more drying time. If you will be changed while the dryer is running or paused. Steam models only: Shut off water faucet. 4. Use tape to save the new dryness level setting. Steam models only: Shut...as you would like, you should: 1. WARNING Changing the Sensor Cycle Settings to adjust the default settings. 1. Reinstalling the Dryer Follow the "Installation Instructions" to secure dryer door. Vacation, storage, and moving your loads on all Sensor cycles are at fuse or breaker box. 2. Turn off )...
Owners Manual
Page 11
http://www.maytag.com/help - Separate the load to side? Run the dryer for most installations, the rear of the dryer requires 5" (127 mm). Long venting will bounce, causing the dryer to check air movement. Dryer located in a closet. Proper operation of fuse. Closet doors must have right fuse. START/... a thumping sound during the first few minutes of lint or replace exhaust vent with lint. Make sure you hear the dryer drum moving. In Canada www.maytag.ca If you may be turning, but you do not feel air movement, clean exhaust system of operation. Exhaust vent...
http://www.maytag.com/help - Separate the load to side? Run the dryer for most installations, the rear of the dryer requires 5" (127 mm). Long venting will bounce, causing the dryer to check air movement. Dryer located in a closet. Proper operation of fuse. Closet doors must have right fuse. START/... a thumping sound during the first few minutes of lint or replace exhaust vent with lint. Make sure you hear the dryer drum moving. In Canada www.maytag.ca If you may be turning, but you do not feel air movement, clean exhaust system of operation. Exhaust vent...
Owners Manual
Page 12
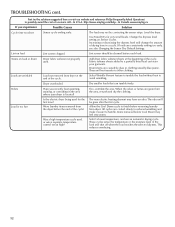
The load may have an odor. Stains on load Lint screen clogged. Loads are wrinkled Load not removed from dryer. Load is located? In Canada www.maytag.ca If you recently been painting, staining, or varnishing in clothing (usually blue jeans). Use Timed Dry for the ... Have you experience Possible Causes Solution Cycle time too short Sensor cycle ending early. http://www.maytag.com/help - Dryer overloaded. Change the dryness level setting on high? Level the dryer. If loads are cooled slowly to reduced wrinkling and make it easier to avoid wrinkling. The...
The load may have an odor. Stains on load Lint screen clogged. Loads are wrinkled Load not removed from dryer. Load is located? In Canada www.maytag.ca If you recently been painting, staining, or varnishing in clothing (usually blue jeans). Use Timed Dry for the ... Have you experience Possible Causes Solution Cycle time too short Sensor cycle ending early. http://www.maytag.com/help - Dryer overloaded. Change the dryness level setting on high? Level the dryer. If loads are cooled slowly to reduced wrinkling and make it easier to avoid wrinkling. The...

Installation Instructions
Page 2
... WARNING You can be killed or seriously injured if you how to potential hazards that can happen if the instructions are very important. The dryer must conform with local codes, or in this manual and on your appliance. Always read and obey all safety messages. This is , tell..., and tell you don't follow instructions. All safety messages will follow the safety alert symbol and either the word "DANGER" or "WARNING." DRYER SAFETY Your safety and the safety of others . We have provided many important safety messages in the absence of local codes, with the National ...
... WARNING You can be killed or seriously injured if you how to potential hazards that can happen if the instructions are very important. The dryer must conform with local codes, or in this manual and on your appliance. Always read and obey all safety messages. This is , tell..., and tell you don't follow instructions. All safety messages will follow the safety alert symbol and either the word "DANGER" or "WARNING." DRYER SAFETY Your safety and the safety of others . We have provided many important safety messages in the absence of local codes, with the National ...

Installation Instructions
Page 4
IMPORTANT SAFETY INSTRUCTIONS When discarding or storing your old clothes dryer, remove the door. Tools needed for all installations: Adjustable wrench that opens to 1" (25 mm) or hex-head socket wrench Caulking gun and compound (for ...
IMPORTANT SAFETY INSTRUCTIONS When discarding or storing your old clothes dryer, remove the door. Tools needed for all installations: Adjustable wrench that opens to 1" (25 mm) or hex-head socket wrench Caulking gun and compound (for ...

Installation Instructions
Page 5
...Electrical Requirements" and "Venting Requirements" before purchasing parts. If slope is located in the same closet as a dryer. Some codes limit, or do not permit, installing dryer in garages, closets, mobile homes, or sleeping quarters. If not level, clothes may not tumble properly and ...;C). Contact your local building inspector. See "Electrical Requirements." ■■ A sturdy floor to water and/or weather. Do not operate your dryer. ■■ If you are included. Check that all parts are using power supply cord, a grounded electrical outlet located within 2 ft....
...Electrical Requirements" and "Venting Requirements" before purchasing parts. If slope is located in the same closet as a dryer. Some codes limit, or do not permit, installing dryer in garages, closets, mobile homes, or sleeping quarters. If not level, clothes may not tumble properly and ...;C). Contact your local building inspector. See "Electrical Requirements." ■■ A sturdy floor to water and/or weather. Do not operate your dryer. ■■ If you are included. Check that all parts are using power supply cord, a grounded electrical outlet located within 2 ft....
Installation Instructions
Page 6
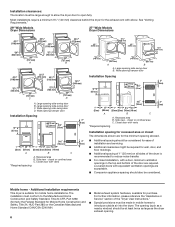
...the "Assistance or Service" section of the door are acceptable. ■■ Companion appliance spacing should be large enough to allow the dryer door to open fully. Wide opening . 6 Large opening side-swing door B. Closet door with equivalent ventilation openings are required. Most ... Standard CAN/CSA-Z240 MH. ■■ Metal exhaust system hardware, available for purchase. Recessed area B. See "Venting Requirements." 29" Wide Models Dryer Dimensions 27" Wide Models Dryer Dimensions 43 " (1092 mm) 23 ¾" (603 mm) 43 " (1092 mm) 13 ¾" (349 mm) *29 1/2" (749...
...the "Assistance or Service" section of the door are acceptable. ■■ Companion appliance spacing should be large enough to allow the dryer door to open fully. Wide opening . 6 Large opening side-swing door B. Closet door with equivalent ventilation openings are required. Most ... Standard CAN/CSA-Z240 MH. ■■ Metal exhaust system hardware, available for purchase. Recessed area B. See "Venting Requirements." 29" Wide Models Dryer Dimensions 27" Wide Models Dryer Dimensions 43 " (1092 mm) 23 ¾" (603 mm) 43 " (1092 mm) 13 ¾" (349 mm) *29 1/2" (749...

Installation Instructions
Page 7
...INSTRUCTIONS Install Leveling Legs WARNING Excessive Weight Hazard Use two or more people to do so can result in length. Failure to whether the dryer is recommended that you are in doubt as to do so can result in back or other injury. 1. If using a replacement power ...) ■■ Do not use a large flat piece of electric shock by a qualified electrician. GROUNDING INSTRUCTIONS � For a grounded, cord-connected dryer: This dryer must be plugged into a grounded 4 prong outlet. Check with all local codes. place under entire back edge of the equipment- Electric...
...INSTRUCTIONS Install Leveling Legs WARNING Excessive Weight Hazard Use two or more people to do so can result in length. Failure to whether the dryer is recommended that you are in doubt as to do so can result in back or other injury. 1. If using a replacement power ...) ■■ Do not use a large flat piece of electric shock by a qualified electrician. GROUNDING INSTRUCTIONS � For a grounded, cord-connected dryer: This dryer must be plugged into a grounded 4 prong outlet. Check with all local codes. place under entire back edge of the equipment- Electric...

Installation Instructions
Page 8
...guidelines for LP (propane or butane) gases with the National Fuel Gas Code, ANSI Z223.1. IMPORTANT: The gas installation must be made to the dryer (see illustration). ■■ Must include a shutoff valve: In the U.S.A.: An individual manual shutoff valve must be easy to flare adapter fitting... can result in leveling legs diamond marking Examine leveling legs, find diamond marking. It is close to its feet. 2. Slide the dryer until diamond marking is located on its final location. LP gas conversion: Conversion must conform with local codes, or in accordance with...
...guidelines for LP (propane or butane) gases with the National Fuel Gas Code, ANSI Z223.1. IMPORTANT: The gas installation must be made to the dryer (see illustration). ■■ Must include a shutoff valve: In the U.S.A.: An individual manual shutoff valve must be easy to flare adapter fitting... can result in leveling legs diamond marking Examine leveling legs, find diamond marking. It is close to its feet. 2. Slide the dryer until diamond marking is located on its final location. LP gas conversion: Conversion must conform with local codes, or in accordance with...

Installation Instructions
Page 9
...pipe. Electrical Requirements WARNING Electrical Shock Hazard Plug into an appropriate outlet that resist the action of LP gas must be used . This dryer is a registered trademark of electric shock. grounding conductor can result in a risk of E.I. NOTE: Pipe joint compounds that is properly ...local codes permit, use a new flexible stainless steel gas connector (Design Certified by the American Gas Association or CSA International) to connect your dryer has a 3/8" male pipe thread. 29" Wide Model Elevations above 10,000 ft. (3,048 m): ■■ When installed above sea ...
...pipe. Electrical Requirements WARNING Electrical Shock Hazard Plug into an appropriate outlet that resist the action of LP gas must be used . This dryer is a registered trademark of electric shock. grounding conductor can result in a risk of E.I. NOTE: Pipe joint compounds that is properly ...local codes permit, use a new flexible stainless steel gas connector (Design Certified by the American Gas Association or CSA International) to connect your dryer has a 3/8" male pipe thread. 29" Wide Model Elevations above 10,000 ft. (3,048 m): ■■ When installed above sea ...

Installation Instructions
Page 10
...if accessible to clean) ■■ Must be fully extended and supported in death or fire. Improper venting can result in final dryer location. ■■ Remove excess to seal all governing codes and ordinances. Venting Requirements WARNING VENTING Exhaust hoods: ■■ ... existing vent system, clean lint from ground or any gas vent, chimney, wall, ceiling, attic, crawlspace, or a concealed space of fire, this dryer MUST BE EXHAUSTED OUTDOORS. Angled hood Elbows: ■■ 45° elbows provide better airflow than 90° elbows. ■■ Only ...
...if accessible to clean) ■■ Must be fully extended and supported in death or fire. Improper venting can result in final dryer location. ■■ Remove excess to seal all governing codes and ordinances. Venting Requirements WARNING VENTING Exhaust hoods: ■■ ... existing vent system, clean lint from ground or any gas vent, chimney, wall, ceiling, attic, crawlspace, or a concealed space of fire, this dryer MUST BE EXHAUSTED OUTDOORS. Angled hood Elbows: ■■ 45° elbows provide better airflow than 90° elbows. ■■ Only ...

Installation Instructions
Page 11
...Exhaust outlet I H A. Periscope installation NOTE: The following kits for close elbow 4396007RW Through-the-wall vent cap 4396008RP 4" steel dryer venting clamps - 2 pack 8212662 Flush mounting louvered vent hood 4" 11 Left or right side exhaust installation (27" wide models...Other installations are shown. Each kit includes step-by-step instructions. A B C A. Standard rear offset exhaust installation B. white (27" Dryers Only) W10186596 4-way vent kit - Refer to connect elbows H. Rigid metal or flexible metal vent G. Vent length necessary to the manufacturer's...
...Exhaust outlet I H A. Periscope installation NOTE: The following kits for close elbow 4396007RW Through-the-wall vent cap 4396008RP 4" steel dryer venting clamps - 2 pack 8212662 Flush mounting louvered vent hood 4" 11 Left or right side exhaust installation (27" wide models...Other installations are shown. Each kit includes step-by-step instructions. A B C A. Standard rear offset exhaust installation B. white (27" Dryers Only) W10186596 4-way vent kit - Refer to connect elbows H. Rigid metal or flexible metal vent G. Vent length necessary to the manufacturer's...
Installation Instructions
Page 12
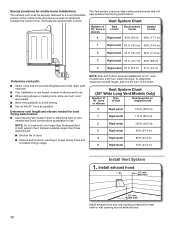
... as few 90° turns as possible. Vent System Chart (29" Wide Long Vent Models Only) Number of 90° turns or elbows Type of dryer. ■■ Reduce performance, resulting in Vent system chart. Install exhaust hood 12" min. (305 mm) 12" min. (305 mm) Install exhaust ... of the mobile home structure and must not terminate beneath the mobile home. To determine maximum exhaust length, add one 90º turn inside the dryer. NOTE: Side and bottom exhaust installations for 27" wide models have a 90º turn to the chart. Special provisions for mobile home installations:...
... as few 90° turns as possible. Vent System Chart (29" Wide Long Vent Models Only) Number of 90° turns or elbows Type of dryer. ■■ Reduce performance, resulting in Vent system chart. Install exhaust hood 12" min. (305 mm) 12" min. (305 mm) Install exhaust ... of the mobile home structure and must not terminate beneath the mobile home. To determine maximum exhaust length, add one 90º turn inside the dryer. NOTE: Side and bottom exhaust installations for 27" wide models have a 90º turn to the chart. Special provisions for mobile home installations:...


