

Use and Care Guide
Page 5
... select a 10" (25.4 cm) or 15.5" (39.4 cm) pedestal with any tools listed here. Backguard If you are installing your PERFORMANCE SERIES washer and dryer and wish to stack your machines, you planning to avoid having loose items fall behind the machines during operation. For further information, please refer ... (39.4 cm) pedestal at least 9" (22.9 cm) above the floor. „ 8" or 10" pipe wrench „ 8" or 10" adjustable wrench (for gas connections) „ Flat-blade screwdriver „ Adjustable wrench that all parts are available in several colors. To order, call the dealer from...
... select a 10" (25.4 cm) or 15.5" (39.4 cm) pedestal with any tools listed here. Backguard If you are installing your PERFORMANCE SERIES washer and dryer and wish to stack your machines, you planning to avoid having loose items fall behind the machines during operation. For further information, please refer ... (39.4 cm) pedestal at least 9" (22.9 cm) above the floor. „ 8" or 10" pipe wrench „ 8" or 10" adjustable wrench (for gas connections) „ Flat-blade screwdriver „ Adjustable wrench that all parts are available in several colors. To order, call the dealer from...

Use and Care Guide
Page 6
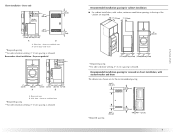
...minimum ventilation openings in the same closet as gasoline, away from your washer using a power supply cord, a grounded electrical outlet located within 4 ft (1.2 m) of the dryer, and water pressure of the dryer. See "Venting Requirements." Installation spacing for recessed area or closet ...(2.5 cm) 27" (68.6 cm) 1"* (2.5 cm) *Required spacing 6 A gas dryer must be considered on the sides and rear. You may not operate correctly if dryer is greater than 1" (2.5 cm), install Extended Dryer Feet Kit, Part Number 279810. Clothes may not tumble properly and automatic sensor cycles may...
...minimum ventilation openings in the same closet as gasoline, away from your washer using a power supply cord, a grounded electrical outlet located within 4 ft (1.2 m) of the dryer, and water pressure of the dryer. See "Venting Requirements." Installation spacing for recessed area or closet ...(2.5 cm) 27" (68.6 cm) 1"* (2.5 cm) *Required spacing 6 A gas dryer must be considered on the sides and rear. You may not operate correctly if dryer is greater than 1" (2.5 cm), install Extended Dryer Feet Kit, Part Number 279810. Clothes may not tumble properly and automatic sensor cycles may...
Use and Care Guide
Page 7
...; For cabinet installation, with vents *Required spacing **For side or bottom venting, 0" (0 cm) spacing is allowed. Dryer only Recommended installation spacing for recessed or closet installation, with stacked washer and dryer The dimensions shown are required. Dryer on pedestal A. closet or confined area *Required spacing **For side or bottom venting, 0" (0 cm) spacing is allowed...
...; For cabinet installation, with vents *Required spacing **For side or bottom venting, 0" (0 cm) spacing is allowed. Dryer only Recommended installation spacing for recessed or closet installation, with stacked washer and dryer The dimensions shown are required. Dryer on pedestal A. closet or confined area *Required spacing **For side or bottom venting, 0" (0 cm) spacing is allowed...
Use and Care Guide
Page 15
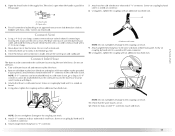
...washer from inlet hose and replace with an additional two-thirds turn. 7. Damage to "Y" connector. 15 Attach straight end of the "Y" connector to exhaust outlet in dryer. Check that there are on coupling by hand until it is parallel to cold water faucet. Attach short hose to the gas... or kink vent. 3. Do not use old hoses. 1. Turn cold water faucet off and remove washer inlet hose. 2. NOTE: If "Y" connector can result. 11. Attach angled end of dryer back panel. Using pliers, tighten the coupling with Step 3. 3. NOTE: Do not overtighten. Screw ...
...washer from inlet hose and replace with an additional two-thirds turn. 7. Damage to "Y" connector. 15 Attach straight end of the "Y" connector to exhaust outlet in dryer. Check that there are on coupling by hand until it is parallel to cold water faucet. Attach short hose to the gas... or kink vent. 3. Do not use old hoses. 1. Turn cold water faucet off and remove washer inlet hose. 2. NOTE: If "Y" connector can result. 11. Attach angled end of dryer back panel. Using pliers, tighten the coupling with Step 3. 3. NOTE: Do not overtighten. Screw ...

Use and Care Guide
Page 17
...injury to starting your dryer. The following is ...chosen will dry most loads adequately using an Air Cycle. See "Cleaning the Lint Screen." 2. Fire Hazard No washer can select a different... read the IMPORTANT SAFETY INSTRUCTIONS before each load. This manual covers several different models. Your dryer may not have all Sensor Cycles. Please... washing). DRYER USE Starting Your Dryer WARNING WARNING Explosion Hazard Keep flammable materials and vapors, such as gasoline, away from dryer. Place laundry... in dryer and shut door. 3. Failure to specific sections of energy. Failure...
...injury to starting your dryer. The following is ...chosen will dry most loads adequately using an Air Cycle. See "Cleaning the Lint Screen." 2. Fire Hazard No washer can select a different... read the IMPORTANT SAFETY INSTRUCTIONS before each load. This manual covers several different models. Your dryer may not have all Sensor Cycles. Please... washing). DRYER USE Starting Your Dryer WARNING WARNING Explosion Hazard Keep flammable materials and vapors, such as gasoline, away from dryer. Place laundry... in dryer and shut door. 3. Failure to specific sections of energy. Failure...


