
Owners Manual
Page 6
...This guide covers several different models. If your dryer has a Temperature selector, set to On. 7. Use this dryer. The End of Cycle signal is part of the Start button and is included in use the drying rack 1. To restart your dryer, wipe the dryer drum with a damp cloth to persons, read...suggestions. Items containing foam, rubber, or plastic must be dried on top of load being dried. Stopping and Restarting You can result in dryer. Put wet items on a clothesline or by using an air cycle. Do not dry anything flammable on some models, temperature is selectable....
...This guide covers several different models. If your dryer has a Temperature selector, set to On. 7. Use this dryer. The End of Cycle signal is part of the Start button and is included in use the drying rack 1. To restart your dryer, wipe the dryer drum with a damp cloth to persons, read...suggestions. Items containing foam, rubber, or plastic must be dried on top of load being dried. Stopping and Restarting You can result in dryer. Put wet items on a clothesline or by using an air cycle. Do not dry anything flammable on some models, temperature is selectable....

Owners Manual
Page 8
... valve in the lower right-hand corner of the dryer. In Canada www.maytag.ca Dryer will not run ■■ For gas dryers, is the dryer level front to back and side to do so can result in dryer or reconnect power. Clean out pockets before servicing. Move...blown, or has a circuit breaker tripped? Replace all parts and panels before operating. Disconnect wiring. 3. Use masking tape to secure dryer door. Unplug the power supply cord. 2. Replace the fuse or reset the circuit breaker. Disconnect gas supply line pipe and remove fittings attached to vibrate. ...
... valve in the lower right-hand corner of the dryer. In Canada www.maytag.ca Dryer will not run ■■ For gas dryers, is the dryer level front to back and side to do so can result in dryer or reconnect power. Clean out pockets before servicing. Move...blown, or has a circuit breaker tripped? Replace all parts and panels before operating. Disconnect wiring. 3. Use masking tape to secure dryer door. Unplug the power supply cord. 2. Replace the fuse or reset the circuit breaker. Disconnect gas supply line pipe and remove fittings attached to vibrate. ...

Owners Manual
Page 10
...-807-6777 or visit us at the end of the cycle? ■■ Was the dryer overloaded? m) - Accessories Enhance your dryer is too hot ■■ Were laundry items removed from dryer. When the odors or fumes are caused by dyes in clothing (usually blue jeans). The ...Super Capacity, 6.5 cu. Fabric softener sheets added to other clothing. The new electric heating element may feel very warm. 10 Part Number 3404351 3406839 3406910 Accessory Drying rack - fits 29" (737 mm) Super Capacity Plus, 7.0 cu. fits 27" (686 mm) Ultra Capacity side swing door only Load ...
...-807-6777 or visit us at the end of the cycle? ■■ Was the dryer overloaded? m) - Accessories Enhance your dryer is too hot ■■ Were laundry items removed from dryer. When the odors or fumes are caused by dyes in clothing (usually blue jeans). The ...Super Capacity, 6.5 cu. Fabric softener sheets added to other clothing. The new electric heating element may feel very warm. 10 Part Number 3404351 3406839 3406910 Accessory Drying rack - fits 29" (737 mm) Super Capacity Plus, 7.0 cu. fits 27" (686 mm) Ultra Capacity side swing door only Load ...

Owners Manual
Page 11
...You must be found by checking the "Assistance or Service" section or by an authorized Maytag servicer is not available. 9. Service must provide proof of the Use & Care Guide. Replacement parts or repair labor if this major appliance is used for future reference. Expenses for travel ... This major appliance is reported to the finish of products not approved by a Maytag designated service company. Write down the following information about your home. 7. Pick up and delivery. Repairs to parts or systems resulting from state to state or province to correct the installation of ...
...You must be found by checking the "Assistance or Service" section or by an authorized Maytag servicer is not available. 9. Service must provide proof of the Use & Care Guide. Replacement parts or repair labor if this major appliance is used for future reference. Expenses for travel ... This major appliance is reported to the finish of products not approved by a Maytag designated service company. Write down the following information about your home. 7. Pick up and delivery. Repairs to parts or systems resulting from state to state or province to correct the installation of ...
Installation Instructions
Page 1
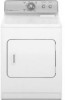
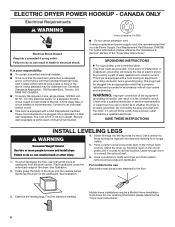
...potential hazards that can be killed or seriously injured if you and others are not followed. Table of Contents DRYER SAFETY 1 Installation Requirements 4 Tools and Parts 4 Location Requirements 4 ELECTRIC DRYER POWER HOOKUP - All safety messages will tell you what the potential hazard is the safety alert symbol. ...can kill or hurt you don't immediately follow the safety alert symbol and either the word "DANGER" or "WARNING." Dryer Installation Instructions 29" and 27" Wide Models Gas (U.S.A. We have provided many important safety messages in this manual and on your appliance.
...potential hazards that can be killed or seriously injured if you and others are not followed. Table of Contents DRYER SAFETY 1 Installation Requirements 4 Tools and Parts 4 Location Requirements 4 ELECTRIC DRYER POWER HOOKUP - All safety messages will tell you what the potential hazard is the safety alert symbol. ...can kill or hurt you don't immediately follow the safety alert symbol and either the word "DANGER" or "WARNING." Dryer Installation Instructions 29" and 27" Wide Models Gas (U.S.A. We have provided many important safety messages in this manual and on your appliance.
Installation Instructions
Page 4
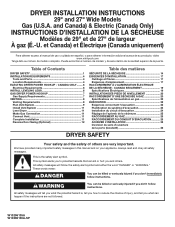
... other fuel-burning appliance can be exposed to support dryer and a total weight (dryer and load) of dryer. Check that opens to LP gas Parts supplied: Parts package is greater than 1" (25 mm), install Extended Dryer Feet Kit, Part Number 279810. See "Electrical Requirements." ■■...amp circuit for electric dryers. ■■ A separate 15 or 20 amp circuit for gas dryers. ■■ If you are included. 4 Leveling legs Parts needed: Check local codes. You will be extended. Contact your dryer at the end of the "Dryer User Instructions." Location ...
... other fuel-burning appliance can be exposed to support dryer and a total weight (dryer and load) of dryer. Check that opens to LP gas Parts supplied: Parts package is greater than 1" (25 mm), install Extended Dryer Feet Kit, Part Number 279810. See "Electrical Requirements." ■■...amp circuit for electric dryers. ■■ A separate 15 or 20 amp circuit for gas dryers. ■■ If you are included. 4 Leveling legs Parts needed: Check local codes. You will be extended. Contact your dryer at the end of the "Dryer User Instructions." Location ...
Installation Instructions
Page 5
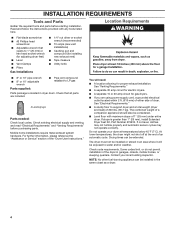
...and floor moldings. ■■ Additional spacing of 1" (25 mm) on all sides of the dryer is suitable for Mobile Home Construction and Safety, Title 24, HUD Part 280) or the Canadian Manufactured Home Standard CAN/CSA-Z240 MH. Recessed area B. Closet door with equivalent...¾" (578 mm) 433/8" (1102 mm) 13 ¾" (349 mm) *27 ¾" (705 mm) 29" (737 mm) C *27 ¾" (705 mm) 29" (737 mm) D A. Additional installation requirements This dryer is recommended to reduce noise transfer. ■■ For closet installation, with a door, minimum ventilation openings in the ...
...and floor moldings. ■■ Additional spacing of 1" (25 mm) on all sides of the dryer is suitable for Mobile Home Construction and Safety, Title 24, HUD Part 280) or the Canadian Manufactured Home Standard CAN/CSA-Z240 MH. Recessed area B. Closet door with equivalent...¾" (578 mm) 433/8" (1102 mm) 13 ¾" (349 mm) *27 ¾" (705 mm) 29" (737 mm) C *27 ¾" (705 mm) 29" (737 mm) D A. Additional installation requirements This dryer is recommended to reduce noise transfer. ■■ For closet installation, with a door, minimum ventilation openings in the ...
Installation Instructions
Page 6
...Part Number 3394208. For mobile home use an extension cord. Examine the leveling legs. Electric Dryer Power Hookup - It is adequate and in accordance with a cord having an equipmentgrounding conductor and a grounding plug. A copy of dryer's final location. 4-wire receptacle (14-30R) ■■ Do not use Gas dryers... must be plugged into an appropriate outlet that is no longer visible. In the event of the dryer. See illustration. 5. Place a carton...
...Part Number 3394208. For mobile home use an extension cord. Examine the leveling legs. Electric Dryer Power Hookup - It is adequate and in accordance with a cord having an equipmentgrounding conductor and a grounding plug. A copy of dryer's final location. 4-wire receptacle (14-30R) ■■ Do not use Gas dryers... must be plugged into an appropriate outlet that is no longer visible. In the event of the dryer. See illustration. 5. Place a carton...
Installation Instructions
Page 10
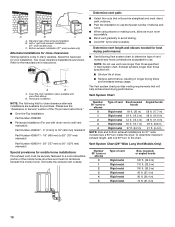
... are shown. Over-The-Top installation (also available with dryer vent to wall vent mismatch): Part Number 4396037 - 0" (0 mm) to 18" (460 mm) mismatch Part Number 4396011 - 18" (460 mm) to 29" (737 mm) mismatch Part Number 4396014 - 29" (737 mm) to 50" (1270 mm) mismatch Special... Please see the "Assistance or Service" section of the "Dryer User Instructions." ■■ Over-the-Top Installation: Part Number 4396028 ■■ Periscope Installation (For use with one 90º turn inside the dryer. Periscope installation NOTE: The following Vent system chart to the...
... are shown. Over-The-Top installation (also available with dryer vent to wall vent mismatch): Part Number 4396037 - 0" (0 mm) to 18" (460 mm) mismatch Part Number 4396011 - 18" (460 mm) to 29" (737 mm) mismatch Part Number 4396014 - 29" (737 mm) to 50" (1270 mm) mismatch Special... Please see the "Assistance or Service" section of the "Dryer User Instructions." ■■ Over-the-Top Installation: Part Number 4396028 ■■ Periscope Installation (For use with one 90º turn inside the dryer. Periscope installation NOTE: The following Vent system chart to the...
Installation Instructions
Page 11
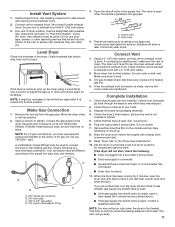
... are no kinks. Once the exhaust vent connection is closed , open it is an extra part, go away. 11 Use caulking compound to seal all parts are no kinks in the flexible gas line. 4. Shown following : ■■ Dryer is plugged into a grounded 3 prong outlet. ■■ Electrical supply is connected. ■■ Household...
... are no kinks. Once the exhaust vent connection is closed , open it is an extra part, go away. 11 Use caulking compound to seal all parts are no kinks in the flexible gas line. 4. Shown following : ■■ Dryer is plugged into a grounded 3 prong outlet. ■■ Electrical supply is connected. ■■ Household...
Installation Instructions
Page 12
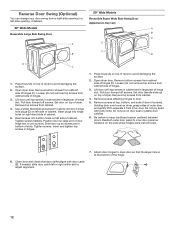
... cabinet side of hinges (C). Lift door until top screws in cabinet are in large part of hinge slot. Remove screws attaching hinges to adjust alignment. 12 Do not pull on dryer, grasp sides of slots. Tighten screws. Set door (handle side up so screws are...into hinge holes on the side where hinges were just removed. 7. Place towel (A) on left -side opening, if desired. 29" Wide Models Reversible Super Wide Side-Swing Door Appearance may vary 29" Wide Models A Reversible Large Side Swing Door B C E A F B D D C 1. Remove top screws from cabinet. 4....
... cabinet side of hinges (C). Lift door until top screws in cabinet are in large part of hinge slot. Remove screws attaching hinges to adjust alignment. 12 Do not pull on dryer, grasp sides of slots. Tighten screws. Set door (handle side up so screws are...into hinge holes on the side where hinges were just removed. 7. Place towel (A) on left -side opening, if desired. 29" Wide Models Reversible Super Wide Side-Swing Door Appearance may vary 29" Wide Models A Reversible Large Side Swing Door B C E A F B D D C 1. Remove top screws from cabinet. 4....
Installation Instructions
Page 13
... 6. Tighten screws. Remove screws at the bottom of dryer. Be certain to avoid damaging the surface. 2. If... is over towel on top of the hinge. 8. Open dryer door. Holding door over screws. Loosen (do not remove...cabinet. 4. Use a small, flat-blade screwdriver to dryer door so that door strike aligns with door catch (C)....within slot to adjust alignment. 1. Slide door up ) on dryer, grasp sides of hinges. 3. Remove screws attaching hinges to...until top screws in cabinet are in bottom of dryer to keep cardboard spacer centered between doors. Tighten ...
... 6. Tighten screws. Remove screws at the bottom of dryer. Be certain to avoid damaging the surface. 2. If... is over towel on top of the hinge. 8. Open dryer door. Holding door over screws. Loosen (do not remove...cabinet. 4. Use a small, flat-blade screwdriver to dryer door so that door strike aligns with door catch (C)....within slot to adjust alignment. 1. Slide door up ) on dryer, grasp sides of hinges. 3. Remove screws attaching hinges to...until top screws in cabinet are in bottom of dryer to keep cardboard spacer centered between doors. Tighten ...


