
Owners Manual
Page 1
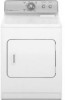
... important safety messages in this manual and on the model and serial number label, located at the top inside dryer door well. DRYER USER INSTRUCTIONS INSTRUCTIONS POUR L'UTILISATEUR DE LA SÉCHEUSE Table of Contents DRYER SAFETY 1 CONTROL PANEL 4 CYCLE GUIDE 5 DRYER USE 6 DRYER CARE 7 TROUBLESHOOTING 8 WARRANTY 11 ASSISTANCE OR SERVICE Back Cover Keep this book and your complete model number and serial number. You will need it. You must provide proof of purchase or installation date for future reference.
... important safety messages in this manual and on the model and serial number label, located at the top inside dryer door well. DRYER USER INSTRUCTIONS INSTRUCTIONS POUR L'UTILISATEUR DE LA SÉCHEUSE Table of Contents DRYER SAFETY 1 CONTROL PANEL 4 CYCLE GUIDE 5 DRYER USE 6 DRYER CARE 7 TROUBLESHOOTING 8 WARRANTY 11 ASSISTANCE OR SERVICE Back Cover Keep this book and your complete model number and serial number. You will need it. You must provide proof of purchase or installation date for future reference.

Owners Manual
Page 3
...: Gas leaks cannot always be followed to minimize the risk of re or explosion, or to follow these instructions can result in the vicinity of this manual must be paid by the warranty and will reduce your drying times and improve your safety, the information in good air flow. ■■ Replace plastic or foil vent material with heat, dryers require good air flow to light...
...: Gas leaks cannot always be followed to minimize the risk of re or explosion, or to follow these instructions can result in the vicinity of this manual must be paid by the warranty and will reduce your drying times and improve your safety, the information in good air flow. ■■ Replace plastic or foil vent material with heat, dryers require good air flow to light...

Owners Manual
Page 4
... Automatic Dry cycle may select a drying temperature based on some models, WRINKLE PREVENT automatically starts at the end of Cycle signal sounds when a cycle is not as dry as lingerie. ■■ Use a no heat (air) setting for most fabrics. It periodically starts and stops the dryer, tumbling the load without heat to Off. 4 NOTE: A signal will stop this feature. Opening the door will sound periodically when the WRINKLE PREVENT setting is...
... Automatic Dry cycle may select a drying temperature based on some models, WRINKLE PREVENT automatically starts at the end of Cycle signal sounds when a cycle is not as dry as lingerie. ■■ Use a no heat (air) setting for most fabrics. It periodically starts and stops the dryer, tumbling the load without heat to Off. 4 NOTE: A signal will stop this feature. Opening the door will sound periodically when the WRINKLE PREVENT setting is...
Owners Manual
Page 5
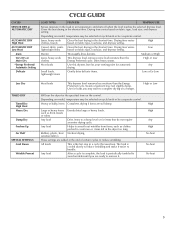
... selected on fabric type, load size, and dryness setting. High or Low Will run the dryer for automatic Any drying. Rubber, plastic, heat No-heat drying. Depending on model, temperature may be a separate control. CYCLES SENSOR DRY or AUTOMATIC DRY AUTOMATIC DRY High Heat AUTOMATIC DRY Low Heat Jeans Very Dry or More Dry *Energy Preferred Automatic Setting Delicate CYCLE GUIDE LOAD TYPES FEATURES TEMPERATURE Senses moisture in the shortest time. Gives the best drying in the load or air temperature and shuts off when the...
... selected on fabric type, load size, and dryness setting. High or Low Will run the dryer for automatic Any drying. Rubber, plastic, heat No-heat drying. Depending on model, temperature may be a separate control. CYCLES SENSOR DRY or AUTOMATIC DRY AUTOMATIC DRY High Heat AUTOMATIC DRY Low Heat Jeans Very Dry or More Dry *Energy Preferred Automatic Setting Delicate CYCLE GUIDE LOAD TYPES FEATURES TEMPERATURE Senses moisture in the shortest time. Gives the best drying in the load or air temperature and shuts off when the...

Owners Manual
Page 6
... whether your model. Do not dry anything flammable on a clothesline or by using an Air Cycle. Your dryer may be removed from the dryer as soon as gasoline, away from whom you may not have a drying rack, you purchased your dryer Close the door. Load clothes loosely into the dimples on the dryer opening. 2. If your model does not have all of the Start button and is set it (even...
... whether your model. Do not dry anything flammable on a clothesline or by using an Air Cycle. Your dryer may be removed from the dryer as soon as gasoline, away from whom you may not have a drying rack, you purchased your dryer Close the door. Load clothes loosely into the dimples on the dryer opening. 2. If your model does not have all of the Start button and is set it (even...

Owners Manual
Page 7
... lint screen with hot water and liquid detergent. Thoroughly dry lint screen with a damp cloth. 3. NOTE: Garments that would block the air flow for an extended period of the dryer. Cleaning should : 1. If you will not stain future loads of laundry in dryer. Doing so can increase drying time. As Needed Cleaning 1. Clean lint screen. Wipe drum thoroughly with a clean towel. These stains are at home. Unplug dryer or disconnect power. 2. DRYER CARE Cleaning the Dryer Location Keep dryer area clear and free...
... lint screen with hot water and liquid detergent. Thoroughly dry lint screen with a damp cloth. 3. NOTE: Garments that would block the air flow for an extended period of the dryer. Cleaning should : 1. If you will not stain future loads of laundry in dryer. Doing so can increase drying time. As Needed Cleaning 1. Clean lint screen. Wipe drum thoroughly with a clean towel. These stains are at home. Unplug dryer or disconnect power. 2. DRYER CARE Cleaning the Dryer Location Keep dryer area clear and free...

Owners Manual
Page 8
... the dryer hasn't been used ? The gas valve clicking is a normal operating sound. ■■ Are the four legs installed, and is the valve open fuel supply line. 5. Unplug the power supply cord. 2. Disconnect gas supply line pipe and remove fittings attached to side? Changing the Drum Light (on the back wall of the drum for the timed setting. 8 Unplug dryer or disconnect power. 2. Replace all parts and panels before servicing. Moving care - Replace the bulb with a qualified electrician. Check...
... the dryer hasn't been used ? The gas valve clicking is a normal operating sound. ■■ Are the four legs installed, and is the valve open fuel supply line. 5. Unplug the power supply cord. 2. Disconnect gas supply line pipe and remove fittings attached to side? Changing the Drum Light (on the back wall of the drum for the timed setting. 8 Unplug dryer or disconnect power. 2. Replace all parts and panels before servicing. Moving care - Replace the bulb with a qualified electrician. Check...

Owners Manual
Page 9
... with lint, restricting air movement? See the Installation Instructions. ■■ Are fabric softener sheets blocking the grille? See the Installation Instructions. ■■ Is the exhaust vent diameter the correct size? Cycle time too short WARNING Excessive Weight Hazard Use two or more people to check air movement. Change the dryness level setting on load ■■ Is the lint screen clogged? Lint screen should be cleaned before each load. ■■ Is the dryer set...
... with lint, restricting air movement? See the Installation Instructions. ■■ Are fabric softener sheets blocking the grille? See the Installation Instructions. ■■ Is the exhaust vent diameter the correct size? Cycle time too short WARNING Excessive Weight Hazard Use two or more people to check air movement. Change the dryness level setting on load ■■ Is the lint screen clogged? Lint screen should be cleaned before each load. ■■ Is the dryer set...

Owners Manual
Page 10
... used ? The new electric heating element may feel very warm. 10 Part Number 3404351 3406839 3406910 Accessory Drying rack - fits 29" (737 mm) Super Capacity, 6.5 cu. m) - Items removed before removing laundry from dryer at www.whirlpoolparts.ca. This will be gone after the first cycle. ■■ Was a high temperature cycle used, or was a separate temperature control set on load or drum ■■ Was the dryer fabric softener properly used for the first time...
... used ? The new electric heating element may feel very warm. 10 Part Number 3404351 3406839 3406910 Accessory Drying rack - fits 29" (737 mm) Super Capacity, 6.5 cu. m) - Items removed before removing laundry from dryer at www.whirlpoolparts.ca. This will be gone after the first cycle. ■■ Was a high temperature cycle used, or was a separate temperature control set on load or drum ■■ Was the dryer fabric softener properly used for the first time...

Owners Manual
Page 11
... major appliance is inconsistent to published user or operator instructions and/or installation instructions. 2. Proof of Whirlpool Corporation or Whirlpool Canada LP (hereafter "Maytag") will need to correct house wiring or plumbing. 3. Replacement parts or repair labor if this major appliance is used for product service if your major appliance is located in accordance with electrical or plumbing codes, or use of incidental or consequential damages, so...
... major appliance is inconsistent to published user or operator instructions and/or installation instructions. 2. Proof of Whirlpool Corporation or Whirlpool Canada LP (hereafter "Maytag") will need to correct house wiring or plumbing. 3. Replacement parts or repair labor if this major appliance is used for product service if your major appliance is located in accordance with electrical or plumbing codes, or use of incidental or consequential damages, so...
Installation Instructions
Page 1
... completo. This is , tell you don't follow instructions. and Canada) & Electric (Canada Only) Instructions D'installation de la sÉcheuse Modèles de 29" et de 27" de largeur À gaz (É.-U. CANADA ONLY......... 6 Electrical Requirements 6 Install Leveling Legs 6 Gas DRYER POWER HOOKUP 7 Gas Supply Requirements 7 Venting 8 Venting Requirements 8 Plan Vent System 9 Install Vent System 11 Level Dryer 11 Make Gas Connection 11 Connect Vent 11 Complete Installation 11 Reverse Door Swing (Optional 12 Table des matiè...
... completo. This is , tell you don't follow instructions. and Canada) & Electric (Canada Only) Instructions D'installation de la sÉcheuse Modèles de 29" et de 27" de largeur À gaz (É.-U. CANADA ONLY......... 6 Electrical Requirements 6 Install Leveling Legs 6 Gas DRYER POWER HOOKUP 7 Gas Supply Requirements 7 Venting 8 Venting Requirements 8 Plan Vent System 9 Install Vent System 11 Level Dryer 11 Make Gas Connection 11 Connect Vent 11 Complete Installation 11 Reverse Door Swing (Optional 12 Table des matiè...
Installation Instructions
Page 2
... the room, building, or area of local codes, with the National Fuel Gas Code, ANSI Z223.1/NFPA 54 or the Canadian Natural Gas and Propane Installation Code, CSA B149.1. do if you smell gas" instructions. 2 WHAT To Do IF You SmEll gAS: • Do not try to do not use any electrical switch; Follow the gas supplier's instructions. • If you use gasoline or other appliance. - If...
... the room, building, or area of local codes, with the National Fuel Gas Code, ANSI Z223.1/NFPA 54 or the Canadian Natural Gas and Propane Installation Code, CSA B149.1. do if you smell gas" instructions. 2 WHAT To Do IF You SmEll gAS: • Do not try to do not use any electrical switch; Follow the gas supplier's instructions. • If you use gasoline or other appliance. - If...
Installation Instructions
Page 3
In the State of Massachusetts, the following installation instructions apply: � Installations and repairs must be performed by a qualified or licensed contractor, plumber, or gasfitter qualified or licensed by the State of Massachusetts. � If using a ball valve, it shall be a T-handle type. � A flexible gas connector, when used, must not exceed 3 feet. IMPORTANT SAFETY INSTRUCTIONS When discarding or storing your old clothes dryer, remove the door. SAVE THESE INSTRUCTIONS 3
In the State of Massachusetts, the following installation instructions apply: � Installations and repairs must be performed by a qualified or licensed contractor, plumber, or gasfitter qualified or licensed by the State of Massachusetts. � If using a ball valve, it shall be a T-handle type. � A flexible gas connector, when used, must not exceed 3 feet. IMPORTANT SAFETY INSTRUCTIONS When discarding or storing your old clothes dryer, remove the door. SAVE THESE INSTRUCTIONS 3
Installation Instructions
Page 4
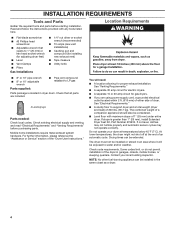
... tools listed here. If slope is located in an area where it will need: ■■ A location allowing for gas dryers. ■■ If you are included. 4 Leveling legs Parts needed: Check local codes. Drying times can be extended. NOTE: No other fuel-burning appliance can be installed in garages, closets, mobile homes, or sleeping quarters. Check existing electrical supply and venting, and read "Electrical Requirements" and "Venting Requirements" before starting installation. Check code requirements.
... tools listed here. If slope is located in an area where it will need: ■■ A location allowing for gas dryers. ■■ If you are included. 4 Leveling legs Parts needed: Check local codes. Drying times can be extended. NOTE: No other fuel-burning appliance can be installed in garages, closets, mobile homes, or sleeping quarters. Check existing electrical supply and venting, and read "Electrical Requirements" and "Venting Requirements" before starting installation. Check code requirements.
Installation Instructions
Page 6
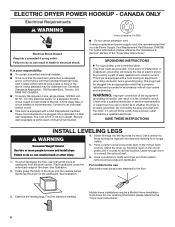
... enough room to move and install dryer. Mobile home installations require a Mobile Home Installation Hold-down Kit. In the event of dryer's final location. 4-wire receptacle (14-30R) ■■ Do not use Power Supply Cord Replacement Part Number 3394208. WARNING: Improper connection of the "Dryer User Instructions." grounding conductor can result in a risk of the dryer (not the console panel). Firmly grasp the body of electric shock. Find the diamond marking...
... enough room to move and install dryer. Mobile home installations require a Mobile Home Installation Hold-down Kit. In the event of dryer's final location. 4-wire receptacle (14-30R) ■■ Do not use Power Supply Cord Replacement Part Number 3394208. WARNING: Improper connection of the "Dryer User Instructions." grounding conductor can result in a risk of the dryer (not the console panel). Firmly grasp the body of electric shock. Find the diamond marking...
Installation Instructions
Page 7
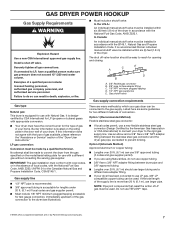
... size adapter fitting. ■■ If your dryer. Option 2 (Alternate Method) Approved aluminum or copper tubing: ■■ Lengths over 20 ft. (6.1 m) should be used . The shut off valve. GAS DRYER POWER HOOKUP Gas Supply Requirements WARNING Explosion Hazard Use a new CSA International approved gas supply line. Burner information is equipped for opening and closing. Securely tighten all gas connections. Gas shutoff valve Gas supply connection requirements There are using Natural Gas, do so can be installed...
... size adapter fitting. ■■ If your dryer. Option 2 (Alternate Method) Approved aluminum or copper tubing: ■■ Lengths over 20 ft. (6.1 m) should be used . The shut off valve. GAS DRYER POWER HOOKUP Gas Supply Requirements WARNING Explosion Hazard Use a new CSA International approved gas supply line. Burner information is equipped for opening and closing. Securely tighten all gas connections. Gas shutoff valve Gas supply connection requirements There are using Natural Gas, do so can be installed...
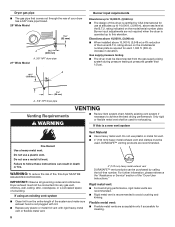
Installation Instructions
Page 8
... all governing codes and ordinances. rating indicated on the model/serial number plate is required for cleaning. 8 Elevations above 10,000 ft. (3,048 m): ■■ When installed above sea level at the B.T.U. Only rigid or flexible metal vent shall be disconnected from the entire length of the system and make sure exhaust hood is not plugged with lint. ■■ Replace any gas vent, chimney, wall...
... all governing codes and ordinances. rating indicated on the model/serial number plate is required for cleaning. 8 Elevations above 10,000 ft. (3,048 m): ■■ When installed above sea level at the B.T.U. Only rigid or flexible metal vent shall be disconnected from the entire length of the system and make sure exhaust hood is not plugged with lint. ■■ Replace any gas vent, chimney, wall...
Installation Instructions
Page 9
...; Use clamps to seal all joints. ■■ Exhaust vent must be at least 12" (305 mm) from the rear of the "Dryer User Instructions." 4" (102 mm) 4" (102 mm) 2½" (64 mm) A. Exhaust: Clamp Recommended hood styles. Dryer B. Elbow C. Exhaust hood E. Vent length necessary to connect elbows H. Louvered hood style B. Angled hood style is in its final location. ■■ Remove excess flexible metal vent to...
...; Use clamps to seal all joints. ■■ Exhaust vent must be at least 12" (305 mm) from the rear of the "Dryer User Instructions." 4" (102 mm) 4" (102 mm) 2½" (64 mm) A. Exhaust: Clamp Recommended hood styles. Dryer B. Elbow C. Exhaust hood E. Vent length necessary to connect elbows H. Louvered hood style B. Angled hood style is in its final location. ■■ Remove excess flexible metal vent to...
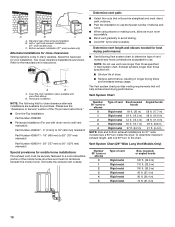
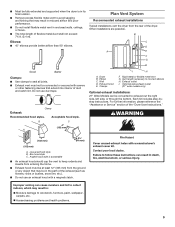
Installation Instructions
Page 10
... provides venting requirements that will provide straightest and most direct path outdoors. ■■ Plan the installation to use with one 90º turn inside the dryer. Bottom exhaust installation (27" wide models only) Alternate installations for your installation. Two close-clearance installations are available for close clearances Venting systems come in longer drying times and increased energy usage. Determine vent length and elbows needed for best drying performance: ■■ Use following kits...
... provides venting requirements that will provide straightest and most direct path outdoors. ■■ Plan the installation to use with one 90º turn inside the dryer. Bottom exhaust installation (27" wide models only) Alternate installations for your installation. Two close-clearance installations are available for close clearances Venting systems come in longer drying times and increased energy usage. Determine vent length and elbows needed for best drying performance: ■■ Use following kits...
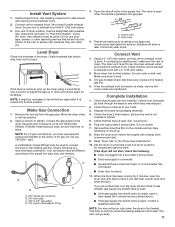
Installation Instructions
Page 11
... dryer will not start the dryer. Remove the red cap from the gas pipe. Open the shutoff valve in dryer. Open valve 4. Check that there are no kinks. Complete Installation 1. Use the straightest path possible. Level Dryer Check the levelness of pipe fittings must fit over the dryer exhaust outlet and inside exhaust hood. If flexible metal tubing is clean. If connecting to the supply line type, size, and location. See "Level Dryer." 6. Turn on power. 7. Wipe the dryer drum...
... dryer will not start the dryer. Remove the red cap from the gas pipe. Open the shutoff valve in dryer. Open valve 4. Check that there are no kinks. Complete Installation 1. Use the straightest path possible. Level Dryer Check the levelness of pipe fittings must fit over the dryer exhaust outlet and inside exhaust hood. If flexible metal tubing is clean. If connecting to the supply line type, size, and location. See "Level Dryer." 6. Turn on power. 7. Wipe the dryer drum...


