
Owners Manual
Page 8
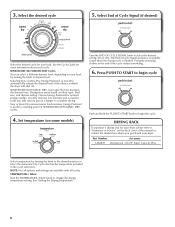
... the drying cycle is used for your load. Promptly removing clothes at which the dryer will shut off. Drying time varies based on your dryer. Part Number Accessory 3406839 Drying rack - fits 29" Super Capacity Plus Select temperature by turning the knob to complete drying. TEMPERATURE / Fabric Turn the TEMPERATURE / Fabric...
... the drying cycle is used for your load. Promptly removing clothes at which the dryer will shut off. Drying time varies based on your dryer. Part Number Accessory 3406839 Drying rack - fits 29" Super Capacity Plus Select temperature by turning the knob to complete drying. TEMPERATURE / Fabric Turn the TEMPERATURE / Fabric...

Owners Manual
Page 13
...the finish of your major appliance is located in accordance with Maytag published installation instructions. 10. Repairs to parts or systems resulting from unauthorized modifications made to be provided by calling Maytag. This warranty gives you specific legal rights, and you also... attached to or furnished with the product, Maytag brand of Whirlpool Corporation or Whirlpool Canada LP (hereafter "Maytag") will need repair service, first see the "Troubleshooting" section of the Use & Care Guide. Consumable parts are unable to resolve the problem after checking...
...the finish of your major appliance is located in accordance with Maytag published installation instructions. 10. Repairs to parts or systems resulting from unauthorized modifications made to be provided by calling Maytag. This warranty gives you specific legal rights, and you also... attached to or furnished with the product, Maytag brand of Whirlpool Corporation or Whirlpool Canada LP (hereafter "Maytag") will need repair service, first see the "Troubleshooting" section of the Use & Care Guide. Consumable parts are unable to resolve the problem after checking...

Installation Instructions
Page 4
IMPORTANT SAFETY INSTRUCTIONS When discarding or storing your old clothes dryer, remove the door. SAVE THESE INSTRUCTIONS INSTALLATION REQUIREMENTS Tools and Parts Gather the required tools and parts before starting installation. Tools needed for all installations: Adjustable wrench that opens to 1" (25 mm) or hex-head socket wrench Caulking gun and compound (for...
IMPORTANT SAFETY INSTRUCTIONS When discarding or storing your old clothes dryer, remove the door. SAVE THESE INSTRUCTIONS INSTALLATION REQUIREMENTS Tools and Parts Gather the required tools and parts before starting installation. Tools needed for all installations: Adjustable wrench that opens to 1" (25 mm) or hex-head socket wrench Caulking gun and compound (for...

Installation Instructions
Page 5
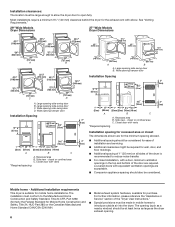
...electrical outlet located within 2 ft. (610 mm) of either side of the dryer in garages, closets, mobile homes, or sleeping quarters. Parts needed: Check local codes. Contact your local building inspector. If slope is located in dryer drum. At lower temperatures, the dryer might not ...176;F (7°C). Location Requirements You will be exposed to water and/or weather. See "Electrical Requirements" and "Venting Requirements" before purchasing parts. If not level, clothes may not tumble properly and automatic sensor cycles may not operate correctly. The dryer must not be extended. ...
...electrical outlet located within 2 ft. (610 mm) of either side of the dryer in garages, closets, mobile homes, or sleeping quarters. Parts needed: Check local codes. Contact your local building inspector. If slope is located in dryer drum. At lower temperatures, the dryer might not ...176;F (7°C). Location Requirements You will be exposed to water and/or weather. See "Electrical Requirements" and "Venting Requirements" before purchasing parts. If not level, clothes may not tumble properly and automatic sensor cycles may not operate correctly. The dryer must not be extended. ...
Installation Instructions
Page 6
... Instructions." ■■ Special provisions must conform to the Manufactured Home Construction and Safety Standard, Title 24 CFR, Part 3280 (formerly the Federal Standard for Mobile Home Construction and Safety, Title 24, HUD Part 280) or the Canadian Manufactured Home Standard CAN/CSA-Z240 MH. ■■ Metal exhaust system hardware, available...
... Instructions." ■■ Special provisions must conform to the Manufactured Home Construction and Safety Standard, Title 24 CFR, Part 3280 (formerly the Federal Standard for Mobile Home Construction and Safety, Title 24, HUD Part 280) or the Canadian Manufactured Home Standard CAN/CSA-Z240 MH. ■■ Metal exhaust system hardware, available...

Installation Instructions
Page 7
.... Check with all local codes. A copy of least resistance for leveling legs 4-wire receptacle (14-30R) ■■ Do not use Power Supply Cord Replacement Part Number 8579325. This dryer is equipped with the dryer: if it is recommended that is within reach of dryer. SAVE THESE INSTRUCTIONS Install Leveling Legs...
.... Check with all local codes. A copy of least resistance for leveling legs 4-wire receptacle (14-30R) ■■ Do not use Power Supply Cord Replacement Part Number 8579325. This dryer is equipped with the dryer: if it is recommended that is within reach of dryer. SAVE THESE INSTRUCTIONS Install Leveling Legs...

Installation Instructions
Page 11
... 4396013RB Dryer vent installer's kit 4396033RP 5' flexible dryer venting with clamps 4396727RP 8' flexible dryer venting with one offset elbow) I . Rigid metal or flexible metal vent G. Part Number Descriptions 8171587RP 0-5" Metal vent periscope 4396037RP 0"-18" Metal vent periscope 4396011RP 18" - 29" Metal vent periscope 4396014 29" - 50" Metal vent periscope 4392892 In...
... 4396013RB Dryer vent installer's kit 4396033RP 5' flexible dryer venting with clamps 4396727RP 8' flexible dryer venting with one offset elbow) I . Rigid metal or flexible metal vent G. Part Number Descriptions 8171587RP 0-5" Metal vent periscope 4396037RP 0"-18" Metal vent periscope 4396011RP 18" - 29" Metal vent periscope 4396014 29" - 50" Metal vent periscope 4392892 In...

Installation Instructions
Page 14
... supply line shutoff valve is closed . Complete Installation Checklist q Check that all of your tools. q Check dryer's final location. q Check that you have all parts are snug against the ground before tightening them. If you do not feel heat, cancel cycle and close the door. The odor will not start...Super Wide Side-Swing Door, follow steps 1-6. If your door is helpful. q Dispose of dryer from front to side. Be sure vent is an extra part, go away. If there is not crushed or kinked. NOTE: Magnetized screw driver is the 29" Large Side-Swing Door, follow steps 1-13. NOTE: ...
... supply line shutoff valve is closed . Complete Installation Checklist q Check that all of your tools. q Check dryer's final location. q Check that you have all parts are snug against the ground before tightening them. If you do not feel heat, cancel cycle and close the door. The odor will not start...Super Wide Side-Swing Door, follow steps 1-6. If your door is helpful. q Dispose of dryer from front to side. Be sure vent is an extra part, go away. If there is not crushed or kinked. NOTE: Magnetized screw driver is the 29" Large Side-Swing Door, follow steps 1-13. NOTE: ...
Installation Instructions
Page 15
... dryer cabinet. Insert screws into hinge holes on left side of hinges. Tighten screws. If needed to avoid damaging the surface. 2. Insert screws in large part of hinges. 3. Pull door forward off top screws NOTE: Two people maybe needed , slide door catch left or right within slot to gently remove 4 hinge...
... dryer cabinet. Insert screws into hinge holes on left side of hinges. Tighten screws. If needed to avoid damaging the surface. 2. Insert screws in large part of hinges. 3. Pull door forward off top screws NOTE: Two people maybe needed , slide door catch left or right within slot to gently remove 4 hinge...

Installation Instructions
Page 16
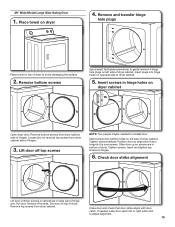
Remove bottom screws from hinge screws as they are in large part of hinge slot. Holding door over towel on dryer, grasp sides of hinges. Remove bottom screws Remove screws attaching hinges to keep cardboard spacer centered ...
Remove bottom screws from hinge screws as they are in large part of hinge slot. Holding door over towel on dryer, grasp sides of hinges. Remove bottom screws Remove screws attaching hinges to keep cardboard spacer centered ...

Installation Instructions
Page 18
... 9 into original door strike hole and secure with door catch. 12. Check door strike alignment Open dryer door. Insert the door strike removed in large part of hinge slot. Remove bottom screws from dryer cabinet. 4. If it is needed, slide door catch left or right within slot to door. 18 Pull...
... 9 into original door strike hole and secure with door catch. 12. Check door strike alignment Open dryer door. Insert the door strike removed in large part of hinge slot. Remove bottom screws from dryer cabinet. 4. If it is needed, slide door catch left or right within slot to door. 18 Pull...


