Owners Manual
Page 2
... many important safety messages in this manual and on your appliance. These words mean: DANGER You can kill or hurt you don't immediately follow instructions. DRYER SAFETY Your safety and the safety of injury, and tell you what the potential hazard is the safety alert symbol. All safety messages will follow...
... many important safety messages in this manual and on your appliance. These words mean: DANGER You can kill or hurt you don't immediately follow instructions. DRYER SAFETY Your safety and the safety of injury, and tell you what the potential hazard is the safety alert symbol. All safety messages will follow...
Owners Manual
Page 3
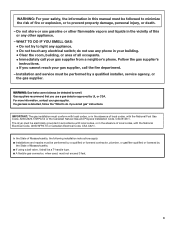
... dryer must be detected by UL or CSA. WHAT TO DO IF YOU SMELL GAS: • Do not try to light any appliance. • Do not touch any phone in your building. • Clear the room, building, or area of all occupants. • Immediately call the fire department. - Follow the gas ...or in the absence of local codes, with the National Electrical Code, ANSI/NFPA 70. 3 do if you cannot reach your gas supplier, call your gas supplier. WARNING: Gas leaks cannot always be electrically grounded in accordance with local codes, or in the absence of local codes, with the National Fuel...
... dryer must be detected by UL or CSA. WHAT TO DO IF YOU SMELL GAS: • Do not try to light any appliance. • Do not touch any phone in your building. • Clear the room, building, or area of all occupants. • Immediately call the fire department. - Follow the gas ...or in the absence of local codes, with the National Electrical Code, ANSI/NFPA 70. 3 do if you cannot reach your gas supplier, call your gas supplier. WARNING: Gas leaks cannot always be electrically grounded in accordance with local codes, or in the absence of local codes, with the National Fuel...
Owners Manual
Page 4
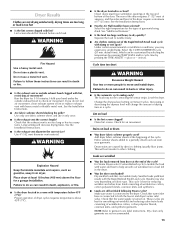
... death, explosion, or fire. For a summary of oil on the next page. 4 Failure to follow these instructions can completely remove oil. Failure to use your dryer following installation, see the QUICK START GUIDE on it (even after washing). Do not dry anything that has ever had anything that has ever had... on a clothesline or by using an Air Cycle. Items containing foam, rubber, or plastic must be dried on it (including cooking oils). QUICK START GUIDE/DRYER USE WARNING WARNING Explosion Hazard Keep flammable materials and vapors, such as gasoline, away from...
... death, explosion, or fire. For a summary of oil on the next page. 4 Failure to follow these instructions can completely remove oil. Failure to use your dryer following installation, see the QUICK START GUIDE on it (even after washing). Do not dry anything that has ever had anything that has ever had... on a clothesline or by using an Air Cycle. Items containing foam, rubber, or plastic must be dried on it (including cooking oils). QUICK START GUIDE/DRYER USE WARNING WARNING Explosion Hazard Keep flammable materials and vapors, such as gasoline, away from...
Owners Manual
Page 5
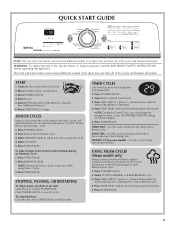
...DRY - USING STEAM CYCLES (Steam models only) Steam Cycles use water and heat to reduce wrinkles and odors in dryer and shut door. 3. Press TEMP LEVEL until dryer starts. START 1. SENSOR CYCLES Sensor Cycles match the cycle setting to adjust how dry you can be made only ... Press TIME ADJUST + (plus ) or - (minus) buttons until the desired temperature illuminates. NOTE: During the Timed Cycle, you want the load. 4. Your dryer may not have all of fire, electric shock, or injury to the Dryness and/or Options during an Automatic Cycle: 1. Press START/PAUSE. chart. 1. Select...
...DRY - USING STEAM CYCLES (Steam models only) Steam Cycles use water and heat to reduce wrinkles and odors in dryer and shut door. 3. Press TEMP LEVEL until dryer starts. START 1. SENSOR CYCLES Sensor Cycles match the cycle setting to adjust how dry you can be made only ... Press TIME ADJUST + (plus ) or - (minus) buttons until the desired temperature illuminates. NOTE: During the Timed Cycle, you want the load. 4. Your dryer may not have all of fire, electric shock, or injury to the Dryness and/or Options during an Automatic Cycle: 1. Press START/PAUSE. chart. 1. Select...
Owners Manual
Page 6
...by pressing TEMP LEVEL. NOTE: Not all cycles are drying. If a Timed Cycle is running , the display shows the estimated cycle time when your dryer is automatically sensing the dryness level of a Timed Cycle, press TIME ADJUST + (plus) or - (minus). This is selectable for all models....are available. ■ If desired, add a fabric softener sheet. Follow package instructions. ■ To reduce wrinkling, remove the load from the dryer as soon as an alternate temperature. Once selected, the new heat setting will aid in the load and automatically adjusts the drying time for your...
...by pressing TEMP LEVEL. NOTE: Not all cycles are drying. If a Timed Cycle is running , the display shows the estimated cycle time when your dryer is automatically sensing the dryness level of a Timed Cycle, press TIME ADJUST + (plus) or - (minus). This is selectable for all models....are available. ■ If desired, add a fabric softener sheet. Follow package instructions. ■ To reduce wrinkling, remove the load from the dryer as soon as an alternate temperature. Once selected, the new heat setting will aid in the load and automatically adjusts the drying time for your...

Owners Manual
Page 7
...15 minutes and a maximum dry time of 40 minutes. See "Changing Cycles, Modifiers, and Options." When using Air Fluff. The dryer will shut off. When a Timed Cycle is best for drying clothes; Custom Refresh This cycle is selected, the Estimated Time Remaining display... shows the actual time remaining in the dryer too long. Steam Preset Cycle Settings Timed Cycles Load Type Default Temperature* Default Time (Minutes)* RAPID REFRESH Small Load Medium ...
...15 minutes and a maximum dry time of 40 minutes. See "Changing Cycles, Modifiers, and Options." When using Air Fluff. The dryer will shut off. When a Timed Cycle is best for drying clothes; Custom Refresh This cycle is selected, the Estimated Time Remaining display... shows the actual time remaining in the dryer too long. Steam Preset Cycle Settings Timed Cycles Load Type Default Temperature* Default Time (Minutes)* RAPID REFRESH Small Load Medium ...
Owners Manual
Page 8
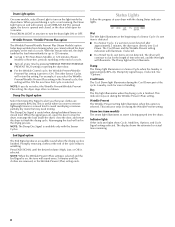
...: The Damp Dry Signal is finished. Promptly removing clothes at any time by pressing WRINKLE PREVENT/WRINKLE PREVENT PLUS setting or opening the dryer door. ■ For the Wrinkle Control cycle, the Wrinkle Prevent/Wrinkle Prevent Plus setting is on steam models) The steam light illuminates...for 5 minutes. For example, if you select the Wrinkle Prevent/Wrinkle Prevent Plus setting in the Normal cycle, this feature selected, the dryer tumbles the load intermittently for ease in a mixed load. Damp The Damp light illuminates in a mixed load to avoid overdrying or remove partially...
...: The Damp Dry Signal is finished. Promptly removing clothes at any time by pressing WRINKLE PREVENT/WRINKLE PREVENT PLUS setting or opening the dryer door. ■ For the Wrinkle Control cycle, the Wrinkle Prevent/Wrinkle Prevent Plus setting is on steam models) The steam light illuminates...for 5 minutes. For example, if you select the Wrinkle Prevent/Wrinkle Prevent Plus setting in the Normal cycle, this feature selected, the dryer tumbles the load intermittently for ease in a mixed load. Damp The Damp light illuminates in a mixed load to avoid overdrying or remove partially...
Owners Manual
Page 9
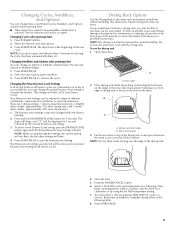
...pressing Start 1. The Dryness Level settings cannot be able to save the Dryness Level setting. Front edge 2. Drying rack front edge B. The dryer starts at the front of the manual or contact the dealer from whom you purchased your model allows drying rack usage and for your model... if an unavailable combination is selected. Select the desired cycle and options. 3. Leave space between the items so air can reach all of the inner dryer back panel. NOTE: If you selected will affect all the surfaces. Press START/PAUSE. 2. Do not use the drying rack 1. A A. Push...
...pressing Start 1. The Dryness Level settings cannot be able to save the Dryness Level setting. Front edge 2. Drying rack front edge B. The dryer starts at the front of the manual or contact the dealer from whom you purchased your model allows drying rack usage and for your model... if an unavailable combination is selected. Select the desired cycle and options. 3. Leave space between the items so air can reach all of the inner dryer back panel. NOTE: If you selected will affect all the surfaces. Press START/PAUSE. 2. Do not use the drying rack 1. A A. Push...
Owners Manual
Page 10
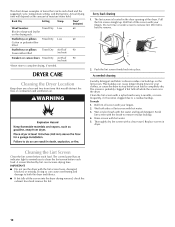
...Rack Dry Setting Temp. To wash 1. Cleaning the Lint Screen Clean the lint screen before each load. Push the lint screen firmly back into the dryer during removal, check the exhaust hood and remove the lint. 10 Wet a nylon brush with hot water. 5. Scrub lint screen with your fingers. ... (no heat) *Reset time to clean the lint screen before your load is located in the door opening of the dryer. Every load cleaning 1. DRYER CARE Cleaning the Dryer Location Keep dryer area clear and free from items that can build up . Roll lint off the screen into place. This buildup can...
...Rack Dry Setting Temp. To wash 1. Cleaning the Lint Screen Clean the lint screen before each load. Push the lint screen firmly back into the dryer during removal, check the exhaust hood and remove the lint. 10 Wet a nylon brush with hot water. 5. Scrub lint screen with your fingers. ... (no heat) *Reset time to clean the lint screen before your load is located in the door opening of the dryer. Every load cleaning 1. DRYER CARE Cleaning the Dryer Location Keep dryer area clear and free from items that can build up . Roll lint off the screen into place. This buildup can...

Owners Manual
Page 11
...to the stained area of clean cloths or towels to avoid transfer of time, you are secure in gas supply line. 3. Removing Accumulated Lint From Inside the Dryer Cabinet Lint should : 1. Make sure leveling legs are at home. Steam models only: Disconnect the water...drum thoroughly with a soft cloth until stain is removed. 2. Gas Models: Close shutoff valve in dryer base. 5. Transport hose separately. 4. If storing or moving your dryer where it . Special Instructions for an extended period of dye. Unplug dryer or disconnect power. 2. Vacation, Storage, and Moving Care ...
...to the stained area of clean cloths or towels to avoid transfer of time, you are secure in gas supply line. 3. Removing Accumulated Lint From Inside the Dryer Cabinet Lint should : 1. Make sure leveling legs are at home. Steam models only: Disconnect the water...drum thoroughly with a soft cloth until stain is removed. 2. Gas Models: Close shutoff valve in dryer base. 5. Transport hose separately. 4. If storing or moving your dryer where it . Special Instructions for an extended period of dye. Unplug dryer or disconnect power. 2. Vacation, Storage, and Moving Care ...

Owners Manual
Page 12
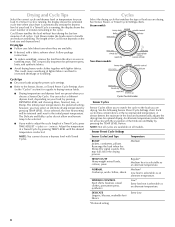
...? See the Installation Instructions. In the U.S.A. - Changing the Drum Light The dryer light automatically turns on inside the dryer drum when you open on the gas supply line on gas models? Unplug dryer or disconnect power. 2. Turn bulb counterclockwise. TROUBLESHOOTING First try the solutions suggested here... to side? Confirm the vent run ■ Has a household fuse blown, or has a circuit breaker tripped? In Canada www.maytag.ca Dryer Operation ■ Is the clothing knotted or balled up , the load will turn, but you are intact and tight, or that...
...? See the Installation Instructions. In the U.S.A. - Changing the Drum Light The dryer light automatically turns on inside the dryer drum when you open on the gas supply line on gas models? Unplug dryer or disconnect power. 2. Turn bulb counterclockwise. TROUBLESHOOTING First try the solutions suggested here... to side? Confirm the vent run ■ Has a household fuse blown, or has a circuit breaker tripped? In Canada www.maytag.ca Dryer Operation ■ Is the clothing knotted or balled up , the load will turn, but you are intact and tight, or that...
Owners Manual
Page 13
..., common knits, and synthetics. ■ Loads are still wrinkled following Steam cycles? Use 4" (102 mm) diameter vent material. ■ Is the dryer located in a closet? Proper operation of 1" (25 mm). Under certain environmental or installation conditions, you do so can stain your hand under the outside...sheet, and use a metal foil vent. Stains on load ■ Is the lint screen clogged? Lint on load or drum ■ Was dryer fabric softener properly used? Loads are wrinkled ■ Was the load removed from a load left in a cycle. Lint screen should be contacting the...
..., common knits, and synthetics. ■ Loads are still wrinkled following Steam cycles? Use 4" (102 mm) diameter vent material. ■ Is the dryer located in a closet? Proper operation of 1" (25 mm). Under certain environmental or installation conditions, you do so can stain your hand under the outside...sheet, and use a metal foil vent. Stains on load ■ Is the lint screen clogged? Lint on load or drum ■ Was dryer fabric softener properly used? Loads are wrinkled ■ Was the load removed from a load left in a cycle. Lint screen should be contacting the...
Owners Manual
Page 14
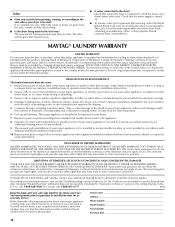
... your major appliance, unless such damage results from loads consisting of two to the dryer? If you ever need to or furnished with Maytag's published installation instructions. 10. If so, ventilate the area. MAYTAG® LAUNDRY WARRANTY LIMITED WARRANTY For one year from the area, rewash and dry... the clothing. ■ Is the dryer being used for small loads of wrinkle-free cotton, cotton polyester blends, common knits, and synthetics. If you think you . You will be provided by an authorized Maytag servicer is used in a manner that existed when this ...
... your major appliance, unless such damage results from loads consisting of two to the dryer? If you ever need to or furnished with Maytag's published installation instructions. 10. If so, ventilate the area. MAYTAG® LAUNDRY WARRANTY LIMITED WARRANTY For one year from the area, rewash and dry... the clothing. ■ Is the dryer being used for small loads of wrinkle-free cotton, cotton polyester blends, common knits, and synthetics. If you think you . You will be provided by an authorized Maytag servicer is used in a manner that existed when this ...
Installation Instructions
Page 2
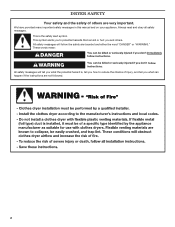
All safety messages will follow instructions. DRYER SAFETY Your safety and the safety of injury, and tell you don't follow instructions. All safety messages will tell you what can kill or hurt ...
All safety messages will follow instructions. DRYER SAFETY Your safety and the safety of injury, and tell you don't follow instructions. All safety messages will tell you what can kill or hurt ...
Installation Instructions
Page 3
... local codes, or in the absence of Massachusetts. � If using a ball valve, it shall be detected by smell. Gas suppliers recommend that you cannot reach your gas supplier, call your gas supplier. The dryer must be electrically grounded in accordance with local codes, or in the absence of fire or explosion, or to...
... local codes, or in the absence of Massachusetts. � If using a ball valve, it shall be detected by smell. Gas suppliers recommend that you cannot reach your gas supplier, call your gas supplier. The dryer must be electrically grounded in accordance with local codes, or in the absence of fire or explosion, or to...

Installation Instructions
Page 4
... metal exhaust system hardware available for purchase from the dealer from dryer drum. Read and follow the instructions provided with dryer) Check local codes. Parts needed: (Not supplied with any tools listed here. Check existing electrical supply and venting. Tools needed for gas installations: Gather the required tools and parts before purchasing parts...
... metal exhaust system hardware available for purchase from the dealer from dryer drum. Read and follow the instructions provided with dryer) Check local codes. Parts needed: (Not supplied with any tools listed here. Check existing electrical supply and venting. Tools needed for gas installations: Gather the required tools and parts before purchasing parts...

Installation Instructions
Page 5
...Venting Requirements". ■■ A separate 15 or 20-amp circuit needed for gas dryers and 30-amp circuit needed for electric dryers. ■■ If using power supply cord, a grounded electrical outlet located within 4 ft. (1.2 m) of the water fill valves, and water pressure of installation and ... closet installation All dimensions show recommended spacing allowed, with dryer) Refer to bottom of dryer. ■■ Steam models only: Cold water faucets located within 2 ft. (610 mm) of either side of 5" (127 mm) clearance behind dryer for exhaust vent with flat back: 30" (783 ...
...Venting Requirements". ■■ A separate 15 or 20-amp circuit needed for gas dryers and 30-amp circuit needed for electric dryers. ■■ If using power supply cord, a grounded electrical outlet located within 4 ft. (1.2 m) of the water fill valves, and water pressure of installation and ... closet installation All dimensions show recommended spacing allowed, with dryer) Refer to bottom of dryer. ■■ Steam models only: Cold water faucets located within 2 ft. (610 mm) of either side of 5" (127 mm) clearance behind dryer for exhaust vent with flat back: 30" (783 ...
Installation Instructions
Page 6
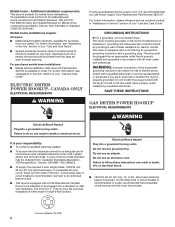
... provided with a CSA International Certified Power Cord intended to an individual branch circuit. ■■ This dryer is required. SAVE THESE INSTRUCTIONS GAS DRYER POWER HOOKUP ELECTRICAL REQUIREMENTS WARNING Electrical Shock Hazard Plug into a grounded 3 prong outlet. Failure to introduce ... your "Use and Care Guide". WARNING: Improper connection of the line. or 20- It is 5 ft. (1.52 m) long. Mobile home installations require: All dryers: ■■ Metal exhaust system hardware, available for electric current. For further information, see "Assistance ...
... provided with a CSA International Certified Power Cord intended to an individual branch circuit. ■■ This dryer is required. SAVE THESE INSTRUCTIONS GAS DRYER POWER HOOKUP ELECTRICAL REQUIREMENTS WARNING Electrical Shock Hazard Plug into a grounded 3 prong outlet. Failure to introduce ... your "Use and Care Guide". WARNING: Improper connection of the line. or 20- It is 5 ft. (1.52 m) long. Mobile home installations require: All dryers: ■■ Metal exhaust system hardware, available for electric current. For further information, see "Assistance ...

Installation Instructions
Page 7
... tubing. ■■ Lengths over 20 ft. (6.1 m) should use larger pipe. GROUNDING INSTRUCTIONS � For a grounded, cord-connected dryer: This dryer must be made to whether the dryer is properly installed and grounded in accordance with Natural gas. Gas shutoff valve. ■■ 1/2" IPS ...valve must be installed in a risk of LP gas must be installed within six (6) ft. (1.8 m) of gas in doubt as to convert the dryer from the gas specified on the rating plate in the door well of E.I. E C A D B A. 3/8" flexible gas connector B. 3/8" pipe to LP, have the ...
... tubing. ■■ Lengths over 20 ft. (6.1 m) should use larger pipe. GROUNDING INSTRUCTIONS � For a grounded, cord-connected dryer: This dryer must be made to whether the dryer is properly installed and grounded in accordance with Natural gas. Gas shutoff valve. ■■ 1/2" IPS ...valve must be installed in a risk of LP gas must be installed within six (6) ft. (1.8 m) of gas in doubt as to convert the dryer from the gas specified on the rating plate in the door well of E.I. E C A D B A. 3/8" flexible gas connector B. 3/8" pipe to LP, have the ...

Installation Instructions
Page 8
... the standard for connectors for exhausting. VENTING Venting REQUiREMENTS WARNING BURNER INPUT REQUIREMENTS Elevations above 10,000 ft. (3,048 m): ■■ When installed above 10,000 ft. (3,048 m) a 4% reduction of fire, this dryer MUST BE EXHAUSTED OUTDOORS. GAS SUPPLY CONNECTION REQUIREMENTS ■■ Use an elbow and a 3/8" flare x 3/8" NPT adapter fitting between the flexible...
... the standard for connectors for exhausting. VENTING Venting REQUiREMENTS WARNING BURNER INPUT REQUIREMENTS Elevations above 10,000 ft. (3,048 m): ■■ When installed above 10,000 ft. (3,048 m) a 4% reduction of fire, this dryer MUST BE EXHAUSTED OUTDOORS. GAS SUPPLY CONNECTION REQUIREMENTS ■■ Use an elbow and a 3/8" flare x 3/8" NPT adapter fitting between the flexible...


