Owners Manual
Page 4
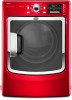
... and storage area. Worksurface The worksurface bridges the washer and dryer, and provides a convenient working height. For more information on top of the washer. 4 Available in matching colors. ACCESSORIES Customize your dealer, or visit: www.maytag.com. 15" Pedestal Color matched pedestals raise the washer and dryer to be installed on options and ordering...
... and storage area. Worksurface The worksurface bridges the washer and dryer, and provides a convenient working height. For more information on top of the washer. 4 Available in matching colors. ACCESSORIES Customize your dealer, or visit: www.maytag.com. 15" Pedestal Color matched pedestals raise the washer and dryer to be installed on options and ordering...

Installation Instructions
Page 4
... knife Tin snips (new vent installations) Pipe-joint compound resistant to LP gas Parts supplied: Parts package is a registered trademark of Saturn Fasteners, Inc. 4 Rubber washers Parts needed for all parts are included. NOTE: Do not use leveling legs supplied with dryer if installing with dryer) ■■Vent clamps ■...
... knife Tin snips (new vent installations) Pipe-joint compound resistant to LP gas Parts supplied: Parts package is a registered trademark of Saturn Fasteners, Inc. 4 Rubber washers Parts needed for all parts are included. NOTE: Do not use leveling legs supplied with dryer if installing with dryer) ■■Vent clamps ■...
Installation Instructions
Page 5
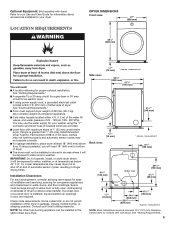
..., install, or store dryer where it will need : ■■A location allowing for proper exhaust installation. Lower temperatures may use the water supply for your washer using a pedestal, you will be exposed to water and/or weather. Side view: 3/4"* (18 mm) * Approx. measurement NOTE: Most installations require a minimum of 5" (127 mm...
..., install, or store dryer where it will need : ■■A location allowing for proper exhaust installation. Lower temperatures may use the water supply for your washer using a pedestal, you will be exposed to water and/or weather. Side view: 3/4"* (18 mm) * Approx. measurement NOTE: Most installations require a minimum of 5" (127 mm...

Installation Instructions
Page 12
... to seal exterior wall opening around exhaust hood. 2. See figure B. Screw on coupling by hand until it is seated on connector. 12 Remove old rubber washer from inlet hose and replace with 4" (102 mm) clamp. Avoid 90° turns. Use clamps to cold water faucet. Screw on the hoses for ... hoses after 5 years of use duct tape, screws, or other fastening devices that extend into interior of vent to exhaust hood with new rubber washer provided. Install Vent System 1. Connect vent to exhaust hood Connect Inlet Hose The dryer must be attached directly to male end of the short hose...
... to seal exterior wall opening around exhaust hood. 2. See figure B. Screw on coupling by hand until it is seated on connector. 12 Remove old rubber washer from inlet hose and replace with 4" (102 mm) clamp. Avoid 90° turns. Use clamps to cold water faucet. Screw on the hoses for ... hoses after 5 years of use duct tape, screws, or other fastening devices that extend into interior of vent to exhaust hood with new rubber washer provided. Install Vent System 1. Connect vent to exhaust hood Connect Inlet Hose The dryer must be attached directly to male end of the short hose...

Installation Instructions
Page 13
... Remove protective cap from water inlet valve. 3. Check that the water faucets are turned on connector. Damage to fill valve at bottom of "Y" connector. Attach washer cold inlet hose to other end of long hose to the coupling can result. 4. Damage to dryer fill valve and tighten coupling A Using pliers, tighten...
... Remove protective cap from water inlet valve. 3. Check that the water faucets are turned on connector. Damage to fill valve at bottom of "Y" connector. Attach washer cold inlet hose to other end of long hose to the coupling can result. 4. Damage to dryer fill valve and tighten coupling A Using pliers, tighten...


