Use & Care Guide
Page 4
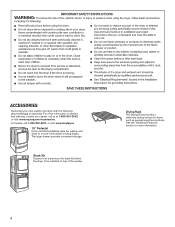
...the dryer to be installed on options and ordering, contact your new washer and dryer with the following genuine Maytag accessories. Drying Rack The Drying Rack provides a stationary drying surface for more information on top of the washer. Stack Kit If space is at 1-800-901-2042, or visit...: www.maytag.com/accessories. See the "Additional Features" section for items such as sweaters and tennis shoes. ACCESSORIES Customize your ...
...the dryer to be installed on options and ordering, contact your new washer and dryer with the following genuine Maytag accessories. Drying Rack The Drying Rack provides a stationary drying surface for more information on top of the washer. Stack Kit If space is at 1-800-901-2042, or visit...: www.maytag.com/accessories. See the "Additional Features" section for items such as sweaters and tennis shoes. ACCESSORIES Customize your ...
Installation Guide
Page 4
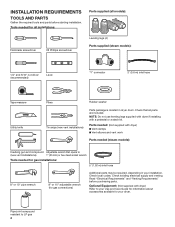
...-blade screwdriver #2 Phillips screwdriver Leveling legs (4) Parts supplied (steam models): 1/4" and 5/16" nut driver (recommended) Level "Y" connector 2' (0.6 m) inlet hose Tape measure Utility knife Pliers Rubber washer Tin snips (new vent installations) Parts package is located in your dryer.
...-blade screwdriver #2 Phillips screwdriver Leveling legs (4) Parts supplied (steam models): 1/4" and 5/16" nut driver (recommended) Level "Y" connector 2' (0.6 m) inlet hose Tape measure Utility knife Pliers Rubber washer Tin snips (new vent installations) Parts package is located in your dryer.
Installation Guide
Page 5
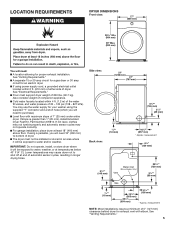
You may use the water supply for your washer using the supplied "Y" connector and a short hose (which you will need: ■■A location allowing for proper exhaust installation. IMPORTANT: Do not operate, install, or ...
You may use the water supply for your washer using the supplied "Y" connector and a short hose (which you will need: ■■A location allowing for proper exhaust installation. IMPORTANT: Do not operate, install, or ...

Installation Guide
Page 12
... vent to secure vent, because they can catch lint. Do not use of box/louvered hoods will help achieve best drying performance. Remove old rubber washer from inlet hose and replace with 4" (102 mm) clamp. The dryer must fit over the exhaust hood. Standard Vent System Chart Number of 90&#...ft. (48.8 m) 150 ft. (45.7 m) 140 ft. (42.7 m) 130 ft. (39.6 m) 120 ft. (36.6 m) Install exhaust hood and use to exhaust hood with new rubber washer. 12 To find your model number, refer to "Connect Vent." Avoid 90° turns. CONNECT INLET HOSE (STEAM MODEL ONLY) For non-steam models, skip...
... vent to secure vent, because they can catch lint. Do not use of box/louvered hoods will help achieve best drying performance. Remove old rubber washer from inlet hose and replace with 4" (102 mm) clamp. The dryer must fit over the exhaust hood. Standard Vent System Chart Number of 90&#...ft. (48.8 m) 150 ft. (45.7 m) 140 ft. (42.7 m) 130 ft. (39.6 m) 120 ft. (36.6 m) Install exhaust hood and use to exhaust hood with new rubber washer. 12 To find your model number, refer to "Connect Vent." Avoid 90° turns. CONNECT INLET HOSE (STEAM MODEL ONLY) For non-steam models, skip...
Installation Guide
Page 13
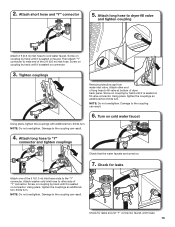
... hand until it is seated on . 7. Damage to fill valve at bottom of long hose to the coupling can result. 6. NOTE: Do not overtighten. Attach washer cold inlet hose to other end of dryer back panel. NOTE: Do not overtighten. Check for leaks Attach one of the 5 ft (1.5 m) inlet hose ends...
... hand until it is seated on . 7. Damage to fill valve at bottom of long hose to the coupling can result. 6. NOTE: Do not overtighten. Attach washer cold inlet hose to other end of dryer back panel. NOTE: Do not overtighten. Check for leaks Attach one of the 5 ft (1.5 m) inlet hose ends...


