
Owners Manual
Page 3
...is , tell you how to potential hazards that can be killed or seriously injured if you don't follow instructions. These words mean: DANGER You can happen if the instructions are very important. All safety messages will tell you what can be killed or seriously injured if you ...alert symbol. All safety messages will follow instructions. Always read and obey all safety messages. We have provided many important safety messages in this manual and on your appliance. This symbol alerts you to reduce the chance of others . COOKTOP SAFETY Your safety and the safety of injury...
...is , tell you how to potential hazards that can be killed or seriously injured if you don't follow instructions. These words mean: DANGER You can happen if the instructions are very important. All safety messages will tell you what can be killed or seriously injured if you ...alert symbol. All safety messages will follow instructions. Always read and obey all safety messages. We have provided many important safety messages in this manual and on your appliance. This symbol alerts you to reduce the chance of others . COOKTOP SAFETY Your safety and the safety of injury...
Owners Manual
Page 4
... cooktop such as a space heater to heat or warm the room. If a gas leak is detected, follow basic precautions, including the following: ■ WARNING: NEVER use any electrical switch. • Do not use this appliance as stepping, leaning, or sitting on or near surface units. ■ Top burner flame size should be adjusted so it does not extend beyond the edge of the cooking...
... cooktop such as a space heater to heat or warm the room. If a gas leak is detected, follow basic precautions, including the following: ■ WARNING: NEVER use any electrical switch. • Do not use this appliance as stepping, leaning, or sitting on or near surface units. ■ Top burner flame size should be adjusted so it does not extend beyond the edge of the cooking...

Owners Manual
Page 5
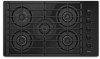
Right front surface burner (12,500 Btu/h) A. Right rear surface burner (8,000 Btu/h) C. Right front surface burner (12,500 Btu/h) 5 Right rear surface burner (5,000 Btu/h) C. Center surface burner (5,000 Btu/h) D. Left rear surface burner (15,000 Btu/h) B. Left front surface burner (15,000 Btu/h) D. Left rear surface burner (9,200 Btu/h) B. Left front surface burner (9,200 Btu/h) E. COOKTOP USE NOTE: Burner ratings listed below are for Natural gas. 30" (76.2 cm) Model 36" (91.4 cm) Model A A B B C C D D E A.
Right front surface burner (12,500 Btu/h) A. Right rear surface burner (8,000 Btu/h) C. Right front surface burner (12,500 Btu/h) 5 Right rear surface burner (5,000 Btu/h) C. Center surface burner (5,000 Btu/h) D. Left rear surface burner (15,000 Btu/h) B. Left front surface burner (15,000 Btu/h) D. Left rear surface burner (9,200 Btu/h) B. Left front surface burner (9,200 Btu/h) E. COOKTOP USE NOTE: Burner ratings listed below are for Natural gas. 30" (76.2 cm) Model 36" (91.4 cm) Model A A B B C C D D E A.

Owners Manual
Page 6
... models) or left front (on some models) or the center position. Cooktop Burners High Performance Burner* There is factory-set for cooking large quantities of food, using large pots and pans. Hold a lit match near a burner and turn knob to see whether it is wired with your new cooktop. Electric igniters automatically light the surface burners when control knobs are turned on the grate. This burner offers higher speed cooking that can result in use LP Gas, an LP Gas Conversion Kit...
... models) or left front (on some models) or the center position. Cooktop Burners High Performance Burner* There is factory-set for cooking large quantities of food, using large pots and pans. Hold a lit match near a burner and turn knob to see whether it is wired with your new cooktop. Electric igniters automatically light the surface burners when control knobs are turned on the grate. This burner offers higher speed cooking that can result in use LP Gas, an LP Gas Conversion Kit...

Owners Manual
Page 7
... level. Burner ports Burner ports: Check burner flames occasionally for the burner to enter the burner ports. Remove the burner cap from the burner base and clean according to the "General Cleaning" section. Do not use oven cleaners, bleach or rust removers. 1. Turn on the grates. AB AB A. A clean burner cap will help avoid poor ignition and uneven flames. Alignment pins C. Gas tube opening Gas tube opening: Gas must be properly positioned before cooking. Keep this area free of...
... level. Burner ports Burner ports: Check burner flames occasionally for the burner to enter the burner ports. Remove the burner cap from the burner base and clean according to the "General Cleaning" section. Do not use oven cleaners, bleach or rust removers. 1. Turn on the grates. AB AB A. A clean burner cap will help avoid poor ignition and uneven flames. Alignment pins C. Gas tube opening Gas tube opening: Gas must be properly positioned before cooking. Keep this area free of...

Owners Manual
Page 8
... stainless steel provides even heating. 8 Ceramic or Ceramic glass ■ Follow manufacturer's instructions. ■ Heats slowly, but unevenly. ■ A core or base of the gas flame. Although the burner grates are clean and dry before and after each use of cooking. ■ Medium or heavy thickness is a factor in cookware. This allows time for slow cooking. Rough finishes may be of medium-to touch any form, clean up all types...
... stainless steel provides even heating. 8 Ceramic or Ceramic glass ■ Follow manufacturer's instructions. ■ Heats slowly, but unevenly. ■ A core or base of the gas flame. Although the burner grates are clean and dry before and after each use of cooking. ■ Medium or heavy thickness is a factor in cookware. This allows time for slow cooking. Rough finishes may be of medium-to touch any form, clean up all types...

Owners Manual
Page 9
...; Gas Grate and Drip Pan Cleaner Part Number 31617 (not included): See "Assistance or Service" section to order. To avoid damage to wear oven mitts while cleaning the cooktop. ■ Cooktop Cleaner and clean damp paper towel: Clean as soon as cooktop has cooled down . Cooktop Cleaner is recommended for stubborn spots. Light to order. You may want to the tempered glass, do not remove seals under knobs. Continue...
...; Gas Grate and Drip Pan Cleaner Part Number 31617 (not included): See "Assistance or Service" section to order. To avoid damage to wear oven mitts while cleaning the cooktop. ■ Cooktop Cleaner and clean damp paper towel: Clean as soon as cooktop has cooled down . Cooktop Cleaner is recommended for stubborn spots. Light to order. You may want to the tempered glass, do not remove seals under knobs. Continue...

Owners Manual
Page 10
..." section. ■ Is the control knob set correctly? Contact a service technician or see Installation Instructions. See the Installation Instructions. See "Surface Burners" section. ■ On models with caps, are uneven, yellow and/or noisy Electrical Shock Hazard Plug into a grounded 3 prong outlet. ■ Has a household fuse blown, or has a circuit breaker tripped? Do not remove ground prong. Level the cooktop. Surface burner flames are the burner caps positioned properly? TROUBLESHOOTING Try the solutions suggested here...
..." section. ■ Is the control knob set correctly? Contact a service technician or see Installation Instructions. See the Installation Instructions. See "Surface Burners" section. ■ On models with caps, are uneven, yellow and/or noisy Electrical Shock Hazard Plug into a grounded 3 prong outlet. ■ Has a household fuse blown, or has a circuit breaker tripped? Do not remove ground prong. Level the cooktop. Surface burner flames are the burner caps positioned properly? TROUBLESHOOTING Try the solutions suggested here...

Owners Manual
Page 11
... -warranty service, anywhere in your area, call . If you use only factory specified parts. Call Maytag Customer eXperience Center toll free: 1-800-688-9900, or visit our website at : Maytag Brand Home Appliances Customer eXperience Center 553 Benson Road Benton Harbor, MI 49022-2692 Stainless Steel Cleaner and Polish (stainless steel models) Order Part Number 31462 Gas Grate and Drip Pan Cleaner Order Part Number 31617 In Canada Call the Whirlpool Canada LP Customer...
... -warranty service, anywhere in your area, call . If you use only factory specified parts. Call Maytag Customer eXperience Center toll free: 1-800-688-9900, or visit our website at : Maytag Brand Home Appliances Customer eXperience Center 553 Benson Road Benton Harbor, MI 49022-2692 Stainless Steel Cleaner and Polish (stainless steel models) Order Part Number 31462 Gas Grate and Drip Pan Cleaner Order Part Number 31617 In Canada Call the Whirlpool Canada LP Customer...

Owners Manual
Page 12
... States and Canada, this information on the model and serial number label located on how to use your major appliance, to instruct you need service, first see the "Troubleshooting" section of the Use & Care Guide. Damage resulting from warranty coverage. 3. Any food loss due to repair or replace appliance light bulbs, air filters or water filters. DISCLAIMER OF IMPLIED WARRANTIES; If you on the product. MAYTAG® MAJOR APPLIANCE WARRANTY LIMITED WARRANTY For one...
... States and Canada, this information on the model and serial number label located on how to use your major appliance, to instruct you need service, first see the "Troubleshooting" section of the Use & Care Guide. Damage resulting from warranty coverage. 3. Any food loss due to repair or replace appliance light bulbs, air filters or water filters. DISCLAIMER OF IMPLIED WARRANTIES; If you on the product. MAYTAG® MAJOR APPLIANCE WARRANTY LIMITED WARRANTY For one...
Installation Instructions
Page 2
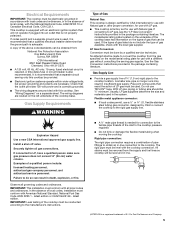
This symbol alerts you to light any appliance. • Do not touch any electrical switch. • Do not use a gas detector approved by the State of Massachusetts. ■ If using a ball valve, it shall be killed or seriously ...installation instructions apply: ■ Installations and repairs must not exceed 3 feet. 2 Always read and obey all safety messages. These words mean: DANGER You can kill or hurt you use any other flammable vapors and liquids in this manual is , tell you how to do if you what can be a T-handle type. ■ A flexible gas connector, when used...
This symbol alerts you to light any appliance. • Do not touch any electrical switch. • Do not use a gas detector approved by the State of Massachusetts. ■ If using a ball valve, it shall be killed or seriously ...installation instructions apply: ■ Installations and repairs must not exceed 3 feet. 2 Always read and obey all safety messages. These words mean: DANGER You can kill or hurt you use any other flammable vapors and liquids in this manual is , tell you how to do if you what can be a T-handle type. ■ A flexible gas connector, when used...
Installation Instructions
Page 3
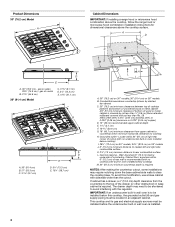
... by installing a range hood that is approved. In Canada, the installation of the cabinets. Tools needed Check local codes and consult gas supplier. Location Requirements IMPORTANT: Observe all governing codes and ordinances. See "Electrical Requirements" section. Check the cooktop base approved installation label for this cooktop must conform with the current standards CAN/CSA-A240-latest edition, or with installation clearances specified on the model/serial rating plate. If cabinet storage is approved. ■ Ovens...
... by installing a range hood that is approved. In Canada, the installation of the cabinets. Tools needed Check local codes and consult gas supplier. Location Requirements IMPORTANT: Observe all governing codes and ordinances. See "Electrical Requirements" section. Check the cooktop base approved installation label for this cooktop must conform with the current standards CAN/CSA-A240-latest edition, or with installation clearances specified on the model/serial rating plate. If cabinet storage is approved. ■ Ovens...
Installation Instructions
Page 4
... minimum horizontal clearances to cooktop H. Wall: Anywhere 6" (15.2 cm) below underside of cutout (with no undercounter built-in base cabinet is installed. 4 This cooktop and its gas and electrical supply sources must be installed before the undercounter built-in wall oven is to be installed below cooktop) M. 24" (61.0 cm) minimum countertop depth is covered by dashed box above the cooktop surface. Combustible area above countertop (shown by not less than ¹⁄₄" [0.6 cm] flame...
... minimum horizontal clearances to cooktop H. Wall: Anywhere 6" (15.2 cm) below underside of cutout (with no undercounter built-in base cabinet is installed. 4 This cooktop and its gas and electrical supply sources must be installed before the undercounter built-in wall oven is to be installed below cooktop) M. 24" (61.0 cm) minimum countertop depth is covered by dashed box above the cooktop surface. Combustible area above countertop (shown by not less than ¹⁄₄" [0.6 cm] flame...
Installation Instructions
Page 5
... circuit breaker is equipped with this cooktop be level and in -line connection to the cooktop location. See "Wiring Diagrams" on the model/serial rating plate for use TEFLON®† tape. The wiring diagrams are located on the types of Gas Natural Gas: This cooktop is design-certified by CSA International for use with Natural gas or, after proper conversion, for use with LP gas. ■ This cooktop is correctly grounded. ■ The wiring diagrams are provided with an electronic ignition...
... circuit breaker is equipped with this cooktop be level and in -line connection to the cooktop location. See "Wiring Diagrams" on the model/serial rating plate for use TEFLON®† tape. The wiring diagrams are located on the types of Gas Natural Gas: This cooktop is design-certified by CSA International for use with Natural gas or, after proper conversion, for use with LP gas. ■ This cooktop is correctly grounded. ■ The wiring diagrams are provided with an electronic ignition...
Installation Instructions
Page 6
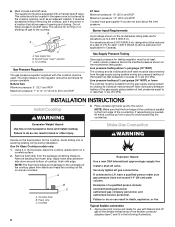
... line must be used. Do not block access to do so can result in a location that the front edge of the cooktop is for turning on the model/serial rating plate are not sure about the inlet pressure. B A C A. Failure to shutoff valve. Avoid drilling into the cutout. A A. Foam strip C. Install a shut-off gas to the cooktop. To cooktop Gas Pressure Regulator The gas pressure regulator supplied with this cooktop must be equipped with a manual shutoff valve...
... line must be used. Do not block access to do so can result in a location that the front edge of the cooktop is for turning on the model/serial rating plate are not sure about the inlet pressure. B A C A. Failure to shutoff valve. Avoid drilling into the cutout. A A. Foam strip C. Install a shut-off gas to the cooktop. To cooktop Gas Pressure Regulator The gas pressure regulator supplied with this cooktop must be equipped with a manual shutoff valve...
Installation Instructions
Page 7
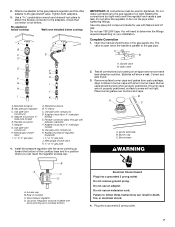
..., or electrical shock. 4. Do not remove ground prong. Plug into a grounded 3 prong outlet. Manifold entrance B. Manual gas shutoff valve I K A. Flexible connector (pass through wall between cabinets) F. Use only pipe-joint compound made for use an extension cord. Open the manual shutoff valve in burner base. Closed valve B. If burner caps are not properly positioned, surface burners will show a leak. Igniter electrode B. Gas pressure regulator D. Do not use with pins in the gas supply line. Use pipe-joint...
..., or electrical shock. 4. Do not remove ground prong. Plug into a grounded 3 prong outlet. Manifold entrance B. Manual gas shutoff valve I K A. Flexible connector (pass through wall between cabinets) F. Use only pipe-joint compound made for use an extension cord. Open the manual shutoff valve in burner base. Closed valve B. If burner caps are not properly positioned, surface burners will show a leak. Igniter electrode B. Gas pressure regulator D. Do not use with pins in the gas supply line. Use pipe-joint...
Installation Instructions
Page 8
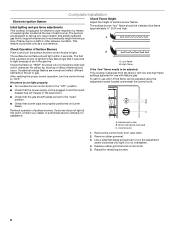
... control knob. If a burner does not light at the rear of surface burner flames. Remove rubber grommet. 3. This feature is equipped for electronic auto-reignition by means of a spark igniter located at this point, contact your dealer or authorized service company for assistance. The surface burner "low" flame should be adjusted: This cooktop is plugged in character. The surface burner flame should occur. Low flame B. Remove the control knob from the factory with low and high flame settings adjusted...
... control knob. If a burner does not light at the rear of surface burner flames. Remove rubber grommet. 3. This feature is equipped for electronic auto-reignition by means of a spark igniter located at this point, contact your dealer or authorized service company for assistance. The surface burner "low" flame should be adjusted: This cooktop is plugged in character. The surface burner flame should occur. Low flame B. Remove the control knob from the factory with low and high flame settings adjusted...


