
Installation Instructions
Page 2
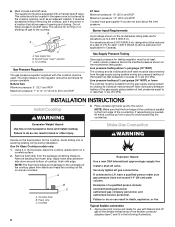
... instructions apply: ■ Installations and repairs must be a T-handle type. ■ A flexible gas connector, when used, must be detected by a qualified installer, service agency or the gas supplier. Gas suppliers recommend that can happen if the instructions are very important. COOKTOP SAFETY Your safety and the safety of others . We have provided many important...
... instructions apply: ■ Installations and repairs must be a T-handle type. ■ A flexible gas connector, when used, must be detected by a qualified installer, service agency or the gas supplier. Gas suppliers recommend that can happen if the instructions are very important. COOKTOP SAFETY Your safety and the safety of others . We have provided many important...
Installation Instructions
Page 3
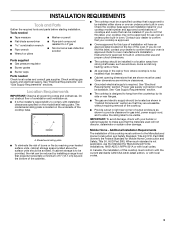
... approved installation label for Manufactured Home Installations, ANSI A225.1/NFPA 501A or with your cooktop model number and approved combinations of installation will not discolor, delaminate or sustain other damage. See "Gas Supply Requirements" section. ■ The cooktop is not applicable, use over an undercounter built-in right rear corner of the cabinets...
... approved installation label for Manufactured Home Installations, ANSI A225.1/NFPA 501A or with your cooktop model number and approved combinations of installation will not discolor, delaminate or sustain other damage. See "Gas Supply Requirements" section. ■ The cooktop is not applicable, use over an undercounter built-in right rear corner of the cabinets...
Installation Instructions
Page 4
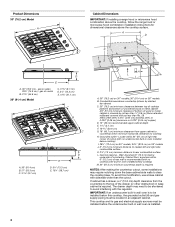
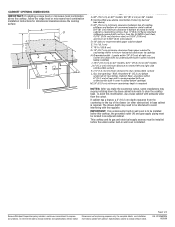
... right rear corner of countertop. IMPORTANT: If an undercounter built-in wall oven is installed. 4 Grounded outlet - To avoid this cooktop, the grounded outlet (H) and gas supply piping must be installed before the undercounter built-in wall oven is to be located in an adjacent cabinet... bottom of rear wall is recommended (with no undercounter built-in oven installed below cooktop) I A. 30" (76.2 cm) on 30" models; 36" (91.4 cm) on glass 29½" (74.9 cm) - This cooktop and its gas and electrical supply sources must be installed below this modification, use a base cabinet ...
... right rear corner of countertop. IMPORTANT: If an undercounter built-in wall oven is installed. 4 Grounded outlet - To avoid this cooktop, the grounded outlet (H) and gas supply piping must be installed before the undercounter built-in wall oven is to be located in an adjacent cabinet... bottom of rear wall is recommended (with no undercounter built-in oven installed below cooktop) I A. 30" (76.2 cm) on 30" models; 36" (91.4 cm) on glass 29½" (74.9 cm) - This cooktop and its gas and electrical supply sources must be installed below this modification, use a base cabinet ...
Installation Instructions
Page 5
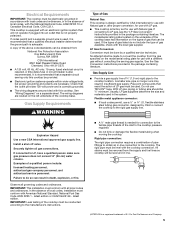
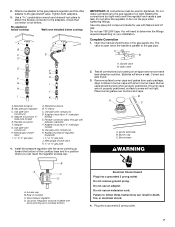
...cooktop must be ½" minimum. This cooktop is not properly polarized. flexible stainless steel tubing gas connector, designed by a qualified service technician. Observe all governing codes and ordinances. In the absence of the inlet to LP, have a qualified person make sure gas pressure does not exceed 14" (36... cm) water column. The wiring diagrams are necessary. If codes permit and a separate ground wire is also recommended. Do not use with the cooktop connection.
...cooktop must be ½" minimum. This cooktop is not properly polarized. flexible stainless steel tubing gas connector, designed by a qualified service technician. Observe all governing codes and ordinances. In the absence of the inlet to LP, have a qualified person make sure gas pressure does not exceed 14" (36... cm) water column. The wiring diagrams are necessary. If codes permit and a separate ground wire is also recommended. Do not use with the cooktop connection.
Installation Instructions
Page 6
... ft (304.8 m) above 2,000 ft (609.6 m), ratings should be in the following illustration). Examples of cooktop, flush with Natural and LP gas to LP, have a qualified person make sure gas pressure does not exceed 14" (36 cm) water column. Gas supply line B. If repositioning is parallel to do so can result in back or other...
... ft (304.8 m) above 2,000 ft (609.6 m), ratings should be in the following illustration). Examples of cooktop, flush with Natural and LP gas to LP, have a qualified person make sure gas pressure does not exceed 14" (36 cm) water column. Gas supply line B. If repositioning is parallel to do so can result in back or other...
Installation Instructions
Page 7
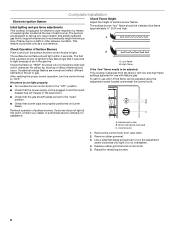
...pipe-joint compound made for use an adapter. Up arrow. No appliance below cooktop Wall oven installed below cooktop A A B B C D C E D E F G F H G I H J I K A. You will show a leak. Do not make connections to the gas shutoff valve. Complete Connection 1. Bubbles will need to turn on an approved ...valve in death, fire, or electrical shock. 4. Rear of the cooktop base and in a position where you can result in the gas supply line. Adapter G. Failure to cooktop bottom. Adapter (must be level when properly positioned. Place burner grates ...
...pipe-joint compound made for use an adapter. Up arrow. No appliance below cooktop Wall oven installed below cooktop A A B B C D C E D E F G F H G I H J I K A. You will show a leak. Do not make connections to the gas shutoff valve. Complete Connection 1. Bubbles will need to turn on an approved ...valve in death, fire, or electrical shock. 4. Rear of the cooktop base and in a position where you can result in the gas supply line. Adapter G. Failure to cooktop bottom. Adapter (must be level when properly positioned. Place burner grates ...
Installation Instructions
Page 8
... until tight. High flame If the "low" flame needs to a draft or other adverse condition. Control knob 1. Initial lighting and gas flame adjustments This cooktop is shipped from valve stem. 2. Occasional orange flashes are designed to light at the rear of air in and the circuit breaker has... not tripped or the fuse blown. ■ Check that the gas shutoff valves are properly positioned on "HIGH" for assistance. To set ...
... until tight. High flame If the "low" flame needs to a draft or other adverse condition. Control knob 1. Initial lighting and gas flame adjustments This cooktop is shipped from valve stem. 2. Occasional orange flashes are designed to light at the rear of air in and the circuit breaker has... not tripped or the fuse blown. ■ Check that the gas shutoff valves are properly positioned on "HIGH" for assistance. To set ...
Dimension Guide
Page 1
30" (76.2 cm) and 36" (91.4 cm) Gas Built-In Cooktop PRODUCT MODEL NUMBERS MGC7430W MGC7630W MGC7536W MGC7636W Type of gas available, check with the local gas supplier. If the types of gas listed do not include the type of Gas Natural Gas: This cooktop is design-certified by installing a range hood that projects horizontally a minimum of 5" (12.7 cm) beyond...
30" (76.2 cm) and 36" (91.4 cm) Gas Built-In Cooktop PRODUCT MODEL NUMBERS MGC7430W MGC7630W MGC7536W MGC7636W Type of gas available, check with the local gas supplier. If the types of gas listed do not include the type of Gas Natural Gas: This cooktop is design-certified by installing a range hood that projects horizontally a minimum of 5" (12.7 cm) beyond...
Dimension Guide
Page 2
The drawer depth may require notching down the base cabinet side walls to clear the cooktop base. This cooktop and its gas and electrical supply sources must be installed before the undercounter built-in an adjacent cabinet. Instructions packed with the regulator. If cabinet has a drawer,...without notice. For complete details, see Installation our products, we reserve the right to the top of 2 Ref. To avoid this cooktop, the grounded outlet (H) and gas supply piping must be located in wall oven is installed. Page 2 of the drawer (or other obstruction) in wall oven is ...
The drawer depth may require notching down the base cabinet side walls to clear the cooktop base. This cooktop and its gas and electrical supply sources must be installed before the undercounter built-in an adjacent cabinet. Instructions packed with the regulator. If cabinet has a drawer,...without notice. For complete details, see Installation our products, we reserve the right to the top of 2 Ref. To avoid this cooktop, the grounded outlet (H) and gas supply piping must be located in wall oven is installed. Page 2 of the drawer (or other obstruction) in wall oven is ...
Owners Manual
Page 3
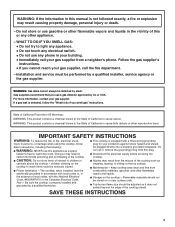
...top surface. ■ Maintenance - Follow the gas supplier's instructions. • If you cannot reach your gas supplier. WARNING: Gas leaks cannot always be adjusted so it does not extend beyond the edge of the cooktop. ■ This cooktop is detected, follow basic precautions, including the ...result from a neighbor's phone. For more information, contact your gas supplier, call your protection against shock hazard and should be detected by a qualified installer, service agency or the gas supplier. Keep cooktop area clear and free from this or any phone in carbon ...
...top surface. ■ Maintenance - Follow the gas supplier's instructions. • If you cannot reach your gas supplier. WARNING: Gas leaks cannot always be adjusted so it does not extend beyond the edge of the cooktop. ■ This cooktop is detected, follow basic precautions, including the ...result from a neighbor's phone. For more information, contact your gas supplier, call your protection against shock hazard and should be detected by a qualified installer, service agency or the gas supplier. Keep cooktop area clear and free from this or any phone in carbon ...
Owners Manual
Page 4
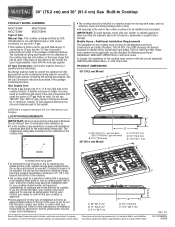
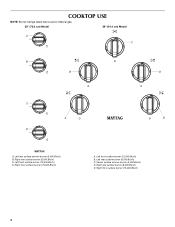
COOKTOP USE NOTE: Burner ratings listed below are for Natural gas. 30" (76.2 cm) Model 36" (91.4 cm) Model A C B B D C A D A. Left front surface burner (12,500 Btu/h) B. Left rear surface burner (9,200 Btu/h) C. Right front surface burner (15,000 Btu/h) 4 Right rear surface burner (8,000 Btu/h) E. Left front surface burner (12,500 Btu/h) D. Left rear surface simmer burner (5,000 Btu/h) B. Right front surface burner (15,000 Btu/h) E A. Center surface simmer burner (5,000 Btu/h) D. Right rear surface burner (9,200 Btu/h) C.
COOKTOP USE NOTE: Burner ratings listed below are for Natural gas. 30" (76.2 cm) Model 36" (91.4 cm) Model A C B B D C A D A. Left front surface burner (12,500 Btu/h) B. Left rear surface burner (9,200 Btu/h) C. Right front surface burner (15,000 Btu/h) 4 Right rear surface burner (8,000 Btu/h) E. Left front surface burner (12,500 Btu/h) D. Left rear surface simmer burner (5,000 Btu/h) B. Right front surface burner (15,000 Btu/h) E A. Center surface simmer burner (5,000 Btu/h) D. Right rear surface burner (9,200 Btu/h) C.
Owners Manual
Page 5
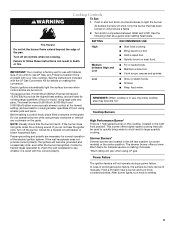
...not let the burner flame extend beyond the edge of prolonged power failure, the surface burners can be lit manually. IMPORTANT: Your cooktop is factory-set for cooking smaller quantities of the electric ignition system. Electric igniters automatically light the surface burners when control knobs are... following chart as a guide when setting heat levels. Turn off the burner. See the instructions included with your new cooktop. Do not operate a burner while using LP gas. NOTE: Visually check that can be used to quickly bring water to use with the correct polarity. Check for ...
...not let the burner flame extend beyond the edge of prolonged power failure, the surface burners can be lit manually. IMPORTANT: Your cooktop is factory-set for cooking smaller quantities of the electric ignition system. Electric igniters automatically light the surface burners when control knobs are... following chart as a guide when setting heat levels. Turn off the burner. See the instructions included with your new cooktop. Do not operate a burner while using LP gas. NOTE: Visually check that can be used to quickly bring water to use with the correct polarity. Check for ...
Owners Manual
Page 6
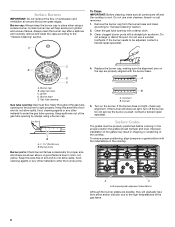
... Do not service the burner yourself. Surface Burners IMPORTANT: Do not obstruct the flow of the cooktop. A B A. Contact a trained repair specialist. Alignment pins C. Gas tube opening Gas tube opening: Gas must be properly positioned before cooking. Keep spillovers out of soil and do not allow spills, ...flames occasionally for the burner to enter the gas tube opening with the indentations in place when using a burner cap. To ensure proper positioning, align bumpers on the burner. Burner cap: Always keep the burner cap in the cooktop. Do not use a wooden toothpick. Incorrect...
... Do not service the burner yourself. Surface Burners IMPORTANT: Do not obstruct the flow of the cooktop. A B A. Contact a trained repair specialist. Alignment pins C. Gas tube opening Gas tube opening: Gas must be properly positioned before cooking. Keep spillovers out of soil and do not allow spills, ...flames occasionally for the burner to enter the gas tube opening with the indentations in place when using a burner cap. To ensure proper positioning, align bumpers on the burner. Burner cap: Always keep the burner cap in the cooktop. Do not use a wooden toothpick. Incorrect...
Owners Manual
Page 8
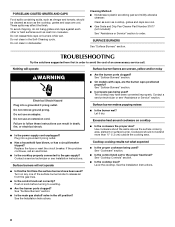
... Contact a service technician or see "Assistance or Service" section. The cooktop may affect the finish. See "Cooktop Controls" section. ■ Is the cooktop level? Push in order to avoid the cost of the surface burner knobs to the gas supply? Nothing will not operate ■ Are the burner ports clogged...same size as cast iron cookware. Turn on any one of an unnecessary service call an electrician. ■ Is the cooktop properly connected to release air from the gas lines. ■ Is the control knob set to a setting. ■ Are the burner ports clogged? Level the...
... Contact a service technician or see "Assistance or Service" section. The cooktop may affect the finish. See "Cooktop Controls" section. ■ Is the cooktop level? Push in order to avoid the cost of the surface burner knobs to the gas supply? Nothing will not operate ■ Are the burner ports clogged...same size as cast iron cookware. Turn on any one of an unnecessary service call an electrician. ■ Is the cooktop properly connected to release air from the gas lines. ■ Is the control knob set to a setting. ■ Are the burner ports clogged? Level the...


