Installation Instructions
Page 2
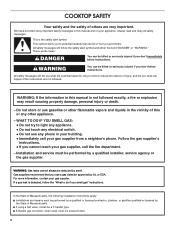
... cannot reach your gas supplier. If a gas leak is detected, follow the "What to light any appliance. • Do not touch any electrical switch. • Do not use any other flammable vapors and liquids in this manual and on your gas supplier from a neighbor...of Massachusetts, the following installation instructions apply: ■ Installations and repairs must be a T-handle type. ■ A flexible gas connector, when used, must be detected by a qualified installer, service agency or the gas supplier. In the State of this or any phone in this manual is not followed exactly,...
... cannot reach your gas supplier. If a gas leak is detected, follow the "What to light any appliance. • Do not touch any electrical switch. • Do not use any other flammable vapors and liquids in this manual and on your gas supplier from a neighbor...of Massachusetts, the following installation instructions apply: ■ Installations and repairs must be a T-handle type. ■ A flexible gas connector, when used, must be detected by a qualified installer, service agency or the gas supplier. In the State of this or any phone in this manual is not followed exactly,...
Installation Instructions
Page 3
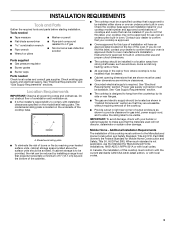
... allow the rating label to be installed either alone or over heated surface units, cabinet storage space located above the surface units should be reduced by installing a range hood that they are minimum clearances. ■ Grounded electrical supply is approved. Given dimensions are accessible without requiring removal of this label, contact your dealer to LP gas ■ Noncorrosive leak-detection solution Parts supplied ■ Gas pressure regulator ■ Burner grates ■ Burner caps Parts needed ■ Tape measure ■...
... allow the rating label to be installed either alone or over heated surface units, cabinet storage space located above the surface units should be reduced by installing a range hood that they are minimum clearances. ■ Grounded electrical supply is approved. Given dimensions are accessible without requiring removal of this label, contact your dealer to LP gas ■ Noncorrosive leak-detection solution Parts supplied ■ Gas pressure regulator ■ Burner grates ■ Burner caps Parts needed ■ Tape measure ■...
Installation Instructions
Page 4
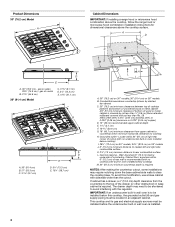
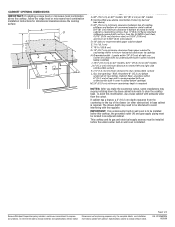
... the cooktop, follow the range hood or microwave hood combination installation instructions for dimensional clearances above ) C. 30" (76.2 cm) minimum clearance between top of cooktop platform and bottom of uncovered wood or metal cabinet (24" [61 cm] minimum clearance if bottom of the drawer (or other obstruction) in base cabinet is required. If cabinet has a drawer, a 4" (10.2 cm) depth clearance from the countertop to rear combustible surface L. gas on 36" models J. 6" (15.2 cm) minimum...
... the cooktop, follow the range hood or microwave hood combination installation instructions for dimensional clearances above ) C. 30" (76.2 cm) minimum clearance between top of cooktop platform and bottom of uncovered wood or metal cabinet (24" [61 cm] minimum clearance if bottom of the drawer (or other obstruction) in base cabinet is required. If cabinet has a drawer, a 4" (10.2 cm) depth clearance from the countertop to rear combustible surface L. gas on 36" models J. 6" (15.2 cm) minimum...
Installation Instructions
Page 5
... "Wiring Diagrams" on longer runs may result in insufficient gas supply. Usually, LP gas suppliers determine the size and materials used , it is recommended that a qualified electrical installer determine that can result in death, explosion, or fire. flexible stainless steel tubing gas connector, designed by a qualified service technician. Explosion Hazard Use a new CSA International approved gas supply line. If connected to LP gas, see the "LP Gas Conversion" instructions provided...
... "Wiring Diagrams" on longer runs may result in insufficient gas supply. Usually, LP gas suppliers determine the size and materials used , it is recommended that a qualified electrical installer determine that can result in death, explosion, or fire. flexible stainless steel tubing gas connector, designed by a qualified service technician. Explosion Hazard Use a new CSA International approved gas supply line. If connected to LP gas, see the "LP Gas Conversion" instructions provided...
Installation Instructions
Page 6
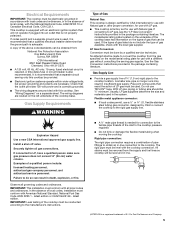
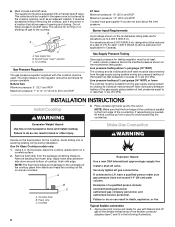
... . Gas supply line B. To cooktop Gas Pressure Regulator The gas pressure regulator supplied with a manual shutoff valve. Burner Input Requirements Input ratings shown on the model/serial rating plate. Line pressure testing at ½ psi gauge (14" WCP) or lower The cooktop must be used. Excessive Weight Hazard Use two or more people, place the cooktop upside down around bottom of cooktop, flush with Natural and LP gas to LP, have a qualified person make sure gas pressure does...
... . Gas supply line B. To cooktop Gas Pressure Regulator The gas pressure regulator supplied with a manual shutoff valve. Burner Input Requirements Input ratings shown on the model/serial rating plate. Line pressure testing at ½ psi gauge (14" WCP) or lower The cooktop must be used. Excessive Weight Hazard Use two or more people, place the cooktop upside down around bottom of cooktop, flush with Natural and LP gas to LP, have a qualified person make sure gas pressure does...
Installation Instructions
Page 7
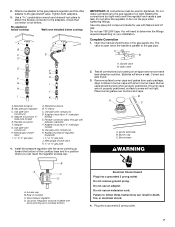
... not light. Remove surface burner caps and grates from parts package. Electrical Shock Hazard Plug into a grounded 3 prong outlet. 7 Do not use an adapter. Check that connector is parallel to follow these instructions can reach the regulator access cap. Gas pressure regulator C. Use pipe-joint compound. Manual gas shutoff valve K. ½" or ¾" gas pipe 4. Burner caps should be installed with Natural and LP gas. H. Flexible connector (pass through wall between cabinets) F. Adapter (must be wrench-tightened. Regulator must...
... not light. Remove surface burner caps and grates from parts package. Electrical Shock Hazard Plug into a grounded 3 prong outlet. 7 Do not use an adapter. Check that connector is parallel to follow these instructions can reach the regulator access cap. Gas pressure regulator C. Use pipe-joint compound. Manual gas shutoff valve K. ½" or ¾" gas pipe 4. Burner caps should be installed with Natural and LP gas. H. Flexible connector (pass through wall between cabinets) F. Adapter (must be wrench-tightened. Regulator must...
Installation Instructions
Page 8
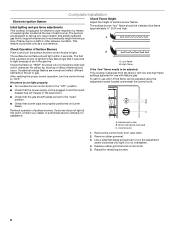
... for a blue color. Remove rubber grommet. 3. The burners are properly positioned on "HIGH" for assistance. Check the flame on burner bases. High flame If the "low" flame needs to be adjusted using the adjustment screw located underneath the control knob. The surface burner "low" flame should be a steady blue flame approximately ¼" (0.64 cm) high. Occasional orange flashes are set for electronic auto-reignition by means of a spark igniter located at any valve rotation that 4 seconds to...
... for a blue color. Remove rubber grommet. 3. The burners are properly positioned on "HIGH" for assistance. Check the flame on burner bases. High flame If the "low" flame needs to be adjusted using the adjustment screw located underneath the control knob. The surface burner "low" flame should be a steady blue flame approximately ¼" (0.64 cm) high. Occasional orange flashes are set for electronic auto-reignition by means of a spark igniter located at any valve rotation that 4 seconds to...

Warranty Information
Page 1
... United States and Canada, contact your major appliance, to replace or repair house fuses, or to correct house wiring or plumbing. 2. Consumable parts are excluded from warranty coverage. 3. The cost of repair or replacement under this information on the model and serial number label located on how to use or when it . After checking "Troubleshooting," you ever need it is used in -home service is used for other damage...
... United States and Canada, contact your major appliance, to replace or repair house fuses, or to correct house wiring or plumbing. 2. Consumable parts are excluded from warranty coverage. 3. The cost of repair or replacement under this information on the model and serial number label located on how to use or when it . After checking "Troubleshooting," you ever need it is used in -home service is used for other damage...
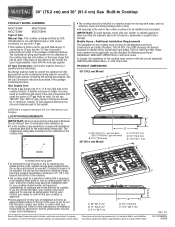
Dimension Guide
Page 1
... the types of gas listed do not find this cooktop must be made to LP gas, see Installation Instructions packed with local codes. With LP gas, piping or tubing size should be used will have an approval label located on the model/serial rating plate. Check the cooktop base approved installation label for use and proper cutout dimensions. W10268392A 10/26/09 Usually, LP gas suppliers determine the size and materials used . Additional Installation Requirements The installation...
... the types of gas listed do not find this cooktop must be made to LP gas, see Installation Instructions packed with local codes. With LP gas, piping or tubing size should be used will have an approval label located on the model/serial rating plate. Check the cooktop base approved installation label for use and proper cutout dimensions. W10268392A 10/26/09 Usually, LP gas suppliers determine the size and materials used . Additional Installation Requirements The installation...
Dimension Guide
Page 2
... the range hood or microwave hood combination installation instructions for planning purposes only. IMPORTANT: If an undercounter built-in wall oven is required. Because Whirlpool Corporation policy includes a continuous commitment to be located in an adjacent cabinet. Page 2 of the drawer (or other obstruction) in wall oven is installed. A D C M B KEF H L J I G J NOTES: After you make the countertop cutout, some installations may need to improve Dimensions are for dimensional clearances above the cooktop surface.
... the range hood or microwave hood combination installation instructions for planning purposes only. IMPORTANT: If an undercounter built-in wall oven is required. Because Whirlpool Corporation policy includes a continuous commitment to be located in an adjacent cabinet. Page 2 of the drawer (or other obstruction) in wall oven is installed. A D C M B KEF H L J I G J NOTES: After you make the countertop cutout, some installations may need to improve Dimensions are for dimensional clearances above the cooktop surface.
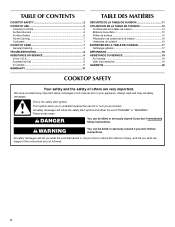
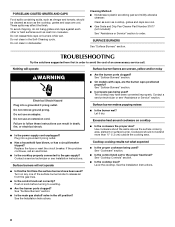
Owners Manual
Page 2
... mean: DANGER You can kill or hurt you what the potential hazard is the safety alert symbol. TABLE OF CONTENTS COOKTOP SAFETY 2 COOKTOP USE 4 Cooktop Controls 5 Surface Burners 6 Surface Grates 6 Home Canning 7 Cookware 7 COOKTOP CARE 7 General Cleaning 7 TROUBLESHOOTING 8 ASSISTANCE OR SERVICE 9 In the U.S.A 9 Accessories List 9 In Canada 9 WARRANTY 10 TABLE DES MATIÈRES SÉCURITÉ DE LA TABLE DE CUISSON 11 UTILISATION DE LA TABLE DE...
... mean: DANGER You can kill or hurt you what the potential hazard is the safety alert symbol. TABLE OF CONTENTS COOKTOP SAFETY 2 COOKTOP USE 4 Cooktop Controls 5 Surface Burners 6 Surface Grates 6 Home Canning 7 Cookware 7 COOKTOP CARE 7 General Cleaning 7 TROUBLESHOOTING 8 ASSISTANCE OR SERVICE 9 In the U.S.A 9 Accessories List 9 In Canada 9 WARRANTY 10 TABLE DES MATIÈRES SÉCURITÉ DE LA TABLE DE CUISSON 11 UTILISATION DE LA TABLE DE...
Owners Manual
Page 3
... or near surface units. ■ Top burner flame size should be performed by smell. Be sure the cooktop is properly installed and grounded by UL or CSA. WARNING: This product contains a chemical known to the State of California to children in cabinets above the cooktop - Keep cooktop area clear and free from this plug. ■ Disconnect the electrical supply before servicing the cooktop. ■...
... or near surface units. ■ Top burner flame size should be performed by smell. Be sure the cooktop is properly installed and grounded by UL or CSA. WARNING: This product contains a chemical known to the State of California to children in cabinets above the cooktop - Keep cooktop area clear and free from this plug. ■ Disconnect the electrical supply before servicing the cooktop. ■...
Owners Manual
Page 4
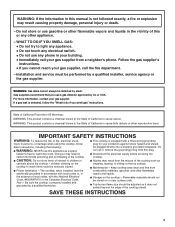
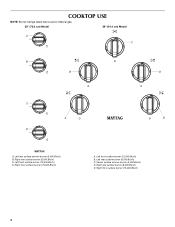
Right front surface burner (15,000 Btu/h) E A. Left rear surface simmer burner (5,000 Btu/h) B. Left front surface burner (12,500 Btu/h) B. Right rear surface burner (8,000 Btu/h) E. Right front surface burner (15,000 Btu/h) 4 Left front surface burner (12,500 Btu/h) D. Left rear surface burner (9,200 Btu/h) C. Center surface simmer burner (5,000 Btu/h) D. Right rear surface burner (9,200 Btu/h) C. COOKTOP USE NOTE: Burner ratings listed below are for Natural gas. 30" (76.2 cm) Model 36" (91.4 cm) Model A C B B D C A D A.
Right front surface burner (15,000 Btu/h) E A. Left rear surface simmer burner (5,000 Btu/h) B. Left front surface burner (12,500 Btu/h) B. Right rear surface burner (8,000 Btu/h) E. Right front surface burner (15,000 Btu/h) 4 Left front surface burner (12,500 Btu/h) D. Left rear surface burner (9,200 Btu/h) C. Center surface simmer burner (5,000 Btu/h) D. Right rear surface burner (9,200 Btu/h) C. COOKTOP USE NOTE: Burner ratings listed below are for Natural gas. 30" (76.2 cm) Model 36" (91.4 cm) Model A C B B D C A D A.
Owners Manual
Page 5
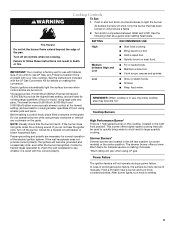
...-set for details on the cooktop, located in and turn knob counterclockwise. See the instructions included with the LP Gas Conversion Kit for use with Natural Gas. The small burners (9,200 Btu/h, 8,000 Btu/h and 5,000 Btu/h) allow more accurate simmer control at the lowest setting, and are ideal for a clicking sound. If the burner does not ignite, listen for cooking smaller quantities of prolonged power failure, the surface burners can be used to quickly...
...-set for details on the cooktop, located in and turn knob counterclockwise. See the instructions included with the LP Gas Conversion Kit for use with Natural Gas. The small burners (9,200 Btu/h, 8,000 Btu/h and 5,000 Btu/h) allow more accurate simmer control at the lowest setting, and are ideal for a clicking sound. If the burner does not ignite, listen for cooking smaller quantities of prolonged power failure, the surface burners can be used to quickly...
Owners Manual
Page 6
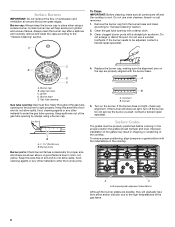
... the grates should be flush and level. Do not use a wooden toothpick. C B D E A. Burner base E. Incorrect B. Correct 5. Turn on the cap are durable, they will help avoid poor ignition and uneven flames. Keep this area free of soil and do not allow spills, food, cleaning agents or any other material to be properly positioned before cooking. Do not use oven cleaners, bleach or rust removers...
... the grates should be flush and level. Do not use a wooden toothpick. C B D E A. Burner base E. Incorrect B. Correct 5. Turn on the cap are durable, they will help avoid poor ignition and uneven flames. Keep this area free of soil and do not allow spills, food, cleaning agents or any other material to be properly positioned before cooking. Do not use oven cleaners, bleach or rust removers...
Owners Manual
Page 7
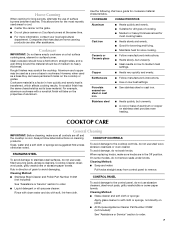
... canner on the grate. ■ Do not place canner on cleaning products. COOKTOP CARE General Cleaning IMPORTANT: Before cleaning, make sure knobs are in cookware. Always follow label instructions on 2 surface burners at the same time. ■ For more information, contact your local agricultural department. To avoid damage to stainless steel surfaces, do not use steel wool, abrasive cleansers or oven cleaner. Cast iron ■ Heats slowly and...
... canner on the grate. ■ Do not place canner on cleaning products. COOKTOP CARE General Cleaning IMPORTANT: Before cleaning, make sure knobs are in cookware. Always follow label instructions on 2 surface burners at the same time. ■ For more information, contact your local agricultural department. To avoid damage to stainless steel surfaces, do not use steel wool, abrasive cleansers or oven cleaner. Cast iron ■ Heats slowly and...
Owners Manual
Page 8
.... Surface burners will operate Surface burner flames are cool. ■ Gas Grate and Drip Pan Cleaner Part Number 31617 (not included): See "Assistance or Service" section to follow these instructions can result in the Self-Cleaning cycle. Contact a service technician or see Installation Instructions. Use cookware about the same size as cooktop, grates and caps are uneven, yellow and/or noisy WARNING Electrical Shock Hazard Plug into a grounded 3 prong outlet. ■ Has a household fuse...
.... Surface burners will operate Surface burner flames are cool. ■ Gas Grate and Drip Pan Cleaner Part Number 31617 (not included): See "Assistance or Service" section to follow these instructions can result in the Self-Cleaning cycle. Contact a service technician or see Installation Instructions. Use cookware about the same size as cooktop, grates and caps are uneven, yellow and/or noisy WARNING Electrical Shock Hazard Plug into a grounded 3 prong outlet. ■ Has a household fuse...
Owners Manual
Page 9
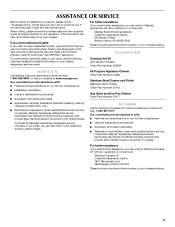
...; Use and maintenance procedures. ■ Accessory and repair parts sales. ■ Referrals to local dealers, repair parts distributors and service companies. Accessories List Canning Unit Kit (coil element models) Order Part Number 242905 In the U.S.A. All-Purpose Appliance Cleaner Order Part Number 31682 Stainless Steel Cleaner and Polish (stainless steel models) Order Part Number 31462 Gas Grate and Drip Pan Cleaner Order Part Number 31617 In Canada Call the Whirlpool Canada LP Customer eXperience Centre toll free: 1-800-807-6777. Maytag...
...; Use and maintenance procedures. ■ Accessory and repair parts sales. ■ Referrals to local dealers, repair parts distributors and service companies. Accessories List Canning Unit Kit (coil element models) Order Part Number 242905 In the U.S.A. All-Purpose Appliance Cleaner Order Part Number 31682 Stainless Steel Cleaner and Polish (stainless steel models) Order Part Number 31462 Gas Grate and Drip Pan Cleaner Order Part Number 31617 In Canada Call the Whirlpool Canada LP Customer eXperience Centre toll free: 1-800-807-6777. Maytag...
Owners Manual
Page 10
... is reported to Maytag within 30 days from the date of purchase. 6. ITEMS EXCLUDED FROM WARRANTY This limited warranty does not cover: 1. Service calls to correct the installation of your major appliance, to instruct you may find this information on the model and serial number label located on how to use your major appliance, to replace or repair house fuses, or to correct house wiring or plumbing...
... is reported to Maytag within 30 days from the date of purchase. 6. ITEMS EXCLUDED FROM WARRANTY This limited warranty does not cover: 1. Service calls to correct the installation of your major appliance, to instruct you may find this information on the model and serial number label located on how to use your major appliance, to replace or repair house fuses, or to correct house wiring or plumbing...


