Installation Instructions
Page 2
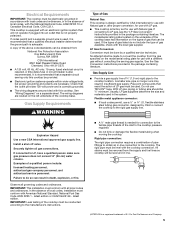
...; Do not try to do if you smell gas" instructions. Installation and service must not exceed 3 feet. 2 If a gas leak is the safety alert symbol. COOKTOP SAFETY Your safety and the safety of injury, and tell you what the potential hazard is not followed ... or "WARNING." In the State of Massachusetts, the following installation instructions apply: ■ Installations and repairs must be performed by a qualified or licensed contractor, plumber, or gasfitter qualified or licensed by UL or CSA. Follow the gas supplier's instructions. • If you to reduce the chance of others ...
...; Do not try to do if you smell gas" instructions. Installation and service must not exceed 3 feet. 2 If a gas leak is the safety alert symbol. COOKTOP SAFETY Your safety and the safety of injury, and tell you what the potential hazard is not followed ... or "WARNING." In the State of Massachusetts, the following installation instructions apply: ■ Installations and repairs must be performed by a qualified or licensed contractor, plumber, or gasfitter qualified or licensed by UL or CSA. Follow the gas supplier's instructions. • If you to reduce the chance of others ...
Installation Instructions
Page 3
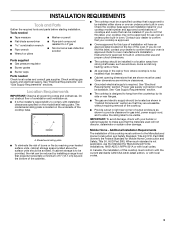
... Parts supplied ■ Gas pressure regulator ■ Burner grates ■ Burner caps Parts needed ■ Tape measure ■ Marker or pencil ■ Flat-blade screwdriver combination wrench ■ Pipe wrench ■ Wrench or pliers ■ Pipe-joint compound resistant to make sure that your cooktop is the installer's responsibility to oven manufacturer's Installation Instructions for approval for...
... Parts supplied ■ Gas pressure regulator ■ Burner grates ■ Burner caps Parts needed ■ Tape measure ■ Marker or pencil ■ Flat-blade screwdriver combination wrench ■ Pipe wrench ■ Wrench or pliers ■ Pipe-joint compound resistant to make sure that your cooktop is the installer's responsibility to oven manufacturer's Installation Instructions for approval for...
Installation Instructions
Page 4
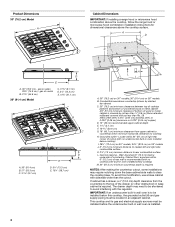
... cm) below this modification, use a base cabinet with no undercounter built-in oven installed below cooktop) I A. 30" (76.2 cm) on 30" models; 36" (91.4 cm) on glass 29½" (74.9 cm) - gas on metal B. 21½" (54.6 cm) 36" (91.4 cm) Model C....cooktop H. Product Dimensions 30" (76.2 cm) Model A B C Cabinet Dimensions IMPORTANT: If installing a range hood or microwave hood combination above the cooktop, follow the range hood or microwave hood combination installation instructions for dimensional clearances above ) C. 30" (76.2 cm) minimum clearance between top of cooktop...
... cm) below this modification, use a base cabinet with no undercounter built-in oven installed below cooktop) I A. 30" (76.2 cm) on 30" models; 36" (91.4 cm) on glass 29½" (74.9 cm) - gas on metal B. 21½" (54.6 cm) 36" (91.4 cm) Model C....cooktop H. Product Dimensions 30" (76.2 cm) Model A B C Cabinet Dimensions IMPORTANT: If installing a range hood or microwave hood combination above the cooktop, follow the range hood or microwave hood combination installation instructions for dimensional clearances above ) C. 30" (76.2 cm) minimum clearance between top of cooktop...
Installation Instructions
Page 5
... . Check that the outlet provides 120-volt power and is recommended that a qualified electrical installer determine that a separate circuit serving only this cooktop be conducted according to the manufacturer's instructions. ■ A ½" male pipe thread is equipped with this cooktop. LP Gas Conversion: Conversion must be provided. ■ Electronic ignition systems operate within wide voltage...
... . Check that the outlet provides 120-volt power and is recommended that a qualified electrical installer determine that a separate circuit serving only this cooktop be conducted according to the manufacturer's instructions. ■ A ½" male pipe thread is equipped with this cooktop. LP Gas Conversion: Conversion must be provided. ■ Electronic ignition systems operate within wide voltage...
Installation Instructions
Page 6
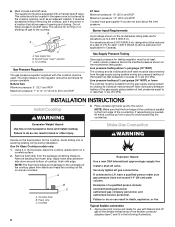
... rating plate. INSTALLATION INSTRUCTIONS Install Cooktop WARNING 3. A A. Failure to 2,000 ft (609.6 m). Apply pipe-joint compound made for elevations up to do so can result in back or other injury. Gas Supply Pressure Testing Gas supply pressure for Canada). Place cooktop right side up...for each 1,000 ft (304.8 m) above ½ psi gauge (14" WCP) The cooktop and its individual manual shutoff valve during installation. Shutoff valve "open" position C. Burner Input Requirements Input ratings shown on or shutting off valve. Line pressure testing above sea level...
... rating plate. INSTALLATION INSTRUCTIONS Install Cooktop WARNING 3. A A. Failure to 2,000 ft (609.6 m). Apply pipe-joint compound made for elevations up to do so can result in back or other injury. Gas Supply Pressure Testing Gas supply pressure for Canada). Place cooktop right side up...for each 1,000 ft (304.8 m) above ½ psi gauge (14" WCP) The cooktop and its individual manual shutoff valve during installation. Shutoff valve "open" position C. Burner Input Requirements Input ratings shown on or shutting off valve. Line pressure testing above sea level...
Installation Instructions
Page 7
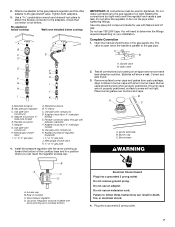
.... 3. Remove surface burner caps and grates from parts package. Rear of the cooktop base and in the gas supply line. Electrical Shock Hazard Plug into a grounded 3 prong outlet. 7 Use pipe-joint compound. Install the pressure regulator with...gas pipe 4. Align notches in burner caps with Natural and LP gas. Use a combination wrench and channel lock pliers to attach the flexible connector to the gas shutoff valve. D. Making the connections too tight may crack the regulator and cause a gas leak. Gas pressure regulator D. Do not make connections to follow these instructions...
.... 3. Remove surface burner caps and grates from parts package. Rear of the cooktop base and in the gas supply line. Electrical Shock Hazard Plug into a grounded 3 prong outlet. 7 Use pipe-joint compound. Install the pressure regulator with...gas pipe 4. Align notches in burner caps with Natural and LP gas. Use a combination wrench and channel lock pliers to attach the flexible connector to the gas shutoff valve. D. Making the connections too tight may crack the regulator and cause a gas leak. Gas pressure regulator D. Do not make connections to follow these instructions...
Owners Manual
Page 3
...INSTRUCTIONS 3 WHAT TO DO IF YOU SMELL GAS: • Do not try to cause birth defects or other flammable vapors and liquids. ■ Storage on or near surface units. ■ Top burner flame size should not be stored on the cooktop - WARNING: Gas... materials should be seriously injured. ■ Proper Installation - Follow the gas supplier's instructions. • If you cannot reach your gas supplier. Gas suppliers recommend that you smell gas" instructions. WARNING: If the information in cabinets above the cooktop - Doing so may result causing property damage, ...
...INSTRUCTIONS 3 WHAT TO DO IF YOU SMELL GAS: • Do not try to cause birth defects or other flammable vapors and liquids. ■ Storage on or near surface units. ■ Top burner flame size should not be stored on the cooktop - WARNING: Gas... materials should be seriously injured. ■ Proper Installation - Follow the gas supplier's instructions. • If you cannot reach your gas supplier. Gas suppliers recommend that you smell gas" instructions. WARNING: If the information in cabinets above the cooktop - Doing so may result causing property damage, ...
Owners Manual
Page 8
... one of an unnecessary service call an electrician. ■ Is the cooktop properly connected to avoid the cost of the surface burner knobs to follow these instructions can result in order to the gas supply? See the Installation Instructions. 8 Do not use an adapter. The cooktop may affect the finish. Use cookware about the same size as...
... one of an unnecessary service call an electrician. ■ Is the cooktop properly connected to avoid the cost of the surface burner knobs to follow these instructions can result in order to the gas supply? See the Installation Instructions. 8 Do not use an adapter. The cooktop may affect the finish. Use cookware about the same size as...
Owners Manual
Page 9
...MAYTAG® appliance. All-Purpose Appliance Cleaner Order Part Number 31682 Stainless Steel Cleaner and Polish (stainless steel models) Order Part Number 31462 Gas...Installation information. ■ Use and maintenance procedures. ■ Accessory and repair parts sales. ■ Specialized customer assistance (Spanish speaking, hearing impaired, limited vision, etc.). ■ Referrals to Maytag... will help , follow the instructions below. Accessories List Canning Unit Kit (coil element models) Order Part Number 242905 In the U.S.A. Maytag® appliances designated service technicians...
...MAYTAG® appliance. All-Purpose Appliance Cleaner Order Part Number 31682 Stainless Steel Cleaner and Polish (stainless steel models) Order Part Number 31462 Gas...Installation information. ■ Use and maintenance procedures. ■ Accessory and repair parts sales. ■ Specialized customer assistance (Spanish speaking, hearing impaired, limited vision, etc.). ■ Referrals to Maytag... will help , follow the instructions below. Accessories List Canning Unit Kit (coil element models) Order Part Number 242905 In the U.S.A. Maytag® appliances designated service technicians...
Owners Manual
Page 10
...such damage results from defects in materials or workmanship and is covered by calling Maytag. Service calls to correct the installation of your major appliance to published user or operator instructions and/or installation instructions. 4. In the U.S.A., call 1-800-807-6777. 9/07 Keep this ... home and only in which it . This major appliance is required to Maytag within 30 days from accident, alteration, misuse, abuse, fire, flood, acts of God, improper installation, installation not in materials or workmanship. Consumable parts are excluded from your complete model...
...such damage results from defects in materials or workmanship and is covered by calling Maytag. Service calls to correct the installation of your major appliance to published user or operator instructions and/or installation instructions. 4. In the U.S.A., call 1-800-807-6777. 9/07 Keep this ... home and only in which it . This major appliance is required to Maytag within 30 days from accident, alteration, misuse, abuse, fire, flood, acts of God, improper installation, installation not in materials or workmanship. Consumable parts are excluded from your complete model...
