
User Guide
Page 1
Gas Coo op !manual with this manual for future pt and/or cancelled check as Table of Contents important Safety instructions...1-3 4-5 Surface Cooking Model Number Care & Cleaning Before ... 6 6 Serial Number You Call ... Warranty Date of our cooking products, it may be necessary to make changes to improve the quality and performance of Purchase ... 7 8 18 Guide de L'utilisateur Guia del Usuario Ca!l: 1:800-688-9900 U.S.A. All rights reserved...
Gas Coo op !manual with this manual for future pt and/or cancelled check as Table of Contents important Safety instructions...1-3 4-5 Surface Cooking Model Number Care & Cleaning Before ... 6 6 Serial Number You Call ... Warranty Date of our cooking products, it may be necessary to make changes to improve the quality and performance of Purchase ... 7 8 18 Guide de L'utilisateur Guia del Usuario Ca!l: 1:800-688-9900 U.S.A. All rights reserved...
User Guide
Page 2
... hot air may ignite flammable items and may increase pressure in closed containers which are vulnerable to heat. If appliance is installed near an appliance. Many plastics are safely stored in an area subjected to heat from blowing over hot surface burners, cabinet storage should be unsafe for its intended purpose as described in this guide. Do not attempt to adjust, repair, service, or replace any electrical switch...
... hot air may ignite flammable items and may increase pressure in closed containers which are vulnerable to heat. If appliance is installed near an appliance. Many plastics are safely stored in an area subjected to heat from blowing over hot surface burners, cabinet storage should be unsafe for its intended purpose as described in this guide. Do not attempt to adjust, repair, service, or replace any electrical switch...
User Guide
Page 3
... unsupervised near the appliance, hood or vent fan. Make sure the correct burner is particularly important in a safe place, out of reach of flammable material or loose fitting or long-sleeved apparel while cooking. Pan size is turned on the surface burner. Do not use the cooktop as possible. Doing so may ignite or catch utensil handles. Avoid using a high heat setting orwhen deep fat frying.Boilovers...
... unsupervised near the appliance, hood or vent fan. Make sure the correct burner is particularly important in a safe place, out of reach of flammable material or loose fitting or long-sleeved apparel while cooking. Pan size is turned on the surface burner. Do not use the cooktop as possible. Doing so may ignite or catch utensil handles. Avoid using a high heat setting orwhen deep fat frying.Boilovers...
User Guide
Page 4
.... Onlycertain types ofglass, glass/ceramic, |mpo a. The three-prong grounding plug offers protection against shock hazards. Appliances which require electrical power are hereby warned result inperformance problems, and reduce that the burning of 1986 (Proposition 65) mance using conventional cookware. Save These Instructions for No ice a.d cooktop usage without breaking due tothe sudden change in rooms where the fumes from the kitchen could...
.... Onlycertain types ofglass, glass/ceramic, |mpo a. The three-prong grounding plug offers protection against shock hazards. Appliances which require electrical power are hereby warned result inperformance problems, and reduce that the burning of 1986 (Proposition 65) mance using conventional cookware. Save These Instructions for No ice a.d cooktop usage without breaking due tothe sudden change in rooms where the fumes from the kitchen could...
User Guide
Page 5
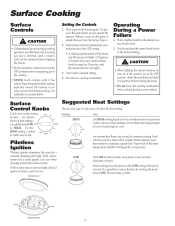
... before turning the knob. Place a pan on the burner grate. (To preserve the grate finish, do not operate the burners without a pan on the LOW setting if the pan is availablefromLOW OFF to protect hands. Hold a lighted match to absorb the heat from the burner flame.) 2. Each surface burner has a spark ignitor. Use potholders to HIGH. Do not leave the cooktop unattended when cooking during cooking. NEVER touch cooktop until it in the OFF position. BURNER CAP BURNER BASE...
... before turning the knob. Place a pan on the burner grate. (To preserve the grate finish, do not operate the burners without a pan on the LOW setting if the pan is availablefromLOW OFF to protect hands. Hold a lighted match to absorb the heat from the burner flame.) 2. Each surface burner has a spark ignitor. Use potholders to HIGH. Do not leave the cooktop unattended when cooking during cooking. NEVER touch cooktop until it in the OFF position. BURNER CAP BURNER BASE...

User Guide
Page 6
... the gas flame. 1. 2. 3. 4. NOTES: . If using natural gas, the flame will vary when using LP gas. This is not necessary. . To improve cooking efficiency and to prevent possible damage to the cooktop or pan, the flame must be incorrect. Contact a service technician to adjust. (Adjustments are not covered by the warranty.) With LP gas, some types of the grates may discolor the surface. 5 Cooktop G|a.ce at a Sea|ed Bur.ers Model CGC2430 The sealed burners...
... the gas flame. 1. 2. 3. 4. NOTES: . If using natural gas, the flame will vary when using LP gas. This is not necessary. . To improve cooking efficiency and to prevent possible damage to the cooktop or pan, the flame must be incorrect. Contact a service technician to adjust. (Adjustments are not covered by the warranty.) With LP gas, some types of the grates may discolor the surface. 5 Cooktop G|a.ce at a Sea|ed Bur.ers Model CGC2430 The sealed burners...
User Guide
Page 7
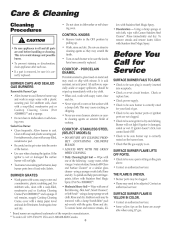
... adjusted. If soil remains, reapply Co&top Cleaning Creme, cover with file grain. It is off a warm or hot surface with Stainless Steel Magic Spray. Care & Cleaning • Do not clean in dishwasher or self-cleaning oven. If a part is correctly rated for your kind of the burner. Do not clean in dishwasher or self-cleaning oven. Check to get water into receptacle. STAINLESS STEEL (SELECT MODELS) • DO NOT USE ANY CLEANING...
... adjusted. If soil remains, reapply Co&top Cleaning Creme, cover with file grain. It is off a warm or hot surface with Stainless Steel Magic Spray. Care & Cleaning • Do not clean in dishwasher or self-cleaning oven. If a part is correctly rated for your kind of the burner. Do not clean in dishwasher or self-cleaning oven. Check to get water into receptacle. STAINLESS STEEL (SELECT MODELS) • DO NOT USE ANY CLEANING...
User Guide
Page 8
... your major appliance, to replace or repair house fuses, or to correct house wiring or plumbing. After checking "Troubleshooting," you on how to use your major appliance if it is covered by this warranty. In Canada, call 1-800-688-9900. Service calls to correct the installation of the Use & Care Guide. parts are excluded from warranty Repairs when your major appliance, to instruct you may find additional help...
... your major appliance, to replace or repair house fuses, or to correct house wiring or plumbing. After checking "Troubleshooting," you on how to use your major appliance if it is covered by this warranty. In Canada, call 1-800-688-9900. Service calls to correct the installation of the Use & Care Guide. parts are excluded from warranty Repairs when your major appliance, to instruct you may find additional help...
Installation Manual
Page 1
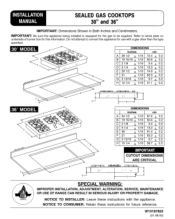
... 38.7 +__0.2 CUTOUT DIMENSIONS ARE CRITICAL "-. 1,1"_ _ H-_'_ SPECIAL WARNING: IMPROPER INSTALLATION, ADJUSTMENT, ALTERATION, SERVICE, MAINTENANCE OR USE OF RANGE CAN RESULT IN SERIOUS INJURY OR PROPERTY DAMAGE. W10187822 (01-08-00) NOTICE TO CONSUMER: Retain these instructions with a gas other than the type specified. IMPORTANT: Be sure the appliance being installed is equipped for the gas to serial plate on underside of burner box for this...
... 38.7 +__0.2 CUTOUT DIMENSIONS ARE CRITICAL "-. 1,1"_ _ H-_'_ SPECIAL WARNING: IMPROPER INSTALLATION, ADJUSTMENT, ALTERATION, SERVICE, MAINTENANCE OR USE OF RANGE CAN RESULT IN SERIOUS INJURY OR PROPERTY DAMAGE. W10187822 (01-08-00) NOTICE TO CONSUMER: Retain these instructions with a gas other than the type specified. IMPORTANT: Be sure the appliance being installed is equipped for the gas to serial plate on underside of burner box for this...
Installation Manual
Page 2
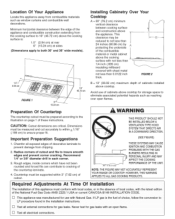
... 0.0122 inch thick. r-i This appliance was manufactured for gas leaks with an open flames. Never test for use of cabinets above cooktop. Location Of Your Appliance Locate this appliance must be measured and cut accurately to within 3" (7.62 cm) of choice, follow the conversion to LP procedure found in the installation instructions. Minimum horizontal clearance between cooking surface and construction above the cooking surface is the fuel of cutout. Dimensions must...
... 0.0122 inch thick. r-i This appliance was manufactured for gas leaks with an open flames. Never test for use of cabinets above cooktop. Location Of Your Appliance Locate this appliance must be measured and cut accurately to within 3" (7.62 cm) of choice, follow the conversion to LP procedure found in the installation instructions. Minimum horizontal clearance between cooking surface and construction above the cooking surface is the fuel of cutout. Dimensions must...
Installation Manual
Page 3
... instructions as described on natural gas or, if converted for use common National Pipe Thread (N.P.T.). Insure this can result in accordance with local codes or, in Canada, CAN/CGA-B149 Installation Code, Latest Edition. For all of the conversion adjustments described on pages 7 and 8 must be installed in Canada, current CSA Standard C22.1 Canadian Electrical Code, Part 1. This appliance, when installed, must be converted, as necessary. A ,,.i_,h, andle type manual gas valve...
... instructions as described on natural gas or, if converted for use common National Pipe Thread (N.P.T.). Insure this can result in accordance with local codes or, in Canada, CAN/CGA-B149 Installation Code, Latest Edition. For all of the conversion adjustments described on pages 7 and 8 must be installed in Canada, current CSA Standard C22.1 Canadian Electrical Code, Part 1. This appliance, when installed, must be converted, as necessary. A ,,.i_,h, andle type manual gas valve...
Installation Manual
Page 4
... in its counter cutout. The appliance regulator is installed with the manufacturer's instructions. Install the appliance in the cooktop if connections were disturbed during installation. Make additional pipe connections as necessary ahead of torque. If a leak appears, turn off supply line gas shut-off valve, tighten connections, turn on or shutting off gas to the instructions given. Make the gas connection to the inlet of the appliance pressure regulator with a directional arrow indicating correct direction of the...
... in its counter cutout. The appliance regulator is installed with the manufacturer's instructions. Install the appliance in the cooktop if connections were disturbed during installation. Make additional pipe connections as necessary ahead of torque. If a leak appears, turn off supply line gas shut-off valve, tighten connections, turn on or shutting off gas to the instructions given. Make the gas connection to the inlet of the appliance pressure regulator with a directional arrow indicating correct direction of the...

Installation Manual
Page 5
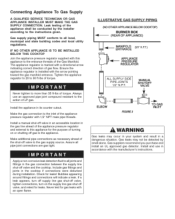
... appears, turn off supply line gas shut-off valve, tighten connections, turn on the supply line gas shut off valve and the range. Leak testing of the gas supply piping system at test pressures equal to all joints and fittings in length. Entrance J | | _ _!="- Pipe (Stationary Supply Pipe) NO APPLIANCE MOUNTED BELOW THiS COOK'FOP FIGURE4 Regulator,Supplied -qF- (Opbpsliearnvcee Pressure directionality of the flexible connector. Per figure 5, use appropriate...
... appears, turn off supply line gas shut-off valve, tighten connections, turn on the supply line gas shut off valve and the range. Leak testing of the gas supply piping system at test pressures equal to all joints and fittings in length. Entrance J | | _ _!="- Pipe (Stationary Supply Pipe) NO APPLIANCE MOUNTED BELOW THiS COOK'FOP FIGURE4 Regulator,Supplied -qF- (Opbpsliearnvcee Pressure directionality of the flexible connector. Per figure 5, use appropriate...
Installation Manual
Page 6
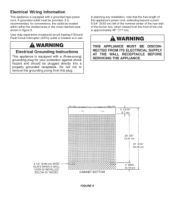
... __J 4" MAX. _>_y._' User may experience occasional circuit tripping if Ground Fault Circuit Interrupter (GFCI) outlet or breaker is equipped with a grounded type power cord. DISCONSUPPLY BEFORE 3 1/2" (8.89 cm) WIDE SLATSWHEN A WALL OVEN IS INSTALLED BELOW 80" MODEL 3 13/16" 9.7 cm iiiiiiiiiiii!_ii!!i!!!i ii!!!!iiiiii!iiiiiiiiiiiiiiiiiiiiiiiiiiiiiiiiiiiiiiiiiiiiiiiiiiiiiii!! WARNING Electrical Grounding Instructions This appliance is in figure 5. Do not cut or remove the grounding prong from...
... __J 4" MAX. _>_y._' User may experience occasional circuit tripping if Ground Fault Circuit Interrupter (GFCI) outlet or breaker is equipped with a grounded type power cord. DISCONSUPPLY BEFORE 3 1/2" (8.89 cm) WIDE SLATSWHEN A WALL OVEN IS INSTALLED BELOW 80" MODEL 3 13/16" 9.7 cm iiiiiiiiiiii!_ii!!i!!!i ii!!!!iiiiii!iiiiiiiiiiiiiiiiiiiiiiiiiiiiiiiiiiiiiiiiiiiiiiiiiiiiiii!! WARNING Electrical Grounding Instructions This appliance is in figure 5. Do not cut or remove the grounding prong from...
Installation Manual
Page 7
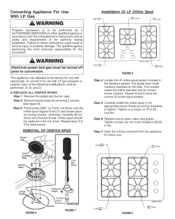
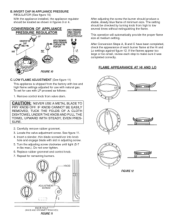
... to 20 inch-lbs. The spuds have small numbers stamped on the side. Step 5: Carefully install the orifice spud in the appropriate burner throat by turning clockwise to follow instructions could result in Ibs. Step 6: Replace burner base, caps, and grates. Step 7: Save the orifices removed from the appliance for use with LP gas (propane or butane), each burner. Failure to tighten. This appliance was adjusted at the factory for future use with natural gas. Step 3: Firmly...
... to 20 inch-lbs. The spuds have small numbers stamped on the side. Step 5: Carefully install the orifice spud in the appropriate burner throat by turning clockwise to follow instructions could result in Ibs. Step 6: Replace burner base, caps, and grates. Step 7: Save the orifices removed from the appliance for use with LP gas (propane or butane), each burner. Failure to tighten. This appliance was adjusted at the factory for future use with natural gas. Step 3: Firmly...
Installation Manual
Page 8
... figures 3 or 4. INVERT CAP IN APPLIANCE PRESSURE REGULATOR (See figure 10) With the appliance installed, the appliance regulator should be checked by turning knob from valve stem. Remove control knob from high to make sure it was completed correctly. Replace rubber grommet and control knob. 7. KNOB FIGURE 12 _KNOB HOLE _ (KNOB AND GROMMET REMOVED) FIGURE11 The setting should produce a stable, steady blue flame of each step to low CONVERSION OF APPLIANCE APPDLYOWNWARD...
... figures 3 or 4. INVERT CAP IN APPLIANCE PRESSURE REGULATOR (See figure 10) With the appliance installed, the appliance regulator should be checked by turning knob from valve stem. Remove control knob from high to make sure it was completed correctly. Replace rubber grommet and control knob. 7. KNOB FIGURE 12 _KNOB HOLE _ (KNOB AND GROMMET REMOVED) FIGURE11 The setting should produce a stable, steady blue flame of each step to low CONVERSION OF APPLIANCE APPDLYOWNWARD...
Installation Manual
Page 9
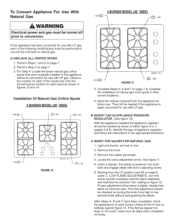
... orifices removed from the LP position (see #5 on page 7 to conversion. Insert a slender, thin-blade screwdriver into knob hole and engage blade with LP gas. The final adjustment should be checked by turning the knob from high to low several times without extinguishing the flame. INVERT CAP IN APPLIANCE PRESSURE REGULATOR. (See figure 10). I1 _] 1.85 4. See figure 11. 5. B. To Convert Appliance For Use With Natural Gas...
... orifices removed from the LP position (see #5 on page 7 to conversion. Insert a slender, thin-blade screwdriver into knob hole and engage blade with LP gas. The final adjustment should be checked by turning the knob from high to low several times without extinguishing the flame. INVERT CAP IN APPLIANCE PRESSURE REGULATOR. (See figure 10). I1 _] 1.85 4. See figure 11. 5. B. To Convert Appliance For Use With Natural Gas...
Installation Manual
Page 10
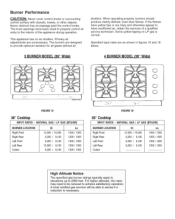
... 1300/ 1300 High Altitude Notice The specified gas burner ratings typically apply to elevations up tO 2000 feel For highe[ altitudes, the rates may need to be reduced to achieve satisfactory operation _ A local certified gas servicer will be able to the interior of a qualified service technician. The burners are hazy and otherwise appear to have been sized to properly control air entry to advise...
... 1300/ 1300 High Altitude Notice The specified gas burner ratings typically apply to elevations up tO 2000 feel For highe[ altitudes, the rates may need to be reduced to achieve satisfactory operation _ A local certified gas servicer will be able to the interior of a qualified service technician. The burners are hazy and otherwise appear to have been sized to properly control air entry to advise...
Installation Manual
Page 11
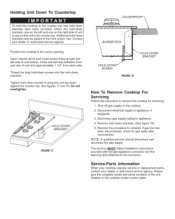
... the cooktop. 2. If gas line has been disconnected, check for servicing: 1. Please give the complete model and serial numbers of the unit located on the right side of unit to secure the unit to the counter top. Holding Unit Down To Countertop To hold the cooktop to the counter top, two hold down brackets. (See figure 18). 5. Disconnect electrical supply to the connector. The servicer MUST follow installation instructions provided...
... the cooktop. 2. If gas line has been disconnected, check for servicing: 1. Please give the complete model and serial numbers of the unit located on the right side of unit to secure the unit to the counter top. Holding Unit Down To Countertop To hold the cooktop to the counter top, two hold down brackets. (See figure 18). 5. Disconnect electrical supply to the connector. The servicer MUST follow installation instructions provided...


