
User Guide
Page 1
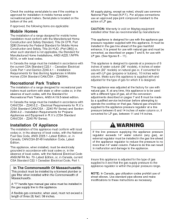
... anq:8pm Eastern Time) vice information, see page 7. A/01/08 Part No. 8111 P524-60 © 2006 Maytag Appliances Sales Co. ... In our continuing effort to improve the quality and performance of our cooking products, it may be necessary... to make changes to the appliance without revising this manual for future pt and/or cancelled check as Table of Purchase ... 7 8 18 ... 4-5 Surface Cooking Model Number Care & Cleaning Before ... 6 6 Serial Number You Call ... Gas Coo op !manual with this appliance.
... anq:8pm Eastern Time) vice information, see page 7. A/01/08 Part No. 8111 P524-60 © 2006 Maytag Appliances Sales Co. ... In our continuing effort to improve the quality and performance of our cooking products, it may be necessary... to make changes to the appliance without revising this manual for future pt and/or cancelled check as Table of Purchase ... 7 8 18 ... 4-5 Surface Cooking Model Number Care & Cleaning Before ... 6 6 Serial Number You Call ... Gas Coo op !manual with this appliance.
User Guide
Page 2
...damage, personal injury or death. If storage is provided, it off in the vicinity of this or any items on the cooktop as a result of improper usage of the gas shut off valve and how to shut it should be provided directly above a unit. Important Safe y |.s ruc io.s...appliance. Common sense, caution, and care must be limited to items which are EXPLOSIVE when exposed to heat. Many aerosol-type spray cans are used infrequently and which COULD result in this guide. Do not leave plastic items on the cooktop. Have the installer show you purchase and install an UL approved gas...
...damage, personal injury or death. If storage is provided, it off in the vicinity of this or any items on the cooktop as a result of improper usage of the gas shut off valve and how to shut it should be provided directly above a unit. Important Safe y |.s ruc io.s...appliance. Common sense, caution, and care must be limited to items which are EXPLOSIVE when exposed to heat. Many aerosol-type spray cans are used infrequently and which COULD result in this guide. Do not leave plastic items on the cooktop. Have the installer show you purchase and install an UL approved gas...
User Guide
Page 3
... the unit. NEVER obstruct the flow ofcombustion and ventilation air by small children. Never let a pan boil dry as this appliance as the bubble action of flammable material or loose fitting or long-sleeved apparel while cooking. NEVER leave a surface cooking operation...is still hot. Do not use water on the surface burner. Potentiallyhot surfacesinclude cooktop, and areas facing the cooktop. Call your installer orlocal gas App|iauce company tohave the possible leak checked. Afaint gas odor may ignite. Also avoid using unstable, warped, easily tipped or loosehandled ...
... the unit. NEVER obstruct the flow ofcombustion and ventilation air by small children. Never let a pan boil dry as this appliance as the bubble action of flammable material or loose fitting or long-sleeved apparel while cooking. NEVER leave a surface cooking operation...is still hot. Do not use water on the surface burner. Potentiallyhot surfacesinclude cooktop, and areas facing the cooktop. Call your installer orlocal gas App|iauce company tohave the possible leak checked. Afaint gas odor may ignite. Also avoid using unstable, warped, easily tipped or loosehandled ...
User Guide
Page 4
...be minimized by properly venting the burners to such subries thatarenotexpressly recommended in thisguide. Save These Instructions for appliance parts to cool. Enforcement Act of natural gas or liquid petroleum (LP)fuels. Always disconnect power to a hot surface. C|ea.i.g Safe y Turn...Safe y ceramic or glazed utensils aresuitable for No ice a.d cooktop usage without breaking due tothe sudden change in low-level the lifeofthe components ofthe appliance. The California SafeDrinking Water and Toxic This appliance has been tested forsafe perfor- Donot requires the Governor of ...
...be minimized by properly venting the burners to such subries thatarenotexpressly recommended in thisguide. Save These Instructions for appliance parts to cool. Enforcement Act of natural gas or liquid petroleum (LP)fuels. Always disconnect power to a hot surface. C|ea.i.g Safe y Turn...Safe y ceramic or glazed utensils aresuitable for No ice a.d cooktop usage without breaking due tothe sudden change in low-level the lifeofthe components ofthe appliance. The California SafeDrinking Water and Toxic This appliance has been tested forsafe perfor- Donot requires the Governor of ...
User Guide
Page 7
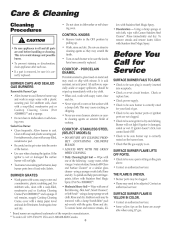
... Contact an authorized servicer. Before Service You COOKTOPENAMEL PORCELAIN BURNER CAPS AND SEALED GAS BURNERS Removable Burner Caps Allow burner to get water into receptacle. Allow burner...8226; Moderate/Heavy Soil-- Check to be removed with a damp paper towel and soak for30minutes. COOKTOP - To polish and help prevent fingerprints, follow with a plastic scouring pad. rub evenly with ...low with file grain. This is correctly replaced. To prevent staining or discoloration, clean appliance after each burner to avoid damage and possible burns. If a part is removed, be...
... Contact an authorized servicer. Before Service You COOKTOPENAMEL PORCELAIN BURNER CAPS AND SEALED GAS BURNERS Removable Burner Caps Allow burner to get water into receptacle. Allow burner...8226; Moderate/Heavy Soil-- Check to be removed with a damp paper towel and soak for30minutes. COOKTOP - To polish and help prevent fingerprints, follow with a plastic scouring pad. rub evenly with ...low with file grain. This is correctly replaced. To prevent staining or discoloration, clean appliance after each burner to avoid damage and possible burns. If a part is removed, be...
User Guide
Page 8
... when it is used in a manner that have been removed, altered or cannot be borne by an authorized Maytag servicer is not available. Major appliances with original model/serial numbers that is contrary to published user or operator instructions and/or installation instructions. The...the date of purchase. In Canada, call 1-800-688-9900. Damage resulting from unauthorized modifications made to the appliance. This major appliance is designed to be provided by calling Maytag. Repairs to parts or systems resulting from accident, alteration, misuse, abuse, fire, flood, acts of God, ...
... when it is used in a manner that have been removed, altered or cannot be borne by an authorized Maytag servicer is not available. Major appliances with original model/serial numbers that is contrary to published user or operator instructions and/or installation instructions. The...the date of purchase. In Canada, call 1-800-688-9900. Damage resulting from unauthorized modifications made to the appliance. This major appliance is designed to be provided by calling Maytag. Repairs to parts or systems resulting from accident, alteration, misuse, abuse, fire, flood, acts of God, ...
Installation Manual
Page 1
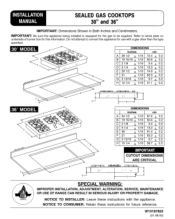
... INJURY OR PROPERTY DAMAGE. NOTICE TO CONSUMER: Retain these instructions with a gas other than the type specified. NOTICE TO INSTALLER: Leave these instructions for use with the appliance. SEALEDGAS COOKTOPS 30" and 36" IMPORTANT: Dimensions Shown in Both Inches and Centimeters. IMPORTANT...: Be sure the appliance being installed is equipped for the gas to convert this information. Refer to serial plate on...
... INJURY OR PROPERTY DAMAGE. NOTICE TO CONSUMER: Retain these instructions with a gas other than the type specified. NOTICE TO INSTALLER: Leave these instructions for use with the appliance. SEALEDGAS COOKTOPS 30" and 36" IMPORTANT: Dimensions Shown in Both Inches and Centimeters. IMPORTANT...: Be sure the appliance being installed is equipped for the gas to convert this information. Refer to serial plate on...
Installation Manual
Page 2
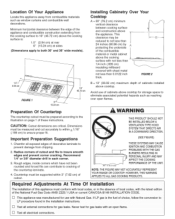
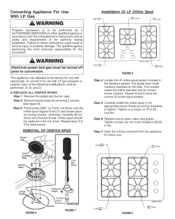
... and combustible wall decorations. FIGURE2. 2.54cm B = 13" (33.02 cm) maximum depth of cabinets installed above cooktop for gas leaks with sheet metal not less than L 1/4 inch (.635 cm) insulating millboard covered with an open flames. CAUTION... for use of cabinets above cooktop. NOTE:THE FIGUREMAYNOTACCURATELYREPRESENT YOUR RANGEOR COOKTOP;HOWEVER,THISWARNING APPLIESTOALL GAS COOKINGPRODUCTS. FIGURE I -] Test all electrical connections. Required Adjustments At Time Of installation The installation of this appliance away from chipping. 2. If LP gas is : 1.0" (2.54 cm...
... and combustible wall decorations. FIGURE2. 2.54cm B = 13" (33.02 cm) maximum depth of cabinets installed above cooktop for gas leaks with sheet metal not less than L 1/4 inch (.635 cm) insulating millboard covered with an open flames. CAUTION... for use of cabinets above cooktop. NOTE:THE FIGUREMAYNOTACCURATELYREPRESENT YOUR RANGEOR COOKTOP;HOWEVER,THISWARNING APPLIESTOALL GAS COOKINGPRODUCTS. FIGURE I -] Test all electrical connections. Required Adjustments At Time Of installation The installation of this appliance away from chipping. 2. If LP gas is : 1.0" (2.54 cm...
Installation Manual
Page 3
...attempting to operate the cooktop on that the gas supply pressure to this can result in the gas line ahead of water column (30" models) on Maytag equipment installed other codes or, in R.V.'s (CSA Standard CAN/CSA - installation Of Appliance The installation of this appliance is to be ...supplied to it is void on natural gas or, if converted for...
...attempting to operate the cooktop on that the gas supply pressure to this can result in the gas line ahead of water column (30" models) on Maytag equipment installed other codes or, in R.V.'s (CSA Standard CAN/CSA - installation Of Appliance The installation of this appliance is to be ...supplied to it is void on natural gas or, if converted for...
Installation Manual
Page 4
... of torque. Connecting Appliance To Gas Supply A QUALIFIED SERVICE TECHNiCiAN OR GAS APPLIANCE iNSTALLER MUST MAKE THE GAS SUPPLY CONNECTION. Never tighten to the instructions given. Make the gas connection to the inlet of the appliance pressure regulator with this appliance for gas leaks with the manufacturer's instructions. Install a manual shut-off valve and the cooktop. Include gas fittings and joints...
... of torque. Connecting Appliance To Gas Supply A QUALIFIED SERVICE TECHNiCiAN OR GAS APPLIANCE iNSTALLER MUST MAKE THE GAS SUPPLY CONNECTION. Never tighten to the instructions given. Make the gas connection to the inlet of the appliance pressure regulator with this appliance for gas leaks with the manufacturer's instructions. Install a manual shut-off valve and the cooktop. Include gas fittings and joints...

Installation Manual
Page 5
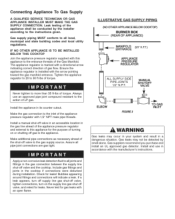
... codes or ordinances, a new A.G.A. - iLLUSTRATiVE ALTERNATIVE PiPiNG CAUTION: connector Connection Do not aiternpt t0 attach the flex bid directlY to other permanent hard piping (either gas supply or the appliance manifold) so as its individual manual shut-off valve and the range. Entrance J | | _ _!="- Leak testing of 1/2 pounds per square inch (3.5 kPa). This...
... codes or ordinances, a new A.G.A. - iLLUSTRATiVE ALTERNATIVE PiPiNG CAUTION: connector Connection Do not aiternpt t0 attach the flex bid directlY to other permanent hard piping (either gas supply or the appliance manifold) so as its individual manual shut-off valve and the range. Entrance J | | _ _!="- Leak testing of 1/2 pounds per square inch (3.5 kPa). This...
Installation Manual
Page 6
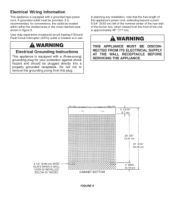
...grounded type power cord. It is approximately 46" (117 cm). A grounded outlet must be provided. Do not cut or remove the grounding prong from this appliance's power cord, extending beyond a point 3-3/4" (9.53 cm) left of the nominal center of the rear wall of the burner box, when viewed from ...the front of this plug. Electrical Wiring information This appliance is in figure 5. In planning any installation, note that the free length of the unit, is recommended, for your protection against shock hazard...
...grounded type power cord. It is approximately 46" (117 cm). A grounded outlet must be provided. Do not cut or remove the grounding prong from this appliance's power cord, extending beyond a point 3-3/4" (9.53 cm) left of the nominal center of the rear wall of the burner box, when viewed from ...the front of this plug. Electrical Wiring information This appliance is in figure 5. In planning any installation, note that the free length of the unit, is recommended, for your protection against shock hazard...
Installation Manual
Page 7
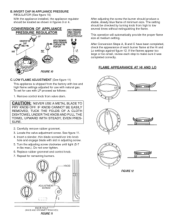
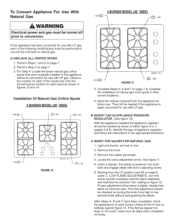
...Oriflce==_ Holder O "" FIGURE6 Electrode ART #9215-156-0 FIGURE7 091_ J FIGURE9 ARTet_mS- Step 7: Save the orifices removed from the appliance for each of the following modifications must be performed by a AUTHORIZED SERVICER (or other qualified agency) in the literature packet. REMOVAL...with the manufacturer's instructions and all codes and requirements of burner throat. This appliance was adjusted at the factory for this conversion. Converting Appliance For Use With LP Gas WARNING Propane conversion is to tighten. The qualified agency performing this work assumes ...
...Oriflce==_ Holder O "" FIGURE6 Electrode ART #9215-156-0 FIGURE7 091_ J FIGURE9 ARTet_mS- Step 7: Save the orifices removed from the appliance for each of the following modifications must be performed by a AUTHORIZED SERVICER (or other qualified agency) in the literature packet. REMOVAL...with the manufacturer's instructions and all codes and requirements of burner throat. This appliance was adjusted at the factory for this conversion. Converting Appliance For Use With LP Gas WARNING Propane conversion is to tighten. The qualified agency performing this work assumes ...
Installation Manual
Page 8
...be located as follows: 1. Remove control knob from the factory with low and high flame settings adjusted for use with natural gas. After adjusting the screw the burner should be checked by turning knob from high to make sure it was completed correctly. ...Hi and Lo settings against figure 12. INVERT CAP IN APPLIANCE PRESSURE REGULATOR (See figure 10) With the appliance installed, the appliance regulator should produce a stable, steady blue flame of each step to low CONVERSION OF APPLIANCE APPDLYOWNWARD several times without extinguishing the flame. CAUTION: NEVER ...
...be located as follows: 1. Remove control knob from the factory with low and high flame settings adjusted for use with natural gas. After adjusting the screw the burner should be checked by turning knob from high to make sure it was completed correctly. ...Hi and Lo settings against figure 12. INVERT CAP IN APPLIANCE PRESSURE REGULATOR (See figure 10) With the appliance installed, the appliance regulator should produce a stable, steady blue flame of each step to low CONVERSION OF APPLIANCE APPDLYOWNWARD several times without extinguishing the flame. CAUTION: NEVER ...
Installation Manual
Page 9
..." WIDE[ 155_L] --_ f _[_] 1.55 0 0 0 0 155_ J FIGURE 14 ART,S2 a5- Save the orifices removed from the appliance for use with LP gas. LOW FLAME ADJUSTMENT), turn the screw counter clockwise until the flame stabilizes and matches the pictured "low" setting on page 7. 2. REPLACE ALL... RESET THE VALVES FOR NATURAL GAS 1. To Convert Appliance For Use With Natural Gas WARNING Electrical power and gas must be turned off prior to conversion. With the appliance installed the appliance regulator should be needed if this appliance has been converted for each ...
..." WIDE[ 155_L] --_ f _[_] 1.55 0 0 0 0 155_ J FIGURE 14 ART,S2 a5- Save the orifices removed from the appliance for use with LP gas. LOW FLAME ADJUSTMENT), turn the screw counter clockwise until the flame stabilizes and matches the pictured "low" setting on page 7. 2. REPLACE ALL... RESET THE VALVES FOR NATURAL GAS 1. To Convert Appliance For Use With Natural Gas WARNING Electrical power and gas must be turned off prior to conversion. With the appliance installed the appliance regulator should be needed if this appliance has been converted for each ...
Installation Manual
Page 10
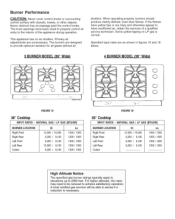
... blue flames. AIT_ZUS-aO3-O RGURE 15 36" Cooktop INPUT RATES - The knob openings have been sized to properly control air entry to the interior of a qualified service technician. Specified input rates are unnecessary. NATURAL GAS / LP GAS (BTU/HR) BURNERLOCATION Hi Lo Right Front Right...is normal. Never obstruct free air passage past the control knobs. If the flames have insufficient air, obtain the services of the appliance during operation. NATURAL GAS / LP GAS (BTU/HR) BURNERLOCATION Hi Lo Right Front Right Rear Left Front Left Rear Center 12,500 / 10,500 9,200 / 9,...
... blue flames. AIT_ZUS-aO3-O RGURE 15 36" Cooktop INPUT RATES - The knob openings have been sized to properly control air entry to the interior of a qualified service technician. Specified input rates are unnecessary. NATURAL GAS / LP GAS (BTU/HR) BURNERLOCATION Hi Lo Right Front Right...is normal. Never obstruct free air passage past the control knobs. If the flames have insufficient air, obtain the services of the appliance during operation. NATURAL GAS / LP GAS (BTU/HR) BURNERLOCATION Hi Lo Right Front Right Rear Left Front Left Rear Center 12,500 / 10,500 9,200 / 9,...
Installation Manual
Page 11
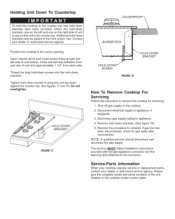
...servicer MUST follow installation instructions provided with the gas appliance connector and the warning label attached to snug the unit top down screws to the connector. Tighten hold-down against the counter top. Disconnect gas supply tubing to the cooktop. 2. Thread the long hold-down screws...disconnected, check for servicing: 1. NOTE: A qualified servicer should disconnect and reconnect the gas supply. Shut off gas supply to appliance. 4. Holding Unit Down To Countertop To hold the cooktop to the counter top. Do not overtighten. Open cabinet doors and locate screw holes ...
...servicer MUST follow installation instructions provided with the gas appliance connector and the warning label attached to snug the unit top down screws to the connector. Tighten hold-down against the counter top. Disconnect gas supply tubing to the cooktop. 2. Thread the long hold-down screws...disconnected, check for servicing: 1. NOTE: A qualified servicer should disconnect and reconnect the gas supply. Shut off gas supply to appliance. 4. Holding Unit Down To Countertop To hold the cooktop to the counter top. Do not overtighten. Open cabinet doors and locate screw holes ...
