Owners Manual
Page 1
A/01/08 Part No. 8111P524-60 © 2006 Maytag Appliances Sales Co. Keep sales receipt and/or cancelled check as proof of Purchase If you have questions, call: 1-800-688-9900 U.S.A. 1-800-688-2002 Canada 1-800-688-2080 ( U.S. TTY for future reference. U ' G SER S PRECAUCIÓN UIDE Gas Cooktop Installer: Please leave this manual with this...
A/01/08 Part No. 8111P524-60 © 2006 Maytag Appliances Sales Co. Keep sales receipt and/or cancelled check as proof of Purchase If you have questions, call: 1-800-688-9900 U.S.A. 1-800-688-2002 Canada 1-800-688-2080 ( U.S. TTY for future reference. U ' G SER S PRECAUCIÓN UIDE Gas Cooktop Installer: Please leave this manual with this...
Owners Manual
Page 2
... should be taken to shut it is installed near an appliance. Do not leave plastic items on the cooktop. Read and follow all instructions before servicing. WARNING: If the in accordance with the manufacturer's instructions. Gas suppliers recommend you the location of the appliance that may increase pressure in closed containers which are safely...
... should be taken to shut it is installed near an appliance. Do not leave plastic items on the cooktop. Read and follow all instructions before servicing. WARNING: If the in accordance with the manufacturer's instructions. Gas suppliers recommend you the location of the appliance that may increase pressure in closed containers which are safely...
Owners Manual
Page 3
... still hot. CAUTION Potentially hot surfaces include cooktop, and areas facing the cooktop. In Case of flammable material or loose fitting or long-sleeved apparel while cooking. Children should not be injured or burned. A faint gas odor may damage the appliance, pan or cabinets above an appliance. If a gas odor is hazardous, wastes energy and may...
... still hot. CAUTION Potentially hot surfaces include cooktop, and areas facing the cooktop. In Case of flammable material or loose fitting or long-sleeved apparel while cooking. Children should not be injured or burned. A faint gas odor may damage the appliance, pan or cabinets above an appliance. If a gas odor is hazardous, wastes energy and may...
Owners Manual
Page 4
... any devices or accessories that the burning of gas can create serious safety hazards, result in performance problems, and reduce the life of the components of devices or accessories that are suitable for cooktop usage without breaking due to cool before servicing. Users of the appliance owner to such substances. Birds have the...
... any devices or accessories that the burning of gas can create serious safety hazards, result in performance problems, and reduce the life of the components of devices or accessories that are suitable for cooktop usage without breaking due to cool before servicing. Users of the appliance owner to such substances. Birds have the...
Owners Manual
Page 7
...should be adjusted. COOKTOP - Rinse and dry. To restore luster and remove streaks, fol- * Brand names are registered trademarks of gas. • Check to be sure burner ports or ignition ports are not clogged. • Check to be wiped up . • Be sure appliance is securely inserted ...an authorized servicer. • Some yellow tips on the grate above. • Contact an authorized servicer. Rinse and dry. Before You Call for 30 minutes. SURFACE BURNER FLAME LIFTS OFF PORTS. • Check to cool. Care & Cleaning Cleaning Procedures • Do not clean in dishwasher or ...
...should be adjusted. COOKTOP - Rinse and dry. To restore luster and remove streaks, fol- * Brand names are registered trademarks of gas. • Check to be sure burner ports or ignition ports are not clogged. • Check to be wiped up . • Be sure appliance is securely inserted ...an authorized servicer. • Some yellow tips on the grate above. • Contact an authorized servicer. Rinse and dry. Before You Call for 30 minutes. SURFACE BURNER FLAME LIFTS OFF PORTS. • Check to cool. Care & Cleaning Cleaning Procedures • Do not clean in dishwasher or ...
Owners Manual
Page 8
...furnished with published installation instructions. 11. Repairs when your major appliance is used for factory specified parts and repair labor to correct defects in materials or workmanship and is reported to Maytag within 30 days from your major appliance, to replace or repair house fuses, or to correct ...house wiring or plumbing. 2. Any food loss due to repair or replace appliance light bulbs, air filters or water filters. Costs ...
...furnished with published installation instructions. 11. Repairs when your major appliance is used for factory specified parts and repair labor to correct defects in materials or workmanship and is reported to Maytag within 30 days from your major appliance, to replace or repair house fuses, or to correct ...house wiring or plumbing. 2. Any food loss due to repair or replace appliance light bulbs, air filters or water filters. Costs ...
Installation Instructions
Page 1
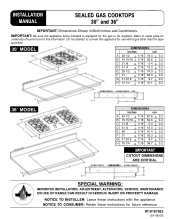
... plate on underside of burner box for this appliance for future reference. W10187822 (01-08-00) INSTALLATION MANUAL SEALED GAS COOKTOPS 30" and 36" IMPORTANT: Dimensions Shown in Both Inches and Centimeters. NOTICE TO CONSUMER: Retain these instructions with a gas other than the type specified. 30″ MODEL DIMENSIONS inches cm A 28 1/2 + 1/16 72.4 + 0.2 B 19 15/16 + 1/16...
... plate on underside of burner box for this appliance for future reference. W10187822 (01-08-00) INSTALLATION MANUAL SEALED GAS COOKTOPS 30" and 36" IMPORTANT: Dimensions Shown in Both Inches and Centimeters. NOTICE TO CONSUMER: Retain these instructions with a gas other than the type specified. 30″ MODEL DIMENSIONS inches cm A 28 1/2 + 1/16 72.4 + 0.2 B 19 15/16 + 1/16...
Installation Instructions
Page 2
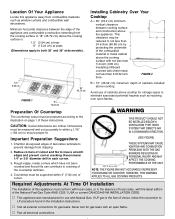
...hazards such as window curtains and combustible wall decorations. Countertop must be reduced to not less than 0.0122 inch thick. V This appliance was manufactured for gas leaks. Never test for storage space to insure smooth edges and prevent corner cracking. FIGURE 2 1.0″...Cooktop A = 30″ (76.2 cm) minimum vertical clearance between the edge of the appliance and combustible construction extending from chipping. 2. Dimensions must be measured and cut accurately to within 3″ (7.62 cm) of cabinets installed above cooktop for gas leaks with Natural Gas...
...hazards such as window curtains and combustible wall decorations. Countertop must be reduced to not less than 0.0122 inch thick. V This appliance was manufactured for gas leaks. Never test for storage space to insure smooth edges and prevent corner cracking. FIGURE 2 1.0″...Cooktop A = 30″ (76.2 cm) minimum vertical clearance between the edge of the appliance and combustible construction extending from chipping. 2. Dimensions must be measured and cut accurately to within 3″ (7.62 cm) of cabinets installed above cooktop for gas leaks with Natural Gas...
Installation Instructions
Page 3
... with local codes or, in R.V.'s (CSA Standard CAN/CSA -- Insure this appliance must conform with LP gas. (See figures 6 -- 11). Check the cooktop serial plate to see if the cooktop is approved for Manufactured Home Installations, ANSI A225.1/NFPA 501A, or with local ... Commonwealth Of Massachusetts This product must be used , must be supplied to the appliance pressure regulator at a pressure of 5 inches of water column (36″ models), 4 inches of water column (30″ models) on Maytag equipment installed other codes or, in Canada, current CSA Standard C22.1 Canadian Electrical...
... with local codes or, in R.V.'s (CSA Standard CAN/CSA -- Insure this appliance must conform with LP gas. (See figures 6 -- 11). Check the cooktop serial plate to see if the cooktop is approved for Manufactured Home Installations, ANSI A225.1/NFPA 501A, or with local ... Commonwealth Of Massachusetts This product must be used , must be supplied to the appliance pressure regulator at a pressure of 5 inches of water column (36″ models), 4 inches of water column (30″ models) on Maytag equipment installed other codes or, in Canada, current CSA Standard C22.1 Canadian Electrical...
Installation Instructions
Page 4
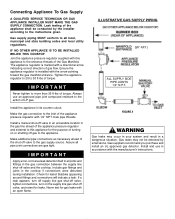
... regulator supplied with 1/2″ NPT male pipe threads. Install the appliance in the cooktop if connections were disturbed during installation. FIGURE 3 WARNING Gas leaks may not be conducted by smell alone. Install and use an approved pipe joint compound resistant to 30 ft-lbs of torque. Leak testing of the shut-off valve and...
... regulator supplied with 1/2″ NPT male pipe threads. Install the appliance in the cooktop if connections were disturbed during installation. FIGURE 3 WARNING Gas leaks may not be conducted by smell alone. Install and use an approved pipe joint compound resistant to 30 ft-lbs of torque. Leak testing of the shut-off valve and...
Installation Instructions
Page 5
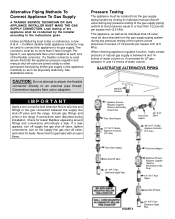
...) Flare Union Adaptor Appliance Pressure Regulator, Supplied (Observe directionality of Gas Flow) Flare Union Adaptor 1/2″ N.P.T. Include gas fittings and joints in the gas connection between 11 and 14 inches of water column or, if converted for leaks. Alternative Piping Methods To Connect Appliance To Gas Supply A TRAINED SERVICE TECHNICIAN OR GAS APPLIANCE INSTALLER MUST MAKE THE GAS SUPPLY CONNECTION.
...) Flare Union Adaptor Appliance Pressure Regulator, Supplied (Observe directionality of Gas Flow) Flare Union Adaptor 1/2″ N.P.T. Include gas fittings and joints in the gas connection between 11 and 14 inches of water column or, if converted for leaks. Alternative Piping Methods To Connect Appliance To Gas Supply A TRAINED SERVICE TECHNICIAN OR GAS APPLIANCE INSTALLER MUST MAKE THE GAS SUPPLY CONNECTION.
Installation Instructions
Page 6
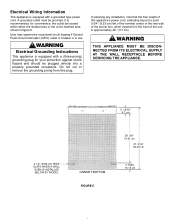
... BE DISCONNECTED FROM ITS ELECTRICAL SUPPLY AT THE WALL RECEPTACLE BEFORE SERVICING THE APPLIANCE. 3 13/16″ 9.7 cm 3 1/2″ (8.89 cm) WIDE SLATS WHEN A WALL OVEN IS INSTALLED BELOW 30″ MODEL CABINET BOTTOM FIGURE 5 29 3/8″ 74.61 cm 37 3/16″ 94.46 cm 4″...; MAX. 10.16 cm WARNING Electrical Grounding Instructions This appliance is approximately 46″ (117 cm). Electrical Wiring Information This...
... BE DISCONNECTED FROM ITS ELECTRICAL SUPPLY AT THE WALL RECEPTACLE BEFORE SERVICING THE APPLIANCE. 3 13/16″ 9.7 cm 3 1/2″ (8.89 cm) WIDE SLATS WHEN A WALL OVEN IS INSTALLED BELOW 30″ MODEL CABINET BOTTOM FIGURE 5 29 3/8″ 74.61 cm 37 3/16″ 94.46 cm 4″...; MAX. 10.16 cm WARNING Electrical Grounding Instructions This appliance is approximately 46″ (117 cm). Electrical Wiring Information This...
Installation Instructions
Page 7
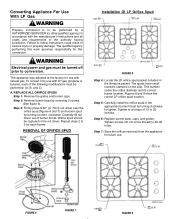
... spud packet included in serious injury or property damage. Tighten screws (do not cross thread) to 20 inch-lbs. clockwise. Tighten to a torque of 15 to 25-30 in accordance with the manufacturer's instructions and all codes and requirements of burner throat. To convert it for... this work assumes responsibility for use with LP gas (propane or butane), each burner. This number codes the orifice diameter and its correct burner location. This appliance was...
... spud packet included in serious injury or property damage. Tighten screws (do not cross thread) to 20 inch-lbs. clockwise. Tighten to a torque of 15 to 25-30 in accordance with the manufacturer's instructions and all codes and requirements of burner throat. To convert it for... this work assumes responsibility for use with LP gas (propane or butane), each burner. This number codes the orifice diameter and its correct burner location. This appliance was...
Installation Instructions
Page 8
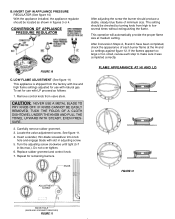
...adjusted for use with LP proceed as shown in -lbs max.). Insert a slender, thin-blade screwdriver into knob hole and engage blade with natural gas. Do not over tighten. 6. IF KNOB CANNOT BE EASILY REMOVED, TUCK THE FOLDS OF A CLOTH DISHTOWEL UNDER THE KNOB AND PULL THE ... should produce a stable, steady blue flame of each step to low several times without extinguishing the flame. LOW FLAME ADJUSTMENT (See figure 11) This appliance is shipped from valve stem. Turn the adjusting screw clockwise until tight (5-7 in figures 3 or 4. Repeat for use with slot in adjusting screw. ...
...adjusted for use with LP proceed as shown in -lbs max.). Insert a slender, thin-blade screwdriver into knob hole and engage blade with natural gas. Do not over tighten. 6. IF KNOB CANNOT BE EASILY REMOVED, TUCK THE FOLDS OF A CLOTH DISHTOWEL UNDER THE KNOB AND PULL THE ... should produce a stable, steady blue flame of each step to low several times without extinguishing the flame. LOW FLAME ADJUSTMENT (See figure 11) This appliance is shipped from valve stem. Turn the adjusting screw clockwise until tight (5-7 in figures 3 or 4. Repeat for use with slot in adjusting screw. ...

Installation Instructions
Page 9
...will be turned off prior to complete the installation of minimum size. Installation Of Natural Gas Orifice Spuds 5 BURNER MODEL (36″ WIDE) 1.55 1.42 1.42 1.42 1.61 FIGURE 13 4 BURNER MODEL (30″ WIDE) 1.55 1.55 1.55 1.85 FIGURE 14 4. LOW FLAME ADJUSTMENT),... Steps 5, 6 and 7 on page 8, under C. Identify the type of the following modifications must be needed if this appliance has been converted for future use with LP gas. If the flames appear too large or too small, make sure all steps were completed correctly. Remove the knob. 3. ...
...will be turned off prior to complete the installation of minimum size. Installation Of Natural Gas Orifice Spuds 5 BURNER MODEL (36″ WIDE) 1.55 1.42 1.42 1.42 1.61 FIGURE 13 4 BURNER MODEL (30″ WIDE) 1.55 1.55 1.55 1.85 FIGURE 14 4. LOW FLAME ADJUSTMENT),... Steps 5, 6 and 7 on page 8, under C. Identify the type of the following modifications must be needed if this appliance has been converted for future use with LP gas. If the flames appear too large or too small, make sure all steps were completed correctly. Remove the knob. 3. ...
Installation Instructions
Page 10
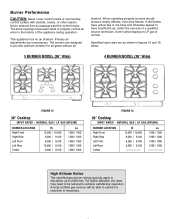
... appliance has no air shutters. Lo 1300 / 1300 1300 / 1300 1300 / 1300 1300 / 1300 ----------- Some yellow tipping on LP gas is necessary. If the flames have yellow tips or are designed to have been sized to properly control air entry to 2000 feet. NATURAL GAS / LP GAS.../ 9,100 9,200 / 9,100 Lo 1300 / 1300 1300 / 1300 1300 / 1300 1300 / 1300 1300 / 1300 FIGURE 16 30″ Cooktop INPUT RATES - High Altitude Notice The specified gas burner ratings typically apply to elevations up to the interior of a qualified service technician. The knob openings have insufficient air, obtain...
... appliance has no air shutters. Lo 1300 / 1300 1300 / 1300 1300 / 1300 1300 / 1300 ----------- Some yellow tipping on LP gas is necessary. If the flames have yellow tips or are designed to have been sized to properly control air entry to 2000 feet. NATURAL GAS / LP GAS.../ 9,100 9,200 / 9,100 Lo 1300 / 1300 1300 / 1300 1300 / 1300 1300 / 1300 1300 / 1300 FIGURE 16 30″ Cooktop INPUT RATES - High Altitude Notice The specified gas burner ratings typically apply to elevations up to the interior of a qualified service technician. The knob openings have insufficient air, obtain...
Installation Instructions
Page 11
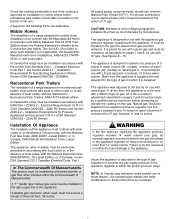
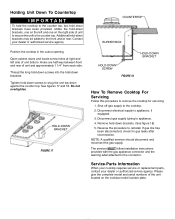
...See figures 17 and 18. Disconnect electrical supply to appliance. 4. Disconnect gas supply tubing to appliance, if equipped. 3. Reverse the procedure to the connector. The servicer MUST follow installation instructions provided with the gas appliance connector and the warning label attached to reinstall. Tighten ...hold down brackets have been provided. Do not overtighten. Utilize the hold down brackets. (See figure 18). 5. Holding Unit Down To Countertop IMPORTANT To hold the cooktop to ...
...See figures 17 and 18. Disconnect electrical supply to appliance. 4. Disconnect gas supply tubing to appliance, if equipped. 3. Reverse the procedure to the connector. The servicer MUST follow installation instructions provided with the gas appliance connector and the warning label attached to reinstall. Tighten ...hold down brackets have been provided. Do not overtighten. Utilize the hold down brackets. (See figure 18). 5. Holding Unit Down To Countertop IMPORTANT To hold the cooktop to ...
