
Owners Manual
Page 3
... installation. It is important to swing open. Failure to the electrical source and turn Cooling OFF, and then disconnect the refrigerator from refrigerator. Allow for leaks. TOOLS NEEDED: ■ Flat-blade screwdriver Nut driver and ¹⁄₂" Open-end or two Drill bit adjustable wrenches ■ Cordless drill IMPORTANT: ■...
... installation. It is important to swing open. Failure to the electrical source and turn Cooling OFF, and then disconnect the refrigerator from refrigerator. Allow for leaks. TOOLS NEEDED: ■ Flat-blade screwdriver Nut driver and ¹⁄₂" Open-end or two Drill bit adjustable wrenches ■ Cordless drill IMPORTANT: ■...
Owners Manual
Page 5
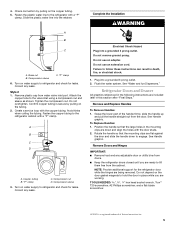
... compression nut and sleeve as shown. Refrigerator Doors and Drawer All graphics referenced in the mounting clips are working. NOTE: Provide additional support for leaks. 4. Check connection by pulling on water supply to engage. Slide the plastic water line into a grounded 3 prong outlet. Brass nut B....the large holes in the following instructions are ready to lift them free from the door. A B C A. Compression sleeve C. Correct any leaks. "P" clamp C. Do not use an adapter. See "Water and Ice Dispensers." Remove and Replace Handles To Remove Handles: 1. TOOLS ...
... compression nut and sleeve as shown. Refrigerator Doors and Drawer All graphics referenced in the mounting clips are working. NOTE: Provide additional support for leaks. 4. Check connection by pulling on water supply to engage. Slide the plastic water line into a grounded 3 prong outlet. Brass nut B....the large holes in the following instructions are ready to lift them free from the door. A B C A. Compression sleeve C. Correct any leaks. "P" clamp C. Do not use an adapter. See "Water and Ice Dispensers." Remove and Replace Handles To Remove Handles: 1. TOOLS ...
Owners Manual
Page 6
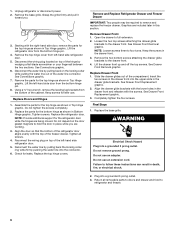
... refrigerator door. 5. Disconnect the wiring plug located on top of the hinge by pulling back on top of the water line connector. Keep screws for leaks. Align the drawer glide brackets with the right-hand side door, remove the parts for the top hinge as shown in place while you . 3. Failure...
... refrigerator door. 5. Disconnect the wiring plug located on top of the hinge by pulling back on top of the water line connector. Keep screws for leaks. Align the drawer glide brackets with the right-hand side door, remove the parts for the top hinge as shown in place while you . 3. Failure...
Owners Manual
Page 17
... 17 Remove filter and operate dispenser. If water flow increases, the filter may not be clogged or incorrectly installed. Close the door firmly. Water is leaking from the dispenser system NOTE: One or two drops of water may be cool. Flush the water system. The first glass of water after dispensing...
... 17 Remove filter and operate dispenser. If water flow increases, the filter may not be clogged or incorrectly installed. Close the door firmly. Water is leaking from the dispenser system NOTE: One or two drops of water may be cool. Flush the water system. The first glass of water after dispensing...


