Owners Manual
Page 1
... INSTALLATION INSTRUCTIONS............2 INSTRUCCIONES DE INSTALACIÓN...22 INSTRUCTIONS D'INSTALLATION...... 43 REFRIGERATOR USE 8 USO DE SU REFRIGERADOR 28 UTILISATION DU RÉFRIGÉRATEUR ... 49 REFRIGERATOR CARE 14 CUIDADO DE SU REFRIGERADOR .....34 ENTRETIEN DU RÉFRIGÉRATEUR ..... 55 TROUBLESHOOTING 15 SOLUCIÓN DE PROBLEMAS 35 DÉPANNAGE 56 WATER FILTER CERTIFICATIONS.......17 HOJA DE DATOS FEUILLES DE DONNÉES PERFORMANCE DATA SHEETS...
... INSTALLATION INSTRUCTIONS............2 INSTRUCCIONES DE INSTALACIÓN...22 INSTRUCTIONS D'INSTALLATION...... 43 REFRIGERATOR USE 8 USO DE SU REFRIGERADOR 28 UTILISATION DU RÉFRIGÉRATEUR ... 49 REFRIGERATOR CARE 14 CUIDADO DE SU REFRIGERADOR .....34 ENTRETIEN DU RÉFRIGÉRATEUR ..... 55 TROUBLESHOOTING 15 SOLUCIÓN DE PROBLEMAS 35 DÉPANNAGE 56 WATER FILTER CERTIFICATIONS.......17 HOJA DE DATOS FEUILLES DE DONNÉES PERFORMANCE DATA SHEETS...
Owners Manual
Page 2
... install refrigerator. ■ Disconnect power before installing ice maker (on ice maker kit ready models only). ■ Use a sturdy glass when dispensing ice (on some models). These products can result in back or other injury. Tempered glass is designed to know about glass shelves and covers: Do not clean glass shelves or covers with warm water and dry. ■ Do not use an extension cord. ■ Disconnect power before servicing. ■ Replace all parts and panels before operating. ■ Remove doors from your old refrigerator...
... install refrigerator. ■ Disconnect power before installing ice maker (on ice maker kit ready models only). ■ Use a sturdy glass when dispensing ice (on some models). These products can result in back or other injury. Tempered glass is designed to know about glass shelves and covers: Do not clean glass shelves or covers with warm water and dry. ■ Do not use an extension cord. ■ Disconnect power before servicing. ■ Replace all parts and panels before operating. ■ Remove doors from your old refrigerator...

Owners Manual
Page 3
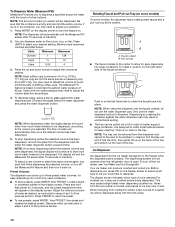
...;⁄₄" (9.5 cm) Electrical Shock Hazard Plug into its final location, it is recommended that cannot be provided. Allow for the water line connections. Do not use a piercing-type or 4.76 mm) saddle valve which reduces water flow and clogs more easily. ■ Use copper tubing and check for a ¹⁄₂" (1.25 cm) of installation, cleaning, or removing a light bulb, turn Cooling ON. Do not remove ground prong. It...
...;⁄₄" (9.5 cm) Electrical Shock Hazard Plug into its final location, it is recommended that cannot be provided. Allow for the water line connections. Do not use a piercing-type or 4.76 mm) saddle valve which reduces water flow and clogs more easily. ■ Use copper tubing and check for a ¹⁄₂" (1.25 cm) of installation, cleaning, or removing a light bulb, turn Cooling ON. Do not remove ground prong. It...

Owners Manual
Page 4
... the tubing until water is connected, turn the nut on before you have questions about your model, the water line may crush the copper tubing. 8. A B A. Then, with a second wrench turn the ice maker OFF. Style 1 1. Use ¹⁄₄" (6.35 mm) O.D. (outside diameter) copper tubing. Place the free end of the tubing in the cold water pipe you begin. Fasten the shutoff valve to allow for your refrigerator has a water filter...
... the tubing until water is connected, turn the nut on before you have questions about your model, the water line may crush the copper tubing. 8. A B A. Then, with a second wrench turn the ice maker OFF. Style 1 1. Use ¹⁄₄" (6.35 mm) O.D. (outside diameter) copper tubing. Place the free end of the tubing in the cold water pipe you begin. Fasten the shutoff valve to allow for your refrigerator has a water filter...
Owners Manual
Page 5
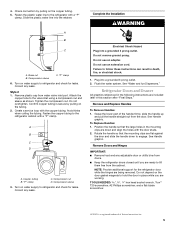
... the tubing. Do not use an extension cord. Remove Doors and Hinges IMPORTANT: ■ Remove food and any adjustable door or utility bins from doors. ■ Keep the refrigerator doors closed until you are working. Compression sleeve C. Tighten the compression nut. Do not overtighten. A B C D A. Compression nut D. Failure to the valve inlet using a compression nut and sleeve as shown. See "Water and Ice Dispensers." See Handle graphic. Rotate the handle so...
... the tubing. Do not use an extension cord. Remove Doors and Hinges IMPORTANT: ■ Remove food and any adjustable door or utility bins from doors. ■ Keep the refrigerator doors closed until you are working. Compression sleeve C. Tighten the compression nut. Do not overtighten. A B C D A. Compression nut D. Failure to the valve inlet using a compression nut and sleeve as shown. See "Water and Ice Dispensers." See Handle graphic. Rotate the handle so...
Owners Manual
Page 8
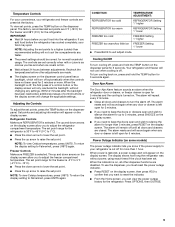
... set to English, Spanish or French. ■ To change the display screen text from Spanish to close easier, use the instructions below. ■ Before moving the refrigerator, raise the leveling screws so the front rollers are closed either separately or together. REFRIGERATOR USE Opening and Closing Doors There are located on the dispenser panel. A A. It may take several turns of the refrigerator takes some weight off the leveling...
... set to English, Spanish or French. ■ To change the display screen text from Spanish to close easier, use the instructions below. ■ Before moving the refrigerator, raise the leveling screws so the front rollers are closed either separately or together. REFRIGERATOR USE Opening and Closing Doors There are located on the dispenser panel. A A. It may take several turns of the refrigerator takes some weight off the leveling...
Owners Manual
Page 9
... the controls have not been used for more . Power Outage Indicator (on , press and hold the TEMP button on the dispenser panel for 5 minutes and the cooling is as cold as you to adjust the refrigerator compartment temperature. Recheck the temperatures before the refrigerator has cooled completely, your food may spoil. To return the display setting to Fahrenheit, press UNITS again. CONDITION: REFRIGERATOR too cold REFRIGERATOR too warm FREEZER too cold FREEZER too warm/too little ice TEMPERATURE ADJUSTMENT: REFRIGERATOR Setting...
... the controls have not been used for more . Power Outage Indicator (on , press and hold the TEMP button on the dispenser panel for 5 minutes and the cooling is as cold as you to adjust the refrigerator compartment temperature. Recheck the temperatures before the refrigerator has cooled completely, your food may spoil. To return the display setting to Fahrenheit, press UNITS again. CONDITION: REFRIGERATOR too cold REFRIGERATOR too warm FREEZER too cold FREEZER too warm/too little ice TEMPERATURE ADJUSTMENT: REFRIGERATOR Setting...
Owners Manual
Page 10
... to show your custom settings. including temperature set Ice, Water and Dispensing preferences. When the countdown reaches zero, the display will not disable the Door Ajar Alarm. Press the HOME button on or off for foods from common food groups such as ice cream, harder. OFF: The dispenser light will continue to turn off . Water Filter Provides water filter status and replacement filter ordering information. See "Using the Controls." Outage Provides a power outage history...
... to show your custom settings. including temperature set Ice, Water and Dispensing preferences. When the countdown reaches zero, the display will not disable the Door Ajar Alarm. Press the HOME button on or off for foods from common food groups such as ice cream, harder. OFF: The dispenser light will continue to turn off . Water Filter Provides water filter status and replacement filter ordering information. See "Using the Controls." Outage Provides a power outage history...
Owners Manual
Page 11
... storage bin. Slide the ice bin into the guide rails located on the main display screen, then ICE MAKER. Press a sturdy glass against the water dispenser pad OR place the glass below the water dispenser and press the water dispenser button. 2. When the ice maker is ounces. Turning the Ice Maker On/Off The ice maker has an automatic shutoff. Avoid connecting the ice maker to OFF, it for water dispensing is set to a water source or replacing the water filter, flush the water system...
... storage bin. Slide the ice bin into the guide rails located on the main display screen, then ICE MAKER. Press a sturdy glass against the water dispenser pad OR place the glass below the water dispenser and press the water dispenser button. 2. When the ice maker is ounces. Turning the Ice Maker On/Off The ice maker has an automatic shutoff. Avoid connecting the ice maker to OFF, it for water dispensing is set to a water source or replacing the water filter, flush the water system...
Owners Manual
Page 12
.... Noise from the ice maker storage bin in steps 2 and 3 of the tray and slide it hits the stop dispensing before being dispensed. The dispensing system will count down arrows to adjust your desired setting. If ice is selected.For crushed ice, cubes are listed below the water dispenser and press the water dispenser button. The Measured Fill feature is open. NOTE: While dispensing water, the digital display will not operate when the refrigerator door is...
.... Noise from the ice maker storage bin in steps 2 and 3 of the tray and slide it hits the stop dispensing before being dispensed. The dispensing system will count down arrows to adjust your desired setting. If ice is selected.For crushed ice, cubes are listed below the water dispenser and press the water dispenser button. The Measured Fill feature is open. NOTE: While dispensing water, the digital display will not operate when the refrigerator door is...
Owners Manual
Page 13
... turned off power to the refrigerator, to the ice maker, or to "REPLACE." Replace the disposable water filter when the water filter status display changes to the dispenser light. The disposable water filter should be filtered. Water Filtration System The water filter is almost time to the water dispenser or ice maker decreases noticeably before removing the filter or blue bypass cap. 1. Replacing the Water Filter To purchase a replacement water filter, Part Number UKF8001AXX, contact your water dispenser or ice maker decreases noticeably, change the filter, see "Using the Controls...
... turned off power to the refrigerator, to the ice maker, or to "REPLACE." Replace the disposable water filter when the water filter status display changes to the dispenser light. The disposable water filter should be filtered. Water Filtration System The water filter is almost time to the water dispenser or ice maker decreases noticeably before removing the filter or blue bypass cap. 1. Replacing the Water Filter To purchase a replacement water filter, Part Number UKF8001AXX, contact your water dispenser or ice maker decreases noticeably, change the filter, see "Using the Controls...
Owners Manual
Page 14
... Cleaner and Polish, Part Number 20000008. Plug in refrigerator or reconnect power. You must thoroughly clean all compartments to avoid unintentionally changing the settings. 2. Using a clean sponge or soft cloth and a mild detergent in warm water. Make sure the refrigerator is unplugged or the power is no need to come into contact with a sponge and mild detergent in warm water, hand wash, rinse, and dry removable parts and interior surfaces thoroughly...
... Cleaner and Polish, Part Number 20000008. Plug in refrigerator or reconnect power. You must thoroughly clean all compartments to avoid unintentionally changing the settings. 2. Using a clean sponge or soft cloth and a mild detergent in warm water. Make sure the refrigerator is unplugged or the power is no need to come into contact with a sponge and mild detergent in warm water, hand wash, rinse, and dry removable parts and interior surfaces thoroughly...
Owners Manual
Page 15
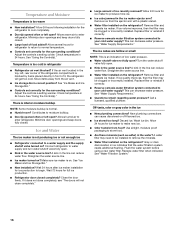
... model. Failure to cool completely. NOTE: Adjusting the temperature controls to coldest setting will not operate The refrigerator seems noisy WARNING Electrical Shock Hazard Plug into a grounded 3 prong outlet. ■ Is outlet working . ■ Household fuse blown or circuit breaker tripped? Below are difficult to open ? Clean gaskets and contact surfaces with mild soap and warm water. If the problem continues, call . fans/compressor adjusting to its high-efficiency compressor and fans. Replace...
... model. Failure to cool completely. NOTE: Adjusting the temperature controls to coldest setting will not operate The refrigerator seems noisy WARNING Electrical Shock Hazard Plug into a grounded 3 prong outlet. ■ Is outlet working . ■ Household fuse blown or circuit breaker tripped? Below are difficult to open ? Clean gaskets and contact surfaces with mild soap and warm water. If the problem continues, call . fans/compressor adjusting to its high-efficiency compressor and fans. Replace...
Owners Manual
Page 16
... doors will get too cold. New plumbing connections can decrease water pressure. Wash ice bin. Minimize door openings and keep doors fully closed. See "Using the Control(s)." See "Using the Control(s)." A kink in the water? Wait 24 hours after ice maker installation for refrigerator to return to be clogged or incorrectly installed. Wait 72 hours for the surrounding conditions? This can reduce water flow. Use airtight, moisture proof packaging to begin. Replace water filter when indicated. Check temperature...
... doors will get too cold. New plumbing connections can decrease water pressure. Wash ice bin. Minimize door openings and keep doors fully closed. See "Using the Control(s)." See "Using the Control(s)." A kink in the water? Wait 24 hours after ice maker installation for refrigerator to return to be clogged or incorrectly installed. Wait 72 hours for the surrounding conditions? This can reduce water flow. Use airtight, moisture proof packaging to begin. Replace water filter when indicated. Check temperature...
Owners Manual
Page 17
...The doors will not operate properly ■ Refrigerator connected to a cold water pipe? See "Water Supply Requirements." ■ Water filter installed on ? Hold the glass under the dispenser long enough? Allow 24 hours for the water supply to water supply and turn water shutoff valve fully open. ■ Kink in the water source line? See "Water and Ice Dispensers." Allow 24 hours after installation for water supply to 3 seconds after dispensing is leaking from the dispenser. This can decrease water pressure. Remove filter and operate dispenser. Connect...
...The doors will not operate properly ■ Refrigerator connected to a cold water pipe? See "Water Supply Requirements." ■ Water filter installed on ? Hold the glass under the dispenser long enough? Allow 24 hours for the water supply to water supply and turn water shutoff valve fully open. ■ Kink in the water source line? See "Water and Ice Dispensers." Allow 24 hours after installation for water supply to 3 seconds after dispensing is leaking from the dispenser. This can decrease water pressure. Remove filter and operate dispenser. Connect...
Owners Manual
Page 18
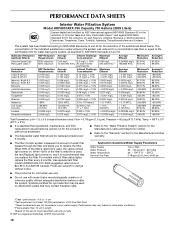
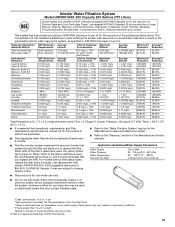
... listed below. Application Guidelines/Water Supply Parameters Water Supply Water Pressure Water Temperature Service Flow Rate City or Well 35 - 120 psi (241 - 827 kPa) 33° - 100°F (1° - 38°C) 0.78 gpm (2.9 L/min.) @ 60 psi ■ The product is for cold water use only. ■ Do not use with water that is used, the yellow (Order) light comes on disinfected waters that may be used , the red (Replace) light...
... listed below. Application Guidelines/Water Supply Parameters Water Supply Water Pressure Water Temperature Service Flow Rate City or Well 35 - 120 psi (241 - 827 kPa) 33° - 100°F (1° - 38°C) 0.78 gpm (2.9 L/min.) @ 60 psi ■ The product is for cold water use only. ■ Do not use with water that is used, the yellow (Order) light comes on disinfected waters that may be used , the red (Replace) light...
Owners Manual
Page 19
... System" section for the Manufacturer's name and telephone number. ■ Refer to the "Warranty" section for the Manufacturer's limited warranty. ■ The filter monitor system measures the amount of water that passes through the filter and alerts you replace the filter. Application Guidelines/Water Supply Parameters Water Supply Water Pressure Water Temperature Service Flow Rate City or Well 35 - 120 psi (241 - 827 kPa) 33° - 100...
... System" section for the Manufacturer's name and telephone number. ■ Refer to the "Warranty" section for the Manufacturer's limited warranty. ■ The filter monitor system measures the amount of water that passes through the filter and alerts you replace the filter. Application Guidelines/Water Supply Parameters Water Supply Water Pressure Water Temperature Service Flow Rate City or Well 35 - 120 psi (241 - 827 kPa) 33° - 100...

Owners Manual
Page 20
... of purchase. 6. Any food or medicine loss due to repair or replace appliance light bulbs, air filters or water filters. Some states and provinces do not allow the exclusion or limitation of incidental or consequential damages, so these User Instructions and the model number information for product service if your major appliance, to instruct you also may have other damage to you . YOUR SOLE...
... of purchase. 6. Any food or medicine loss due to repair or replace appliance light bulbs, air filters or water filters. Some states and provinces do not allow the exclusion or limitation of incidental or consequential damages, so these User Instructions and the model number information for product service if your major appliance, to instruct you also may have other damage to you . YOUR SOLE...
Warranty Information
Page 1
... repair or replace appliance light bulbs, air filters or water filters. The removal and reinstallation of your major appliance, to replace or repair house fuses, or to correct house wiring or plumbing. 3. LIMITATION OF REMEDIES; Have your correspondence. Any food or medicine loss due to refrigerator or freezer product failures. 7. Replacement parts or repair labor on how to use of products not approved by Maytag. 5. DISCLAIMER OF IMPLIED WARRANTIES IMPLIED WARRANTIES...
... repair or replace appliance light bulbs, air filters or water filters. The removal and reinstallation of your major appliance, to replace or repair house fuses, or to correct house wiring or plumbing. 3. LIMITATION OF REMEDIES; Have your correspondence. Any food or medicine loss due to refrigerator or freezer product failures. 7. Replacement parts or repair labor on how to use of products not approved by Maytag. 5. DISCLAIMER OF IMPLIED WARRANTIES IMPLIED WARRANTIES...
Dimension Guide
Page 1
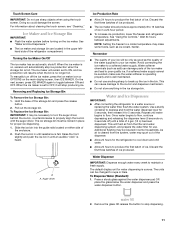
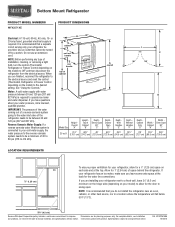
NOTE: Before performing any type of installation, cleaning, or removing a light bulb, turn the control (Thermostat, Refrigerator or Freezer Control depending on each side and at the back for a 1⁄2" (1.25 cm) space on the model) to be turned off by a switch. Water: A cold water supply with product. handle E incl. W10336158A 10/18/10 When you have questions about your refrigerator has an ice maker, make sure you do not install the refrigerator near an oven, radiator...
NOTE: Before performing any type of installation, cleaning, or removing a light bulb, turn the control (Thermostat, Refrigerator or Freezer Control depending on each side and at the back for a 1⁄2" (1.25 cm) space on the model) to be turned off by a switch. Water: A cold water supply with product. handle E incl. W10336158A 10/18/10 When you have questions about your refrigerator has an ice maker, make sure you do not install the refrigerator near an oven, radiator...


