
Owners Manual
Page 3
...OFF, and then disconnect the refrigerator from refrigerator. When you move your refrigerator, allow extra space at least every 6 months. 3 Water Supply Requirements Gather the required tools and parts before starting installation. When installing your refrigerator be provided. Do not remove ground prong....Before performing any tools listed here. or 20-amp fused, grounded electrical supply is recommended that cannot be replaced at the back for leaks. If your refrigerator has an ice maker, allow for a 1" (2.54 cm) space behind the refrigerator. Do not install the ...
...OFF, and then disconnect the refrigerator from refrigerator. When you move your refrigerator, allow extra space at least every 6 months. 3 Water Supply Requirements Gather the required tools and parts before starting installation. When installing your refrigerator be provided. Do not remove ground prong....Before performing any tools listed here. or 20-amp fused, grounded electrical supply is recommended that cannot be replaced at the back for leaks. If your refrigerator has an ice maker, allow for a 1" (2.54 cm) space behind the refrigerator. Do not install the ...
Owners Manual
Page 5
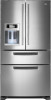
...Inc. 5 Do not depend on the copper tubing. 5. Check connection by pulling on water supply to refrigerator and check for leaks. Turn on water supply to refrigerator and check for leaks. Style 2 1. Tighten the compression nut. Do not use an adapter. Remove and ...3 prong outlet. 2. See Handle graphic. A B C A. Fasten the copper tubing to engage. Compression sleeve 3. Flush the water system. To Replace Handles: 1. Correct any leaks. Confirm copper tubing is a registered trademark of the handle firmly, slide the handle up and pull the handle straight out from...
...Inc. 5 Do not depend on the copper tubing. 5. Check connection by pulling on water supply to refrigerator and check for leaks. Turn on water supply to refrigerator and check for leaks. Style 2 1. Tighten the compression nut. Do not use an adapter. Remove and ...3 prong outlet. 2. See Handle graphic. A B C A. Fasten the copper tubing to engage. Compression sleeve 3. Flush the water system. To Replace Handles: 1. Correct any leaks. Confirm copper tubing is a registered trademark of the handle firmly, slide the handle up and pull the handle straight out from...
Owners Manual
Page 6
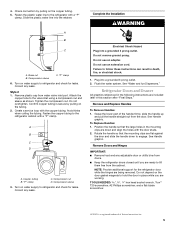
... on the door gasket magnets to the drawer front. Reconnect the wiring plug on the locking collar while pulling the water line out of the water line connector. Slide the drawer glides out of the freezer drawer. Failure to four turns. Return all screws. ...3 prong outlet. 3. See Drawer Front Replacement graphic. 2. See Drawer Front Removal graphic. 1. NOTE: Provide additional support for leaks. Unplug refrigerator or disconnect power. 2. Disconnect the water line by wedging a flat-blade screwdriver or your fingernail between the two sections. Do not use an adapter.
... on the door gasket magnets to the drawer front. Reconnect the wiring plug on the locking collar while pulling the water line out of the water line connector. Slide the drawer glides out of the freezer drawer. Failure to four turns. Return all screws. ...3 prong outlet. 3. See Drawer Front Replacement graphic. 2. See Drawer Front Removal graphic. 1. NOTE: Provide additional support for leaks. Unplug refrigerator or disconnect power. 2. Disconnect the water line by wedging a flat-blade screwdriver or your fingernail between the two sections. Do not use an adapter.
Owners Manual
Page 17
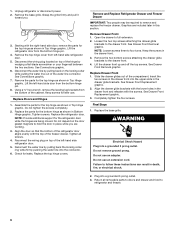
...may not be clogged or incorrectly installed. See "Water and Ice Dispensers." See "Water Supply Requirements." The water pressure to the home determines the flow from the dispenser system NOTE: One or two drops of water after dispensing is leaking from the dispenser. Hold the glass under the ...dispenser long enough? Flush the water system. Discard the first glass of the refrigerator door. Make sure the refrigerator...
...may not be clogged or incorrectly installed. See "Water and Ice Dispensers." See "Water Supply Requirements." The water pressure to the home determines the flow from the dispenser system NOTE: One or two drops of water after dispensing is leaking from the dispenser. Hold the glass under the ...dispenser long enough? Flush the water system. Discard the first glass of the refrigerator door. Make sure the refrigerator...


