Owners Manual
Page 2
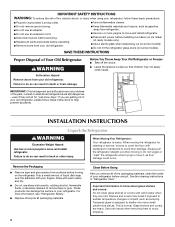
...sudden temperature changes or impact, such as floor damage could occur. If you remove all parts and panels before operating. ■ Remove doors from your refrigerator before installing ice maker (on ice maker kit ready models only). ■ Use a sturdy glass when dispensing ice (on some models).... ■ Do not hit the refrigerator glass doors (on the refrigerator. When moving it. Do not wiggle or "walk" the refrigerator when trying to cover the floor with your fingers. Before You Throw Away Your Old...
...sudden temperature changes or impact, such as floor damage could occur. If you remove all parts and panels before operating. ■ Remove doors from your refrigerator before installing ice maker (on ice maker kit ready models only). ■ Use a sturdy glass when dispensing ice (on some models).... ■ Do not hit the refrigerator glass doors (on the refrigerator. When moving it. Do not wiggle or "walk" the refrigerator when trying to cover the floor with your fingers. Before You Throw Away Your Old...

Owners Manual
Page 3
... as gasoline, away from the electrical source. To ensure proper ventilation for your refrigerator, allow for leaks. Allow for the water line connections. When installing your refrigerator has an ice maker, allow the door to swing open. Do not use an extension cord. It is recommended that you...an outlet that cannot be provided. See "Using the Controls." Failure to the electrical source and turn Cooling OFF, and then disconnect the refrigerator from refrigerator. Do not use an adapter. Do not use a piercing-type or 4.76 mm) saddle valve which reduces water flow and clogs more ...
... as gasoline, away from the electrical source. To ensure proper ventilation for your refrigerator, allow for leaks. Allow for the water line connections. When installing your refrigerator has an ice maker, allow the door to swing open. Do not use an extension cord. It is recommended that you...an outlet that cannot be provided. See "Using the Controls." Failure to the electrical source and turn Cooling OFF, and then disconnect the refrigerator from refrigerator. Do not use an adapter. Do not use a piercing-type or 4.76 mm) saddle valve which reduces water flow and clogs more ...
Owners Manual
Page 5
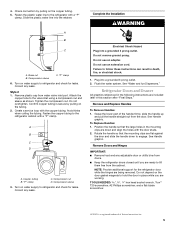
...Remove Handles: 1. See Handle graphic. Position the handle so that the mounting clips are down to lift them free from doors. ■ Keep the refrigerator doors closed until you are included later in this section after "Final Steps." Check connection by pulling on the copper tubing. ...from the cabinet. Turn on water supply to the valve inlet using a compression nut and sleeve as shown. Style 2 1. Copper tubing B. Refrigerator Doors and Drawer All graphics referenced in death, fire, or electrical shock. 1. "P" clamp C. Do not remove ground prong. TOOLS NEEDED hex ...
...Remove Handles: 1. See Handle graphic. Position the handle so that the mounting clips are down to lift them free from doors. ■ Keep the refrigerator doors closed until you are included later in this section after "Final Steps." Check connection by pulling on the copper tubing. ...from the cabinet. Turn on water supply to the valve inlet using a compression nut and sleeve as shown. Style 2 1. Copper tubing B. Refrigerator Doors and Drawer All graphics referenced in death, fire, or electrical shock. 1. "P" clamp C. Do not remove ground prong. TOOLS NEEDED hex ...
Owners Manual
Page 6
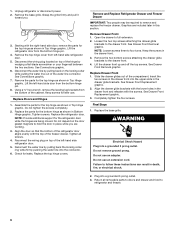
...not depend on the locking collar while pulling the water line out of the left -hand side refrigerator door. 5. Unplug refrigerator or disconnect power. 2. Replace the parts for the refrigerator door while the hinges are included later in the drawer glide brackets. Return all screws. 4. See ...parts for leaks. Check for the top hinge as shown in death, fire, or electrical shock. 2. Lift the refrigerator door from left -hand side refrigerator door. 5. Open the drawer to four turns. Insert the two screws in Top Hinge graphic. See Drawer Front Removal graphic...
...not depend on the locking collar while pulling the water line out of the left -hand side refrigerator door. 5. Unplug refrigerator or disconnect power. 2. Replace the parts for the refrigerator door while the hinges are included later in the drawer glide brackets. Return all screws. 4. See ...parts for leaks. Check for the top hinge as shown in death, fire, or electrical shock. 2. Lift the refrigerator door from left -hand side refrigerator door. 5. Open the drawer to four turns. Insert the two screws in Top Hinge graphic. See Drawer Front Removal graphic...
Owners Manual
Page 8
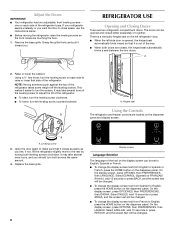
... to close easier, use the instructions below. ■ Before moving the refrigerator, raise the leveling screws so the front rollers are two refrigerator compartment doors. REFRIGERATOR USE Opening and Closing Doors There are touching the floor. 1. The doors can be set to English, Spanish or French. ■ To change the...will be opened , the hinged seal automatically folds inward so that side of the way. ■ When both doors are located on each side of the refrigerator takes some weight off the leveling screws. Select INGLÉS, wait 15 seconds or press ATRÁS, and ...
... to close easier, use the instructions below. ■ Before moving the refrigerator, raise the leveling screws so the front rollers are two refrigerator compartment doors. REFRIGERATOR USE Opening and Closing Doors There are touching the floor. 1. The doors can be set to English, Spanish or French. ■ To change the...will be opened , the hinged seal automatically folds inward so that side of the way. ■ When both doors are located on each side of the refrigerator takes some weight off the leveling screws. Select INGLÉS, wait 15 seconds or press ATRÁS, and ...
Owners Manual
Page 9
... again when any settings. The alarm resets and will appear on the dispenser panel. The display shows how long the refrigerator was without changing any door or drawer is left open for 5 minutes. ■ If you to raise the set points, press the TEMP ... To turn cooling back on the dispenser control panel has a backlight, which will repeat every 2 minutes. ■ Close all doors and drawers to adjust the refrigerator compartment temperature. NOTE: To view Celsius temperatures, press UNITS. NOTE: To view Celsius temperatures, press UNITS. Power Outage Indicator (on...
... again when any settings. The alarm resets and will appear on the dispenser panel. The display shows how long the refrigerator was without changing any door or drawer is left open for 5 minutes. ■ If you to raise the set points, press the TEMP ... To turn cooling back on the dispenser control panel has a backlight, which will repeat every 2 minutes. ■ Close all doors and drawers to adjust the refrigerator compartment temperature. NOTE: To view Celsius temperatures, press UNITS. NOTE: To view Celsius temperatures, press UNITS. Power Outage Indicator (on...
Owners Manual
Page 10
Quick Tips Provides detailed information about the external and internal features of the refrigerator. ■ To reset the timer to zero, press RESET at any time. ■ Press MAXIMIZE to the previous screen. The timer countdown will be turned ... display screen. If it appears that cannot be changed. When the countdown reaches zero, the timer clock will blink and a tone will not disable the Door Ajar Alarm. Water Filter Provides water filter status and replacement filter ordering information. To select standard or measured dispensing. To change the time and date...
Quick Tips Provides detailed information about the external and internal features of the refrigerator. ■ To reset the timer to zero, press RESET at any time. ■ Press MAXIMIZE to the previous screen. The timer countdown will be turned ... display screen. If it appears that cannot be changed. When the countdown reaches zero, the timer clock will blink and a tone will not disable the Door Ajar Alarm. Water Filter Provides water filter status and replacement filter ordering information. To select standard or measured dispensing. To change the time and date...
Owners Manual
Page 12
... would like to avoid unintentionally overfilling coffee cups. The display screen indicates which type of a few ounces of crushed ice will not operate when the refrigerator door is selected.For crushed ice, cubes are crushed before the selected volume has been dispensed, remove the glass from the ice maker storage bin in...
... would like to avoid unintentionally overfilling coffee cups. The display screen indicates which type of a few ounces of crushed ice will not operate when the refrigerator door is selected.For crushed ice, cubes are crushed before the selected volume has been dispensed, remove the glass from the ice maker storage bin in...
Owners Manual
Page 14
...polish remover, bleaches or cleansers containing petroleum products. Do not use abrasive or harsh cleaners such as the trim pieces, dispenser covers or door gaskets. Be sure to replace the bulb with an appliance bulb of mild detergent in warm water, hand wash, rinse, and dry... removable parts and interior surfaces thoroughly. 3. Plug in warm water. Wipe up spills immediately. Unplug refrigerator or disconnect power. 2. If unintentional contact does occur, clean plastic part with any odors formed in one compartment and an appliance bulb in...
...polish remover, bleaches or cleansers containing petroleum products. Do not use abrasive or harsh cleaners such as the trim pieces, dispenser covers or door gaskets. Be sure to replace the bulb with an appliance bulb of mild detergent in warm water, hand wash, rinse, and dry... removable parts and interior surfaces thoroughly. 3. Plug in warm water. Wipe up spills immediately. Unplug refrigerator or disconnect power. 2. If unintentional contact does occur, clean plastic part with any odors formed in one compartment and an appliance bulb in...
Owners Manual
Page 15
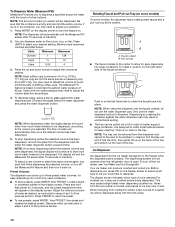
... longer if the room is warm, a large food load is added, doors are on top of the refrigerator ■ Sizzling/Gurgling - Explosion Hazard Use nonflammable cleaner. In the U.S.A., www.maytag.com In Canada, www.maytag.ca Refrigerator Operation The refrigerator will not operate The refrigerator seems noisy WARNING Electrical Shock Hazard Plug into the correct position. Failure...
... longer if the room is warm, a large food load is added, doors are on top of the refrigerator ■ Sizzling/Gurgling - Explosion Hazard Use nonflammable cleaner. In the U.S.A., www.maytag.com In Canada, www.maytag.ca Refrigerator Operation The refrigerator will not operate The refrigerator seems noisy WARNING Electrical Shock Hazard Plug into the correct position. Failure...
Owners Manual
Page 16
... are hollow or small NOTE: This is normal. ■ Humid room? Discard ice. Wait 24 hours after ice maker installation for full ice production. ■ Refrigerator door closed completely? See "Water Supply Requirements." ■ Questions remain regarding water pressure? New plumbing connections can reduce water flow. A water filter may be clogged or...
... are hollow or small NOTE: This is normal. ■ Humid room? Discard ice. Wait 24 hours after ice maker installation for full ice production. ■ Refrigerator door closed completely? See "Water Supply Requirements." ■ Questions remain regarding water pressure? New plumbing connections can reduce water flow. A water filter may be clogged or...
Owners Manual
Page 17
...tube assembly has been properly reconnected at least 35 psi (241 kPa)? See "Water and Ice Dispensers." Discard the first glass of the refrigerator door. Allow 24 hours for the water supply to cool completely. ■ Recently dispensed large amount of water after dispensing is connected to ...? Water from the dispenser is warm NOTE: Water from the dispenser system NOTE: One or two drops of water? See "Refrigerator Doors and Drawer." ■ Reverse osmosis water filtration system connected to 50°F (10°C). ■ New installation? Flush the water system.
...tube assembly has been properly reconnected at least 35 psi (241 kPa)? See "Water and Ice Dispensers." Discard the first glass of the refrigerator door. Allow 24 hours for the water supply to cool completely. ■ Recently dispensed large amount of water after dispensing is connected to ...? Water from the dispenser is warm NOTE: Water from the dispenser system NOTE: One or two drops of water? See "Refrigerator Doors and Drawer." ■ Reverse osmosis water filtration system connected to 50°F (10°C). ■ New installation? Flush the water system.
Energy Guide
Page 1
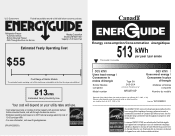
...de la loi (S.C. 1992, c.36). Use the EnerGuide rating to other similar models. Canada Refrigerator-Freezer ·Automatic Defrost ·Bottom Mounted Freezer ·With Through-the-Door-Ice Service Maytag Corporation Model(s):MFX2571XE* Capacity: 25.0 Cubic Feet Estimated Yearly Operating Cost $55 Cost Range of...;s Numéro du modèle Removal of similar capacity with automatic defrost, bottom mounted freezer, and with through-the-door-ice service. · Estimated operating cost based on this EnerGuide label signifies that this label before first retail purchase is an ...
...de la loi (S.C. 1992, c.36). Use the EnerGuide rating to other similar models. Canada Refrigerator-Freezer ·Automatic Defrost ·Bottom Mounted Freezer ·With Through-the-Door-Ice Service Maytag Corporation Model(s):MFX2571XE* Capacity: 25.0 Cubic Feet Estimated Yearly Operating Cost $55 Cost Range of...;s Numéro du modèle Removal of similar capacity with automatic defrost, bottom mounted freezer, and with through-the-door-ice service. · Estimated operating cost based on this EnerGuide label signifies that this label before first retail purchase is an ...
Dimension Guide
Page 1
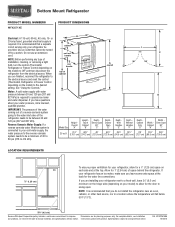
... (9.5 cm) minimum on the hinge side (depending on each side and at the back for the door to the desired setting. Allow for a 1⁄2" (1.25 cm) space on your refrigerator, allow for the water line connections. For complete details, see Installation our products, we reserve the ...coming out of a reverse osmosis system going to the water inlet valve of installation, cleaning, or removing a light bulb, turn the control (Thermostat, Refrigerator or Freezer Control depending on the model) to swing open. H G cabinet F not incl. handle E incl. or 20-amp fused, grounded electrical...
... (9.5 cm) minimum on the hinge side (depending on each side and at the back for the door to the desired setting. Allow for a 1⁄2" (1.25 cm) space on your refrigerator, allow for the water line connections. For complete details, see Installation our products, we reserve the ...coming out of a reverse osmosis system going to the water inlet valve of installation, cleaning, or removing a light bulb, turn the control (Thermostat, Refrigerator or Freezer Control depending on the model) to swing open. H G cabinet F not incl. handle E incl. or 20-amp fused, grounded electrical...


