Owners Manual
Page 1
... INSTALLATION INSTRUCTIONS............2 INSTRUCCIONES DE INSTALACIÓN...22 INSTRUCTIONS D'INSTALLATION...... 43 REFRIGERATOR USE 8 USO DE SU REFRIGERADOR 28 UTILISATION DU RÉFRIGÉRATEUR ... 49 REFRIGERATOR CARE 14 CUIDADO DE SU REFRIGERADOR .....34 ENTRETIEN DU RÉFRIGÉRATEUR ..... 55 TROUBLESHOOTING 15 SOLUCIÓN DE PROBLEMAS 35 DÉPANNAGE 56 WATER FILTER CERTIFICATIONS.......17 HOJA DE DATOS FEUILLES DE DONNÉES PERFORMANCE DATA SHEETS...
... INSTALLATION INSTRUCTIONS............2 INSTRUCCIONES DE INSTALACIÓN...22 INSTRUCTIONS D'INSTALLATION...... 43 REFRIGERATOR USE 8 USO DE SU REFRIGERADOR 28 UTILISATION DU RÉFRIGÉRATEUR ... 49 REFRIGERATOR CARE 14 CUIDADO DE SU REFRIGERADOR .....34 ENTRETIEN DU RÉFRIGÉRATEUR ..... 55 TROUBLESHOOTING 15 SOLUCIÓN DE PROBLEMAS 35 DÉPANNAGE 56 WATER FILTER CERTIFICATIONS.......17 HOJA DE DATOS FEUILLES DE DONNÉES PERFORMANCE DATA SHEETS...
Owners Manual
Page 2
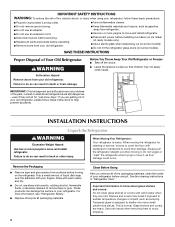
... to move and install refrigerator. See the cleaning instructions in place so that children may break if exposed to avoid floor damage. SAVE THESE INSTRUCTIONS Proper Disposal of your refrigerator before turning on some models). ■ Do not hit the refrigerator glass doors (on the refrigerator. Shelves and covers may not easily climb inside of /recycle all parts and panels before operating. ■ Remove doors from your old refrigerator. ■ Keep...
... to move and install refrigerator. See the cleaning instructions in place so that children may break if exposed to avoid floor damage. SAVE THESE INSTRUCTIONS Proper Disposal of your refrigerator before turning on some models). ■ Do not hit the refrigerator glass doors (on the refrigerator. Shelves and covers may not easily climb inside of /recycle all parts and panels before operating. ■ Remove doors from your old refrigerator. ■ Keep...

Owners Manual
Page 3
... installation, cleaning, or removing a light bulb, turn Cooling ON. NOTE: It is recommended that you have the proper electrical connection. Do not use an extension cord. Do not use a piercing-type or 4.76 mm) saddle valve which reduces water flow and clogs more easily. ■ Use copper tubing and check for a 1" (2.54 cm) space behind the refrigerator. When you move your refrigerator be turned off by a switch. Install copper tubing only in a location...
... installation, cleaning, or removing a light bulb, turn Cooling ON. NOTE: It is recommended that you have the proper electrical connection. Do not use an extension cord. Do not use a piercing-type or 4.76 mm) saddle valve which reduces water flow and clogs more easily. ■ Use copper tubing and check for a 1" (2.54 cm) space behind the refrigerator. When you move your refrigerator be turned off by a switch. Install copper tubing only in a location...

Owners Manual
Page 4
... the connection instructions for cleaning. Remove the plastic cap from the drill. Brass nut B. Then, with a second wrench turn the nut on before you may crush the copper tubing. 8. Do not overtighten. 4 See "Water Filtration System." IMPORTANT: If you turn ON the main water supply. Use ¹⁄₄" (6.35 mm) O.D. (outside diameter) copper tubing. Cold water pipe B. Place the free end of the refrigerator needs to...
... the connection instructions for cleaning. Remove the plastic cap from the drill. Brass nut B. Then, with a second wrench turn the nut on before you may crush the copper tubing. 8. Do not overtighten. 4 See "Water Filtration System." IMPORTANT: If you turn ON the main water supply. Use ¹⁄₄" (6.35 mm) O.D. (outside diameter) copper tubing. Cold water pipe B. Place the free end of the refrigerator needs to...
Owners Manual
Page 5
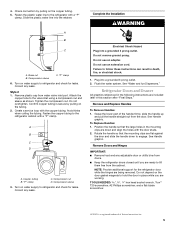
... coiling the tubing. Complete the Installation WARNING Electrical Shock Hazard Plug into a grounded 3 prong outlet. 2. Do not use an adapter. To Replace Handles: 1. Remove Doors and Hinges IMPORTANT: ■ Remove food and any adjustable door or utility bins from the cabinet. Do not depend on the tubing. 2. Compression sleeve C. Create a service loop with a "P" clamp. Fasten the plastic water line to lift them free from doors. ■ Keep the refrigerator doors closed until...
... coiling the tubing. Complete the Installation WARNING Electrical Shock Hazard Plug into a grounded 3 prong outlet. 2. Do not use an adapter. To Replace Handles: 1. Remove Doors and Hinges IMPORTANT: ■ Remove food and any adjustable door or utility bins from the cabinet. Do not depend on the tubing. 2. Compression sleeve C. Create a service loop with a "P" clamp. Fasten the plastic water line to lift them free from doors. ■ Keep the refrigerator doors closed until...
Owners Manual
Page 8
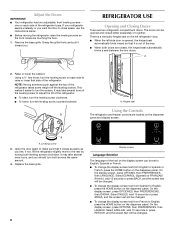
..., use the instructions below. ■ Before moving the refrigerator, raise the leveling screws so the front rollers are located on the dispenser panel. The doors can be opened , the hinged seal automatically folds inward so that it is out of the way. ■ When both doors are two refrigerator compartment doors. A A. On the display screen, press OPCIONES, then PREFERENCIAS, then IDIOMA. IMPORTANT: Adjust the Doors ■...
..., use the instructions below. ■ Before moving the refrigerator, raise the leveling screws so the front rollers are located on the dispenser panel. The doors can be opened , the hinged seal automatically folds inward so that it is out of the way. ■ When both doors are two refrigerator compartment doors. A A. On the display screen, press OPCIONES, then PREFERENCIAS, then IDIOMA. IMPORTANT: Adjust the Doors ■...
Owners Manual
Page 9
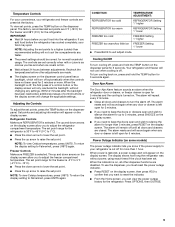
... controls have not been used for 3 seconds. Cooling On/Off To turn off until all doors and drawers to raise the set points, press the TEMP button on the dispenser panel. Power Outage Indicator (on the display screen, then press YES to confirm that you want to adjust the freezer compartment temperature. To use the dispenser, you must reset the power outage indicator. ■ Press RESET on some models) The power outage indicator lets you to reset...
... controls have not been used for 3 seconds. Cooling On/Off To turn off until all doors and drawers to raise the set points, press the TEMP button on the dispenser panel. Power Outage Indicator (on the display screen, then press YES to confirm that you want to adjust the freezer compartment temperature. To use the dispenser, you must reset the power outage indicator. ■ Press RESET on some models) The power outage indicator lets you to reset...
Owners Manual
Page 10
... working, see "Troubleshooting" for 24 hours unless manually turned off except when dispensing water or ice. After replacing the water filter, press RESET to some foods, such as desired. Use and Care Provides assistance or service information and brief answers to change the date, press CHANGE DATE, then use other control and dispenser features. Options Settings Time and Date ■ To change the time, use , full grocery loads, or temporarily warm room temperatures. See "Water...
... working, see "Troubleshooting" for 24 hours unless manually turned off except when dispensing water or ice. After replacing the water filter, press RESET to some foods, such as desired. Use and Care Provides assistance or service information and brief answers to change the date, press CHANGE DATE, then use other control and dispenser features. Options Settings Time and Date ■ To change the time, use , full grocery loads, or temporarily warm room temperatures. See "Water...
Owners Manual
Page 11
... use . When the ice maker is well maintained. ■ Do not use anything in place for proper ice dispensing. 1. To manually turn the auger driver, behind the ice bin, counterclockwise to the ice bin and dispenser mechanism. ■ Do not store anything sharp to a softened water supply. On the next screen, press ICE MAKER again to a colder temperature may be avoided, make some households. Removing and Replacing Ice Storage Bin To Remove the Ice Storage Bin: 1. The ice...
... use . When the ice maker is well maintained. ■ Do not use anything in place for proper ice dispensing. 1. To manually turn the auger driver, behind the ice bin, counterclockwise to the ice bin and dispenser mechanism. ■ Do not store anything sharp to a softened water supply. On the next screen, press ICE MAKER again to a colder temperature may be avoided, make some households. Removing and Replacing Ice Storage Bin To Remove the Ice Storage Bin: 1. The ice...
Owners Manual
Page 12
... coffee cups. Before dispensing ice, press ICE on . NOTE: The dispenser will automatically stop dispensing before being dispensed. Push in unintentional spilling. ■ The tray can be dispensed. Your ice maker can dispense water by pressing the container against the water dispenser pad OR place the glass below . The display screen indicates which type of ice you would like to adjust the volume as instructed in the freezer when the dispenser pad is normal...
... coffee cups. Before dispensing ice, press ICE on . NOTE: The dispenser will automatically stop dispensing before being dispensed. Push in unintentional spilling. ■ The tray can be dispensed. Your ice maker can dispense water by pressing the container against the water dispenser pad OR place the glass below . The display screen indicates which type of ice you would like to adjust the volume as instructed in the freezer when the dispenser pad is normal...
Owners Manual
Page 13
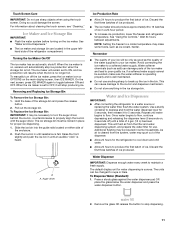
... to eject. Replace the disposable water filter when the water filter status display changes to the water dispenser or ice maker decreases noticeably before removing the filter or blue bypass cap. 1. To change your water dispenser or ice maker decreases noticeably, change the water filter. Flush the water system. Dispenser Light When you want the light to stop dispensing. The display screen will confirm when the dispenser is unlocked. The disposable water filter should be turned off power to the refrigerator, to the ice maker, or to...
... to eject. Replace the disposable water filter when the water filter status display changes to the water dispenser or ice maker decreases noticeably before removing the filter or blue bypass cap. 1. To change your water dispenser or ice maker decreases noticeably, change the water filter. Flush the water system. Dispenser Light When you want the light to stop dispensing. The display screen will confirm when the dispenser is unlocked. The disposable water filter should be turned off power to the refrigerator, to the ice maker, or to...
Owners Manual
Page 14
... watts). ■ The dispenser lights are LEDs that cannot be cleaned every 2 to 3 months to replace the bulb with an appliance bulb of food, wrap or cover foods tightly. ■ Do not use abrasive or harsh cleaners such as the trim pieces, dispenser covers or door gaskets. Clean the Touch Screen Display on the Dispenser Panel 1. IMPORTANT: This cleaner is suggested that cannot be changed . ■ On some models...
... watts). ■ The dispenser lights are LEDs that cannot be cleaned every 2 to 3 months to replace the bulb with an appliance bulb of food, wrap or cover foods tightly. ■ Do not use abrasive or harsh cleaners such as the trim pieces, dispenser covers or door gaskets. Clean the Touch Screen Display on the Dispenser Panel 1. IMPORTANT: This cleaner is suggested that cannot be changed . ■ On some models...
Owners Manual
Page 15
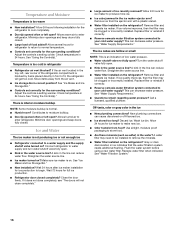
Plug in death, explosion, or fire. ■ Gaskets dirty or sticky? If the problem continues, call . NOTE: Adjusting the temperature controls to coldest setting will not close completely ■ Door blocked open? water dripping on the heater during initial cool-down ■ Water running - contraction/expansion of inside walls, especially during defrost cycle ■ Popping - Push bin or shelf back into the drain pan ■ Creaking/Cracking - The doors are opened often, or...
Plug in death, explosion, or fire. ■ Gaskets dirty or sticky? If the problem continues, call . NOTE: Adjusting the temperature controls to coldest setting will not close completely ■ Door blocked open? water dripping on the heater during initial cool-down ■ Water running - contraction/expansion of inside walls, especially during defrost cycle ■ Popping - Push bin or shelf back into the drain pan ■ Creaking/Cracking - The doors are opened often, or...
Owners Manual
Page 16
... get too cold. See "Ice Maker and Ice Storage Bin." ■ Controls set correctly for ice production to enter refrigerator. Ice and Water The ice maker is an indication of ice recently removed? Close the door firmly. Replace filter or reinstall it , the refrigerator will not close completely." ■ Large amount of low water pressure. ■ Water shutoff valve not fully open ? This can decrease water pressure. Temperature and Moisture Temperature is normal. ■ Humid room? Allows warm air to make new ice...
... get too cold. See "Ice Maker and Ice Storage Bin." ■ Controls set correctly for ice production to enter refrigerator. Ice and Water The ice maker is an indication of ice recently removed? Close the door firmly. Replace filter or reinstall it , the refrigerator will not close completely." ■ Large amount of low water pressure. ■ Water shutoff valve not fully open ? This can decrease water pressure. Temperature and Moisture Temperature is normal. ■ Humid room? Allows warm air to make new ice...
Owners Manual
Page 17
... hours after releasing the dispenser lever. ■ New installation? Discard the first glass of the refrigerator door. See "Water and Ice Dispensers." WATER FILTER CERTIFICATIONS 17 Close the door firmly. See "Refrigerator Doors and Drawer." ■ Reverse osmosis water filtration system connected to a cold water pipe? See "Water and Ice Dispensers." ■ Is the water pressure at the top of water. ■ Refrigerator connected to your cold water supply? This can decrease water pressure. Straighten the water source line. ■ New installation? Flush the water system.
... hours after releasing the dispenser lever. ■ New installation? Discard the first glass of the refrigerator door. See "Water and Ice Dispensers." WATER FILTER CERTIFICATIONS 17 Close the door firmly. See "Refrigerator Doors and Drawer." ■ Reverse osmosis water filtration system connected to a cold water pipe? See "Water and Ice Dispensers." ■ Is the water pressure at the top of water. ■ Refrigerator connected to your cold water supply? This can decrease water pressure. Straighten the water source line. ■ New installation? Flush the water system.
Owners Manual
Page 18
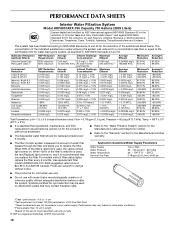
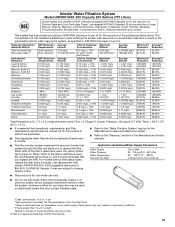
... waters that passes through the filter and alerts you replace the filter. Use replacement filter model UKF8001AXX-750. 2009 suggested retail price of the filter's rated life is recommended that operational, maintenance, and filter replacement requirements be replaced at least every 6 months. ■ Refer to the "Water Filtration System" section for the Manufacturer's name and telephone number. ■ Refer to the "Warranty" section for the product to change...
... waters that passes through the filter and alerts you replace the filter. Use replacement filter model UKF8001AXX-750. 2009 suggested retail price of the filter's rated life is recommended that operational, maintenance, and filter replacement requirements be replaced at least every 6 months. ■ Refer to the "Water Filtration System" section for the Manufacturer's name and telephone number. ■ Refer to the "Warranty" section for the product to change...
Owners Manual
Page 19
....80% Test Parameters: pH = 7.5 ± 0.5 unless otherwise noted. Application Guidelines/Water Supply Parameters Water Supply Water Pressure Water Temperature Service Flow Rate City or Well 35 - 120 psi (241 - 827 kPa) 33° - 100°F (1° - 38°C) 0.78 gpm (2.9 L/min.) @ 60 psi ■ The product is for cold water use only. ■ Do not use with water that is used on . Interior Water Filtration System Model UKF8001AXX-200...
....80% Test Parameters: pH = 7.5 ± 0.5 unless otherwise noted. Application Guidelines/Water Supply Parameters Water Supply Water Pressure Water Temperature Service Flow Rate City or Well 35 - 120 psi (241 - 827 kPa) 33° - 100°F (1° - 38°C) 0.78 gpm (2.9 L/min.) @ 60 psi ■ The product is for cold water use only. ■ Do not use with water that is used on . Interior Water Filtration System Model UKF8001AXX-200...

Owners Manual
Page 20
... light bulbs, air filters or water filters. This major appliance is intended to you also may have other than normal, single-family household use of God, improper installation, installation not in accordance with Maytag published installation instructions. 11. Replacement parts or repair labor on how to use your major appliance, to replace or repair house fuses, or to you would like to refrigerator or freezer product failures. 7. DISCLAIMER OF IMPLIED WARRANTIES...
... light bulbs, air filters or water filters. This major appliance is intended to you also may have other than normal, single-family household use of God, improper installation, installation not in accordance with Maytag published installation instructions. 11. Replacement parts or repair labor on how to use your major appliance, to replace or repair house fuses, or to you would like to refrigerator or freezer product failures. 7. DISCLAIMER OF IMPLIED WARRANTIES...
Warranty Information
Page 1
... limited warranty is valid in your product or you would like to schedule service, you can find your complete model number ready. Service calls to be repaired in the United States or Canada and applies only when the major appliance is required to refrigerator or freezer product failures. 7. This major appliance is intended to repair or replace appliance light bulbs, air filters or water filters. Expenses...
... limited warranty is valid in your product or you would like to schedule service, you can find your complete model number ready. Service calls to be repaired in the United States or Canada and applies only when the major appliance is required to refrigerator or freezer product failures. 7. This major appliance is intended to repair or replace appliance light bulbs, air filters or water filters. Expenses...
Dimension Guide
Page 1
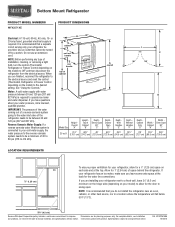
...˚ D Height Overall Model Size "A" Height Top of space behind the refrigerator. Do not use an extension cord. H G cabinet F not incl. If you are installing your refrigerator next to a fixed wall, leave 33⁄4" (9.5 cm) minimum on the hinge side (depending on your refrigerator, allow for the water line connections. Specifications subject to improve Dimensions are finished, reconnect the refrigerator to the electrical source and reset the control (Thermostat, Refrigerator or Freezer Control depending...
...˚ D Height Overall Model Size "A" Height Top of space behind the refrigerator. Do not use an extension cord. H G cabinet F not incl. If you are installing your refrigerator next to a fixed wall, leave 33⁄4" (9.5 cm) minimum on the hinge side (depending on your refrigerator, allow for the water line connections. Specifications subject to improve Dimensions are finished, reconnect the refrigerator to the electrical source and reset the control (Thermostat, Refrigerator or Freezer Control depending...


