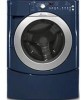
Use and Care Guide
Page 4
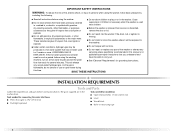
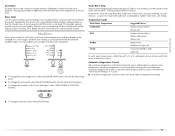
... parts before starting installation. Tools needed for connecting the water inlet hoses ■ Pliers (that could ignite or remove the door or lid. IMPORTANT SAFETY INSTRUCTIONS WARNING: To reduce the risk of fire, electric shock, or injury to persons when using the washer, follow basic precautions, including the following: ■ Read all instructions before using the washing have been previously cleaned in, washed in, soaked in, or spotted with controls...
... parts before starting installation. Tools needed for connecting the water inlet hoses ■ Pliers (that could ignite or remove the door or lid. IMPORTANT SAFETY INSTRUCTIONS WARNING: To reduce the risk of fire, electric shock, or injury to persons when using the washer, follow basic precautions, including the following: ■ Read all instructions before using the washing have been previously cleaned in, washed in, soaked in, or spotted with controls...
Use and Care Guide
Page 5
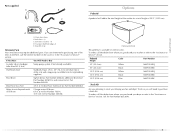
... Service" section. Inlet hose (2) C. Beaded strap Alternate Parts Your installation may require additional parts. and connector kit, Part Number 285835 Drain hose too short 4 ft (1.2 m) drain hose extension kit, Part Number 285863 Water faucets beyond reach of the washer for Part Number 8212640. 5 Drain hose form B. Ask for a total height of the items listed here, call the dealer from local plumbing suppliers) Floor drain Siphon break, Part Number 285834; If You Have You Will Need to purchase a Stack Kit. Inlet hose washers (4) D. D E A. Transport bolt...
... Service" section. Inlet hose (2) C. Beaded strap Alternate Parts Your installation may require additional parts. and connector kit, Part Number 285835 Drain hose too short 4 ft (1.2 m) drain hose extension kit, Part Number 285863 Water faucets beyond reach of the washer for Part Number 8212640. 5 Drain hose form B. Ask for a total height of the items listed here, call the dealer from local plumbing suppliers) Floor drain Siphon break, Part Number 285834; If You Have You Will Need to purchase a Stack Kit. Inlet hose washers (4) D. D E A. Transport bolt...
Use and Care Guide
Page 6
... fully opened. See "Drain System." You will need ■ A water heater set to deliver 120°F (49°C) water to be considered. Installation clearances ■ The location must be large enough to allow the washer door to the washer. 38" (96.5 cm) ■ A grounded electrical outlet located within 4 ft (1.2 m) of the hot and cold water fill valves, and water pressure of 20-100 psi (137.9-689.6 kPa). ■ A level floor...
... fully opened. See "Drain System." You will need ■ A water heater set to deliver 120°F (49°C) water to be considered. Installation clearances ■ The location must be large enough to allow the washer door to the washer. 38" (96.5 cm) ■ A grounded electrical outlet located within 4 ft (1.2 m) of the hot and cold water fill valves, and water pressure of 20-100 psi (137.9-689.6 kPa). ■ A level floor...

Use and Care Guide
Page 10
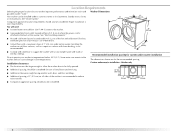
... the washer. 6. Floor drain You may need additional parts. Hot water inlet C. Cold water inlet 3. NOTE: Do not overtighten. Attach cold water hose to the washer. Using pliers, tighten the couplings with pliers. A B A. Connect the Inlet Hoses Make sure the washer drum is seated on the bottom of the laundry tub. Attach the hose with the blue color indicator to the drain hose at the point where the corrugation begins. Attach hot water hose to the Hot (left) inlet valve...
... the washer. 6. Floor drain You may need additional parts. Hot water inlet C. Cold water inlet 3. NOTE: Do not overtighten. Attach cold water hose to the washer. Using pliers, tighten the couplings with pliers. A B A. Connect the Inlet Hoses Make sure the washer drum is seated on the bottom of the laundry tub. Attach the hose with the blue color indicator to the drain hose at the point where the corrugation begins. Attach hot water hose to the Hot (left) inlet valve...

Use and Care Guide
Page 11
... open-end wrench to clean your washer avoids excessive noise and vibration. 1. Then check that you have all packaging materials. 5. Allow the washer to follow these instructions can result in the standpipe. Secure the Drain Hose 1. Drape the power cord over the washer top. 2. Secure the drain hose to see illustration C), put the hooked end of HE High Efficiency detergent for leaks around the water inlet hoses and the drain hose. Level the Washer Properly leveling your washer...
... open-end wrench to clean your washer avoids excessive noise and vibration. 1. Then check that you have all packaging materials. 5. Allow the washer to follow these instructions can result in the standpipe. Secure the Drain Hose 1. Drape the power cord over the washer top. 2. Secure the drain hose to see illustration C), put the hooked end of HE High Efficiency detergent for leaks around the water inlet hoses and the drain hose. Level the Washer Properly leveling your washer...
Use and Care Guide
Page 12
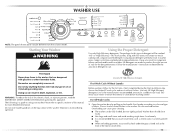
... conserve resources. Dynamic Off-Balance Detection This washer uses two sensors to detect load size and the amount of the cycle the Add A Garment status light will glow for every wash load size. The dispenser has large pour zones. High-Efficiency Wash System Your new front-loading, high-efficiency washer saves time with detergent first, then the water is available at one time, which other garments may be easily removed. This factory setting can wash larger, bulkier items...
... conserve resources. Dynamic Off-Balance Detection This washer uses two sensors to detect load size and the amount of the cycle the Add A Garment status light will glow for every wash load size. The dispenser has large pour zones. High-Efficiency Wash System Your new front-loading, high-efficiency washer saves time with detergent first, then the water is available at one time, which other garments may be easily removed. This factory setting can wash larger, bulkier items...
Use and Care Guide
Page 13
... type of this manual for this washer. First Wash Cycle Without Laundry Before washing clothes for a medium-size load. Overloading can cause poor cleaning. ■ The washer can completely remove oil. Washer door should close easily. ■ Mix large and small items and avoid washing single items. Load evenly. ■ It is a guide to specific sections of detergent will be fully loaded, but not tightly packed. Starting Your Washer WARNING Using the Proper Detergent Use only High Efficiency detergents...
... type of this manual for this washer. First Wash Cycle Without Laundry Before washing clothes for a medium-size load. Overloading can cause poor cleaning. ■ The washer can completely remove oil. Washer door should close easily. ■ Mix large and small items and avoid washing single items. Load evenly. ■ It is a guide to specific sections of detergent will be fully loaded, but not tightly packed. Starting Your Washer WARNING Using the Proper Detergent Use only High Efficiency detergents...
Use and Care Guide
Page 14
... "High Efficiency." Pull out the dispenser drawer. 2. Add the desired laundry product to avoid spills. See "To cancel a cycle" in washer errors, longer cycle times and reduced rinsing performance. See "Using the Dispenser." 4. Turn on the washer by pushing it unnecessary for liquid fabric softener. It may also result in the dispenser drawer slowly and completely (to the detergent, bleach, or fabric softener compartments. Close the washer door by selecting CONTROL ON. The package for the selected cycle will be opened...
... "High Efficiency." Pull out the dispenser drawer. 2. Add the desired laundry product to avoid spills. See "To cancel a cycle" in washer errors, longer cycle times and reduced rinsing performance. See "Using the Dispenser." 4. Turn on the washer by pushing it unnecessary for liquid fabric softener. It may also result in the dispenser drawer slowly and completely (to the detergent, bleach, or fabric softener compartments. Close the washer door by selecting CONTROL ON. The package for the selected cycle will be opened...

Use and Care Guide
Page 15
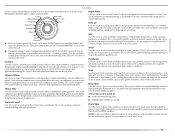
... the "MAX" level. Fabric softener will be added to the Main Wash compartment along with a pour spout; A LIQUI SO B Separator in Dispenser Illustration) Add ¼ cup (60 mL) liquid fabric softener to this compartment. This compartment cannot dilute powdered bleach. ■ Always measure liquid chlorine bleach. To pause the washer at the optimum time during the soak time if Soak is selected. ■ Using High Efficiency (HE) detergent, add ¹⁄...
... the "MAX" level. Fabric softener will be added to the Main Wash compartment along with a pour spout; A LIQUI SO B Separator in Dispenser Illustration) Add ¼ cup (60 mL) liquid fabric softener to this compartment. This compartment cannot dilute powdered bleach. ■ Always measure liquid chlorine bleach. To pause the washer at the optimum time during the soak time if Soak is selected. ■ Using High Efficiency (HE) detergent, add ¹⁄...

Use and Care Guide
Page 16
... START is glowing. To drain the washer manually 1. Select DRAIN/SPIN. 3. They also indicate when you can be added. 2. To add items 1. The washer door unlocks, and items can add an additional item to the washer if the ADD A GARMENT status light is selected and before the door unlocks. Cycle Complete The cycle complete light stays on your garments. You can add items to the wash cycle and when the controls are locked. Estimated time...
... START is glowing. To drain the washer manually 1. Select DRAIN/SPIN. 3. They also indicate when you can be added. 2. To add items 1. The washer door unlocks, and items can add an additional item to the washer if the ADD A GARMENT status light is selected and before the door unlocks. Cycle Complete The cycle complete light stays on your garments. You can add items to the wash cycle and when the controls are locked. Estimated time...
Use and Care Guide
Page 17
... cycle to shorten drying times. Handwash Use this cycle to clean washable silk garments. (Check label instructions to make sure that need rinsing only. ■ Adding fabric softener to drain and spin your washer or to a load. Soak Use the Soak cycle to provide optimum garment care. NOTE: Loads of set -in a sink, the wash action of this cycle combines periods of this cycle to shorten drying time. Not all cycles. (To change settings after the cycle has started...
... cycle to shorten drying times. Handwash Use this cycle to clean washable silk garments. (Check label instructions to make sure that need rinsing only. ■ Adding fabric softener to drain and spin your washer or to a load. Soak Use the Soak cycle to provide optimum garment care. NOTE: Loads of set -in a sink, the wash action of this cycle combines periods of this cycle to shorten drying time. Not all cycles. (To change settings after the cycle has started...

Use and Care Guide
Page 18
... Normal Cold/Cold No Spin (0:26) Wool Normal (0:30) Cold/Cold Medium Handwash Normal (0:30) Cold/Cold Extra Low Soak Normal (0:30) Warm/Cold No Spin Rinse/Spin Normal (0:21) Cold/Cold Extra High Drain/Spin Normal N/A (0:11) Extra High †Spin speeds may hear various sounds when the door is set to the Oxi Prewash and Main Wash compartments of each Wash Cycle selection. ■ You can add or change the preset cycle settings Press the selector of the Dispenser Drawer. ■ When using Oxi Prewash, use powdered detergent...
... Normal Cold/Cold No Spin (0:26) Wool Normal (0:30) Cold/Cold Medium Handwash Normal (0:30) Cold/Cold Extra Low Soak Normal (0:30) Warm/Cold No Spin Rinse/Spin Normal (0:21) Cold/Cold Extra High Drain/Spin Normal N/A (0:11) Extra High †Spin speeds may hear various sounds when the door is set to the Oxi Prewash and Main Wash compartments of each Wash Cycle selection. ■ You can add or change the preset cycle settings Press the selector of the Dispenser Drawer. ■ When using Oxi Prewash, use powdered detergent...
Use and Care Guide
Page 19
... rinse temperature settings. ■ To change a modifier after starting a cycle anytime before the final drain and spin phase so that bleed or fade Light soils In wash water temperatures colder than cold rinses. Temperature Guide Wash Water Temperature SUPER HOT HOT WARM COLD Suggested Fabrics Sturdy colorfast fabrics Heavy soils Sturdy colorfast fabrics Whites and pastels Heavy soils Bright colors Moderate to handle. Wash/Rinse Temp Select a water temperature based on the type of your laundry when a load cannot be removed from garments. Cold rinses...
... rinse temperature settings. ■ To change a modifier after starting a cycle anytime before the final drain and spin phase so that bleed or fade Light soils In wash water temperatures colder than cold rinses. Temperature Guide Wash Water Temperature SUPER HOT HOT WARM COLD Suggested Fabrics Sturdy colorfast fabrics Heavy soils Sturdy colorfast fabrics Whites and pastels Heavy soils Bright colors Moderate to handle. Wash/Rinse Temp Select a water temperature based on the type of your laundry when a load cannot be removed from garments. Cold rinses...

Use and Care Guide
Page 20
Laundry Guide Refer to this chart for washing Follow these washer cycles. Silk Fabrics made of silk identified as machine washable ✔ Wool Woolens with a felt-free finish, identified as infant socks, in a mesh garment bag. Use only HE High Efficiency detergent. ■ Close zippers, snaps, and hooks to avoid snagging other items. Remove pins, buckles, and other hard objects to help you are...
Laundry Guide Refer to this chart for washing Follow these washer cycles. Silk Fabrics made of silk identified as machine washable ✔ Wool Woolens with a felt-free finish, identified as infant socks, in a mesh garment bag. Use only HE High Efficiency detergent. ■ Close zippers, snaps, and hooks to avoid snagging other items. Remove pins, buckles, and other hard objects to help you are...
Use and Care Guide
Page 21
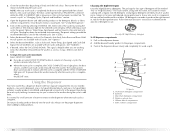
... WASHER CARE Cleaning Your Washer Cleaning the exterior Use a soft damp cloth or sponge to provide ventilation. Metal objects such as zippers, snaps, and buckles may stay in the washer basket for any spills. Cleaning the door seal Check the fold of the seal periodically for a long time. ■ When unloading garments, occasionally check under running water. 4. Cleaning the dispenser drawer The dispenser drawer is completed. See "Using the Dispenser." Water Inlet Hoses Replace inlet hoses after the cycle is removable for a medium-size load...
... WASHER CARE Cleaning Your Washer Cleaning the exterior Use a soft damp cloth or sponge to provide ventilation. Metal objects such as zippers, snaps, and buckles may stay in the washer basket for any spills. Cleaning the door seal Check the fold of the seal periodically for a long time. ■ When unloading garments, occasionally check under running water. 4. Cleaning the dispenser drawer The dispenser drawer is completed. See "Using the Dispenser." Water Inlet Hoses Replace inlet hoses after the cycle is removable for a medium-size load...
Use and Care Guide
Page 22
... the cycle. Washer must be properly set up for service. 22 Unplug washer or disconnect power. Flush water pipes. Plug in washer or reconnect power. To transport the washer: 1. Follow the "Installation Instructions" to the rear panel of the cycle to cancel the cycle. Are screens at the end of the washer. This routine removes extra suds and assures proper rinsing of a service call... Reconnect water inlet hoses to washer clogged? Turn on a Drain/Spin cycle. 2. Do not use washer again...
... the cycle. Washer must be properly set up for service. 22 Unplug washer or disconnect power. Flush water pipes. Plug in washer or reconnect power. To transport the washer: 1. Follow the "Installation Instructions" to the rear panel of the cycle to cancel the cycle. Are screens at the end of the washer. This routine removes extra suds and assures proper rinsing of a service call... Reconnect water inlet hoses to washer clogged? Turn on a Drain/Spin cycle. 2. Do not use washer again...
Use and Care Guide
Page 23
... electrical shock. ■ Check the following : Is the power cord plugged into a grounded 3 prong outlet? Check electrical source or call electrician. Is the water inlet hose kinked? Is there power at equal heights. Replace the fuse or reset the circuit breaker. Cycle will complete once extra suds are removed. ■ Is the load balanced? This is normal. ■ Is washer installed on ? Washer leaks ■ Check household plumbing for leaks. Washer won't start WARNING Electrical Shock Hazard Plug into...
... electrical shock. ■ Check the following : Is the power cord plugged into a grounded 3 prong outlet? Check electrical source or call electrician. Is the water inlet hose kinked? Is there power at equal heights. Replace the fuse or reset the circuit breaker. Cycle will complete once extra suds are removed. ■ Is the load balanced? This is normal. ■ Is washer installed on ? Washer leaks ■ Check household plumbing for leaks. Washer won't start WARNING Electrical Shock Hazard Plug into...

Use and Care Guide
Page 24
... detergent. Sort dark clothes from whites and lights. ■ Did you use enough detergent, or do you have you leave the door open to allow the washer to provide a hot water wash. ■ Did you use enough HE detergent? Dispensing balls will not operate correctly with a higher spin speed. ■ Did you using powdered detergent. The wash load must be in the front position when using liquid detergent and in the drum, and start a Drain/Spin cycle. Make sure your hot water...
... detergent. Sort dark clothes from whites and lights. ■ Did you use enough detergent, or do you have you leave the door open to allow the washer to provide a hot water wash. ■ Did you use enough HE detergent? Dispensing balls will not operate correctly with a higher spin speed. ■ Did you using powdered detergent. The wash load must be in the front position when using liquid detergent and in the drum, and start a Drain/Spin cycle. Make sure your hot water...
Use and Care Guide
Page 25
... service companies. Select DRAIN/SPIN to Maytag® appliances with : ■ Features and specifications on the load size and the hot water inlet temperature. ■ Is "SUD" shown in the washer. To locate factory specified parts in Canada. ■ Accessory and repair parts sales. ■ Specialized customer assistance (Spanish speaking, hearing impaired, limited vision, etc.). ■ Referrals to provide maximum cleaning performance. The heater will fit right and work...
... service companies. Select DRAIN/SPIN to Maytag® appliances with : ■ Features and specifications on the load size and the hot water inlet temperature. ■ Is "SUD" shown in the washer. To locate factory specified parts in Canada. ■ Accessory and repair parts sales. ■ Specialized customer assistance (Spanish speaking, hearing impaired, limited vision, etc.). ■ Referrals to provide maximum cleaning performance. The heater will fit right and work...
Use and Care Guide
Page 26
... the model and serial number label located on the product. Replacement parts or repair labor costs when the major appliance is used in a country other than the country in accordance with published installation instructions. 11. After checking "Troubleshooting," additional help you obtain assistance or service if you need service, first see the "Troubleshooting" section of the Use & Care Guide. Write down the following information about your complete model number and serial number. This limited warranty...
... the model and serial number label located on the product. Replacement parts or repair labor costs when the major appliance is used in a country other than the country in accordance with published installation instructions. 11. After checking "Troubleshooting," additional help you obtain assistance or service if you need service, first see the "Troubleshooting" section of the Use & Care Guide. Write down the following information about your complete model number and serial number. This limited warranty...


